1-16 (No.YF091)
3.2.6 DISASSEMBLY of [17] MONITOR ASSEMBLY
z
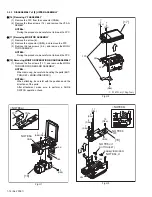
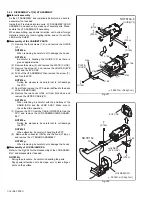
Disassembly of MONITOR ASSEMBLY
(1) Remove the three screws (1-4), and remove the MONI-
TOR COVER ASSEMBLY by disengaging the five hooks
(L17a-e).
NOTE17a:
When removing, be careful not to damage the hooks.
(2) Pull out the U/D SWITCH BOARD from the MONITOR
CASE ASSEMBLY.
NOTE17b:
When attaching, make sure to place the FPC over the
HINGE ASSEMBLY, and set it in the slot of the MON-
ITOR CASE.
(3) Release the lock of the connector(CN17a,b), and re-
move the HINGE ASSEMBLY by pulling it up.
NOTE17c:
During the procedure, be careful in handling the FPC.
When attaching, make sure to place the CN17b under.
(4) Release the lock of the connector (CN17c), and pull out
the FPC.
(5) Remove the screw (5).
(6) Remove the MONI BL BOARD ASSEMBLY and the
BACK LIGHT together.
NOTE17d:
Since the BACKLIGHT is soldered to the BOARD AS-
SEMBLY (SD17), they should be removed together
except for the replacement.
(7) Remove the SHEET (DIFF. ) and the SHEET (BEF).
(8) Remove the LCD MODULE.
(9) Remove the BKT(LCD) ASSY.
Fig.3-2-6
MONITOR CASE
HINGE UNIT
ASSY
MONITOR
COVER ASSY
MONI BL
BOARD ASSY
BACKLIGHT ASSY
LCD MODULE
BKT(LCD) ASSY
SHEET(BEF)
SHEET(DIFF.)
㧦
0.078N
㨯
m (0.8kgf
㨯
cm)
㧦
0.198N
㨯
m (2.0kgf
㨯
cm)
CN17c
CN17a
CN17b
L17d
L17c
L17a
L17b
FPC
SD17
1
(S17a)
2
(S17a)
3
(S17b)
4
(S17b)
5
(S17c)
d
d
c
c
e
a
b
a
a
c
b
<NOTE17c>
NOTE17a
<NOTE17a>
e
NOTE17b
NOTE17d
NOTE17d
NOTE17c
<NOTE17b>
U/D SW
BOARD ASSY
FPC
L17e
L17g


