1-15
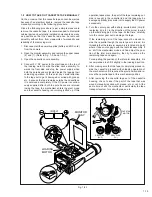
1.8 HOW TO TAKE OUT CASSETTE TAPE MANUALLY
On the occasion that the cassette tape cannot be ejected
because of an electrical trouble, remove the cassette tape
manually according to the following procedure.
Since the following procedure is just a simple measure to
remove the cassette tape, it is recommended to dismantle
cabinet parts and externally installed components as many
as possible so that the cassette tape can be removed
smoothly without force from viewpoints of workability and
reliability of the removing work.
1. Disconnect all the power supplies (battery and DC cord)
from the camera.
2. Open the monitor assembly and remove the upper cases
(2) and (1). (Refer to Fig. 1-3-2 and 1-3-3.)
3. Open the cassette cover assembly.
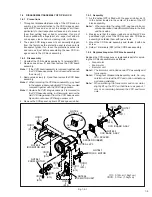
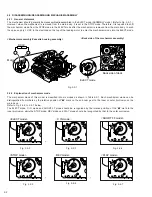
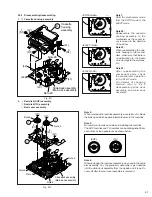
4. Connect 3 V DC power to the electrodes on the top of
the loading motor to side the slide deck assembly to-
wards the front side and stop the power supply when
both the pole bases are located inside the tape as their
unloading operation. At this point pay careful attention
to the tape not to get it damaged or soiled with grease,
etc., because the tape remains outside the cassette as
it is not wound completely. If the DC power is continu-
ously supplied after both the pole bases are returned
inside the tape, the mechanism enters the eject mode
and the cassette housing is accordingly lifted up. If this
Fig. 1-8-1
(SUP)
REEL DISK
2
3
1
4
(TU)
REEL DISK
CAPSTAN
MOTOR
DRUM
LOADING
MOTOR
(DC3V)
MONITOR
ASSY
operation takes place, the part of the tape remaining out-
side is caught in the cassette lid and the tape may be
damaged partially. Be careful not to supply the DC power
excessively.
5. Turn the center gear with a sharp-pointed stick (chip IC
replacing jig, etc.) in the direction of the arrow to wind
up the remaining part of the tape. At that time, carefully
turn the center gear not to damage the tape.
If the remaining part of the tape cannot be wound in-
side the cassette though the center gear is turned, it is
thinkable that the idler arm assembly is located at a point
where it does not engage with the reel disk assembly. If
so, shift the mechanism mode and fine adjust the posi-
tion of the idler arm assembly, then try to wind up the
remaining tape once again.
For adjusting the position of the idler arm assembly, it is
recommended to shift it slightly in the loading direction.
6. After making sure that the tape is completely wound in-
side the cassette, proceed with unloading operation of
the mechanism until it reaches the eject position and re-
move the cassette tape at this mechanism position.
7. After removing the cassette tape out of the cassette
housing, check to see if the part of the tape that was
wound manually is soiled with grease, etc. or not. At the
same time, check the mechanism, particularly the tape
transport system, for soil with grease, etc.


