background image

Master Page: Right

— 9 —

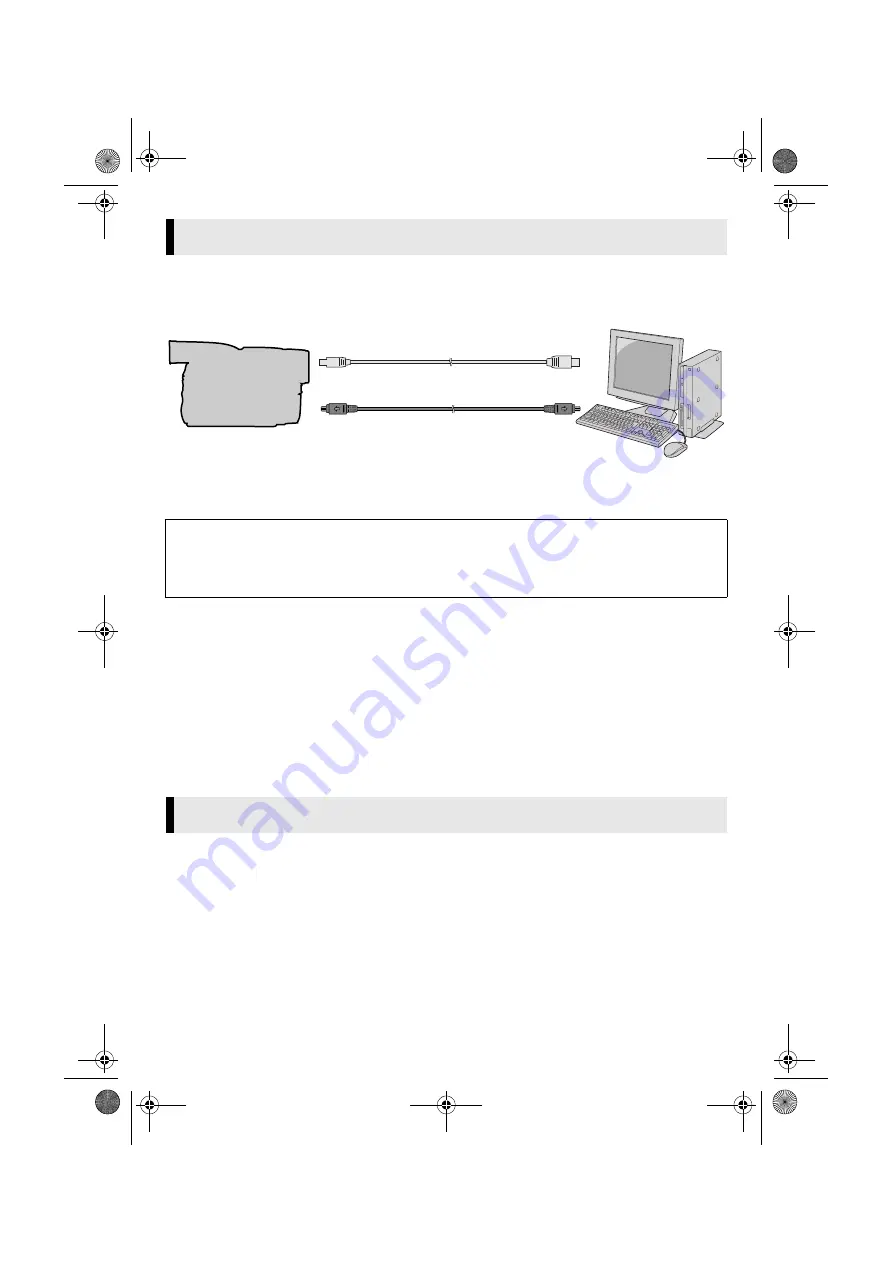
Connecting the USB cable

Connect the USB cable to copy still image and video clip files in a memory card to the PC or to use 
ImageMixer in capturing video.

1

To assure safety, make sure all units are turned off before making any connections.

2

Use the USB cable to connect the camcorder to the PC.

NOTES:

It is recommended to use the AC Adapter as the power supply instead of the battery pack.

When the USB cable or DV cable is connected, turning on or off the camcorder or switching the VIDEO/
MEMORY (DSC) mode on the camcorder causes malfunctions of the PC.

If you connect the camcorder to the PC through a USB hub, compatibility issues between the hub and the 
PC may result in instability in the operation of the PC. If this happens, connect the camcorder directly to the 
PC, not through the hub.

Do not use an extension USB cable.

When connecting the camcorder to a PC using a DV cable, make sure to follow the procedure below. 
Connecting the cable incorrectly may cause malfunctions to the camcorder and/or the PC.
• Connect the DV cable first to the PC, and then to the camcorder.
• Connect the DV cable (plugs) correctly according to the shape of the DV connector.

1

Install [USB Mass Storage Class driver]. (Windows

® 

98/98SE only) (

pg. 5)

2

Make sure that there is a memory card in the camcorder.

3

Set the camcorder’s VIDEO/MEMORY Switch to “MEMORY”.

4

Set the camcorder’s Power Switch to “PLAY” while pressing down the Lock Button located 
on the switch.

The camcorder turns on.

5

Connect the camcorder to the PC with a USB cable. (See above)

On the camcorder’s LCD monitor [USB MODE] appears.

Connections (Windows

®

)

To get video of higher picture quality or to create DVD Video when using ImageMixer:

For Windows

® 

2000/Me/XP

: Use a DV cable instead of a USB cable to capture video from a tape.

For Windows

® 

XP

: In addition, you can capture DV pictures from a tape with USB connection (USB 

2.0) even if the PC has no IEEE1394 connector. (The USB 1.1 connector on the PC cannot be used.)

For more details, refer to the help. (

“Help” in the software instruction manual on the CD-ROM)

Viewing the Contents of a Memory Card (Windows

®

)

To USB connector

PC

To USB connector

USB cable

Camcorder

DV cable (optional)

To DV connector

To IEEE1394 connector

CONTINUED ON NEXT PAGE

M4D6+DSC_InstaGuide.fm  Page 9  Wednesday, May 12, 2004  3:05 PM

Summary of Contents for GR-DZ7US - Camcorder - 2.12 MP

Page 1: ...ree from any defects in materials and workmanship for a period of thirty 30 days from the date of Your purchasing any our products accompanying the Program JVC s entire liability and your exclusive remedy in connection with the Program shall be replacement of such defective media EXCEPT FOR THE EXPRESS WARRANTIES STATED HEREIN AND TO THE EXTENT PERMITTED BY APPLICABLE LAW JVC AND ITS LICENSORS DIS...

Page 2: ...JVC 2 If any part of this Agreement is held invalid by or in conflict with any law having jurisdiction over this Agreement the remaining provisions will remain in full force and effect 3 This Agreement shall be governed by and interpreted under the laws of Japan The Tokyo District Court has jurisdiction over all disputes which may arise with respect to the execution interpretation and performance ...

Page 3: ...nts must be satisfied to connect a camcorder to a PC and to use Digital Photo Navigator Notice for Users Product Name Model Problem Error Message PC Manufacturer Model Desktop Laptop CPU OS Memory MB Available Hard Disk Space MB System Requirements OS Windows 98 pre installed Windows 98 Second Edition 98SE pre installed Windows Millennium Edition Me pre installed Windows 2000 Professional 2000 pre...

Page 4: ...e previous page Windows 98 Windows 98SE cannot be used when you connect a camcorder to the PC with an IEEE1394 DV cable For capturing DV pictures with USB connection USB 2 0 Windows XP which is pre installed or updated to Windows XP Service Pack 1 and installing USB Video Class Driver are necessary To update to Windows XP Service Pack 1 click Start and select Windows Update in All programs For det...

Page 5: ...s and to create Video CDs or DVD Videos Digital Photo Navigator 1 0 This application is used to organize still images and convert them into a variety of formats G 726 decoder This is an audio decoder for video clips created by the camcorder extension asf HDD Recording Plug in provided only for camcorder equipped with Network Function This plug in allows you to record audio and video streamed with ...

Page 6: ...he My Computer window SETUP screen appears and repeat the above procedure from step 3 to 4 5 Click Next License Agreement screen appears 6 Click Yes Customer Information screen appears 7 Confirm your information and click Next It is possible to change the information Then Choose Destination Location screen appears 8 Click Next Then Start Copying Files screen appears 9 Click Next Setup Status scree...

Page 7: ...ion is finished Windows XP KB838889 Setup Wizard screen appears In this step the number other than KB838889 may appear This is not a malfunction so continue the installation If KB830363 or later version is already installed SetupError appears Click OK andgo tostep 13 13 Install Windows XP KB838889 by following the instructions which appear on the screen When the installation finished InstallShield...

Page 8: ...before installing USB Mass Storage Class driver the installation might not be performed properly In this case follow the procedure described below to update the Device Manager and install USB Mass Storage Class driver properly NOTE Disconnect any other USB audio devices from PC before performing the following procedure Installing USB Mass Storage Class driver 1 Use the USB cable to connect the cam...

Page 9: ... first to the PC and then to the camcorder Connect the DV cable plugs correctly according to the shape of the DV connector 1 Install USB Mass Storage Class driver Windows 98 98SE only 墌 pg 5 2 Make sure that there is a memory card in the camcorder 3 Set the camcorder s VIDEO MEMORY Switch to MEMORY 4 Set the camcorder s Power Switch to PLAY while pressing down the Lock Button located on the switch...

Page 10: ...irst You may not be able to copy files from the memory card to the PC without doing so The file extension may not appear depending on the setting 6 When using Windows XP The Removable Disk window appears on the PC s screen after a moment Select Open folders to view files using Windows Explorer and click OK NOTE If the Removable Disk window does not appear confirm the connection 墌 pg 9 or perform t...

Page 11: ...NOTE Never disconnect the USB cable while the message ACCESSING FILES is displayed on the camcorder s LCD monitor Still images Use an application that can handle the JPEG file format To view a still image double click the still image file extension jpg Video clips Use the Windows MediaTM Player version 6 4 or later You can download the Windows MediaTM Player from the Microsoft web site at http www...

Page 12: ... wait for a while and then proceed to step 5 5 Disconnect the USB cable If any message appears click OK 6 Set the camcorder s Power Switch to OFF The camcorder turns off When using Windows 2000 Me XP 1 Confirm that the message ACCESSING FILES is not currently displayed on the LCD monitor of the camcorder If the message ACCESSING FILES is currently displayed wait until it disappears before proceedi...

Page 13: ... camcorder to the PC NOTES It is recommended to use the AC Adapter as the power supply instead of the battery pack When the USB cable is connected turning on or off the camcorder or switching the VIDEO MEMORY DSC mode on the camcorder causes malfunctions of the PC If you connect the camcorder to the PC through a USB hub compatibility issues between the hub and the PC may result in instability in t...

Page 14: ...m a memory card delete it through the camcorder Never disconnect the USB cable while the message ACCESSING FILES is displayed on the camcorder s LCD monitor If you are using a brand new memory card you need to initialize the memory card with the camcorder first You may not be able to copy files from the memory card to the PC without doing so Still image and video clip files that are stored in a me...

Page 15: ...y cards or turning off the PC first disconnect the USB cable and turn off the camcorder 1 Drop the memory card icon on the desktop into the Trash icon If the confirmation message appears click OK 2 Confirm that the message ACCESSING FILES is not currently displayed on the LCD monitor of the camcorder If the message ACCESSING FILES is currently displayed wait until it disappears before proceeding 3...

Page 16: ...Master Page Right 16 M4D6 DSC_InstaGuide fm Page 16 Wednesday May 12 2004 3 05 PM ...

Reviews: