background image

EN

35

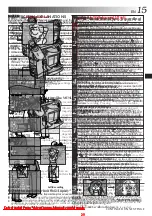
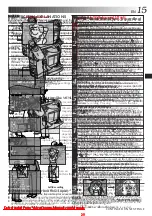
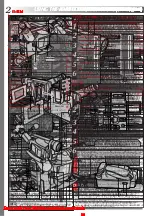
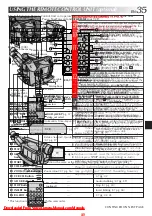
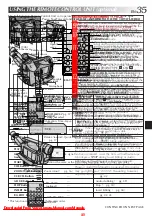
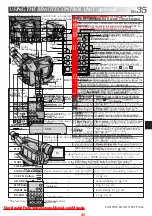
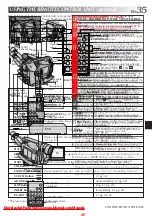
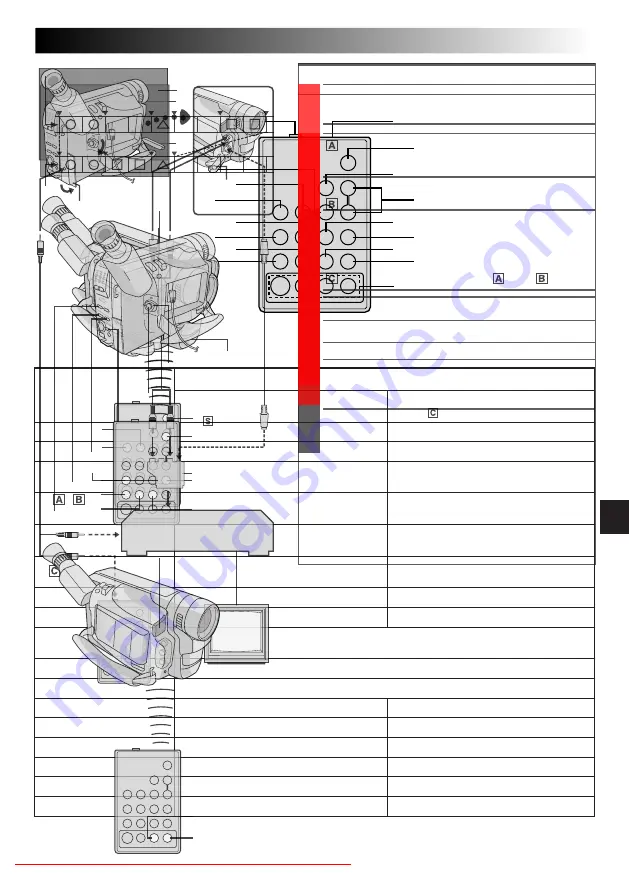
USING THE REMOTE CONTROL UNIT (optional)

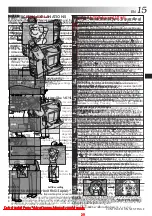
Buttons

1

PAUSE IN Connector

2

MBR SET Button

3

INT. TIME Button
SELF TIMER Button*

4

REC TIME Button
ANIM. Button

5

FF Button

6

REW Button

7

 PAUSE Button

8

PLAY Button

9

Infrared beam
transmitting window

0

START/STOP Button

!

VISS Button*

@

ZOOM (T/W) Buttons

#

VCR CTL Button

$

A.DUB Button

%

STOP Button

^

INSERT Button

&

R.A.EDIT Buttons

Functions

With the camcorder’s Power Switch set
to “CAMERA” (“AUTO” or “PRO.”).

Time-Lapse (

Z

 pg. 37)

Animation, Time-Lapse (

Z

 pg. 37)

Retake (forward) (

Z

 pg. 17)

Retake (rewind), Quick Review
(

Z

 pg. 17)

Transmits the beam signal.

Functions the same as the Recording Start/Stop Button on the camcorder.

Zoom in/out (

Z

 pg. 16)

With the camcorder’s Power Switch
set to “PLAY”.

Z

 pg. 41

Z

 pg. 40

Fast-Forward, Forward Shuttle Search
(

Z

 pg. 30)

Rewind, Reverse Shuttle Search
(

Z

 pg. 30)

Pause (

Z

 pg. 30)

Playback start (

Z

 pg. 30)

Z

 pg. 42

Audio dubbing (

Z

 pg. 39)

Stop (

Z

 pg. 30)

Insert Editing (

Z

 pg. 38)

Z

 pg. 42, 43

1

3

5

7

9

!

#

%

&

2

4

6

8

0

@

$

^

The Full-Function Remote Control Unit can operate this camcorder from a distance as well as the basic
operations (Playback, Stop, Pause, Fast-Forward and Rewind) of your VCR.

This function is unavailable with this camcorder.

RM-V700U (optional)

Downloaded From VideoCamera-Manual.com Manuals

37

FEATURE:

PURPOSE:

The remote control lets you set/release Interval Time
and Recording Time without using the Menu Screen.

OPERATION:

Animation
1) Set

Instead of performing steps 1 through on pg. 29
(“Animation”), press REC TIME on the remote
control. Each time REC TIME is pressed, the
Recording Time indicator appears, changing in the
following order: 1/4S, 1/2S, 1S, 5S and no indication
(off).

2) Release

Instead of using the Menu in step 5 on pg. 29, press
REC TIME on the remote control until the Recording
Time indicator disappears.

Time-Lapse
1) Set

Instead of performing steps 1 and 2 on pg. 29
(“Time-Lapse”), press REC TIME and INT. TIME on
the remote control. Each time REC TIME is pressed,
the Recording Time indicator appears, changing in
the following order: 1/4S, 1/2S, 1S, 5S and no
indication (off). Each time INT. TIME is pressed, the
Interval Time indicator appears, changing in the
following order: 15S, 30S, 1MIN, 5MIN and no
indication (off).

2) Release

Instead of using the Menu in step 5 on pg. 29, press
REC TIME and INT. TIME on the remote control until
the indicators disappear.

Also refer to pg. 29.

Interval time
indicator

Recording time
indicator

Remote sensor

RM-V700U

(optional)

Downloaded From VideoCamera-Manual.com Manuals

39

You can record a new soundtrack on a prerecorded tape.
The existing original sound is erased and replaced by the
sound from the built-in microphone.
Perform steps 1, 2 and 3 of the Insert Editing procedure
(

Z

 pg. 40) before continuing.

Use the remote control unit to perform the following
procedures.

1

Press REW to go a little beyond the beginning of the
scene onto which you want to dub the new audio,
press PLAY to view the recorded tape, then press
PAUSE at exactly the point where dubbing should
start.

2

Press and hold A. DUB, and without releasing
A. DUB, press and release PAUSE. The Audio Dub-
Standby mode is engaged.

3

To begin Audio Dubbing, press PLAY. When the
counter reaches “0:00:00”, Audio Dubbing stops
automatically and the camcorder enters the Audio
Dub-Standby mode.

4

To end Audio Dubbing, press STOP.

Do not press FF or REW during Audio Dub-Standby, or
the edit points will not be accurate.

If the microphone is too close to the TV, or if the TV’s
volume is too high, whistling or howling may occur.

Insert Editing and Audio Dubbing may not work
correctly if the tape contains blank segments.

To edit/dub onto a tape, make sure the Erase Protection
tab is in the position that allows recording. If not, slide
the tab. Some cassettes have removable tabs. If the tab
has been removed, cover the hole with adhesive tape.

Do not press STOP during Insert Editing or Audio
Dubbing, or the edit points will not be accurate.

During Insert Editing and Audio Dubbing, when Insert-
Pause or Audio Dub-Standby is engaged, the counter
may go slightly past “0:00:00”. Recording, however,
stops at exactly 0:00:00.

Microphone

During Audio
Dubbing

Audio dubbing
indicator

Remote sensor

Display

RM-V700U

(optional)

Downloaded From VideoCamera-Manual.com Manuals

41

MAKE CONNECTIONS

Set “VIDEO OUT” of the camcorder according to the
system of the VCR you will be using. (

Z

 pg. 24)

1

JVC VCR EQUIPPED WITH REMOTE
PAUSE TERMINAL

Connect the editing cable to the Remote PAUSE
terminal.

JVC VCR NOT EQUIPPED WITH REMOTE
PAUSE TERMINAL BUT EQUIPPED WITH
R.A. EDIT CONNECTOR

Connect the editing cable to the R.A.EDIT
connector.

VCR OTHER THAN TYPE 

 OR 

Connect the editing cable to the RM-V700U’s
PAUSE-IN connector.

2

Insert a recorded tape into the camcorder and set the
Power Switch to “PLAY”.

3

Turn the VCR power on, insert a recordable tape and
engage the AUX mode (refer to the VCR’s
instructions).

If your VCR has an S-Video input connector or a SCART
connector compatible with Y/C signals, connect the
camcorder and the VCR using the provided
S-Video cable. This can improve the dubbed picture
quality.

If you use the cable adapter, set the “Y/C”/“CVBS” video
out select switch as required.
Y/C

: When connecting to a VCR which accepts Y/C

signals and uses an S-Video cable.

CVBS : When connecting to a VCR which does not

accept Y/C signals and uses an audio/video
cable.

If you are using a SECAM VCR, set “VIDEO OUT” to
“SECAM” (

Z

 pg. 24).

S-Video cable
(provided)

To J
terminal
(JLIP)

Open the cover.

To Video
output and
Audio
output
connectors

To S-Video
output
connector

Open the
cover.


To Remote
PAUSE

RM-V700U

(optional)

VCR

TV

To PAUSE-IN

Editing cable
(optional, ø3.5
mini-plug cable)

If your VCR has
the SCART
connector, use the
cable adapter.

“Y/C”/“CVBS”
video out select
switch

To AUDIO (L/
MONO), VIDEO
and 

-IN

connectors

Audio/Video
(A/V) cable
(provided)

CONTINUED ON NEXT PAGE.

Downloaded From VideoCamera-Manual.com Manuals

43

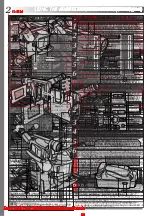
AUTOMATIC EDITING TO VCR

9

Rewind the tape in the camcorder to the beginning of
the scene you want to edit and press PAUSE.

10

Point the remote control towards the VCR’s infrared
sensor and press VCR REC STBY, or manually engage
the VCR’s Record-Pause mode.

11

Press MENU on the camcorder to begin Automatic
Editing, and the previously selected scenes are copied
to the VCR in the specified order.
While editing, the R.A. Edit counter of the scene
which is being copied is shown with a blinking
highlight.
•Pressing START/STOP on the remote control does

not start editing.

12

When all selected scenes have been copied, the
camcorder and VCR enter the Still or Pause mode.
Press STOP on both units. To make the R.A. Edit
counter display disappear, press ON/OFF.
•When finished editing, be sure to disconnect the

editing cable and the audio/video cable.

If you performed step 1

 on page 41 (“MAKE CON-

NECTIONS”), keep the remote control pointed at the
VCR during editing.

The on-screen display only appears while the camcorder
searches for each scene.

There may be noise at in- or out-points on the edited
tape with certain VCRs.

Edited tape (VCR)

Original tape (camcorder)

RM-V700U
(optional)

REW (

) Button

STOP ( ) Button

PAUSE ( ) Button

MENU Button

Recording Start/Stop Button

Power Switch

Remote Sensor

Downloaded From VideoCamera-Manual.com Manuals

Summary of Contents for GR-SXM26

Page 1: ...20 PLAYBACK 30 34 Basic Playback 30 Features 31 Connections 32 Using The Cassette Adapter optional 34 USING THE REMOTE CONTROL UNIT optional 35 43 Animation And Time Lapse 37 Insert Editing 38 Audio Dubbing 39 Random Assemble Editing 40 TROUBLESHOOTING 44 45 INDEX 46 49 Controls Connectors And Indicators 46 Indications 48 CAUTIONS 50 51 USER MAINTENANCE 52 TERMS 53 54 SPECIFICATIONS 55 Downloaded ...

Page 2: ...sh to play back recorded tapes on a VCR or camcorder other than this unit be sure to use a PAL VCR or camcorder S VHS ET is displayed when a VHS cassette is loaded and S VHS is displayed when an S VHS cassette is loaded Z pg 11 If a cassette is not loaded S VHS will be displayed in the Menu Screen S VHS ET is preset to OFF RECORDING Downloaded From VideoCamera Manual com Manuals EN This feature au...

Page 3: ...angerous voltages DON T leave equipment switched on when it is unattended unless it is specifically stated that it is designed for unattended operation or has a standby mode Switch off using the switch on the equipment and make sure that your family knows how to do this Special arrangements may need to be made for infirm or handicapped people DON T use equipment such as personal stereos or radios ...

Page 4: ...colour may be affected Be sure to choose the correct setting before you start shooting Recordings are made in PAL with this camcorder If you wish to play back recorded tapes on a VCR or camcorder other than this unit be sure to use a PAL VCR or camcorder S VHS ET is displayed when a VHS cassette is loaded and S VHS is displayed when an S VHS cassette is loaded Z pg 11 If a cassette is not loaded S...

Page 5: ...erous voltages DON T leave equipment switched on when it is unattended unless it is specifically stated that it is designed for unattended operation or has a standby mode Switch off using the switch on the equipment and make sure that your family knows how to do this Special arrangements may need to be made for infirm or handicapped people DON T use equipment such as personal stereos or radios so ...

Page 6: ...sette is loaded Z pg 11 If a cassette is not loaded S VHS will be displayed in the Menu Screen S VHS ET is preset to OFF RECORDING Advanced Features cont Downloaded From VideoCamera Manual com Manuals EN Exposure Control This feature automatically adjusts the iris for the best available picture quality but you can override it and make the adjustment manually Manual exposure adjustment is recommend...

Page 7: ...fore using It is impossible to charge the BN V856U battery pack using the provided AC Power Adapter Charger Use the optional AA V80EK AC Power Adapter Charger Downloaded From VideoCamera Manual com Manuals R I T D J D V B E N I A L E I R A C T T T I M D E C L E P O E T K T E O U I T T I M R M I L I D O O N E M A M D U E N E N E T G O O O E 0 O P F F N 6 F A F F G F L L I SH Y M D T E E O A I X A N...

Page 8: ...sette is loaded Z pg 11 If a cassette is not loaded S VHS will be displayed in the Menu Screen S VHS ET is preset to OFF RECORDING Advanced Features cont Downloaded From VideoCamera Manual com Manuals EN Exposure Control This feature automatically adjusts the iris for the best available picture quality but you can override it and make the adjustment manually Manual exposure adjustment is recommend...

Page 9: ...s impossible to charge the BN V856U battery pack using the provided AC Power Adapter Charger Use the optional AA V80EK AC Power Adapter Charger Downloaded From VideoCamera Manual com Manuals 4 R I T D J D V 4 B E N I A L E I R A C T T T I M D E C L E P O E T K T E O U I T T I M R M I L I D O O N E M A M D U E N E N E T G O O O E 0 O P F F N 6 F A F F G F L L I SH Y M D T E E O A I X A N Y M I R T ...

Page 10: ...ure to use a PAL VCR or camcorder S VHS ET is displayed when a VHS cassette is loaded and S VHS is displayed when an S VHS cassette is loaded Z pg 11 If a cassette is not loaded S VHS will be displayed in the Menu Screen S VHS ET is preset to OFF RECORDING Advanced Features cont Downloaded From VideoCamera Manual com Manuals EN Exposure Control This feature automatically adjusts the iris for the b...

Page 11: ...s impossible to charge the BN V856U battery pack using the provided AC Power Adapter Charger Use the optional AA V80EK AC Power Adapter Charger Downloaded From VideoCamera Manual com Manuals 4 R I T D J D V 4 B E N I A L E I R A C T T T I M D E C L E P O E T K T E O U I T T I M R M I L I D O O N E M A M D U E N E N E T G O O O E 0 O P F F N 6 F A F F G F L L I SH Y M D T E E O A I X A N Y M I R T ...

Page 12: ...sette is loaded Z pg 11 If a cassette is not loaded S VHS will be displayed in the Menu Screen S VHS ET is preset to OFF RECORDING Advanced Features cont Downloaded From VideoCamera Manual com Manuals EN Exposure Control This feature automatically adjusts the iris for the best available picture quality but you can override it and make the adjustment manually Manual exposure adjustment is recommend...

Page 13: ... It is impossible to charge the BN V856U battery pack using the provided AC Power Adapter Charger Use the optional AA V80EK AC Power Adapter Charger Downloaded From VideoCamera Manual com Manuals R I T D J D V B E N I A L E I R A C T T T I M D E C L E P O E T K T E O U I T T I M R M I L I D O O N E M A M D U E N E N E T G O O O E 0 O P F F N 6 F A F F G F L L I SH Y M D T E E O A I X A N Y M I R T...

Page 14: ...ure to use a PAL VCR or camcorder S VHS ET is displayed when a VHS cassette is loaded and S VHS is displayed when an S VHS cassette is loaded Z pg 11 If a cassette is not loaded S VHS will be displayed in the Menu Screen S VHS ET is preset to OFF RECORDING Advanced Features cont Downloaded From VideoCamera Manual com Manuals EN Exposure Control This feature automatically adjusts the iris for the b...

Page 15: ...ion can function When set to OFF during Digital Zoom zoom magnification changes to 16X Usually the distance to a subject where the lens is in focus depends on the zoom magnification Unless there is a distance of more than 1 m to the subject the lens is out of focus at the maximum telephoto setting When set to ON you can shoot a subject as large as possible at a distance of approx 60 cm Depending o...

Page 16: ...ure to use a PAL VCR or camcorder S VHS ET is displayed when a VHS cassette is loaded and S VHS is displayed when an S VHS cassette is loaded Z pg 11 If a cassette is not loaded S VHS will be displayed in the Menu Screen S VHS ET is preset to OFF RECORDING Advanced Features cont Downloaded From VideoCamera Manual com Manuals EN Exposure Control This feature automatically adjusts the iris for the b...

Page 17: ...fication can function When set to OFF during Digital Zoom zoom magnification changes to 16X Usually the distance to a subject where the lens is in focus depends on the zoom magnification Unless there is a distance of more than 1 m to the subject the lens is out of focus at the maximum telephoto setting When set to ON you can shoot a subject as large as possible at a distance of approx 60 cm Depend...

Page 18: ...sette is loaded Z pg 11 If a cassette is not loaded S VHS will be displayed in the Menu Screen S VHS ET is preset to OFF RECORDING Advanced Features cont Downloaded From VideoCamera Manual com Manuals EN Exposure Control This feature automatically adjusts the iris for the best available picture quality but you can override it and make the adjustment manually Manual exposure adjustment is recommend...

Page 19: ...ess there is a distance of more than 1 m to the subject the lens is out of focus at the maximum telephoto setting When set to ON you can shoot a subject as large as possible at a distance of approx 60 cm Depending on the zoom position the lens may go out of focus Factory preset CONTINUED ON NEXT PAGE Downloaded From VideoCamera Manual com Manuals 2 5 1 2 9 9 25 12 99 22 25 00 22 25 00 25 12 99 DAT...

Page 20: ...splayed when a VHS cassette is loaded and S VHS is displayed when an S VHS cassette is loaded Z pg 11 If a cassette is not loaded S VHS will be displayed in the Menu Screen S VHS ET is preset to OFF VIDEO OUT RECORDING Advanced Features cont Downloaded From VideoCamera Manual com Manuals EN Exposure Control This feature automatically adjusts the iris for the best available picture quality but you ...

Page 21: ...an function When set to OFF during Digital Zoom zoom magnification changes to 16X Usually the distance to a subject where the lens is in focus depends on the zoom magnification Unless there is a distance of more than 1 m to the subject the lens is out of focus at the maximum telephoto setting When set to ON you can shoot a subject as large as possible at a distance of approx 60 cm Depending on the...

Page 22: ...ure to use a PAL VCR or camcorder S VHS ET is displayed when a VHS cassette is loaded and S VHS is displayed when an S VHS cassette is loaded Z pg 11 If a cassette is not loaded S VHS will be displayed in the Menu Screen S VHS ET is preset to OFF RECORDING Advanced Features cont Downloaded From VideoCamera Manual com Manuals EN Exposure Control This feature automatically adjusts the iris for the b...

Page 23: ...magnification can function When set to OFF during Digital Zoom zoom magnification changes to 16X Usually the distance to a subject where the lens is in focus depends on the zoom magnification Unless there is a distance of more than 1 m to the subject the lens is out of focus at the maximum telephoto setting When set to ON you can shoot a subject as large as possible at a distance of approx 60 cm D...

Page 24: ...splayed when a VHS cassette is loaded and S VHS is displayed when an S VHS cassette is loaded Z pg 11 If a cassette is not loaded S VHS will be displayed in the Menu Screen S VHS ET is preset to OFF VIDEO OUT RECORDING Advanced Features cont Downloaded From VideoCamera Manual com Manuals EN Exposure Control This feature automatically adjusts the iris for the best available picture quality but you ...

Page 25: ...here is a distance of more than 1 m to the subject the lens is out of focus at the maximum telephoto setting When set to ON you can shoot a subject as large as possible at a distance of approx 60 cm Depending on the zoom position the lens may go out of focus OFF ON D ZOOM TELE MACRO TITLE DATE TIME DISP FOCUS EXPOSURE WIDE M W B Factory preset GAIN CONTINUED ON NEXT PAGE Downloaded From VideoCamer...

Page 26: ...an this unit be sure to use a PAL VCR or camcorder S VHS ET is displayed when a VHS cassette is loaded and S VHS is displayed when an S VHS cassette is loaded Z pg 11 If a cassette is not loaded S VHS will be displayed in the Menu Screen S VHS ET is preset to OFF RECORDING Advanced Features cont Downloaded From VideoCamera Manual com Manuals EN Exposure Control This feature automatically adjusts t...

Page 27: ...n When set to OFF during Digital Zoom zoom magnification changes to 16X Usually the distance to a subject where the lens is in focus depends on the zoom magnification Unless there is a distance of more than 1 m to the subject the lens is out of focus at the maximum telephoto setting When set to ON you can shoot a subject as large as possible at a distance of approx 60 cm Depending on the zoom posi...

Page 28: ...splayed when a VHS cassette is loaded and S VHS is displayed when an S VHS cassette is loaded Z pg 11 If a cassette is not loaded S VHS will be displayed in the Menu Screen S VHS ET is preset to OFF VIDEO OUT RECORDING Advanced Features cont Downloaded From VideoCamera Manual com Manuals EN Exposure Control This feature automatically adjusts the iris for the best available picture quality but you ...

Page 29: ...distance of more than 1 m to the subject the lens is out of focus at the maximum telephoto setting When set to ON you can shoot a subject as large as possible at a distance of approx 60 cm Depending on the zoom position the lens may go out of focus Factory preset CONTINUED ON NEXT PAGE Downloaded From VideoCamera Manual com Manuals 2 5 1 2 9 9 25 12 99 22 25 00 22 25 00 25 12 99 DATE TIME DATE TIM...

Page 30: ...Z pg 11 If a cassette is not loaded S VHS will be displayed in the Menu Screen S VHS ET is preset to OFF RECORDING Advanced Features cont Downloaded From VideoCamera Manual com Manuals EN Exposure Control This feature automatically adjusts the iris for the best available picture quality but you can override it and make the adjustment manually Manual exposure adjustment is recommended in the follow...

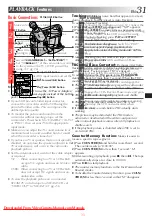
Page 31: ...ctions 1 Make sure all units are turned off 2 Connect the camcorder to a TV or VCR as shown in the illustration Z pg 32 If using a VCR go to step 3 If not go to step 4 3 Connect the VCR output to the TV input referring to your VCR s instruction manual 4 Turn on the camcorder the VCR and the TV Set VIDEO OUT of the camcorder according to the system of the TV or VCR you will be using Z pg 24 5 Set t...

Page 32: ...ont Downloaded From VideoCamera Manual com Manuals EN Exposure Control This feature automatically adjusts the iris for the best available picture quality but you can override it and make the adjustment manually Manual exposure adjustment is recommended in the following situations When shooting using reverse lighting or when the background is too bright When shooting on a reflective natural backgro...

Page 33: ...ctions 1 Make sure all units are turned off 2 Connect the camcorder to a TV or VCR as shown in the illustration Z pg 32 If using a VCR go to step 3 If not go to step 4 3 Connect the VCR output to the TV input referring to your VCR s instruction manual 4 Turn on the camcorder the VCR and the TV Set VIDEO OUT of the camcorder according to the system of the TV or VCR you will be using Z pg 24 5 Set t...

Page 34: ...sette is loaded Z pg 11 If a cassette is not loaded S VHS will be displayed in the Menu Screen S VHS ET is preset to OFF RECORDING Advanced Features cont Downloaded From VideoCamera Manual com Manuals EN Exposure Control This feature automatically adjusts the iris for the best available picture quality but you can override it and make the adjustment manually Manual exposure adjustment is recommend...

Page 35: ...g and Audio Dubbing may not work correctly if the tape contains blank segments To edit dub onto a tape make sure the Erase Protection tab is in the position that allows recording If not slide the tab Some cassettes have removable tabs If the tab has been removed cover the hole with adhesive tape Do not press STOP during Insert Editing or Audio Dubbing or the edit points will not be accurate During...

Page 36: ... pg 11 If a cassette is not loaded S VHS will be displayed in the Menu Screen S VHS ET is preset to OFF RECORDING Advanced Features cont Downloaded From VideoCamera Manual com Manuals EN Exposure Control This feature automatically adjusts the iris for the best available picture quality but you can override it and make the adjustment manually Manual exposure adjustment is recommended in the followi...

Page 37: ...Dubbing Insert Editing and Audio Dubbing may not work correctly if the tape contains blank segments To edit dub onto a tape make sure the Erase Protection tab is in the position that allows recording If not slide the tab Some cassettes have removable tabs If the tab has been removed cover the hole with adhesive tape Do not press STOP during Insert Editing or Audio Dubbing or the edit points will n...

Page 38: ...d when a VHS cassette is loaded and S VHS is displayed when an S VHS cassette is loaded Z pg 11 If a cassette is not loaded S VHS will be displayed in the Menu Screen S VHS ET is preset to OFF RECORDING Advanced Features cont Downloaded From VideoCamera Manual com Manuals EN Exposure Control This feature automatically adjusts the iris for the best available picture quality but you can override it ...

Page 39: ...rt Editing and Audio Dubbing Insert Editing and Audio Dubbing may not work correctly if the tape contains blank segments To edit dub onto a tape make sure the Erase Protection tab is in the position that allows recording If not slide the tab Some cassettes have removable tabs If the tab has been removed cover the hole with adhesive tape Do not press STOP during Insert Editing or Audio Dubbing or t...

Page 40: ...ORDING Advanced Features cont Downloaded From VideoCamera Manual com Manuals EN Exposure Control This feature automatically adjusts the iris for the best available picture quality but you can override it and make the adjustment manually Manual exposure adjustment is recommended in the following situations When shooting using reverse lighting or when the background is too bright When shooting on a ...

Page 41: ... Insert Editing and Audio Dubbing may not work correctly if the tape contains blank segments To edit dub onto a tape make sure the Erase Protection tab is in the position that allows recording If not slide the tab Some cassettes have removable tabs If the tab has been removed cover the hole with adhesive tape Do not press STOP during Insert Editing or Audio Dubbing or the edit points will not be a...

Page 42: ...HS ET is displayed when a VHS cassette is loaded and S VHS is displayed when an S VHS cassette is loaded Z pg 11 If a cassette is not loaded S VHS will be displayed in the Menu Screen S VHS ET is preset to OFF RECORDING Advanced Features cont Downloaded From VideoCamera Manual com Manuals EN Exposure Control This feature automatically adjusts the iris for the best available picture quality but you...

Page 43: ...ing and Audio Dubbing Insert Editing and Audio Dubbing may not work correctly if the tape contains blank segments To edit dub onto a tape make sure the Erase Protection tab is in the position that allows recording If not slide the tab Some cassettes have removable tabs If the tab has been removed cover the hole with adhesive tape Do not press STOP during Insert Editing or Audio Dubbing or the edit...

Page 44: ...sette is loaded Z pg 11 If a cassette is not loaded S VHS will be displayed in the Menu Screen S VHS ET is preset to OFF RECORDING Advanced Features cont Downloaded From VideoCamera Manual com Manuals EN Exposure Control This feature automatically adjusts the iris for the best available picture quality but you can override it and make the adjustment manually Manual exposure adjustment is recommend...

Page 45: ... dangerous voltages DON T leave equipment switched on when it is unattended unless it is specifically stated that it is designed for unattended operation or has a standby mode Switch off using the switch on the equipment and make sure that your family knows how to do this Special arrangements may need to be made for infirm or handicapped people DON T use equipment such as personal stereos or radio...

Page 46: ...r Select Wheel To Change The Tint For Recording 2 2 MENU Button RECORDING Advanced Features cont Downloaded From VideoCamera Manual com Manuals EN 1 2 PLAYBACK Basic Playback Rewind Button Fast Forward Button Play Pause Button Stop Button Power Zoom Lever VOL Select Wheel BRIGHT Set to PLAY Speaker BRIGHT VOL 1 2 1 2 Downloaded From VideoCamera Manual com Manuals EN PLAYBACK Connections A V cable ...

Page 47: ...N T leave equipment switched on when it is unattended unless it is specifically stated that it is designed for unattended operation or has a standby mode Switch off using the switch on the equipment and make sure that your family knows how to do this Special arrangements may need to be made for infirm or handicapped people DON T use equipment such as personal stereos or radios so that you are dist...

Page 48: ...d Z pg 11 If a cassette is not loaded S VHS will be displayed in the Menu Screen S VHS ET is preset to OFF RECORDING Advanced Features cont Downloaded From VideoCamera Manual com Manuals EN Exposure Control This feature automatically adjusts the iris for the best available picture quality but you can override it and make the adjustment manually Manual exposure adjustment is recommended in the foll...

Page 49: ...N T leave equipment switched on when it is unattended unless it is specifically stated that it is designed for unattended operation or has a standby mode Switch off using the switch on the equipment and make sure that your family knows how to do this Special arrangements may need to be made for infirm or handicapped people DON T use equipment such as personal stereos or radios so that you are dist...

Page 50: ...corded tapes on a VCR or camcorder other than this unit be sure to use a PAL VCR or camcorder S VHS ET is displayed when a VHS cassette is loaded and S VHS is displayed when an S VHS cassette is loaded Z pg 11 If a cassette is not loaded S VHS will be displayed in the Menu Screen S VHS ET is preset to OFF RECORDING Downloaded From VideoCamera Manual com Manuals EN This feature automatically adjust...

Page 51: ...N T leave equipment switched on when it is unattended unless it is specifically stated that it is designed for unattended operation or has a standby mode Switch off using the switch on the equipment and make sure that your family knows how to do this Special arrangements may need to be made for infirm or handicapped people DON T use equipment such as personal stereos or radios so that you are dist...

Page 52: ...sette is loaded Z pg 11 If a cassette is not loaded S VHS will be displayed in the Menu Screen S VHS ET is preset to OFF RECORDING Advanced Features cont Downloaded From VideoCamera Manual com Manuals EN Exposure Control This feature automatically adjusts the iris for the best available picture quality but you can override it and make the adjustment manually Manual exposure adjustment is recommend...

Page 53: ...T leave equipment switched on when it is unattended unless it is specifically stated that it is designed for unattended operation or has a standby mode Switch off using the switch on the equipment and make sure that your family knows how to do this Special arrangements may need to be made for infirm or handicapped people DON T use equipment such as personal stereos or radios so that you are distra...

Page 54: ...anced Features cont Downloaded From VideoCamera Manual com Manuals EN Exposure Control This feature automatically adjusts the iris for the best available picture quality but you can override it and make the adjustment manually Manual exposure adjustment is recommended in the following situations When shooting using reverse lighting or when the background is too bright When shooting on a reflective...

Page 55: ...angerous voltages DON T leave equipment switched on when it is unattended unless it is specifically stated that it is designed for unattended operation or has a standby mode Switch off using the switch on the equipment and make sure that your family knows how to do this Special arrangements may need to be made for infirm or handicapped people DON T use equipment such as personal stereos or radios ...

Page 56: ...COPYRIGHT 2000 VICTOR COMPANY OF JAPAN LTD EK Printed in Japan 0100MKV UN YP VICTOR COMPANY OF JAPAN LIMITED GR SXM26 Downloaded From VideoCamera Manual com Manuals ...

Reviews: