1-14 (No.YA385)
3.1.1.8
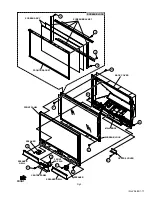
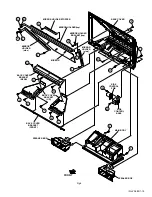
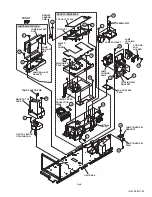
REMOVING THE MIRROR (Fig.2)
• Remove the SPEAKER GRILL.
• Remove the FRONT PANEL.
• Remove the SCREEN BLOCK.
(1) Remove the 4 screws
[A]
attaching the MIRROR HOLDER
(top).
(2) Remove the 6 screws
[B]
attaching the MIRROR HOLDER
(side).
(3) Raise slightly to disengage of the MIRROR from the bottom
holder.
(4) Remove the MIRROR.
NOTE :
• Do not touch the front of the MIRROR.
• Do not shock the the MIRROR.
• Because of the large size, at least 2 persons are
recommended for removal and reassemble.
3.1.1.9
REMOVING THE SIDE CONTROL PWB (Fig.2)
• Remove the SPEAKER GRILL.
• Remove the FRONT PANEL.
• Remove the SCREEN BLOCK.
(1) Remove the 2 screws
[C]
.
(2) Remove the SIDE CONTROL BASE.
(3) Remove the 2 screws
[D]
.
(4) Remove the SIDE CONTROL PWB.
3.1.1.10 REMOVING THE SUPPORT HOLDER (Fig.2)
• Remove the SPEAKER GRILL.
• Remove the FRONT PANEL.
• Remove the SCREEN BLOCK.
(1) Remove the 2 screws
[E]
.
(2) Remove the SUPPORT HOLDER.
3.1.1.11 REMOVING THE BACK COVER (Fig.2)
• Remove the SPEAKER GRILL.
• Remove the FRONT PANEL.
• Remove the SCREEN BLOCK.
• Remove the SUPPORT HOLDER.
(1) Remove the 6 screws
[F]
, the 2 screws
[G]
and the 2
screws
[H]
.
(2) Remove the BACK COVER.
CAUTION :
• Because of the large size, at least 2 persons are
recommended for removal and reassemble.
3.1.1.12 REMOVING THE SPEAKER BOX (Fig.2)
• Remove the SPEAKER GRILL.
• Remove the FRONT PANEL.
• Remove the SCREEN BLOCK.
• Remove the SUPPORT HOLDER.
• Remove the BACK COVER.
(1) Remove the 2 screws
[J]
.
(2) Remove the SPEAKER BOX.
3.1.1.13 REMOVING THE FILTER (Fig.2)
(1) Remove the 2 screws
[K]
.
(2) Remove the FILTER COVER with the FILTER.
(3) Remove the FILTER.


