background image

Page 1

November 2, 2000 11:33 am

VIDEO CASSETTE RECORDER

HR-A57U

HR-A37U

INSTRUCTIONS

LPT0497-001A

Printed in China

COPYRIGHT © 2000 VICTOR COMPANY OF JAPAN, LTD.

1100 IYV

f

ID

f

BJ

Dear Customer,

Thank you for purchasing the JVC VHS video cassette recorder. 
Before use, please read the safety information and precautions to 
ensure safe use of your new VCR.

CAUTIONS

Failure to heed the following precautions may result in damage 
to the VCR, Remote or video cassette.

1. DO NOT place the VCR …

… in an environment prone to extreme temperatures or 
humidity.
… in direct sunlight.
… in a dusty environment.
… in an environment where strong magnetic fields are 
generated.
… on a surface that is unstable or subject to vibration.

2. DO NOT block the VCR’s ventilation openings.
3. DO NOT place heavy objects on the VCR or on the Remote.
4. DO NOT place anything which might spill on the top of the 

VCR or on the Remote.

5. AVOID violent shocks to the VCR during transport.

Cassettes marked “VHS” (or “S-VHS”) can be used with this 
video cassette recorder. However, S-VHS recording is not 
possible with this model.

This model is equipped with SQPB (S-VHS QUASI PLAYBACK) 
that makes it possible to play back S-VHS recordings with 
regular VHS resolution.

HQ VHS is compatible with existing VHS equipment.

As an E

NERGY

 S

TAR

®

 Partner, JVC has determined that this 

product or product model meets the E

NERGY

 S

TAR

®

 guidelines 

for energy efficiency.

WARNING:

TO PREVENT FIRE OR SHOCK HAZARD, DO NOT EXPOSE 
THIS UNIT TO RAIN OR MOISTURE.

CAUTION:

This video cassette recorder should be used with AC 120V

d

60Hz only.
To prevent electric shocks and fire hazards, DO NOT use any 
other power source.

CAUTION:

TO PREVENT ELECTRIC SHOCK, MATCH WIDE BLADE OF 
PLUG TO WIDE SLOT, FULLY INSERT.

ATTENTION:

POUR ÉVITER LES CHOCS ÉLECTRIQUES, INTRODUIRE LA 
LAME LA PLUS LARGE DE LA FICHE DANS LA BORNE 
CORRESPONDANTE DE LA PRISE ET POUSSER JUSQU’AU 
FOND.

Note to CATV system installer:

This reminder is provided to call the CATV system installer’s 
attention to Article 820-40 of the NEC that provides guidelines 
for proper grounding and, in particular, specifies that the cable 
ground shall be connected to the grounding system of the 
building, as close to the point of cable entry as practical.

The lightning flash with arrowhead symbol, within 
an equilateral triangle, is intended to alert the user 
to the presence of uninsulated “dangerous voltage” 
within the product’s enclosure that may be of 
sufficient magnitude to constitute a risk of electric 
shock to persons.

The exclamation point within an equilateral triangle 
is intended to alert the user to the presence of 
important operating and maintenance (servicing) 
instructions in the literature accompanying the 
appliance.

CAUTION:

Changes or modifications not approved by JVC could void 
user’s authority to operate the equipment.

Declaration of Conformity

Model Number:

HR-A57U
HR-A37U

Trade Name:

JVC

Responsible Party:

JVC Americas Corp.

Address:

1700 Valley Road Wayne, N.J. 07470

Telephone Number: 973-315-5000
This device complies with Part 15 of FCC Rules.
Operation is subject to the following two conditions:
(1) This device may not cause harmful interference, and (2) this 
device must accept any interference received, including 
interference that may cause undesired operation.

For Customer Use:

Enter below the Model No. and Serial No. which are located 
on the rear of cabinet. Retain this information for future 
reference.
Model No.

Serial No.

HR-VP57U37U-EN.fm  Page 1  Thursday, November 2, 2000  11:33 AM

Summary of Contents for HR-A37U

Page 1: ...r power source CAUTION TO PREVENT ELECTRIC SHOCK MATCH WIDE BLADE OF PLUG TO WIDE SLOT FULLY INSERT ATTENTION POUR ÉVITER LES CHOCS ÉLECTRIQUES INTRODUIRE LA LAME LA PLUS LARGE DE LA FICHE DANS LA BORNE CORRESPONDANTE DE LA PRISE ET POUSSER JUSQU AU FOND Note to CATV system installer This reminder is provided to call the CATV system installer s attention to Article 820 40 of the NEC that provides ...

Page 2: ...hould be mounted to a wall or ceiling only as recommended by the manufacturer ANTENNA INSTALLATION INSTRUCTIONS 1 Outdoor Antenna Grounding If an outside antenna or cable system is connected to the product be sure the antenna or cable system is grounded so as to provide some protection against voltage surges and built up static charges Article 810 of the National Electrical Code ANSI NFPA 70 provi...

Page 3: ... the same characteristics as the original part Unauthorized substitutions may result in fire electric shock or other hazards 4 Safety Check Upon completion of any service or repairs to this product ask the service technician to perform safety checks to determine that the product is in safe operating condition How to use the Remote Before use insert two AA size batteries into the Remote with the po...

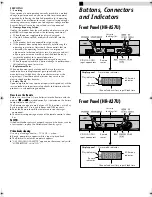
Page 4: ...Rear Panel HR A57U Rear Panel HR A37U Remote AC power cord AC power cord Number keys Connections and Plug Play Setting ...

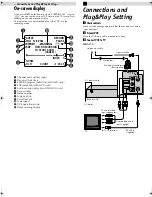
Page 5: ... J Tape speed K VCR operation mode L Timer warning display Connections and Plug Play Setting A Check contents Make sure the package contains all of the accessories listed in Specifications B Situate VCR Place the VCR on a stable horizontal surface C Connect VCR to TV HR A57U B E CH125 RECORD THU 12 00 AM PAUSE STEREO WARNING SP SAP TIMER RECORDING TO START SOON CANCEL INDEX 1 NORM HI FI COUNT 1 23...

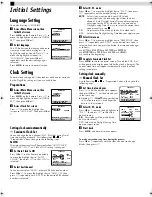
Page 6: ...ailed If an incorrect time is displayed on the display panel perform the Semiauto Clock Set or Manual Clock Set procedure If appears on the display panel ensure that the antenna cable is connected correctly Then turn on and off the VCR the Plug Play setting will be automatically reactivated If Plug Play setting is not performed though the antenna cable is connected correctly perform Manual Clock S...

Page 7: ...ct the correct time zone manually in step 4 4 4 4 ON Adjustment will be made by the built in clock itself OFF Select when Daylight Saving Time does not apply to you D Select time zone Press OK or e to move the highlight bar to TIME ZONE then press rt repeatedly until AUTO or the desired time zone is selected Each time you press the button the time zone changes as follows AUTO ATLANTIC EASTERN CENT...

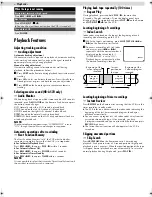
Page 8: ... VCR Do not apply too much pressure when inserting The VCR turns on and the counter on the on screen display is reset automatically If the cassette s record safety tab has been removed playback begins automatically B Start playback Press PLAY 4 MAIN MENU FUNCTION SET TUNER SET INITIAL SET PRESS THEN OK PRESS MENU TO END AUTO CHANNEL SET SCANNING PRESS MENU TO END TUNER SET BAND CATV AUTO CHANNEL S...

Page 9: ... tape repeatedly 100 times Repeat Play During playback press and hold PLAY 4 for more than 5 seconds The play indicator on the display panel starts blinking slowly To stop playback press STOP 8 on the Remote or STOP EJECT 0 on the VCR Locating beginning of recordings Index Search Index codes are placed on the tape at the beginning of each recording when recording on this VCR A While the tape is no...

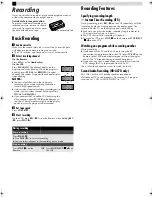
Page 10: ...Start recording On the VCR press REC 7 Or on the Remote while holding REC 7 press PLAY 4 Recording Features Specifying recording length Instant Timer Recording ITR During recording press REC 7 on the VCR repeatedly until the recording length you want appears on the display panel The record indicator 䡬 on the display panel starts blinking Each time you press the button recording length increases in...

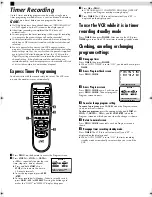
Page 11: ...Friday or weekly serials press DAILY M F or WEEKLY Pressing the button again makes the DAILY or WEEKLY display disappear C Press OK or PROG If PROGRAM NOT COMPLETED PROGRAM OVERLAP appears see Program overlap warning display D Press TIMER The VCR turns off automatically and is displayed on the display panel To use the VCR while it is in timer recording standby mode Press TIMER then press POWER Aft...

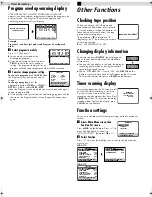
Page 12: ...DISPLAY on the Remote is pressed time counter will appear on the TV screen To reset the time counter press C RESET on the Remote Timer warning display A warning appears on the TV screen to tell you that the timer recording is to start in 5 minutes if you are not in the timer recording standby mode at that time Press TIMER to put the VCR into timer recording standby mode To clear the display press ...

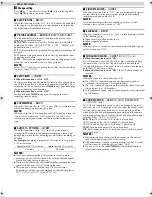
Page 13: ...ble during ITR Instant Timer Recording and will not work properly on the following tapes T ST 30 T ST 60 T ST 90 and T ST 120 䡵 VIDEO STABILIZER ON OFF When this function is set to ON you can automatically correct vertical vibrations in the picture when playing back unstable recordings made on another VCR NOTE To watch recordings with close caption or when you finish viewing a tape set this functi...

Page 14: ... Specifications shown are for SP mode unless specified otherwise E O E Design and specifications subject to change without notice To audio video input This VCR for playback Another VCR for recording Audio video cable not supplied To AUDIO VIDEO OUT GENERAL Power requirement AC 120 Vd 60 Hz Power consumption HR A57U Power on 18 W Power off 2 0 W HR A37U Power on 16 W Power off 2 0 W Temperature Ope...

Page 15: ...OF JVC AMERICAS CORP Sophisticated electronic products may require occasional service Just as quality is a keyword in the engineering and production of the wide array of JVC products service is the key to maintaining the high level performance for which JVC is world famous The JVC service and engineering organization stands behind our products NATIONAL HEADQUARTERS JVC SERVICE ENGINEERING COMPANY ...

Page 16: ... to abuse accident alteration modification tampering negligence misuse faulty installation lack of reasonable care or if repaired or serviced by anyone other than a service facility authorized by JVC to render such service or if affixed to any attachment not provided with the products or if the model or serial number has been altered tampered with defaced or removed 2 Initial installation and inst...

Reviews: