EN
13
Manual
%
%
To Make Corrections
Press
OK
or
SHUTTLE PLUS
until the item you want to
change blinks, then press
CH
5∞
or
SHUTTLE PLUS
%fi
.
%
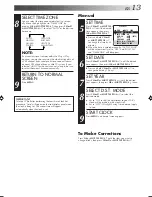
SELECT TIME ZONE
8
You can select the time zone automatically or manu-
ally. Move the highlight bar to "TIME ZONE" by
pressing
OK
or
SHUTTLE PLUS
, then press
CH
5∞
or
SHUTTLE PLUS
%fi
to select "AUTO" or the desired
time zone.
AUTO
ATLANTIC
HAWAII
EASTERN
ALASKA
CENTRAL
PACIFIC
MOUNTAIN
NOTE:
If an incorrect time is displayed by the Plug & Play
function, you may be receiving the clock setting data of
a PBS channel from an adjacent time zone or from an
incorrect PBS channel from a cable TV system. If you
selected "AUTO" for the host channel in step
6
, be sure
to select the correct time zone manually.
RETURN TO NORMAL
SCREEN
9
Press
MENU
.
IMPORTANT
Turn the VCR off after performing the Semi-Auto Clock Set
procedure. "Auto" will appear on the front display panel when
the clock is being set. The current time will appear
automatically when the clock is set.
%
%
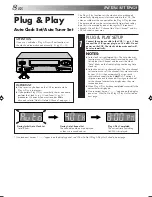
CLOCK SET
TIME
DATE
YEAR
– –:– –AM 1/ 1
99
AUTO CLOCK : ON
HOST CH
: AUTO (CATV)
D.S.T.
: AUTO
TIME ZONE
: AUTO
PRESS (
5
,
∞
), THEN (OK)
PRESS (MENU) TO END
SET TIME
5
Press
CH
5∞
or
SHUTTLE
PLUS
%fi
until the desired
time appears, then press
OK
or
SHUTTLE PLUS
.
●
Press and hold
CH
5∞
or
SHUTTLE PLUS
%fi
to change the time by 30
minutes.
●
When the time is entered manually, "AUTO CLOCK"
will be automatically set to "OFF", and "HOST CH"
and "TIME ZONE" will disappear.
SET DATE
6
Press
CH
5∞
or
SHUTTLE PLUS
%fi
until the desired
date appears, then press
OK
or
SHUTTLE PLUS
.
●
Press and hold
CH
5∞
or
SHUTTLE PLUS
%fi
to
change the date by 15 days.
SET YEAR
7
Press
CH
5∞
or
SHUTTLE PLUS
%fi
until the desired
year appears, then press
OK
or
SHUTTLE PLUS
twice.
SELECT D.S.T. MODE
8
Press
CH
5∞
or
SHUTTLE PLUS
%fi
to select the
desired mode.
a
– Set to "ON" so that the adjustment to your VCR's
clock will be made on the clock itself.
b
– Set to "OFF" if Daylight Saving Time does not apply
to you.
START CLOCK
9
Press
MENU
and normal screen appears.
HR-A51U-EN01-17
99.6.17, 11:32 AM
13
Summary of Contents for HR-A51U
Page 46: ...46EN MEMO ...
Page 47: ...EN 47 MEMO ...


