background image

Filename [HRJ261EU3.fm]

Masterpage:Left

34


EN

SUBSIDIARY SETTINGS (cont.)

Manual Channel Set

Store channels that were not stored during Auto Set Up 
(

pg. 8), Preset Download (

pg. 10) or Auto Channel Set 

(

pg. 32).

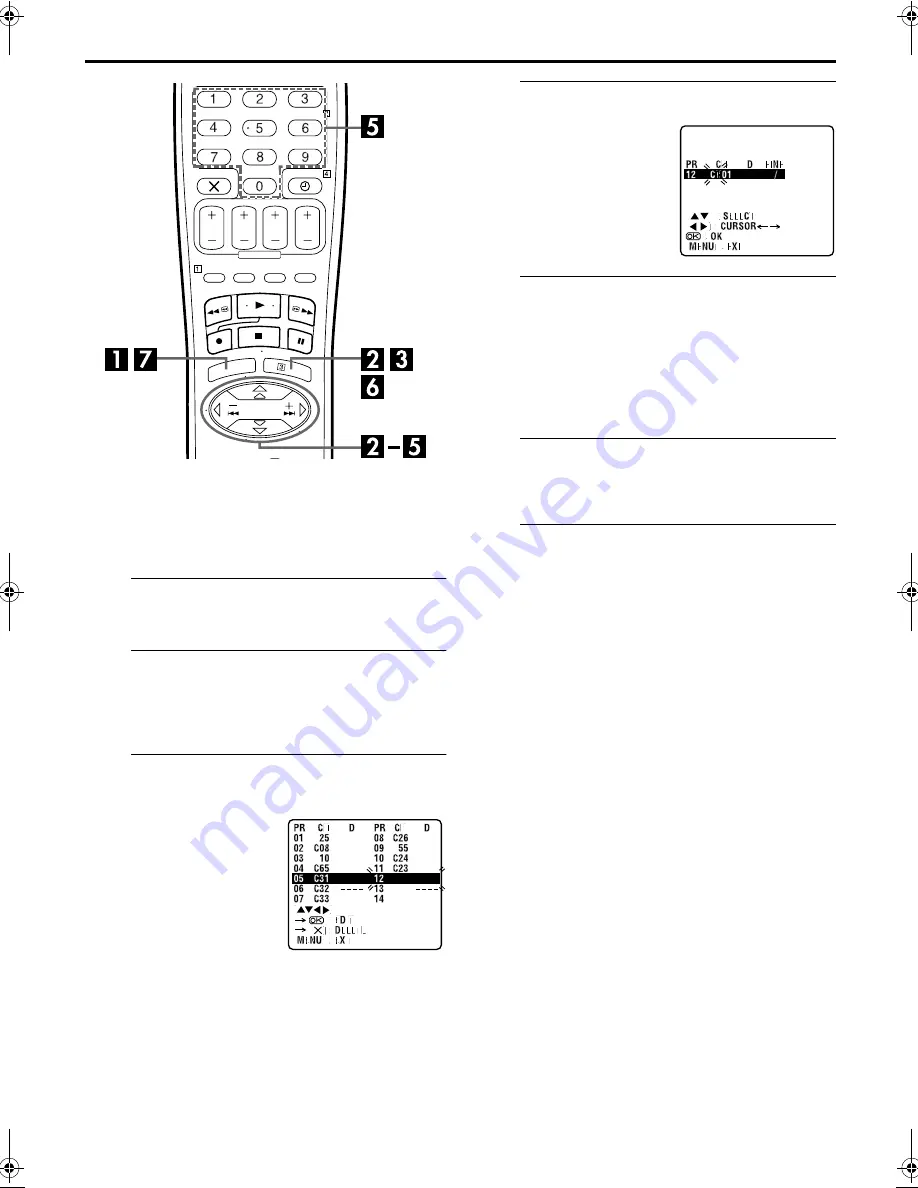
A

Access the Main Menu screen.

Press 

MENU

.

B

Access the Confirmation screen.

Press 

rt

 to move the highlight bar (pointer) to 

“MANUAL CH SET”, then press 

OK

 or 

e

. The 

Confirmation screen appears.

C

Select the channel position.

Press 

rt


w


e

 until an open 

position in which you want to 
store a channel begins blinking, 
then press 

OK

. The Manual 

Channel Set screen appears.

D

Select the band.

E

Input the channel.

Press the 

NUMBER

 keys to input the channel number you 

want to store.

Input “0” before any single number entries.

To input the registered station name (ID – 

pg. 37), press 

e


until “– – – –” (ID setting) begins blinking, then press 

rt

.

For fine tuning adjustment, press 

e

 until “+/–” begins blinking, 

then press 

rt

. While tuning, “+” or “–” appears.

F

Enter new channel information.

Press 

OK

 and the Confirmation screen appears.

Repeat steps 

3

 – 

6

 as necessary.

G

Close the Confirmation screen.

Press 

MENU

.

To change positions, see “Change Station Channel Position” 
(

pg. 35).

If you wish to set station names other than the ones registered 
in your recorder, see “Set Stations (B)” (

pg. 36).

The blueback screen and the 
programme currently being 
broadcast by the selected 
channel appear alternately for 8 
seconds each.

(Example) To store in position 12.

Press 

rt

 to change the band 

between CH (regular) and CC 
(cable), then press 

e

.

HRJ261EU3.fm  Page 34  Wednesday, February 9, 2000  5:35 PM

Summary of Contents for HR-J261EU

Page 1: ... V LINK 13 T V Link Functions 13 PLAYBACK 14 Basic Playback 14 Playback Features 15 RECORDING 18 Basic Recording 18 Recording Features 19 B E S T Picture System 21 TIMER RECORDING 22 Express Timer Programming 22 EDITING 26 Edit From A Camcorder 26 Edit To Or From Another Video Recorder 27 SUBSIDIARY SETTINGS 28 Mode Set 28 Clock Set 31 Tuner Set 32 Video Channel Set 38 TROUBLESHOOTING 39 QUESTIONS...

Page 2: ...made of SECAM B television signals produce monochrome pictures if played back on a video recorder of SECAM L standard or do not produce normal colour pictures if played back on a PAL video recorder with SECAM B system incorporated even if the TV set is SECAM compatible 3 SECAM L prerecorded cassettes or recordings made with a SECAM L video recorder produce monochrome pictures when played back with...

Page 3: ...e in the air will condense on the recorder when you move it from a cold place to a warm place or under extremely humid conditions just as water droplets form in the surface of a glass filled with cold liquid Moisture condensation on the head drum will cause damage to the tape In conditions where condensation may occur keep the recorder turned on for a few hours to let the moisture dry For Italy It...

Page 4: ...14 15 G Counter Reset 0000 Button 墌 pg 20 H Timer Button 墌 pg 23 I Front Display Panel 墌 pg 5 J Infrared Beam Receiving Window K PR Buttons 墌 pg 18 L Display Button 墌 pg 20 M Record 7 Button 墌 pg 18 N Stop Eject 0 Button 墌 pg 14 O Pause 9 Button 墌 pg 15 REAR VIEW A Mains Power Cord 墌 pg 7 B ANT IN Connector 墌 pg 7 C AV1 L 1 IN OUT Connector 墌 pg 7 26 27 D RF OUT Connector 墌 pg 7 ...

Page 5: ...aining time indicator 墌 pg 20 E Tape position indicator The tape position indicator appears on the TV screen when you press 3 or 5 from the Stop mode or perform an Index Search 墌 pg 17 The position of q in relation to 0 beginning or end shows you where you are on the tape NOTE Depending on the type of tape used the tape position indicator may not appear correctly F Current day month year G Clock d...

Page 6: ... 墌 pg 15 d OK Button 墌 pg 9 e w e Button 墌 pg 15 TV Button 墌 Operating JVC TVs below Buttons with a small dot on the left side of the name can also be used to operate your JVC TV while holding down the TV button 墌 Operating JVC TVs in the right column This remote control transmits A code signals only it is not applicable to B code signals How To Use The remote control can operate most of your vide...

Page 7: ...r AV Connection To connect to a TV with AV input connectors A Connect the aerial recorder and TV as per RF Connection B Connect an optional 21 pin SCART cable between the AV1 L 1 IN OUT connector on the rear panel of the recorder and the TV s 21 pin SCART connector D Connect the recorder to mains Plug the end of the mains power cord into a mains outlet Make AV connection if your TV has a 21 pin AV...

Page 8: ...gium BELGIUM or Switzerland SUISSE you also need to select your language International Telephone Country Code BELGIUM CESKÁ REPUBLIKA DANMARK DEUTSCHLAND ESPAÑA GREECE ITALIA MAGYARORSZÁG NEDERLAND 32 42 45 49 34 30 39 36 31 NORGE ÖSTERREICH POLSKA PORTUGAL SUISSE SUOMI SVERIGE OTHER WESTERN EUROPE OTHER EASTERN EUROPE 47 43 48 351 41 358 46 EE Before starting make sure of the following The TV aer...

Page 9: ...O NEDERLANDS SVENSKA 01 02 03 04 05 06 07 NORSK SUOMI DANSK POLSKI CEcTINA MAGYAR 08 09 10 11 12 13 On the on screen display Press rt to move the highlight bar pointer to the language of your choice Press OK The Clock Set screen appears Press rt to set the time then press OK or e The date display begins blinking Repeat the same procedure to set the date and year International telephone country cod...

Page 10: ... to select CH and press OK or e B Set the video channel Set the video channel to off manually 墌 pg 38 ATTENTION You can use this function only with a TV offering T V Link etc Be sure to use a fully wired 21 pin SCART cable Compatible with TVs offering T V Link EasyLink Megalogic SMARTLINK Q Link DATA LOGIC or NexTViewLink via fully wired 21 pin SCART cable The degree of compatibility and available...

Page 11: ...een display depending on the Country setting you have made in step 2 on page 8 unless you have selected BELGIUM or SUISSE as shown below If you want to change the language setting manually see Language on page 12 SUOMI SUOMI DANMARK DANSK NEDERLAND NEDERLANDS PORTUGAL ENGLISH ÖSTERREICH DEUTSCH GREECE ENGLISH DEUTSCHLAND DEUTSCH CESKÁ REPUBLIKA CEcTINA OTHER WESTERN EUROPE ENGLISH POLSKA POLSKI IT...

Page 12: ...ENU B Access the Country Set screen C Select your country Press rt to move the highlight bar pointer to your country s name then press OK or e D Select the language E Return to the normal screen Press MENU Turn on the TV and select the video channel or AV mode Press rt to move the highlight bar pointer to AUTO CH SET then press OK or e Press rt to move the highlight bar pointer to the language of ...

Page 13: ...ble functions may differ by system NexTView Link You can download the EPG Electronic Programme Guide information from your TV for timer programming on the recorder For details refer to the instruction manual of your TV TV Auto Power On The TV will turn on and be set to its AV mode automatically whenever you play a tape For details refer to the instruction manual of your TV VCR Auto Standby You can...

Page 14: ... D Stop playback Press 8 on the remote control or 0 on the recorder s front panel Then press 0 to remove the cassette Turn on the TV and select the video channel or AV mode Clean the video heads using a dry cleaning cassette TCL 2UX when Rough poor picture appears while a tape is played back The picture is unclear or no picture appears USE CLEANING CASSETTE appears on the screen only with O S D se...

Page 15: ... picture High Speed Search During playback or still press 5 for forward high speed search or 3 for reverse high speed search NOTE For short searches press and hold 5 or 3 for over 2 seconds during playback or still picture When released normal playback resumes Variable Speed Search During still picture press w or e The more times you press the faster the playback picture moves To decrease speed pr...

Page 16: ...he last timer recorded programme If you have several programmes recorded you can easily access any of them NOTE Before starting make sure that the recorder is off and that the Timer mode is disengaged Activate Instant ReView Press REVIEW The recorder power comes on and the recorder searches for the index code indicating the start of the last timer recorded programme Once it s found playback begins...

Page 17: ...ver unwanted sections To resume normal playback press 4 Each press initiates a 30 second period of fast motion playback Normal playback resumes automatically Next Function Memory The Next Function Memory tells the recorder what to do after rewinding Before continuing make sure the recorder is in the Stop mode a For Automatic Start Of Playback Press 3 then press 4 within 2 seconds b For Automatic P...

Page 18: ...0 to remove the cassette Turn on the TV and select the video channel or AV mode Recording Resume Function If there is a power outage during recording Instant Timer Recording 墌 pg 19 or timer recording 墌 pg 22 the recording will resume automatically when power is restored to the recorder unless the recorder s memory backup has expired B E S T takes place at the beginning of the first recording afte...

Page 19: ... to extend the time Each press extends recording time by 30 minutes NOTE You can only perform ITR using the 7 button on the recorder s front panel Record One Programme While Watching Another If your recorder is connected to the TV via the AV connection press TV VCR The recorder s VCR indicator and the TV broadcast being recorded disappear Once recording is in progress all you need to do is to set ...

Page 20: ...me of a recording or playback Tape Remaining Time Press until the time remaining on the tape appears The front display panel shows the tape remaining time with y displayed By pressing the button you can change the display to show the counter reading channel position clock time or tape remaining time Channel position is not displayed during playback NOTE Depending on the type of tape used the tape ...

Page 21: ...ape once you initiate recording DURING B E S T The recorder spends approximately 7 seconds assessing the condition of the tape then begins recording NOTES The B E S T system works only after a tape has been inserted and the Record mode is first initiated It does not work during recording In the case of timer recordings the B E S T system works before recording is initiated Once the cassette is eje...

Page 22: ...0 minute increments or press and release repeatedly to move 1 minute at a time D Enter the programme date Press DATE The current date appears on the TV screen The date you enter appears in its place Before performing Express Timer Programming Make sure that the recorder s built in clock is set properly Insert a cassette with the safety tab in place The recorder will come on automatically Turn on t...

Page 23: ...front display panel To disengage the timer mode press TIMER again To Timer Record Weekly Or Daily Serials anytime during steps 2 through 6 press WEEKLY NUMBER key 9 for weekly serials or DAILY NUMBER key 8 for daily serials Monday Friday Either WEEKLY or DAILY appears on the TV screen Pressing the button again makes the corresponding indication disappear NOTE You can programme this recorder to tim...

Page 24: ... a programme To change programme settings press the appropriate button START STOP DATE and or PR E Return to the normal screen display Press as many times as necessary If there are still some programmes remaining go on to step 6 F Return to the timer mode Press TIMER NOTE You can also check the programmes on the front display panel even if the recorder s power is off unless the recorder is in the ...

Page 25: ...ll not be recorded correctly If no changes are made for approximately 1 minute the recorder will return to the normal screen C Cancel or change programme setting To cancel a programme press when the Programme screen you do not want is shown PROGRAM COMPLETED appears on the TV screen for about 5 seconds then the normal screen appears To change a programme press the appropriate button START STOP DAT...

Page 26: ...0 and or PR to select L 1 C Set the edit mode See PICTURE CONTROL on page 29 D Start the camcorder Engage the Play mode of the camcorder E Start the recorder Engage the Record mode of the recorder NOTES All necessary cables can be obtained from your dealer When you select EDIT to dub tapes in step 3 be sure to select AUTO or NORM when B E S T is set to OFF after you finish dubbing the tapes Your r...

Page 27: ...player Engage the Play mode of the source player E Start the recording deck Engage the Record mode of the recording deck NOTES All necessary cables can be obtained from your dealer When you select EDIT to dub tapes in step 3 be sure to select AUTO or NORM when B E S T is set to OFF after you finish dubbing the tapes When you use this recorder as the source player for editing be sure to set O S D t...

Page 28: ... 30 A Access the Main Menu screen Press MENU B Access the Mode Set screen C Select the mode D Select the mode setting Press OK or e E Return to the normal screen Press MENU Turn on the TV and select the video channel or AV mode Press rt to move the highlight bar pointer to MODE SET then press OK or e Press rt to move the highlight bar pointer to the item you want to change ...

Page 29: ...s automatically engaged when the recorder power is turned off and automatically disengaged when the recorder is powered back on NOTE For safety when AUTO TIMER is set to OFF all other recorder functions are disabled while the Timer mode is engaged To disengage the timer press TIMER 8 O S D ON OFF When this function is set to ON various operational indicators appear on the TV screen Messages appear...

Page 30: ...nals on this recorder Select the appropriate colour system SECAM signals will be recorded as MESECAM on this recorder MESECAM is the designation for tapes with SECAM signals that have been recorded on a MESECAM compatible PAL video cassette recorder NOTES About NTSC Playback Some TVs shrink the picture vertically and place black bars at the top and bottom of the TV screen This is not a malfunction...

Page 31: ...OK or e The date display begins blinking Repeat the same procedure to set the date and year When you set the time press and hold rt to change the time by 30 minutes When you set the date press and hold rt to change the date by 15 days E Start the clock operation Press MENU Turn on the TV and select the video channel or AV mode IMPORTANT Perform the following steps only if the recorder s memory bac...

Page 32: ... C Access the Auto Channel Set screen D Select your country Press rt to move the highlight bar pointer to your country s name then press OK or e E Select the language Press rt to move the highlight bar pointer to the language of your choice Turn on the TV and select the video channel or AV mode IMPORTANT Perform the following steps only if Auto Channel Set has not been set correctly by Auto Set Up...

Page 33: ...searches for receivable stations As Auto Channel Set progresses the q mark on the TV screen moves from left to right Wait until the TV screen as shown in step 7 appears G View the Confirmation screen After SCAN COMPLETED is displayed on the TV screen for about 5 seconds the Confirmation screen looking like the one to the right appears The stations your recorder located appear on a Confirmation scr...

Page 34: ...you want to store Input 0 before any single number entries To input the registered station name ID 墌 pg 37 press e until ID setting begins blinking then press rt For fine tuning adjustment press e until begins blinking then press rt While tuning or appears F Enter new channel information Press OK and the Confirmation screen appears Repeat steps 3 6 as necessary G Close the Confirmation screen Pres...

Page 35: ... Set screen Press OK twice The Manual Channel Set screen appears C Perform tuning Press e until begins blinking then press rt until the picture is its clearest Then press OK The Confirmation screen appears Repeat steps 1 3 as necessary D Close the Confirmation screen Press MENU Perform steps 1 and 2 of Manual Channel Set on page 34 to access the Confirmation screen before continuing Perform steps ...

Page 36: ...ters the same way maximum of 4 After entering all characters press OK The Confirmation screen appears If you make a mistake press w until the incorrect character begins blinking Then enter the correct character by pressing rt C Close the Confirmation screen Press MENU NOTE The characters available for the station name ID are A Z 0 9 f I space maximum of 4 Perform steps 1 and 2 of Manual Channel Se...

Page 37: ...1 ETB2 EURONEWS EUROSPORTS FEMMAN FILM FILMNET France2 France3 GALAVISION HESSEN3 INFO KANAL ITALIA1 ITALIA7 ITV JSTV KA2 KABEL1 KANAL2 LOCAL M6 MBR MCM MDR MOVIE MTV MTV3 NORD3 N TV NBC SUPER NDR3 NED1 NED2 NED3 NICKELODEON NRK NRK2 ODEON ORF1 ORF2 ID STATION NAME ORF3 OWL3 PREM PRO7 RAI1 RAI2 RAI3 RET4 21 RTBF RTL RTL2 RTL4 RTL5 RTP S4 SAT1 SBS SHOW SIC SKY SKYN SPRT SRTL STAR SVT1 SVT2 SWR TCC ...

Page 38: ...o UHF channel 50 If the two vertical white bars appear clearly on the TV screen as shown to the right go to step 4 If the two vertical white bars do not appear clearly re set the video recorder to another vacant channel and try again NOTES If you set the video recorder to a channel which is occupied by a local station or has neighbouring channels that are occupied by local stations the picture rec...

Page 39: ...s 4 to turn the i indicator off 2 The tape will not rewind or fast forward The tape is already fully rewound or fast forwarded Check the cassette SYMPTOM POSSIBLE CAUSE CORRECTIVE ACTION 1 The playback picture does not appear while the tape is running If you re using the RF connection the TV receiver s channel selector is not set to the video channel the recorder s video channel has not been corre...

Page 40: ...r timer settings The timer is not engaged Press and confirm that is displayed on the front display panel 2 Timer programming is not possible Timer recording is in progress Timer programming can t be performed while a timer recording is in progress Wait until it finishes 3 and on the front display panel won t stop blinking The timer is engaged but there s no cassette loaded Load a cassette with the...

Page 41: ...Channel settings that were made manually seem to have changed or disappeared After the manual settings were made Auto Channel Set was performed Perform manual setting again 5 No channels are stored in the recorder s memory The TV aerial cable was not connected to the recorder when Auto Set Up was performed Connect the TV aerial cable to the recorder properly and turn off the recorder power once th...

Page 42: ...here may be index codes too close together RECORDING Q When I pause and then resume a recording the end of the recording before the pause is overlapped by the beginning of the continuation of recording Why does this happen A This is normal It reduces distortion at the pause and resume points Q Can the video recorder indefinitely remain in the Record Pause mode A No The video recorder goes to its S...

Page 43: ...anguage 12 M Manual Channel Set 34 Manual Tracking 16 Mode Set 28 N Next Function Memory 17 O O S D 29 ON SCREEN DISPLAY 5 P PICTURE CONTROL 29 PLAYBACK 14 POWER SAVE 30 Preset Download 10 R Record One Programme While Watching Another 19 RECORDING 18 Recording Resume Function 18 Repeat Playback 17 S Set Stations A 36 Set Stations B 36 Skip Search 17 Slow Motion 15 Still Picture Frame By Frame Play...

Page 44: ...l and CCIR monochrome signal 625 lines 50 fields Recording system Rotary two head herical scan system Signal to noise ratio 45 dB Horizontal resolution 250 lines Frequency range 70 Hz to 10 000 Hz Input Output 21 pin SCART connector IN OUT x 1 TUNER TIMER TV channel storage capacity 99 positions AUX position Tuning system Frequency synthesized tuner Channel coverage VHF 47 MHz 89 MHz 104 MHz 300 M...

Reviews: