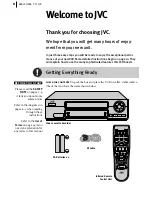
equipment key
7
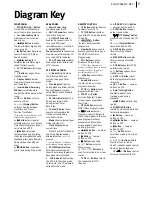
Diagram Key
REAR PANEL
1
Mains Power Cord
supplies power to VCR.
2
ANT. IN
Connector
enables
connection of aerial.
3
L-1 IN/OUT Connector
enables AV connection to TV
or second VCR; input
recordable when L-1 selected.
4
AUDIO OUT (L/R)
Connectors
enable connection
of audio cassette recorder, TV
or second VCR for dubbing.
5
RF. OUT Connector
enables
connection to aerial terminal
of TV receiver.
VCR DISPLAY PANEL
1
c
Indicator
lights when
the
c
button has been
pressed to engage Timer
mode.
2
Play Indicator
lights up
during playback; blinks during
Repeat Playback or when
using Next Function Memory
for playback.
3
Record Indicator
lights up
during recording; blinks
during Instant Timer
Recording.
4
Channel Display
shows
preset position where the
station currently being
received is stored.
Mode
shows external input
mode selected (L-1).
Clock Display
shows
current time.
Preset Position* (or Mode)
and Clock Display appear
alternately when
b
is
pressed.
*
Preset Position (or Mode) is
not displayed during playback.
5
REVIEW Indicator
blinks
after timer-recording and
shows how many programmes
have been timer-recorded.
6
VCR
Indicator
lights when
the VCR is in the video mode.
At this point, the TV automati-
cally enters AV mode.
REMOTE CONTROL
1
TV Button
enables Remote
Control of your JVC TV.
2
TV/VCR Button
switches
connected TV’s mode between
TV and AV.
3
r
Button
‘reviews’ timer-recorded
programme.
4
Number Keys
are used in
preset position selection and
the VIDEO Plus+ Timer
Programming.
5
PDC Button
enables/
disables PDC recording.
*
VPS (Video Programme
System) recording is not currently
available in the U.K. and not
possible with this VCR.
6
x
Button
cancels timer-
programme.
0000 Button
resets
counter on the on-screen
display to ‘0:00:00’.
7
STOP +/– Button
inputs
programme Stop Time.
8
START +/– Button
accesses Regular Program
screen; inputs programme
Start Time.
9
PROG Button
accesses
VIDEO Plus+ Program screen.
10
C
Button
accesses
Program screens/displays to
check the programme that you
have programmed (next
programme’s information
screen appears each time
button is pressed).
11
<
Button
— same as
button on VCR.
12
T
Button
— same as
button on VCR.
13
S
Button
stops tape.
14
m
Button
accesses
Menu screen.
15
AB
Buttons
are
used for selection in on-screen
menus.
TV PR +/– Buttons
selects
the connected JVC TV's
channel.
16
STANDBY/ON
o
Button
— same as button on VCR.
17
AUDIO Button
changes
output sound mode.
(TV Muting) Button
mutes sound of connected JVC
TV.
18
b
(Display) Button
—
same as button on VCR
.
19
DAILY Button
enables
timer recording of daily
serials.
20
WEEKLY Button
enables
timer recording of weekly
serials.
21
AUX Button
selects VCR’s
auxiliary input mode.
22
c
Button
engages timer-
standby mode.
23
DATE +/– Button
inputs
date of programme for timer
recording.
24
PR +/– Button
— same as
buttons on VCR.
25
Auto Tracking Button
enables/disables auto
tracking mode during
playback.
/
Button
selects tape
speed.
26
3
Button
initiates a 30-second period of
fast-motion playback.
27
.
Button
— same as
button on VCR.
28
>
Button
— same as
button on VCR.
29
|
Button
— same as
button on VCR.
30
O
Button
enters
selections made in on-screen
menus.
31
D
E
Buttons
initiate
functions such as Index
Search, variable-speed search,
frame by frame playback.
TV
+/– Buttons
control
volume of connected JVC TV.
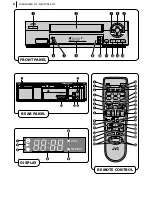
FRONT PANEL
1
STANDBY/ON
o
Button
turns VCR on/off (loading a
cassette also turns power on).
2
Cassette Loading Slot
is
where cassette is inserted;
door closes.
3
<
Button
rewinds
the tape; initiates high-speed
reverse search.
4
.
Button
plays back tape;
cancels Pause, Still, Slow,
Search modes.
5
>
Button
fast-
forwards tape; initiates high-
speed forward search.
6
SP/LP Button
selects tape
speed.
7
c
Button
engages timer
standby mode.
8
Display Panel
provides
clear view of various displays
and indicators.
9
Infrared Beam Receiving
Window
is where Remote
Control should be aimed when
in use.
10
PR +/– Buttons
select a
preset position.
11
b
(Display) Button
switches display between
clock time and Preset
Position* (or Mode).
* Preset Position (or Mode) is not
displayed during playback.
12
T
Button
starts regular
recording (press once), Instant
Timer Recording (press twice);
sets duration of ITR.
13
|
Button
stops tape
temporarily during recording;
stops tape temporarily during
playback; plays back frame by
frame with each additional
press.
14
§
Button
stops tape;
ejects tape during Stop mode.
Summary of Contents for HR-J580EK
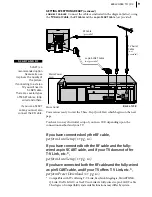
Page 14: ...three step quick start 14 ...
Page 55: ...MEMO ...


