background image

— 8 —

Page 8

February 9, 2004 6:50 pm

B

Select host channel

You can either select “AUTO” or enter a PBS channel number.
Press 

OK

 or 

e

 to move the highlight bar to “HOST CH”, then 

press 

rt

 repeatedly until “AUTO” or the desired PBS channel 

number is selected.

Some PBS channels do not transmit clock setting data.

C

Select D.S.T. mode

Press 

OK

 or 

e

 to move the highlight bar to “D.S.T.”, then press 

rt

 repeatedly until the desired setting is selected.

AUTO

: Select if you want to adjust your VCR’s clock 

automatically by the incoming signal from the host 
channel. (Auto Daylight Saving Time enables automatic 
adjustment of the VCR’s clock at the start and end of 
Daylight Saving Time.) Be sure to select the correct time 
zone manually in step 

4

.

ON

:

Adjustment will be made by the built-in clock itself.

OFF

:

Select when Daylight Saving Time does not apply to you.

D

Select time zone

Press 

OK

 or 

e

 to move the highlight bar to “TIME ZONE”, then 

press 

rt

 repeatedly until “AUTO” or the desired time zone is 

selected. Each time you press the button, the time zone changes as 
follows:

{

 AUTO 

{

 ATLANTIC 

{

 EASTERN


{

 CENTRAL

{

 MOUNTAIN 

{

 PACIFIC


{

 ALASKA 

{

 HAWAII

{

 (back to the beginning)

E

Complete Semiauto Clock Set

Press 

MENU

 to return to normal screen. Turn off the VCR. “Aut” 

will appear on the display panel while the clock is being set. The 
current clock time will appear automatically when the clock 
setting is complete.

Setting clock manually
— Manual Clock Set

First follow steps 

1

 to 

2

 in “Preparations” above, then go to the 

following steps.

A

Set time, date and year

Press 

rt

 until the desired time appears, 

then press 

OK

 or 

e

. Set the date and year 

in the same way.

Holding 

rt

 changes the time in 30-

minute intervals, or changes the date in 
15-day intervals.

B

Select D.S.T. mode

Press 

OK

 or 

e

 to move the highlight bar to 

“D.S.T.”, then press 

rt

 to select the 

desired setting.

ON

: Adjustment will be made by the 

built-in clock itself.

OFF

: Select when Daylight Saving Time 

does not apply to you.

C

Start clock

Press 

MENU

 and normal screen appears.

To make corrections any time during the process

Press 

OK

 or 

e

 repeatedly until the item you want to change 

blinks, then press 

rt

.

Tuner Setting

Setting channels automatically
— Auto Channel Set

Perform Auto Channel Set only if channels have not been set 
correctly by the Plug&Play setting.

A

Access Main Menu screen, then Tuner 
Set screen

Press 

MENU

 on the Remote. Press 

rt

 to 

move the highlight bar (arrow) to “TUNER 
SET”, then press 

OK

 or 

e

.

B

Perform Auto Channel Set

Press 

rt

 to move the highlight bar 

(arrow) to “AUTO CHANNEL SET”, then 
press 

OK

 or 

e

. The VCR selects the correct 

band (TV or CATV) automatically during 
Auto Channel Set.

When Auto Channel Set is complete, 
“SCAN COMPLETED” appears on 
screen.

If the scan was unsuccessful, “SCAN 
COMPLETED–NO SIGNAL–” appears on 
screen. Check the connections and start 
again.

Press 

MENU

 to return to normal screen.

Setting channels manually
— Manual Channel Set

You can add the channels you want or delete the channels you do 
not want manually.

A

Access Main Menu screen, then Tuner 
Set screen

Press 

MENU

 on the Remote. Press 

rt

 to 

move the highlight bar (arrow) to “TUNER 
SET”, then press 

OK

 or 

e

.

B

Access Manual Channel Set screen

Press 

rt

 to move the highlight bar 

(arrow) to “MANUAL CHANNEL SET”, 
then press 

OK

 or 

e

.

C

Add or skip desired channels

To add channels

A

Press the 

Number keys

 on the Remote 

to input a channel number you want to 
add.

B

Press 

OK

 or 

e

 to set to “ADD”.

C

Repeat 

A

 to 

B

 to add other channels. 

Press 

MENU

 to return to normal screen.

To skip channels

A

Press 

rt

 or the 

Number keys

 to select a channel number you 

want to skip.

B

Press 

OK

 or 

e

 to set to “SKIP”.

C

Repeat 

A

 and 

B

 to skip other channels. Press 

MENU

 to return 

to normal screen.

Selections of host channel and D.S.T. mode will be reset to 
“AUTO” after a power failure occurs.

Manual setting of the clock will be lost after a power failure 
occurs.

Turn on the VCR and TV, and select the VCR channel (or AV 

mode).

After a power failure occurs, band selection will be reset to 
“CATV”.

HR-S2913U_EN.fm  Page 8  Monday, February 9, 2004  6:51 PM

Summary of Contents for HR-S2913U

Page 1: ...ial Settings 7 Language Setting 7 Clock Setting 7 Tuner Setting 8 Playback 9 Basic Playback 9 Playback Features 9 Recording 10 Basic Recording 10 Recording Features 11 Timer Recording 11 Express Timer Programing 11 Other Functions 12 Timer warning display 12 Checking tape position 12 Changing display information 12 Function settings 12 Child Lock 14 Editing 15 Editing with Another VCR 15 Specifica...

Page 2: ... by JVC could void the user s authority to operate the equipment This equipment has been tested and found to comply with the limits for a Class B digital device pursuant to Part 15 of the FCC Rules These limits are designed to provide reasonable protection against harmful interference in a residential installation This equipment generates uses and can radiate radio frequency energy and if not inst...

Page 3: ... should be mounted to a wall or ceiling only as recommended by the manufacturer ANTENNA INSTALLATION INSTRUCTIONS 1 Outdoor Antenna Grounding If an outside antenna or cable system is connected to the product be sure the antenna or cable system is grounded so as to provide some protection against voltage surges and built up static charges Article 810 of the National Electrical Code ANSI NFPA 70 pro...

Page 4: ...ct sunlight in a dusty environment in an environment where strong magnetic fields are generated on a surface that is unstable or subject to vibration 2 DO NOT block the VCR s ventilation openings 3 DO NOT place heavy objects on the VCR or on the Remote 4 DO NOT place anything which might spill on the top of the VCR or on the Remote 5 AVOID violent shocks to the VCR during transport How to use the ...

Page 5: ...E PLAY STOP EJECT Cassette loading slot VIDEO AUDIO input connectors Display panel VCR mode indicator Play indicator Record indicator Timer mode indicator Channel and auxiliary input Clock time Remote sensor S VHS indicator S VIDEO input connector S VIDEO AC power cord ...

Page 6: ...OUT connectors on the rear of the VCR and the audio video input connectors on the TV A Press OSD OK All indications corresponding to the current status are displayed for 5 seconds After that the counter information and RECORD PAUSE if in the Record Pause mode are left displayed on the screen B Press OSD OK again to clear the display The RECORD PAUSE indication is left displayed on the screen TIMER...

Page 7: ... in your area F Final preparation for use Turn on the VCR and the TV and select the VCR channel 3 or 4 or AV mode on the TV You can now perform basic playback or basic recording If you connect the TV and the VCR only using the RF connection press TV VCR on the Remote so that the VCR mode indicator lights on the display panel Language Setting The default setting is ENGLISH A Access Main Menu screen...

Page 8: ...hen Daylight Saving Time does not apply to you C Start clock Press MENU and normal screen appears To make corrections any time during the process Press OK or e repeatedly until the item you want to change blinks then press rt Tuner Setting Setting channels automatically Auto Channel Set Perform Auto Channel Set only if channels have not been set correctly by the Plug Play setting A Access Main Men...

Page 9: ...墌 pg 13 though the monitor sound changes in sequence Playback Turn on the VCR and TV and select the VCR channel or AV mode During playback Stop playback Press STOP 8 on the Remote OR Press STOP EJECT 0 on the VCR Pause playback and view still picture Press PAUSE 9 Press PLAY 4 to resume normal playback NOTE During still picture vertical vibration may appear on the TV screen Press CHr t on the Remo...

Page 10: ... PLAY 4 It may be unlawful to record or play back copyrighted material without the consent of the copyright owner Accidental erasure prevention To prevent accidental recording on a recorded cassette remove its record safety tab To record on it later cover the hole with adhesive tape Basic Recording A Load a cassette Make sure the record safety tab is intact If not cover the hole with adhesive tape...

Page 11: ...in advance Remember the clock must be set before you can program the timer NOTES If all the 8 programs have already been set PROGRAM FULL appears on the TV screen After timer recording is completed the VCR turns off automatically You can program the timer recording while a regular recording is in progress the menu screens will not be recorded Even if a power failure occurs the VCR keeps your timer...

Page 12: ...ess TIMER to put the VCR into timer recording standby mode To clear the display press CANCEL on the Remote Checking tape position When you change the VCR operation mode from the stop mode to fast forward or rewind mode or when you perform an Index Search or Instant Review the tape position indicator appears The position of q in relation to B Beginning or E End shows you where you are on the tape S...

Page 13: ... off It is temporarily canceled when the VCR is turned on You do not have to press TIMER to engage or disengage the timer recording standby mode When this function is set to OFF You have to press TIMER to engage or disengage the timer recording standby mode 䡵 SUPERIMPOSE ON OFF When this function is set to ON various VCR status information on screen display appears on the screen NOTE When you use ...

Page 14: ...NOTES S VHS mode allows you to make high quality video recordings with horizontal resolution of 400 lines comparing with the 230 lines of resolution of conventional VHS recordings To achieve the highest quality picture we recommended to record in S VHS mode But remember that a conventional VHS VCR without SQPB cannot play back S VHS tapes recorded in S VHS mode S VHS MODE setting does not affect r...

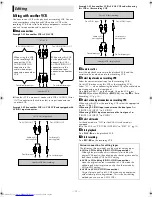
Page 15: ...ct edit mode Set the edit mode to ON for the VCRs if such a mode is equipped On this VCR set PICTURE CONTROL to EDIT 墌 pg 13 F Start playback Press PLAY 4 on the playback VCR G Start recording Press REC 7 on the recording VCR Editing To audio video input This VCR Another VCR To AUDIO VIDEO IN To AUDIO VIDEO OUT To audio video output When using this VCR as the recording VCR connect this VCR s AUDIO...

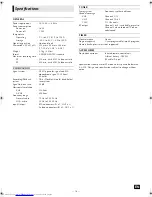
Page 16: ...C type color signal and EIA monochrome signal 525 lines 60 fields Recording Playback system DA 4 Double Azimuth head helical scan system Signal to noise ratio 45 dB Horizontal resolution VHS 230 lines S VHS 400 lines Frequency range Normal audio 70 Hz to 10 000 Hz Hi Fi audio 20 Hz to 20 000 Hz Input Output RCA connectors IN x 1 OUT x 1 S video connectors IN x 1 OUT x 1 TUNER Tuning system Frequen...

Reviews: