background image

— 11 —

It may be unlawful to record or play back copyrighted material 
without the consent of the copyright owner.

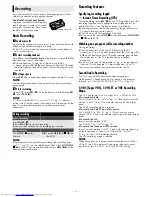
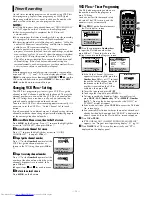
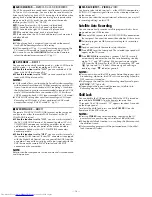
Accidental erasure prevention

To prevent accidental recording on a 
recorded cassette, remove its record 
safety tab. To record on it later, cover 
the hole with adhesive tape.

Basic Recording

A

Load a cassette

Make sure the record safety tab is intact. If not, cover the hole with 
adhesive tape before inserting the cassette.

The VCR turns on, and the counter on the on-screen display is 
reset, automatically.

B

Select recording channel

Press 

CH+/–

 or the 

Number keys

 on the Remote. Or push the 

JOG


dial, then turn it to the left or right.

If you connect the TV and the VCR only using the RF 
connection, press 

TV/VCR

 on the Remote so that the VCR mode 

indicator lights on the display panel, to view the program to be 
recorded.

C

Set tape speed

Press 

SP/EP

. The selected tape speed will appear on the TV screen.

NOTE:

You can select tape speed in the stop mode or during recording 
pause mode.

D

Start recording

On the VCR, press 

REC

 (

7

). Or on the Remote, while holding 

REC


(

7

), press 

PLAY

 (

4

).

NOTE:

If “VIDEO CALIBRATION” is set to “ON” (

pg. 15) (default 

setting), the VCR takes about 7 seconds to assess the quality of the 
tape in use, then recording begins with the picture level 
optimized.

NOTE:

If the tape reaches its end during recording, the recording stops 
and “

” and “

$

” on the display panel blink. Press 

STOP/EJECT


(

0

) on the VCR to eject the cassette or press 

REW

 (

3

) on the 

Remote to rewind the tape.

Recording Features

Specifying recording length
— Instant Timer Recording (ITR)

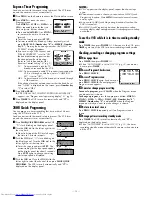
During recording, press 

REC

 (

7

) on the VCR repeatedly until the 

recording length you want appears on the display panel. The 
record indicator (

) on the display panel starts blinking.

Each time you press the button, recording length increases in 
30-minute intervals (up to 6 hours).

The VCR shuts off after recording is finished.

To cancel an ITR, press 

STOP

 (

8

) on the Remote or 

STOP/EJECT


(

0

) on the VCR.

Watching one program while recording another

During recording...

If you connect the TV and the VCR only using the RF 
connection (

pg. 5) to view pictures from the VCR, press 

TV/

VCR

 on the Remote so that VCR mode indicator goes off from 

the display panel. (The TV broadcast being recorded 
disappears.)

If you are using the AV connection (

pg. 5) to view pictures 

from the VCR, change the TV’s input mode from AV to TV.

Then, select the channel you want to watch, on the TV.

Second Audio Recording

This VCR’s built-in MTS decoder enables reception of 
Multichannel TV Sound broadcast. To record a SAP program 
received, set “2ND AUDIO RECORD” to “ON” (

pg. 15).

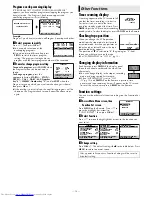
S-VHS (Super VHS), S-VHS ET or VHS Recording 
Mode

This VCR can record in S-VHS (Super VHS), S-VHS ET or VHS.

To record in S-VHS:

Set “S-VHS MODE” to “ON” (

pg. 16). Then, insert a cassette 

marked “S-VHS”. The S-VHS indicator lights up on the display 
panel.
The S-VHS recording mode is selected.

To record in S-VHS ET on a VHS cassette:

Set “S-VHS ET” to “ON” (

pg. 15). Then, insert a cassette 

marked “VHS”. The S-VHS indicator lights up on the front display 
panel.

To record in VHS:

Insert a cassette marked “VHS”.
Set “S-VHS ET” to “OFF” (

pg. 15).

To record in VHS on an S-VHS cassette:

Insert a cassette marked “S-VHS”. The S-VHS indicator lights up 
on the display panel. Then, set “S-VHS MODE” to “OFF” 
(

pg. 16). The S-VHS indicator goes off.

The VHS recording mode is selected.

NOTE:

When playing back a tape that has been recorded in S-VHS or 
S-VHS ET, the S-VHS indicator lights up on the display panel 
regardless of the “S-VHS ET” or “S-VHS MODE” setting.

Recording

During recording

Pause recording

Press 

PAUSE

 (

9

).

Press 

PLAY

 (

4

) to resume recording.

You can select channel in the recording pause mode.

Stop recording

Press 

STOP

 (

8

) on the 

Remote.

OR

Press 

STOP/EJECT

 (

0

) on 

the VCR.

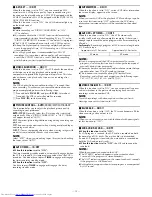
Record safety tab

Summary of Contents for HR-S3901

Page 1: ...OSE THIS UNIT TO RAIN OR MOISTURE CAUTION This video cassette recorder should be used with AC 120Vd 60Hz only To prevent electric shocks and fire hazards DO NOT use any other power source CAUTION TO PREVENT ELECTRIC SHOCK MATCH WIDE BLADE OF PLUG TO WIDE SLOT FULLY INSERT ATTENTION POUR ÉVITER LES CHOCS ÉLECTRIQUES INTRODUIRE LA LAME LA PLUS LARGE DE LA FICHE DANS LA BORNE CORRESPONDANTE DE LA PRI...

Page 2: ... obsolete outlet Do not defeat the safety purpose of the grounding type plug 2 Power Sources Operate your product only from the type of power source indicated on the marking label If you are not sure of the type of power supply to your home consult your product dealer or local power company If your product is intended to operate from battery power or other sources refer to the operating instructio...

Page 3: ...ng covers may expose you to dangerous voltage or other hazards Refer all servicing to qualified service personnel 2 Damage Requiring Service Unplug this product from the wall outlet and refer servicing to qualified service personnel under the following conditions a When the power supply cord or plug is damaged b If liquid has been spilled or objects have fallen into the product c If the product ha...

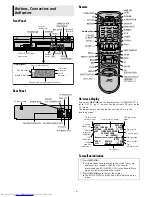
Page 4: ...vanced JOG dial S VHS indicator S VIDEO AC power cord A Press OSD OK All indications corresponding to the current status are displayed for 5 seconds After that the counter information and RECORD PAUSE if in the Record Pause mode are left displayed on the screen B Press OSD OK again to clear the display The RECORD PAUSE indication is left displayed on the screen Number keys B E CH125 RECORD THU 12 ...

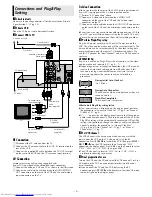
Page 5: ...tely 墌 pg 6 7 Depending on areas or reception conditions the VCR may not receive the Auto clock setting data from PBS channel If this function is taking a considerable amount of time it may be necessary to perform the semiauto or manual clock set procedure What to do if Plug Play setting failed If an incorrect time is displayed on the display panel perform the procedure in Semiauto Clock Set 墌 pg ...

Page 6: ...ct time zone manually in step 4 4 4 4 ON Adjustment will be made by the built in clock itself OFF Select when Daylight Saving Time does not apply to you D Select time zone Press OK or e to move the highlight bar to TIME ZONE then press rt repeatedly until AUTO or the desired time zone is selected Each time you press the button the time zone changes as follows AUTO ATLANTIC EASTERN CENTRAL MOUNTAIN...

Page 7: ...ceive your TV channels through a cable box descrambler and or if you receive satellite channels through DBS Direct Broadcast Satellite receiver The Controller allows the VCR to automatically switch the cable box or DBS receiver s channel during timer recording NOTES The Controller is not supplied with this unit It can be requested by mailing in the completed JVC Cable Mouse Certificate that is inc...

Page 8: ...r brand code and perform test Press the appropriate Number keys on the Remote to enter the brand code from the following list then press OK or e For cable box If the cable box s channel changes to 9 setting is complete Press OK If the cable box s channel does not change to 9 A Press rt to move the highlight bar arrow to NO then press OK or e B Repeat step 0 0 0 0 until the cable box s channel chan...

Page 9: ... Pause playback and view still picture Press PAUSE 9 Press PLAY 4 to resume normal playback OR Push the JOG dial Push the JOG dial again to resume normal playback NOTE During still picture vertical vibration may appear on the TV screen Press CH on the remote to get a clearer picture Pause and Frame by Frame playback Press PAUSE 9 to pause then press 2or 6 or PAUSE 9 repeatedly Press PLAY 4 to resu...

Page 10: ...ay press 2or 6 repeatedly until the correct number is displayed on the screen only if SUPERIMPOSE is set to ON 墌 pg 15 Playback begins automatically when the desired recording is located Locating beginning of timer recordings Instant Review After ensuring that the VCR is turned off and that the timer mode is disengaged press REVIEW The VCR turns on and rewinds to the index code indicating the begi...

Page 11: ... recording length increases in 30 minute intervals up to 6 hours The VCR shuts off after recording is finished To cancel an ITR press STOP 8 on the Remote or STOP EJECT 0 on the VCR Watching one program while recording another During recording If you connect the TV and the VCR only using the RF connection 墌 pg 5 to view pictures from the VCR press TV VCR on the Remote so that VCR mode indicator go...

Page 12: ...reen Press rt to move the highlight bar arrow to GUIDE CHANNEL SET then press OK or e C Input guide channel number Press rtor the Number keys to select the VCR Plus guide channel number as shown in the TV listing then press OK or e D Input receiving channel number Press rtor the Number keys to select the number of the channel on which the guide channel s broadcasts are received then press OK or e ...

Page 13: ...he display panel for about 5 seconds Press SP EP again to change the setting while tape speed is displayed D Push the JOG dial Turn the JOG dial to the left or right to select the channel then press 24HR QUICK PROGRAM The VCR turns off automatically and is displayed on the display panel NOTES If Err appears on the display panel repeat the above steps again When a menu screen is shown you cannot us...

Page 14: ...LAY the display panel shows the channel number and the clock time alternatively You can change display in the stop or recording mode or during rewind fast forward When SUPERIMPOSE is set to ON 墌 pg 15 and DISPLAY on the Remote is pressed time counter and tape remaining time will appear on the TV screen To reset the time counter press C RESET on the Remote Function settings You can use the other us...

Page 15: ...ged when the VCR is turned off It is temporarily canceled when the VCR is turned on You do not have to press TIMER to engage or disengage the timer recording standby mode When this function is set to OFF You have to press TIMER to engage or disengage the timer recording standby mode 䡵 SUPERIMPOSE ON OFF When this function is set to ON various VCR status information on screen display appears on the...

Page 16: ...ts linked via their AV COMPULINK connectors becomes possible When this function is set to OFF you can use this terminal as the remote PAUSE terminal If your JVC camcorder is equipped with the Master Edit Control you can control the VCR from the camcorder Connect the mini plug cable not supplied with this VCR between the remote PAUSE terminal and the EDIT connector on the camcorder NOTE Refer to th...

Page 17: ... VCR s channels only Changing Remote Control Code This Remote is capable of transmitting two control codes one set to respond to A code control signals and another set to respond to B code control signals This Remote control is preset to send A code signals because your VCR is initially set to respond to A code signals You can easily modify your VCR and the Remote to respond to B code signals When...

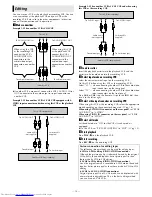
Page 18: ... on the rear panel set REAR AUX INPUT to VIDEO E Select edit mode Set the edit mode to ON for the VCRs if such a mode is equipped On this VCR set PICTURE CONTROL to EDIT 墌 pg 15 F Start playback Press PLAY 4 on the playback VCR G Start recording Press REC 7 on the recording VCR Editing To audio video input This VCR Another VCR To AUDIO VIDEO IN To AUDIO VIDEO OUT To audio video output When using t...

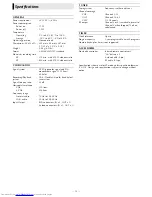
Page 19: ...e color signal and EIA monochrome signal 525 lines 60 fields Recording Playback system DA 4 Double Azimuth head helical scan system Signal to noise ratio 45 dB Horizontal resolution VHS 230 lines S VHS 400 lines Frequency range Normal audio 70 Hz to 10 000 Hz Hi Fi audio 20 Hz to 20 000 Hz Input Output RCA connectors IN x 2 OUT x 1 S video connectors IN x 1 OUT x 1 TUNER Tuning system Frequency sy...

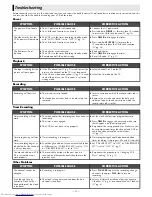
Page 20: ...rd safety tab is intact The loaded cassette has had its record safety tab removed Remove the cassette and cover the hole with adhesive tape or load a cassette on which the record safety tab is intact SYMPTOM POSSIBLE CAUSE CORRECTIVE ACTION Timer recording will not work The clock and or the timer program have been set incorrectly Set the clock and or timer program correctly The timer is not engage...

Page 21: ... 6 21 2 9 0 5 6 253 6RSKLVWLFDWHG HOHFWURQLF SURGXFWV PD UHTXLUH RFFDVLRQDO VHUYLFH XVW DV TXDOLW LV D NH ZRUG LQ WKH HQJLQHHULQJ DQG SURGXFWLRQ RI WKH ZLGH DUUD RI 9 SURGXFWV VHUYLFH LV WKH NH WR PDLQWDLQLQJ WKH KLJK OHYHO SHUIRUPDQFH IRU ZKLFK 9 LV ZRUOG IDPRXV 7KH 9 VHUYLFH DQG HQJLQHHULQJ RUJDQL DWLRQ VWDQGV EHKLQG RXU SURGXFWV 1 7 21 48 57 56 9 6 59 1 1 5 1 203 1 2 0 5 9 6 21 2 9 0 5 6 253 1H...

Page 22: ...DYH EHHQ VXEMHFW WR DEXVH DFFLGHQW DOWHUDWLRQ PRGLILFDWLRQ WDPSHULQJ QHJOLJHQFH PLVXVH IDXOW LQVWDOODWLRQ ODFN RI UHDVRQDEOH FDUH RU LI UHSDLUHG RU VHUYLFHG E DQ RQH RWKHU WKDQ D VHUYLFH IDFLOLW DXWKRUL HG E 9 WR UHQGHU VXFK VHUYLFH RU LI DIIL HG WR DQ DWWDFKPHQW QRW SURYLGHG ZLWK WKH SURGXFWV RU LI WKH PRGHO RU VHULDO QXPEHU KDV EHHQ DOWHUHG WDPSHUHG ZLWK GHIDFHG RU UHPRYHG QLWLDO LQVWDOODWLRQ DQ...

Page 23: ...Memo ...

Page 24: ... 23 5 7 9 725 203 1 2 3 1 7 3ULQWHG LQ KLQD 019f3 f ...

Reviews: