EN
17
D
Adjusting tracking condition
—
Tracking Adjustments
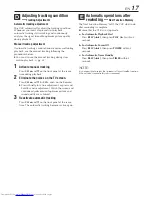
Automatic tracking adjustment
This VCR automatically adjusts the tracking condition.
Whenever you insert a tape and start playback,
automatic tracking starts working and continuously
analyzes the signal to enable optimum picture quality
during playback.
Manual tracking adjustment
If automatic tracking cannot eliminate noises well during
playback, use the manual tracking following the
procedures below.
●
You can also use the manual tracking during slow
motion playback (
墌
pg. 23).
1
Activate manual tracking
Press
CH
5
and
∞
on the front panel at the same
time during playback.
2
Eliminate the noises on the TV screen.
Press
CH
5
and
∞
(or
CH +
and
–
on the Remote).
●
Press it briefly for a fine adjustment, or press and
hold for coarse adjustment. Watch the screen and
continue adjustment until optimum picture and
sound quality are achieved.
3
Reactivate automatic tracking
Press
CH
5
and
∞
on the front panel at the same
time. The automatic tracking becomes active again.
Automatic operations after
rewinding —
Next Function Memory
The Next Function Memory “tells” the VCR what to do
after rewinding is complete.
●
Ensure that the VCR is in stop mode.
a– For Automatic Playback Start
Press
REW (
1
)
, then press
PLAY (
3
)
within 2
seconds.
b– For Automatic Power Off
Press
REW (
1
)
, then press
POWER
within 2
seconds.
c– For Automatic Timer Standby
Press
REW (
1
)
, then press
TIMER
within 2
seconds.
NOTE:
It is not possible to select the Automatic Timer Standby function
if the cassette’s record safety tab is removed.
E
Summary of Contents for HR-VP48U
Page 46: ...46 EN MEMO ...
Page 47: ...EN 47 ...

