background image

ENGLISH

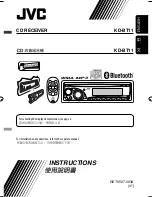
 KD-BT11

CD RECEIVER 

KD-BT11

  For canceling the display demonstration, see page 4.

For installation and connections, refer to the separate manual.

INSTRUCTIONS

GET0507-003A

[UT]

Cover_KD-BT11_003A_f.indd   1

Cover_KD-BT11_003A_f.indd   1

12/8/07   8:46:19 AM

12/8/07   8:46:19 AM

Summary of Contents for KD-BT11 - Radio / CD

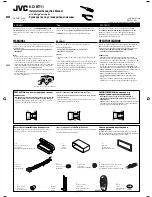
Page 1: ...ous à la page 4 For installation and connections refer to the separate manual Para la instalación y las conexiones refiérase al manual separado Pour l installation et les raccordements se référer au manuel séparé INSTRUCTIONS MANUAL DE INSTRUCCIONES MANUEL D INSTRUCTIONS GET0506 001A J For customer Use Enter below the Model No and Serial No which are located on the top or bottom of the cabinet Ret...

Page 2: ... the equipment and receiver Connect the equipment into an outlet on a circuit different from that to which the receiver is connected Consult the dealer or an experienced radio TV technician for help Caution Changes or modifications not approved by JVC could void the user s authority to operate the equipment IMPORTANT FOR LASER PRODUCTS 1 CLASS 1 LASER PRODUCT 2 CAUTION Do not open the top cover Th...

Page 3: ... noise compared with other sources Lower the volume before playing a disc to avoid damaging the speakers by the sudden increase of the output level CONTENTS INTRODUCTIONS Preparation 4 OPERATIONS Basic operations 5 Using the control panel 5 Using the remote controller RM RK50 6 Listening to the radio 8 Disc operations 9 Using the Bluetooth devices 10 Using the Bluetooth cellular phone 12 Using the...

Page 4: ...ack number with the clock time Album name performer folder name 3 Track title file name 3 back to the beginning BLUETOOTH Current track number with the elapsed playing time Current track number with the clock time Album name performer Track title back to the beginning HD RADIO Clock Call Sign 4 Frequency Title artist album name of the current segment 5 back to the beginning SIRIUS XM Clock Categor...

Page 5: ...ormorefeatures seepage15 2 Youcannotselectthesesourcesiftheyarenotready ornotconnected 3 Forstoringpresetphonenumber seepage14 1 FM AM Select preset station HD RADIO Select channel SIRIUS XM Select category CD CD CH Select folder IPOD Enter the main menu Pause playback Confirm selection 2 Eject disc 3 Turn on the power Turn off the power Hold Attenuate the sound if the power is on 4 Volume control...

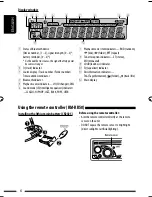
Page 6: ... 5 signal strength 0 3 battery reminder 0 3 Asthenumberincreases thesignal batterypower becomesstronger 2 Tr track indicator 3 Source display Track number Folder number Time countdown indicator 4 Bluetooth indicator 5 Playback source indicators CH CD changer DISC 6 Sound mode iEQ intelligent equalizer indicators CLASSIC HIP HOP JAZZ ROCK POPS USER 7 Playback mode item indicators RND random disc fo...

Page 7: ...calls if pressed and held 7 Searches for stations if pressed briefly Fast forwards or reverses the track if pressed and held Changes the tracks if pressed briefly While listening to the satellite radio Changes the channels if pressed briefly Changes the channels rapidly if pressed and held While listening to an iPod in menu selecting mode Selects an item if pressed briefly Then press D to confirm ...

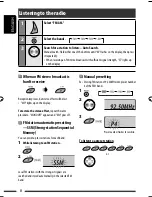
Page 8: ...ss it repeatedly When receiving an FM stereo broadcast with sufficient signal strength ST lights up on the display When an FM stereo broadcast is hard to receive Reception improves but stereo effect will be lost MO lights up on the display To restore the stereo effect repeat the same procedure MONO OFF appears and MO goes off FM station automatic presetting SSM Strong station Sequential Memory You...

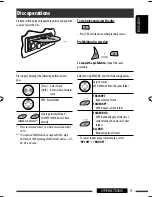
Page 9: ...rectly 1 Presstoselectnumber1to6 holdtoselectnumber7 to12 2 Itisrequiredthatfoldersbeassignedwith2 digit numbersatthebeginningoftheirfoldernames 01 02 03 andsoon All tracks will be played repeatedly until you change the source or eject the disc After pressing M MODE press the following buttons Skip 10 tracks MP3 WMA Within the same folder TRACK RPT Repeat current track FOLDER RPT MP3 Repeat curren...

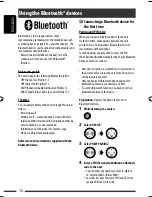
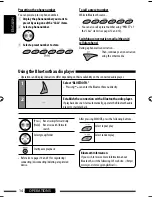
Page 10: ...he unit You can enter any number you like 1 digit to 16 digit number Initial 0000 SomedeviceshavetheirownPINcode Enterthe specifiedPINcodetotheunit Using the Bluetooth devices Bluetooth is a short range wireless radio communication technology for the mobile device such as mobile phones portable PCs and other devices The Bluetooth devices can be connected without cables and communicate with each ot...

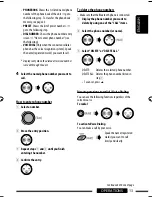
Page 11: ...PHONE or CNNCT AUDIO or activate AUTO CNNCT to connect the same device from next time on See the following and page 26 Deleting a registered device Perform steps 1 and 2 on page 10 then 1 Select DELETE PAIR 2 Select a device you want to delete then select YES Connecting a registered device PHONE AUDIO Perform steps 1 and 2 on page 10 then 1 Select CNNCT PHONE or CNNCT AUDIO 2 Select a device you w...

Page 12: ...ring a waiting call If your cellular phone is equipped with the call waiting function you can put the current call on hold and answer the waiting call Press any button except and 0 To restore the on hold call press any button except and 0 again When you end one call you can connect to the other When a text message comes in If the cellular phone is compatible with text message notification via Blue...

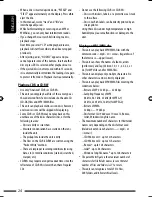
Page 13: ...ant to call How to enter phone number 1 Select a number 2 Move the entry position 3 Repeat steps 1 and 2 until you finish entering the number 4 Confirm the entry To delete the phone numbers Make sure that the Bluetooth phone is connected 1 Display the phone number you want to delete by using one of the CALL items 2 Select the phone number or name 3 Select DELETE or DELETE ALL DELETE Deletes the se...

Page 14: ...cting deleting a registered device After pressing M MODE press the following buttons Select repeat play Select random play Bluetooth Information If you wish to receive more information about Bluetooth visit the following JVC web site http www jvc victor co jp english car To call a preset number While in Bluetooth source You can also call a preset number using PRESET of the CALL items see page 13 S...

Page 15: ...er This setting cannot take effect for the conventional FM AM stations If the radio station forces the reception mode to digital HOLD flashes HD Station Call Sign appears Lights up When digital audio is broadcast Flashes When analog audio is broadcast Channel number First four letters of Call Sign HD Lights up When holding the digital reception Flashes When holding the analog reception Listening t...

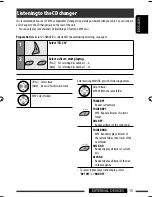
Page 16: ...all tracks of current disc ALL RND Randomly play all tracks of the discs in the magazine To cancel repeat play or random play select RPT OFF or RND OFF Listening to the CD changer It is recommended to use a JVC MP3 compatible CD changer separately purchased with your unit You can connect a CD changer to the CD changer jack on the rear of the unit You can only play conventional CDs including CD Tex...

Page 17: ...ally 3 Check your XM Satellite radio ID labelled on the casing of the XMDirect Universal Tuner Box or tune in to Channel 0 see page 18 4 Contact XM Satellite radio on the internet at http xmradio com activation to activate your subscription or you can call 1 800 XM RADIO 1 800 967 2346 Once completed the unit tunes in to one of the available channels Channel 4 or higher Before operating connect ei...

Page 18: ...15 seconds category selected in step 3 is canceled You can select all channels of all categories now including non categorised channels Storing channels in memory You can preset six channels for each band Ex Storing channels into preset number 4 1 Tune in to a channel you want 2 Checking the XM Satellite radio ID While selecting XM1 XM2 or XM3 select Channel 0 The display alternately shows RADIO I...

Page 19: ...Press Select tracks Hold Reverse fast forward track After pressing M MODE press the following buttons ONE RPT Functions the same as Repeat One of the iPod ALL RPT Functions the same as Repeat All of the iPod ALBUM RND Functions the same as Shuffle Albums of the iPod SONG RND Functions the same as Shuffle Songs of the iPod To cancel repeat play or random play select RPT OFF or RND OFF Functionsonly...

Page 20: ...put Adapter KS U58 Preparation Make sure EXT INPUT is selected for the external input setting see page 25 AUX auxiliary input jack on the control panel 1 Select EXT INPUT or AUX IN 2 Turn on the connected component and start playing the source 3 Adjust the volume 4 Adjust the sound as you want see pages 21 and 22 Connecting an external component to the AUX input jack 3 5 mm 3 16 stereo mini plug n...

Page 21: ...Fix OFF ROCK 100 Hz 03 Q1 0 1 0 kHz 00 Q1 25 10 0 kHz 02 Fix CLASSIC 80 Hz 01 Q1 25 1 0 kHz 00 Q1 25 10 0 kHz 03 Fix POP 100 Hz 02 Q1 25 1 0 kHz 01 Q1 25 10 0 kHz 02 Fix HIP HOP 60 Hz 04 Q1 0 1 0 kHz 02 Q1 0 10 0 kHz 01 Fix JAZZ 80 Hz 03 Q1 25 1 0 kHz 00 Q1 25 10 0 kHz 03 Fix Freq Frequency Q Quality slope Storing your own sound mode You can adjust the sound modes and store your own adjustments in...

Page 22: ...VOLUME Adjust the volume 00 to 50 or 00 to 30 5 1 Displayedonlywhen L OMODE issetto SUB W seepage24 2 Ifyouareusingatwo speakersystem setthefader levelto 00 3 Thisadjustmentwillnotaffectthesubwooferoutput 4 Loudnesssettingwillbeappliedtoallsoundmodes 5 Dependingontheamplifiergaincontrolsetting See page25fordetails 3 Adjust the quality slope Q Sound elements Range selectable items BASS MID TRE Freq...

Page 23: ...OFF The display demonstration will be activated automatically if no operation is done for about 20 seconds 4 Cancels CLOCK DISP 1 Clock display CLOCK ON CLOCK OFF The clock time is always shown on the display when the power is turned off Cancels pressing DISP will show the clock time for about 5 seconds when the power is turned off 4 CLOCK HOUR Hour adjustment 1 12 Initial 1 1 00 4 CLOCK MIN Minut...

Page 24: ...ng at 5 second intervals Cancels Pressing DISP for more than one second can scroll the display regardless of the setting L O MODE Line output mode REAR SUB W Select if the REAR LINE OUT terminals are used for connecting the rear speakers through an external amplifier Select if the REAR LINE OUT terminals are used for connecting a subwoofer through an external amplifier SUB W FREQ 7 Subwoofer cutof...

Page 25: ...mediate frequency band AUTO WIDE Increases the tuner selectivity to reduce interference noises between adjacent stations Stereo effect may be lost Subject to interference noises from adjacent stations but sound quality will not be degraded and the stereo effect will remain AREA Tuner channel interval AREA US AREA EU AREA SA When using in North Central South America AM FM intervals are set to 10 kH...

Page 26: ...DRESS Address of the unit VERSION Hardware and software versions of the Bluetooth module PHONE NAME 2 Name of the connected Bluetooth phone AUDIO NAME 2 Name of the connected Bluetooth audio player 1 IftheconnectedBluetoothphonedoesnotsupport textmessagenotification viaBluetooth theunitwill notreceiveanynotificationuponthearrivalofatext message 2 AppearsonlywhenaBluetoothphone audioplayeris connec...

Page 27: ...f you turn off the power while listening to a track playback will start from where it had been stopped previously next time you turn on the power Tuner operations Storing stations in memory During SSM search All previously stored stations are erased and the stations are stored anew Received stations are preset in No 1 lowest frequency to No 6 highest frequency When SSM is over the station stored i...

Page 28: ... missing data etc or media conditions stained scratched warped etc CD RWs may require a longer readout time since the reflectance of CD RWs is lower than that of regular CDs Do not use the following CD Rs or CD RWs Discs with stickers labels or a protective seal stuck to the surface Discs on which labels can be directly printed by an ink jet printer Using these discs under high temperature or high...

Page 29: ...Error Connection The device is registered but the connection has failed Connect the device again See page 11 ERROR Try the operation again If ERROR appears again check if the device supports the function you have tried PLEASE WAIT The unit is preparing to use the Bluetooth function If the message does not disappear turn off and turn on the unit then connect the device again or reset the unit PLS R...

Page 30: ...r If the iPod does not play correctly please update your iPod software to the latest version For details about updating your iPod visit http www apple com When you turn on this unit the iPod is charged through this unit While the iPod is connected all operations from the iPod are disabled Perform all operations from this unit The text information may not be displayed correctly If the text informat...

Page 31: ...you used for recording Disc can neither be played back nor ejected Unlock the disc see page 9 Eject the disc forcibly see page 3 Disc sound is sometimes interrupted Stop playback while driving on rough roads Change the disc Check the cords and connections NO DISC appears on the display Insert a playable disc into the loading slot PLEASE and EJECT appear alternately on the display This occurs somet...

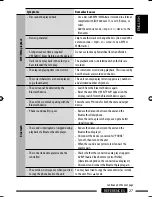
Page 32: ...vice Enter the same PIN code for both the unit and target device Phone sound quality is poor Reduce the distance between the unit and the Bluetooth cellular phone Move the car to a place where you can get a better signal reception The sound is interrupted or skipped during playback of a Bluetooth audio player Reduce the distance between the unit and the Bluetooth audio player Disconnect the device...

Page 33: ...d the CD changer correctly and press the reset button of the CD changer RESET 1 RESET 7 appears on the display Press the reset button of the CD changer The CD changer does not work at all Reset the unit see page 3 Satellite radio CALL 1 888 539 SIRIUS TO SUBSCRIBE scrolls on the display while listening to the SIRIUS Satellite radio Starts subscribing to SIRIUS Satellite radio see page 17 No sound ...

Page 34: ...play Satellite radio does not work at all Reconnect this unit and the satellite radio correctly and reset this unit iPod The iPod does not turn on or does not work Check the connecting cable and its connection Update the firmware version Charge the battery The sound is distorted Deactivate the equalizer either on this unit or the iPod NO IPOD appears on the display Check the connecting cable and i...

Page 35: ...c out holding it by the edges Always hold the disc by the edges Do not touch its recording surface When storing a disc in its case gently insert the disc around the center holder with the printed surface facing up Make sure to store discs in cases after use Connectors Center holder To keep discs clean A dirty disc may not play correctly If a disc does become dirty wipe it with a soft cloth in a st...

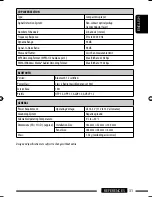
Page 36: ...bwoofer Out Level Impedance 2 5 V 20 kΩ load full scale Output Impedance 1 kΩ Other Terminal CD changer jack AUX auxiliary input jack Antenna input TUNER SECTION Frequency Range FM with channel interval set to 100 kHz or 200 kHz 87 5 MHz to 107 9 MHz with channel interval set to 50 kHz 87 5 MHz to 108 0 MHz AM with channel interval set to 10 kHz 530 kHz to 1 710 kHz with channel interval set to 9 ...

Page 37: ...ion Bluetooth 1 2 certified Power Class Class 2 Radio possible distance 10 m Service Area 10 m Profile HFP 1 5 OPP 1 1 A2DP 1 2 AVRCP 1 3 GENERAL Power Requirement Operating Voltage DC 14 4 V 11 V to 16 V allowance Grounding System Negative ground Allowable Operating Temperature 0 C to 40 C 32 F to 104 F Dimensions W H D approx Installation Size 182 mm 52 mm 160 mm 7 3 16 2 1 16 6 5 16 Panel Size ...

Page 38: ...th operation Please reset your unit Refer to page of How to reset your unit Still having trouble USA ONLY Call 1 800 252 5722 http www jvc com We can help you EN SP FR 1207DTSMDTJEIN 2007 Victor Company of Japan Limited ...

Page 39: ...es de instalar la unidad Asegúrese de volver a conectar a masa esta unidad al chasis del automóvil después de la instalación Notas Reemplace el fusible por uno con la corriente especificada Si el fusible se quemase frecuentemente consulte con su concesionario de JVC de equipos de audio para automóviles Se recomienda conectar altavoces que tengan una potencia máxima de más de 50 W tanto en las part...

Page 40: ...rear 2 Not supplied for this unit 1 Al poner la unidad vertical tenga cuidado de no dañar el fusible provisto en la parte posterior 2 No suministrado con esta unidad 1 Lorsque vous mettez l appareil à la verticale faire attention de ne pas endommager le fusible situé sur l arrière 2 Non fourni avec cet appareil TROUBLESHOOTING The fuse blows Are the red and black leads connected correctly Power ca...

Page 41: ... gauche avant Right speaker front Altavoz derecho frontal Enceinte droit avant Left speaker rear Altavoz izquierdo trasero Enceinte gauche arrière Right speaker rear Altavoz derecho trasero Enceinte droit arrière Purple Púrpura Violet Purple with black stripe Púrpura con rayas negras Violet avec bande noire Green Verde Vert Green with black stripe Verde con rayas negras Vert avec bande noire Gray ...

Page 42: ...off You can connect the following JVC components to the CD changer jack JVC component Model name CD changer CD CH CH X1500 etc HD RadioTM tuner box KT HD300 You can also connect the following components through the various JVC adapters Connection cords may need to be purchased separately Component Adapter Model name iPod Interface adapter for iPod KS PD100 XMDirectTM Universal Tuner Box Smart Digi...

Page 43: ...tions refer to the separate manual Pour l installation et les raccordements se référer au manuel séparé INSTRUCTIONS MANUEL D INSTRUCTIONS GET0508 003A EX EU For canceling the display demonstration see page 4 Pour annuler la démonstration des affichages référez vous à la page 4 ...

Page 44: ...Richtlinie 1999 5 EG befindet Wien Con la presente JVC dichiara che questo KD BT11 è conforme ai requisiti essenziali ed alle altre disposizioni pertinenti stabilite dalla direttiva 1999 5 CE Français Malti Par la présente JVC déclare que l appareil KD BT11 est conforme aux exigences essentielles et aux autres dispositions pertinentes de la directive 1999 5 CE Hawnhekk JVC jiddikjara li dan KD BT1...

Page 45: ...v og øvrige relevante krav i direktiv 1999 5 EF Niniejszym JVC oświadcza że KD BT11 jest zgodny z zasadniczymi wymogami oraz pozostałymi stosownymi postanowieniami Dyrektywy 1999 5 EC Cesky Slovensko JVC tímto prohlašuje že tento KD BT11 je ve shode se základními požadavky a dalšími príslušnými ustanoveními smernice 1999 5 ES JVC izjavlja da je ta KD BT11 v skladu z bistvenimi zahtevami in ostalim...

Page 46: ... rules in your country and municipality By disposing of this product correctly you will help to conserve natural resources and will help prevent potential negative effects on the environment and human health Note Only for EX model users in UK and European countries For security reasons a numbered ID card is provided with this unit and the same ID number is imprinted on the unit s chassis Keep the ...

Page 47: ...ared with other sources Lower the volume before playing a disc to avoid damaging the speakers by the sudden increase of the output level CONTENTS INTRODUCTIONS Preparation 4 OPERATIONS Basic operations 5 Using the control panel 5 Listening to the radio 6 Disc operations 9 Using the Bluetooth devices 10 Using the Bluetooth cellular phone 12 Using the Bluetooth audio player 15 EXTERNAL DEVICES Liste...

Page 48: ...Text Current track number with the elapsed playing time Current track number with the clock time Disc title performer 1 Track title 1 back to the beginning MP3 WMA Current track number with the elapsed playing time Current track number with the clock time Album name performer folder name 2 Track title file name 2 back to the beginning BLUETOOTH Current track number with the elapsed playing time Cu...

Page 49: ...dy ornotconnected 2 Forstoringpresetphonenumber seepage14 1 DAB Select DAB service CD CD CH Select folder IPOD Enter the main menu Pause playback Confirm selection 2 Eject disc 3 Turn on the power Turn off the power Hold Attenuate the sound if the power is on 4 Volume control Turn 5 FM AM Select the bands BLUETOOTH AUDIO Start playback 6 Loading slot 7 Display window 8 Activate deactivate TA Stand...

Page 50: ...indicators ST stereo MO monaural 8 LOUD loudness indicator 9 EQ equalizer indicator p Disc information indicators TAG Tag information folder track file q Playback source indicators CH CD changer DISC w Sound mode iEQ intelligent equalizer indicators CLASSIC HIP HOP JAZZ ROCK POPS USER e Main display Listening to the radio 1 Select FM AM 2 Select the bands 3 Search for a station to listen Auto Sear...

Page 51: ...broadcasting a programme of the same PTY code as you have selected that station is tuned in When an FM stereo broadcast is hard to receive Reception improves but stereo effect will be lost MO lights up on the display To restore the stereo effect repeat the same procedure MONO OFF appears and MO goes off FM station automatic presetting SSM Strong station Sequential Memory You can preset up to six s...

Page 52: ...lashes TA Standby Reception is not yet activated This occurs when you are listening to an FM station without the RDS signals required for TA Standby Reception To activate TA Standby Reception tune in to another station providing these signals The TP indicator will stop flashing and remain lit To deactivate the TA Standby Reception The TP indicator goes off PTY Standby Reception PTY Standby Recepti...

Page 53: ...from the FM RDS preset station are not sufficient for good reception this unit using the AF data tunes in to another frequency broadcasting the same programme as the original preset station is broadcasting The unit takes some time to tune in to another station using programme search See also page 25 PTY codes NEWS AFFAIRS INFO SPORT EDUCATE DRAMA CULTURE SCIENCE VARIED POP M music ROCK M music EAS...

Page 54: ...cate particular folder 2 for MP3 WMA disc or track directly 1 Presstoselectnumber1to6 holdtoselectnumber7 to12 2 Itisrequiredthatfoldersbeassignedwith2 digit numbersatthebeginningoftheirfoldernames 01 02 03 andsoon After pressing M MODE press the following buttons Skip 10 tracks MP3 WMA Within the same folder TRACK RPT Repeat current track FOLDER RPT MP3 Repeat current folder FOLDER RND MP3 Random...

Page 55: ...its Bluetooth function 1 While listening to a source 2 Select DEVICE 3 Select NEW PAIRING Continuedonthenextpage 4 Enter a PIN Personal Identification Number code to the unit You can enter any number you like 1 digit to 16 digit number Initial 0000 SomedeviceshavetheirownPINcode Enterthe specifiedPINcodetotheunit 1 Move to the next or previous number position 2 Select a number 3 Repeat steps 1 and...

Page 56: ... turned on See AUTO CNNCT on page 27 Disconnecting a device PHONE AUDIO Perform steps 1 and 2 on page 11 then Select DISCN PHONE or DISCN AUDIO DISCONNECT appears on the display Using the Bluetooth cellular phone 1 Establish the connection with a device see page 11 2 Enter Bluetooth menu 3 Select CALL then make a call or settings using the SETTINGS menu See the following and page 27 Deleting a reg...

Page 57: ...ation via Bluetooth and MSG NOTICE message notice is set to ON see page 27 the unit rings and RCV MESSAGE receiving message appears on the display to inform you of the message arrival You cannot read edit or send a text message through the unit Making a call 1 While listening to a source 2 Select CALL 3 Select a method to make a call DIALED Shows the phone numbers you have dialed go to the followi...

Page 58: ...ions to redial Voice Dialing You can use the following functions regardless of the current source To redial To activate Voice Dialing You can make a call by your voice Presetting the phone number You can preset up to six phone numbers 1 Display the phone number you want to preset by using one of the CALL items 2 Select a phone number 3 Select a preset number to store To call a preset number While ...

Page 59: ...art automatically operate the Bluetooth audio player to start playback Press Reverse skip forward skip Hold Reverse search forward search Select group folder Start pause playback Refer also to page 12 for registering connecting disconnecting deleting a registered device After pressing M MODE press the following buttons Select repeat play Select random play Bluetooth Information If you wish to rece...

Page 60: ...all tracks of current disc ALL RND Randomly play all tracks of the discs in the magazine To cancel repeat play or random play select RPT OFF or RND OFF Listening to the CD changer It is recommended to use a JVC MP3 compatible CD changer separately purchased with your unit You can connect a CD changer to the CD changer jack on the rear of the unit You can only play conventional CDs including CD Tex...

Page 61: ...ss Select tracks Hold Reverse fast forward track After pressing M MODE press the following buttons ONE RPT Functions the same as Repeat One of the iPod ALL RPT Functions the same as Repeat All of the iPod ALBUM RND Functions the same as Shuffle Albums of the iPod SONG RND Functions the same as Shuffle Songs of the iPod To cancel repeat play or random play select RPT OFF or RND OFF Functionsonlyify...

Page 62: ...sound without any annoying interference and signal distortion When transmitting DAB combines several programmes called services to form one ensemble In addition each service called primary service can also be divided into its components called secondary service A typical ensemble has six or more programmes services broadcast at the same time By connecting the DAB tuner this unit can do the followi...

Page 63: ...Tracing the same programme Alternative Frequency Reception You can keep listening to the same programme by activating the Alternative Frequency Reception While receiving a DAB service When driving in an area where a service cannot be received this unit automatically tunes in to another ensemble or FM RDS station broadcasting the same programme While receiving an FM RDS station When driving in an a...

Page 64: ...Adapter KS U58 Preparation Make sure EXT INPUT is selected for the external input setting see page 26 AUX auxiliary input jack on the control panel 1 Select EXT INPUT or AUX IN 2 Turn on the connected component and start playing the source 3 Adjust the volume 4 Adjust the sound as you want see pages 22 24 Connecting an external component to the AUX input jack 3 5 mm stereo mini plug not supplied P...

Page 65: ...h other metallic materials Do not poke the battery with tweezers or similar tools Wrap the battery with tape and insulate when throwing away or saving it Remote sensor 1 Turns the power on if pressed briefly or attenuates the sound when the power is on Turns the power off if pressed and held 2 Changes the FM AM DAB bands with 5 U Changes the preset stations or DAB services with D Changes the folde...

Page 66: ... menu selecting mode Selects an item if pressed briefly Then press D to confirm the selection Skips 10 items at a time if pressed and held Reverse skip forward skip for Bluetooth audio Storing your own sound mode You can adjust the sound modes and store your own adjustments in memory The adjustment you make will be stored for the currently selected sound mode iEQ including USER 1 Select a sound mo...

Page 67: ...LOUD 4 loudness Boost low and high frequencies to produce a well balanced sound at a low volume level LOUD ON or LOUD OFF SUB W 1 subwoofer Adjust the subwoofer output level 00 to 08 initial 04 VOL ADJ volume adjust Adjust the volume level of each source except FM compared to the FM volume level The volume level will automatically increase or decrease when you change the source Before making an ad...

Page 68: ...e is always shown on the display when the power is turned off Cancels pressing DISP will show the clock time for about 5 seconds when the power is turned off 4 CLOCK HOUR Hour adjustment 0 23 1 12 Initial 0 0 00 4 CLOCK MIN Minute adjustment 00 59 Initial 00 0 00 4 Preset value setting for each sound mode Sound mode Preset value BASS bass MID mid range TRE treble LOUD loudness Freq Level Q Freq Le...

Page 69: ...g the same programme The AF and REG indicators light up Cancels not selectable when DAB AF is set to AF ON PTY STANDBY 2 PTY standby OFF PTY codes Activates PTY Standby Reception with one of the PTY codes 8 TA VOLUME 2 Traffic announcement volume VOLUME 00 VOLUME 50 or VOLUME 00 VOLUME 30 3 Initial VOLUME 15 P SEARCH 2 Programme search ON OFF Activates Programme Search 9 Cancels DAB AF 4 Alternati...

Page 70: ...ther 0 DEG or 180 DEG which reproduces a better sound EXT INPUT 7 External input CHANGER EXT INPUT To connect a JVC CD changer 16 or an Apple iPod 17 To connect portable audio player to the CD changer jack 20 TAG DISPLAY Tag display TAG ON TAG OFF Shows the Tag information while playing MP3 WMA tracks Cancels AMP GAIN Amplifier gain control LOW POWER HIGH POWER VOLUME 00 VOLUME 30 Select this if t...

Page 71: ...s ADDRESS Address of the unit VERSION Hardware and software versions of the Bluetooth module PHONE NAME 2 Name of the connected Bluetooth phone AUDIO NAME 2 Name of the connected Bluetooth audio player 1 IftheconnectedBluetoothphonedoesnotsupport textmessagenotification viaBluetooth theunitwill notreceiveanynotificationuponthearrivalofatext message 2 AppearsonlywhenaBluetoothphone audioplayeris co...

Page 72: ...hout deactivating Alternative Frequency Reception See page 25 If you want to know more about RDS visit http www rds org uk Disc operations Caution for DualDisc playback The Non DVD side of a DualDisc does not comply with the Compact Disc Digital Audio standard Therefore the use of Non DVD side of a DualDisc on this product may not be recommended General This unit has been designed to reproduce CDs...

Page 73: ...MPEG 2 Bit rate of WMA 32 kbps 192 kbps Disc format ISO 9660 Level 1 Level 2 Romeo Joliet Windows long file name The maximum number of characters for file folder names vary depending on the disc format used includes 4 extension characters mp3 or wma ISO 9660 Level 1 up to 12 characters ISO 9660 Level 2 up to 31 characters Romeo up to 128 characters Joliet up to 64 characters Windows long file name...

Page 74: ...lick Wheel 4th Generation iPod mini iPod photo iPod nano 1 iPod video 5th Generation 2 1 WhenyouconnecttheiPodnanototheinterface adapter besuretodisconnecttheheadphones otherwise nosoundisheard 2 Itisnotpossibletobrowsevideofilesonthe Videos menuwhiletheiPodisconnectedtothe interfaceadapter If the iPod does not play correctly please update your iPod software to the latest version For details about...

Page 75: ...Disc can neither be played back nor ejected Unlock the disc see page 9 Eject the disc forcibly see page 3 Disc sound is sometimes interrupted Stop playback while driving on rough roads Change the disc Check the cords and connections NO DISC appears on the display Insert a playable disc into the loading slot PLEASE and EJECT appear alternately on the display This occurs sometimes due to over heatin...

Page 76: ...can get a better signal reception The sound is interrupted or skipped during playback of a Bluetooth audio player Reduce the distance between the unit and the Bluetooth audio player Disconnect the device connected for PHONE Turn off then turn on the unit When the sound is not yet restored Connect the player again The connected audio player cannot be controlled Check whether the connected audio pla...

Page 77: ...ck Restart the playback operation see page 17 No sound can be heard when connecting an iPod nano Disconnect the headphones from the iPod nano Update the firmware version of the iPod nano NO FILES appears on the display No tracks are stored Import tracks to the iPod RESET 1 RESET 7 appears on the display Disconnect the adapter from both this unit and iPod Then connect it again RESET 8 appears on th...

Page 78: ...out holding it by the edges Always hold the disc by the edges Do not touch its recording surface When storing a disc in its case gently insert the disc around the center holder with the printed surface facing up Make sure to store discs in cases after use Connectors Center holder To keep discs clean A dirty disc may not play correctly If a disc does become dirty wipe it with a soft cloth in a stra...

Page 79: ...eting Sensitivity 16 3 dBf 1 8 μV 75 Ω Alternate Channel Selectivity 400 kHz 65 dB Frequency Response 40 Hz to 15 000 Hz Stereo Separation 30 dB MW Tuner Sensitivity Selectivity 20 μV 35 dB LW Tuner Sensitivity 50 μV CD PLAYER SECTION Type Compact disc player Signal Detection System Non contact optical pickup semiconductor laser Number of Channels 2 channels stereo Frequency Response 5 Hz to 20 00...

Page 80: ... compatibility and electrical safety European representative of Victor Company of Japan Limited is JVC Technology Centre Europe GmbH Company name changed in JVC Technical Services Europe GmbH Postfach 10 05 52 61145 Friedberg Germany Cher e client e Cet appareil est conforme aux directives et normes européennes en vigueur concernant la compatibilité électromagnétique et à la sécurité électrique Re...

Page 81: ...otre revendeur d autoradios JVC Il est recommandé de connecter des enceintes avec une puissance maximum de plus de 50 W à l arrière et à l avant et avec une impédance de 4 Ω à 8 Ω Si la puissance maximum est inférieure à 50 W changez AMP GAIN pour éviter d endommager vos enceintes voir page 26 du MANUEL D INSTRUCTIONS Pour éviter les courts circuits recouvrez les extrémités des fils INUTILISÉS ave...

Page 82: ...onger screws are used they could damage the unit Remarque Lors de l installation de l appareil sur le support de montage s assurer d utiliser des vis d une longueur de 8 mm Si des vis plus longues sont utilisées elles peuvent endommager l appareil Screw option Vis en option Stay option Hauban en option Fire wall Cloison Dashboard Tableau de bord Install the unit at an angle of less than 30 Install...

Page 83: ...ier le fonctionnement de cet appareil avant installation ce fil doit être raccordé sinon l appareil ne peut pas être mis sous tension Connecting to the steering wheel remote controller Connexion de la télécommande de volant If your car is equipped with the steering wheel remote controller you can operate this unit using the controller To do it a JVC s OE remote adapter not supplied which matches w...

Page 84: ...à distance 4 Attachez solidement le fil de mise à la masse au châssis métallique de la voiture à un endroit qui n est pas recouvert de peinture s il est recouvert de peinture enlevez d abord la peinture avant d attacher le fil L appareil peut être endommagé si cela n est pas fait correctement 5 Coupez les fils des enceintes arrière du connecteur ISO de la voiture et connectez les à l amplificateur...

Page 85: ... und die Anschlüsse siehe das eigenständige Handbuch Указания по установке и выполнению соединений приводятся в отдельной инструкции INSTRUCTIONS BEDIENUNGSANLEITUNG ИНСТРУКЦИИ ПО ЭКСПЛУАТАЦИИ GET0508 006A EY For canceling the display demonstration see page 4 Zum Abbrechen der Displaydemonstration siehe Seite 4 Информацию об отмене демонстрации функций дисплея см на стр 4 ...

Page 86: ...Richtlinie 1999 5 EG befindet Wien Con la presente JVC dichiara che questo KD BT11 è conforme ai requisiti essenziali ed alle altre disposizioni pertinenti stabilite dalla direttiva 1999 5 CE Français Malti Par la présente JVC déclare que l appareil KD BT11 est conforme aux exigences essentielles et aux autres dispositions pertinentes de la directive 1999 5 CE Hawnhekk JVC jiddikjara li dan KD BT1...

Page 87: ...v og øvrige relevante krav i direktiv 1999 5 EF Niniejszym JVC oświadcza że KD BT11 jest zgodny z zasadniczymi wymogami oraz pozostałymi stosownymi postanowieniami Dyrektywy 1999 5 EC Cesky Slovensko JVC tímto prohlašuje že tento KD BT11 je ve shode se základními požadavky a dalšími príslušnými ustanoveními smernice 1999 5 ES JVC izjavlja da je ta KD BT11 v skladu z bistvenimi zahtevami in ostalim...

Page 88: ...national legislation or other rules in your country and municipality By disposing of this product correctly you will help to conserve natural resources and will help prevent potential negative effects on the environment and human health For security reasons a numbered ID card is provided with this unit and the same ID number is imprinted on the unit s chassis Keep the card in a safe place as it wi...

Page 89: ...ared with other sources Lower the volume before playing a disc to avoid damaging the speakers by the sudden increase of the output level CONTENTS INTRODUCTIONS Preparation 4 OPERATIONS Basic operations 5 Using the control panel 5 Listening to the radio 6 Disc operations 9 Using the Bluetooth devices 10 Using the Bluetooth cellular phone 12 Using the Bluetooth audio player 15 EXTERNAL DEVICES Liste...

Page 90: ...Text Current track number with the elapsed playing time Current track number with the clock time Disc title performer 1 Track title 1 back to the beginning MP3 WMA Current track number with the elapsed playing time Current track number with the clock time Album name performer folder name 2 Track title file name 2 back to the beginning BLUETOOTH Current track number with the elapsed playing time Cu...

Page 91: ...dy ornotconnected 2 Forstoringpresetphonenumber seepage14 1 DAB Select DAB service CD CD CH Select folder IPOD Enter the main menu Pause playback Confirm selection 2 Eject disc 3 Turn on the power Turn off the power Hold Attenuate the sound if the power is on 4 Volume control Turn 5 FM AM Select the bands BLUETOOTH AUDIO Start playback 6 Loading slot 7 Display window 8 Activate deactivate TA Stand...

Page 92: ...indicators ST stereo MO monaural 8 LOUD loudness indicator 9 EQ equalizer indicator p Disc information indicators TAG Tag information folder track file q Playback source indicators CH CD changer DISC w Sound mode iEQ intelligent equalizer indicators CLASSIC HIP HOP JAZZ ROCK POPS USER e Main display Listening to the radio 1 Select FM AM 2 Select the bands 3 Search for a station to listen Auto Sear...

Page 93: ...broadcasting a programme of the same PTY code as you have selected that station is tuned in When an FM stereo broadcast is hard to receive Reception improves but stereo effect will be lost MO lights up on the display To restore the stereo effect repeat the same procedure MONO OFF appears and MO goes off FM station automatic presetting SSM Strong station Sequential Memory You can preset up to six s...

Page 94: ...lashes TA Standby Reception is not yet activated This occurs when you are listening to an FM station without the RDS signals required for TA Standby Reception To activate TA Standby Reception tune in to another station providing these signals The TP indicator will stop flashing and remain lit To deactivate the TA Standby Reception The TP indicator goes off PTY Standby Reception PTY Standby Recepti...

Page 95: ...from the FM RDS preset station are not sufficient for good reception this unit using the AF data tunes in to another frequency broadcasting the same programme as the original preset station is broadcasting The unit takes some time to tune in to another station using programme search See also page 25 PTY codes NEWS AFFAIRS INFO SPORT EDUCATE DRAMA CULTURE SCIENCE VARIED POP M music ROCK M music EAS...

Page 96: ...cate particular folder 2 for MP3 WMA disc or track directly 1 Presstoselectnumber1to6 holdtoselectnumber7 to12 2 Itisrequiredthatfoldersbeassignedwith2 digit numbersatthebeginningoftheirfoldernames 01 02 03 andsoon After pressing M MODE press the following buttons Skip 10 tracks MP3 WMA Within the same folder TRACK RPT Repeat current track FOLDER RPT MP3 Repeat current folder FOLDER RND MP3 Random...

Page 97: ...its Bluetooth function 1 While listening to a source 2 Select DEVICE 3 Select NEW PAIRING Continuedonthenextpage 4 Enter a PIN Personal Identification Number code to the unit You can enter any number you like 1 digit to 16 digit number Initial 0000 SomedeviceshavetheirownPINcode Enterthe specifiedPINcodetotheunit 1 Move to the next or previous number position 2 Select a number 3 Repeat steps 1 and...

Page 98: ... turned on See AUTO CNNCT on page 27 Disconnecting a device PHONE AUDIO Perform steps 1 and 2 on page 11 then Select DISCN PHONE or DISCN AUDIO DISCONNECT appears on the display Using the Bluetooth cellular phone 1 Establish the connection with a device see page 11 2 Enter Bluetooth menu 3 Select CALL then make a call or settings using the SETTINGS menu See the following and page 27 Deleting a reg...

Page 99: ...ation via Bluetooth and MSG NOTICE message notice is set to ON see page 27 the unit rings and RCV MESSAGE receiving message appears on the display to inform you of the message arrival You cannot read edit or send a text message through the unit Making a call 1 While listening to a source 2 Select CALL 3 Select a method to make a call DIALED Shows the phone numbers you have dialed go to the followi...

Page 100: ...ions to redial Voice Dialing You can use the following functions regardless of the current source To redial To activate Voice Dialing You can make a call by your voice Presetting the phone number You can preset up to six phone numbers 1 Display the phone number you want to preset by using one of the CALL items 2 Select a phone number 3 Select a preset number to store To call a preset number While ...

Page 101: ...art automatically operate the Bluetooth audio player to start playback Press Reverse skip forward skip Hold Reverse search forward search Select group folder Start pause playback Refer also to page 12 for registering connecting disconnecting deleting a registered device After pressing M MODE press the following buttons Select repeat play Select random play Bluetooth Information If you wish to rece...

Page 102: ...all tracks of current disc ALL RND Randomly play all tracks of the discs in the magazine To cancel repeat play or random play select RPT OFF or RND OFF Listening to the CD changer It is recommended to use a JVC MP3 compatible CD changer separately purchased with your unit You can connect a CD changer to the CD changer jack on the rear of the unit You can only play conventional CDs including CD Tex...

Page 103: ...ss Select tracks Hold Reverse fast forward track After pressing M MODE press the following buttons ONE RPT Functions the same as Repeat One of the iPod ALL RPT Functions the same as Repeat All of the iPod ALBUM RND Functions the same as Shuffle Albums of the iPod SONG RND Functions the same as Shuffle Songs of the iPod To cancel repeat play or random play select RPT OFF or RND OFF Functionsonlyify...

Page 104: ...sound without any annoying interference and signal distortion When transmitting DAB combines several programmes called services to form one ensemble In addition each service called primary service can also be divided into its components called secondary service A typical ensemble has six or more programmes services broadcast at the same time By connecting the DAB tuner this unit can do the followi...

Page 105: ...Tracing the same programme Alternative Frequency Reception You can keep listening to the same programme by activating the Alternative Frequency Reception While receiving a DAB service When driving in an area where a service cannot be received this unit automatically tunes in to another ensemble or FM RDS station broadcasting the same programme While receiving an FM RDS station When driving in an a...

Page 106: ...Adapter KS U58 Preparation Make sure EXT INPUT is selected for the external input setting see page 26 AUX auxiliary input jack on the control panel 1 Select EXT INPUT or AUX IN 2 Turn on the connected component and start playing the source 3 Adjust the volume 4 Adjust the sound as you want see pages 22 24 Connecting an external component to the AUX input jack 3 5 mm stereo mini plug not supplied P...

Page 107: ...h other metallic materials Do not poke the battery with tweezers or similar tools Wrap the battery with tape and insulate when throwing away or saving it Remote sensor 1 Turns the power on if pressed briefly or attenuates the sound when the power is on Turns the power off if pressed and held 2 Changes the FM AM DAB bands with 5 U Changes the preset stations or DAB services with D Changes the folde...

Page 108: ... menu selecting mode Selects an item if pressed briefly Then press D to confirm the selection Skips 10 items at a time if pressed and held Reverse skip forward skip for Bluetooth audio Storing your own sound mode You can adjust the sound modes and store your own adjustments in memory The adjustment you make will be stored for the currently selected sound mode iEQ including USER 1 Select a sound mo...

Page 109: ...LOUD 4 loudness Boost low and high frequencies to produce a well balanced sound at a low volume level LOUD ON or LOUD OFF SUB W 1 subwoofer Adjust the subwoofer output level 00 to 08 initial 04 VOL ADJ volume adjust Adjust the volume level of each source except FM compared to the FM volume level The volume level will automatically increase or decrease when you change the source Before making an ad...

Page 110: ...e is always shown on the display when the power is turned off Cancels pressing DISP will show the clock time for about 5 seconds when the power is turned off 4 CLOCK HOUR Hour adjustment 0 23 1 12 Initial 0 0 00 4 CLOCK MIN Minute adjustment 00 59 Initial 00 0 00 4 Preset value setting for each sound mode Sound mode Preset value BASS bass MID mid range TRE treble LOUD loudness Freq Level Q Freq Le...

Page 111: ...g the same programme The AF and REG indicators light up Cancels not selectable when DAB AF is set to AF ON PTY STANDBY 2 PTY standby OFF PTY codes Activates PTY Standby Reception with one of the PTY codes 8 TA VOLUME 2 Traffic announcement volume VOLUME 00 VOLUME 50 or VOLUME 00 VOLUME 30 3 Initial VOLUME 15 P SEARCH 2 Programme search ON OFF Activates Programme Search 9 Cancels DAB AF 4 Alternati...

Page 112: ...ther 0 DEG or 180 DEG which reproduces a better sound EXT INPUT 7 External input CHANGER EXT INPUT To connect a JVC CD changer 16 or an Apple iPod 17 To connect portable audio player to the CD changer jack 20 TAG DISPLAY Tag display TAG ON TAG OFF Shows the Tag information while playing MP3 WMA tracks Cancels AMP GAIN Amplifier gain control LOW POWER HIGH POWER VOLUME 00 VOLUME 30 Select this if t...

Page 113: ...s ADDRESS Address of the unit VERSION Hardware and software versions of the Bluetooth module PHONE NAME 2 Name of the connected Bluetooth phone AUDIO NAME 2 Name of the connected Bluetooth audio player 1 IftheconnectedBluetoothphonedoesnotsupport textmessagenotification viaBluetooth theunitwill notreceiveanynotificationuponthearrivalofatext message 2 AppearsonlywhenaBluetoothphone audioplayeris co...

Page 114: ...hout deactivating Alternative Frequency Reception See page 25 If you want to know more about RDS visit http www rds org uk Disc operations Caution for DualDisc playback The Non DVD side of a DualDisc does not comply with the Compact Disc Digital Audio standard Therefore the use of Non DVD side of a DualDisc on this product may not be recommended General This unit has been designed to reproduce CDs...

Page 115: ...MPEG 2 Bit rate of WMA 32 kbps 192 kbps Disc format ISO 9660 Level 1 Level 2 Romeo Joliet Windows long file name The maximum number of characters for file folder names vary depending on the disc format used includes 4 extension characters mp3 or wma ISO 9660 Level 1 up to 12 characters ISO 9660 Level 2 up to 31 characters Romeo up to 128 characters Joliet up to 64 characters Windows long file name...

Page 116: ...lick Wheel 4th Generation iPod mini iPod photo iPod nano 1 iPod video 5th Generation 2 1 WhenyouconnecttheiPodnanototheinterface adapter besuretodisconnecttheheadphones otherwise nosoundisheard 2 Itisnotpossibletobrowsevideofilesonthe Videos menuwhiletheiPodisconnectedtothe interfaceadapter If the iPod does not play correctly please update your iPod software to the latest version For details about...

Page 117: ...Disc can neither be played back nor ejected Unlock the disc see page 9 Eject the disc forcibly see page 3 Disc sound is sometimes interrupted Stop playback while driving on rough roads Change the disc Check the cords and connections NO DISC appears on the display Insert a playable disc into the loading slot PLEASE and EJECT appear alternately on the display This occurs sometimes due to over heatin...

Page 118: ...can get a better signal reception The sound is interrupted or skipped during playback of a Bluetooth audio player Reduce the distance between the unit and the Bluetooth audio player Disconnect the device connected for PHONE Turn off then turn on the unit When the sound is not yet restored Connect the player again The connected audio player cannot be controlled Check whether the connected audio pla...

Page 119: ...ck Restart the playback operation see page 17 No sound can be heard when connecting an iPod nano Disconnect the headphones from the iPod nano Update the firmware version of the iPod nano NO FILES appears on the display No tracks are stored Import tracks to the iPod RESET 1 RESET 7 appears on the display Disconnect the adapter from both this unit and iPod Then connect it again RESET 8 appears on th...

Page 120: ...out holding it by the edges Always hold the disc by the edges Do not touch its recording surface When storing a disc in its case gently insert the disc around the center holder with the printed surface facing up Make sure to store discs in cases after use Connectors Center holder To keep discs clean A dirty disc may not play correctly If a disc does become dirty wipe it with a soft cloth in a stra...

Page 121: ...eting Sensitivity 16 3 dBf 1 8 μV 75 Ω Alternate Channel Selectivity 400 kHz 65 dB Frequency Response 40 Hz to 15 000 Hz Stereo Separation 30 dB MW Tuner Sensitivity Selectivity 20 μV 35 dB LW Tuner Sensitivity 50 μV CD PLAYER SECTION Type Compact disc player Signal Detection System Non contact optical pickup semiconductor laser Number of Channels 2 channels stereo Frequency Response 5 Hz to 20 00...

Page 122: ...pe GmbH Company name changed in JVC Technical Services Europe GmbH Postfach 10 05 52 61145 Friedberg Germany Sehr geehrter Kunde sehr geehrte Kundin dieses Gerät stimmt mit den gültigen europäischen Richtlinien und Normen bezüglich elektromagnetischer Verträglichkeit und elektrischer Sicherheit überein Die europäische Vertretung für die Victor Company of Japan Limited ist JVC Technology Centre Eur...

Page 123: ...r mit einer Maximalleistung von mehr als 50 W anzuschließen sowohl hinten als auch vorne mit einer Impedanz von 4 Ω bis 8 Ω Wenn die Maximalleistung weniger als 50 W beträgt stellen Sie AMP GAIN anders ein um Schäden an den Lautsprechern zu vermeiden siehe Seite 26 der BEDIENUNGSANLEITUNG Um Kurzschlüsse zu verhindern die Klemmen der NICHT VERWENDETEN Leitungen mit Isolierband abdecken Der Kühlkör...

Page 124: ...alifizierten Techniker einbauen УСТАНОВКА УСТАНОВКА В ПРИБОРНУЮ ПАНЕЛЬ На следующих иллюстрациях показана типовая установка Если у Вас есть какие либо вопросы касающиеся установки обратитесь к Вашему дилеру автомобилнего специалиста JVC или в компанию поставляющую соответствующие принадлежности Если Вы не знаете точно как следует устанавливать это устройство обратитесь к квалифицированному специал...

Page 125: ...ver nicht einschaltet Если приемник не включается используйте преобразованную схему соединений 2 Modified wiring 2 Modifizierte Verdrahtung 2 Преобразованная схема соединений 2 Vor dem Anschließen Die Verdrahtung im Fahrzeug sorgfältig überprüfen Falsche Anschlüsse können ernsthafte Schäden am Gerät hervorrufen Die Leiter des Stromkabels und die Leiter des Anschlusses im Fahrzeug können sich farbl...

Page 126: ...ont speakers see diagram Vordere Lautsprecher siehe Schaltplan Передние громкоговорители см схему Rear speakers Hintere Lautsprecher Задние громкоговорители JVC Amplifier JVC Verstärker JVC усилитель JVC Amplifier JVC Verstärker JVC усилитель Subwoofer Subwoofer Низкочастотный динамик Set L O MODE to SUB W See page 26 of the INSTRUCTIONS Stellen Sie L O MODE auf SUB W siehe Seite 26 der BEDIENUNGS...

Page 127: ... представлять опасность для жизни здоровья потребителя причинять вред его имуществу или окружающей среде составляет семь 7 лет со дня производства Этот срок является временем в течение которого потребитель данного товара может безопасно им пользоваться при условии соблюдения инструкции по эксплуатации данного товара проводя необходимое обслуживание включающее замену расходных материалов и или соот...

Page 128: ...open Do not view directly with optical instruments 4 REPRODUCTION OF LABEL CAUTION LABEL PLACED OUTSIDE THE UNIT Warning If you need to operate the unit while driving be sure to look around carefully or you may be involved in a traffic accident For safety Do not raise the volume level too much as this will block outside sounds making driving dangerous Stop the car before performing any complicated...

Page 129: ...tons will automatically cancels the functions mode Caution on volume setting Discs produce very little noise compared with other sources Lower the volume before playing a disc to avoid damaging the speakers by the sudden increase of the output level CONTENTS INTRODUCTIONS Preparation 4 OPERATIONS Basic operations 5 Using the control panel 5 Listening to the radio 6 Disc operations 9 Using the Blue...

Page 130: ...ng FM RDS Station name PS Station Frequency Programme type PTY Clock back to the beginning CD Audio CD CD Text Current track number with the elapsed playing time Current track number with the clock time Disc title performer 1 Track title 1 back to the beginning MP3 WMA Current track number with the elapsed playing time Current track number with the clock time Album name performer folder name 2 Tra...

Page 131: ...otselect CD astheplaybacksourceifthere isnodiscintheunit 2 Forstoringpresetphonenumber seepage14 1 FM AM Select preset station CD Select folder 2 Eject disc 3 Turn on the power Turn off the power Hold Attenuate the sound if the power is on 4 Volume control Turn 5 FM AM Select the bands BLUETOOTH AUDIO Start playback 6 Loading slot 7 Display window 8 Activate deactivate TA Standby Reception Enter p...

Page 132: ...stereo MO monaural 8 LOUD loudness indicator 9 EQ equalizer indicator p Disc information indicators TAG Tag information folder track file q DISC indicator w Sound mode iEQ intelligent equalizer indicators CLASSIC HIP HOP JAZZ ROCK POPS USER e Main display Listening to the radio 1 Select FM AM 2 Select the bands 3 Search for a station to listen Auto Search Manual Search Hold either one of the butto...

Page 133: ... broadcasting a programme of the same PTY code as you have selected that station is tuned in When an FM stereo broadcast is hard to receive Reception improves but stereo effect will be lost MO lights up on the display To restore the stereo effect repeat the same procedure MONO OFF appears and MO goes off FM station automatic presetting SSM Strong station Sequential Memory You can preset up to six ...

Page 134: ...lashes TA Standby Reception is not yet activated This occurs when you are listening to an FM station without the RDS signals required for TA Standby Reception To activate TA Standby Reception tune in to another station providing these signals The TP indicator will stop flashing and remain lit To deactivate the TA Standby Reception The TP indicator goes off PTY Standby Reception PTY Standby Recepti...

Page 135: ...from the FM RDS preset station are not sufficient for good reception this unit using the AF data tunes in to another frequency broadcasting the same programme as the original preset station is broadcasting The unit takes some time to tune in to another station using programme search See also page 21 PTY codes NEWS AFFAIRS INFO SPORT EDUCATE DRAMA CULTURE SCIENCE VARIED POP M music ROCK M music EAS...

Page 136: ...cate particular folder 2 for MP3 WMA disc or track directly 1 Presstoselectnumber1to6 holdtoselectnumber7 to12 2 Itisrequiredthatfoldersbeassignedwith2 digit numbersatthebeginningoftheirfoldernames 01 02 03 andsoon After pressing M MODE press the following buttons Skip 10 tracks MP3 WMA Within the same folder TRACK RPT Repeat current track FOLDER RPT MP3 Repeat current folder FOLDER RND MP3 Random...

Page 137: ...its Bluetooth function 1 While listening to a source 2 Select DEVICE 3 Select NEW PAIRING Continuedonthenextpage 4 Enter a PIN Personal Identification Number code to the unit You can enter any number you like 1 digit to 16 digit number Initial 0000 SomedeviceshavetheirownPINcode Enterthe specifiedPINcodetotheunit 1 Move to the next or previous number position 2 Select a number 3 Repeat steps 1 and...

Page 138: ... turned on See AUTO CNNCT on page 22 Disconnecting a device PHONE AUDIO Perform steps 1 and 2 on page 11 then Select DISCN PHONE or DISCN AUDIO DISCONNECT appears on the display Using the Bluetooth cellular phone 1 Establish the connection with a device see page 11 2 Enter Bluetooth menu 3 Select CALL then make a call or settings using the SETTINGS menu See the following and page 22 Deleting a reg...

Page 139: ...ation via Bluetooth and MSG NOTICE message notice is set to ON see page 22 the unit rings and RCV MESSAGE receiving message appears on the display to inform you of the message arrival You cannot read edit or send a text message through the unit Making a call 1 While listening to a source 2 Select CALL 3 Select a method to make a call DIALED Shows the phone numbers you have dialed go to the followi...

Page 140: ...ions to redial Voice Dialing You can use the following functions regardless of the current source To redial To activate Voice Dialing You can make a call by your voice Presetting the phone number You can preset up to six phone numbers 1 Display the phone number you want to preset by using one of the CALL items 2 Select a phone number 3 Select a preset number to store To call a preset number While ...

Page 141: ...art automatically operate the Bluetooth audio player to start playback Press Reverse skip forward skip Hold Reverse search forward search Select group folder Start pause playback Refer also to page 12 for registering connecting disconnecting deleting a registered device After pressing M MODE press the following buttons Select repeat play Select random play Bluetooth Information If you wish to rece...

Page 142: ...xiliary input jack on the control panel 1 Select AUX IN 2 Turn on the connected component and start playing the source 3 Adjust the volume 4 Adjust the sound as you want see pages 18 and 19 Connecting an external component to the AUX input jack 3 5 mm stereo mini plug not supplied Portable audio player etc ...

Page 143: ...charge short disassemble heat the battery or dispose of it in a fire Do not leave the battery with other metallic materials Do not poke the battery with tweezers or similar tools Wrap the battery with tape and insulate when throwing away or saving it Remote sensor 1 Turns the power on if pressed briefly or attenuates the sound when the power is on Turns the power off if pressed and held 2 Changes ...

Page 144: ... 03 Q1 0 1 0 kHz 00 Q1 25 10 0 kHz 02 CLASSIC 80 Hz 01 Q1 25 1 0 kHz 00 Q1 25 10 0 kHz 03 POPS 100 Hz 02 Q1 25 1 0 kHz 01 Q1 25 10 0 kHz 02 HIP HOP 60 Hz 04 Q1 0 1 0 kHz 02 Q1 0 10 0 kHz 01 JAZZ 80 Hz 03 Q1 25 1 0 kHz 00 Q1 25 10 0 kHz 03 Freq Frequency Q Quality slope 2 Enter the adjustment mode This mode will be canceled if no operations are done for about 5 seconds 3 Select a tone Storing your ...

Page 145: ...6 to F06 BALANCE 3 Adjust the left and right speaker balance L06 to R06 LOUD 4 loudness Boost low and high frequencies to produce a well balanced sound at a low volume level LOUD ON or LOUD OFF SUB W 1 subwoofer Adjust the subwoofer output level 00 to 08 initial 04 VOL ADJ volume adjust Adjust the volume level of each source except FM compared to the FM volume level The volume level will automatic...

Page 146: ...sing DISP will show the clock time for about 5 seconds when the power is turned off 4 CLOCK HOUR Hour adjustment 0 23 1 12 Initial 0 0 00 4 CLOCK MIN Minute adjustment 00 59 Initial 00 0 00 4 24H 12H Time display mode 12 HOUR 24 HOUR See also page 4 for setting CLOCK ADJ 2 Clock adjustment AUTO OFF The built in clock is automatically adjusted using the clock data provided via the satellite radio c...

Page 147: ...MID HIGH Frequencies lower than 90 Hz are sent to the subwoofer Frequencies lower than 135 Hz are sent to the subwoofer Frequencies lower than 180 Hz are sent to the subwoofer SUB W PHASE 6 Subwoofer phase 180 DEG 0 DEG Select either 0 DEG or 180 DEG which reproduces a better sound TAG DISPLAY Tag display TAG ON TAG OFF Shows the Tag information while playing MP3 WMA tracks Cancels AMP GAIN Amplif...

Page 148: ...s MSG NOTICE message notice ON 1 The unit informs you of the arrival of a message by ringing and displaying RCV MESSAGE receiving message OFF The unit does not inform you of the arrival of a message MIC SETTING microphone setting Adjust the built in microphone volume LEVEL 01 02 03 PHONEBOOK Load the phone book of the Bluetooth phone to the unit You can load up to 50 phone numbers Before using thi...

Page 149: ...preset level When Alternative Frequency Reception is activated with AF selected Network Tracking Reception is also activated automatically If you want to know more about RDS visit http www rds org uk Disc operations Caution for DualDisc playback The Non DVD side of a DualDisc does not comply with the Compact Disc Digital Audio standard Therefore the use of Non DVD side of a DualDisc on this produc...

Page 150: ...s This unit can display only one byte characters No other characters can be correctly displayed This unit can play back MP3 WMA files meeting the conditions below Bit rate of MP3 32 kbps 320 kbps Sampling frequency of MP3 48 kHz 44 1 kHz 32 kHz for MPEG 1 24 kHz 22 05 kHz 16 kHz for MPEG 2 Bit rate of WMA 32 kbps 192 kbps Disc format ISO 9660 Level 1 Level 2 Romeo Joliet Windows long file name The...

Page 151: ...failed Connect the device again See page 12 ERROR Try the operation again If ERROR appears again check if the device supports the function you have tried PLEASE WAIT The unit is preparing to use the Bluetooth function If the message does not disappear turn off and turn on the unit then connect the device again or reset the unit PLEASE RESET Reset the unit and try the operation again If PLEASE RESE...

Page 152: ...rding Disc can neither be played back nor ejected Unlock the disc see page 9 Eject the disc forcibly see page 3 Disc sound is sometimes interrupted Stop playback while driving on rough roads Change the disc Check the cords and connections NO DISC appears on the display Insert a playable disc into the loading slot PLEASE and EJECT appear alternately on the display This occurs sometimes due to over ...

Page 153: ...ular phone Move the car to a place where you can get a better signal reception The sound is interrupted or skipped during playback of a Bluetooth audio player Reduce the distance between the unit and the Bluetooth audio player Disconnect the device connected for PHONE Turn off then turn on the unit When the sound is not yet restored Connect the player again The connected audio player cannot be con...

Page 154: ...out holding it by the edges Always hold the disc by the edges Do not touch its recording surface When storing a disc in its case gently insert the disc around the center holder with the printed surface facing up Make sure to store discs in cases after use Connectors Center holder To keep discs clean A dirty disc may not play correctly If a disc does become dirty wipe it with a soft cloth in a stra...

Page 155: ...Sensitivity 16 3 dBf 1 8 μV 75 Ω Alternate Channel Selectivity 400 kHz 65 dB Frequency Response 40 Hz to 15 000 Hz Stereo Separation 30 dB MW Tuner Sensitivity Selectivity 20 μV 35 dB LW Tuner Sensitivity 50 μV CD PLAYER SECTION Type Compact disc player Signal Detection System Non contact optical pickup semiconductor laser Number of Channels 2 channels stereo Frequency Response 5 Hz to 20 000 Hz D...

Page 156: ...агрузите Ваше устройство Для получения информации о перезагрузке Вашего устройства обратитесь на соответствующую страницу Маєте ПРОБЛЕМУ з функціонуванням Повторно налаштуйте систему Див сторінку Як повторно налаштувати пристрій 2007 Victor Company of Japan Limited Bіктор Компані оф Джепен Лімітед 12 3 чоме Морійя чо Канагава ку Йокогама Канагава 221 8520 Японія ...

Page 157: ...ля предотвращения коротких замыканий обмотайте терминалы НЕИСПОЛЬЗУЕМЫХ проводов изоляционной лентой Радиатор во время использования сильно нагревается Старайтесь его не трогать во время удаления устройства Список деталей для установки и подключения Следующие детали поставлены в комплекте с устройством При отсутствии какого либо элемента немедленно свяжитесь с дилером автомобильного специалиста JV...

Page 158: ...предназначенные для прочной установки корпуса Зігніть відповідні фіксатори для надійного встановлення екрану на його місці Removing the unit Before removing the unit release the rear section Insert the two handles then pull them as illustrated so that the unit can be removed Вставьте два рычажка затем потяните их как показано на рисунке чтобы вынуть устройство Вставте дві ручки а потім потягніть ї...

Page 159: ...мужкою Red Красный Червоний Yellow 2 Желтый 2 Жовтий 2 1 Не входит в комплект 2 Перед проверкой работы устройства подключите этот провод иначе питание не включится To metallic body or chassis of the car К металлическому корпусу или шасси автомобиля На металічний корпус або на шасі авто To a live terminal in the fuse block connecting to the car battery bypassing the ignition switch constant 12 V К ...

Page 160: ...ого пристрою іншого обладнання або на антену якщо встановлена JVC Amplifier JVC усилитель Підсилювач JVC Rear speakers Задние громкоговорители Задні гучномовці Front speakers see diagram Передние громкоговорители см схему Передні гучномовці див схему Rear speakers Задние громкоговорители Задні гучномовці JVC Amplifier JVC усилитель Підсилювач JVC Subwoofer Низкочастотный динамик Низькочастотний ди...

Page 161: ... отмене демонстрации функций дисплея см на стр 4 For installation and connections refer to the separate manual Указания по установке и выполнению соединений приводятся в отдельной инструкции INSTRUCTIONS ИНСТРУКЦИИ ПО ЭКСПЛУАТАЦИИ GET0507 001A U РЕСИВЕР С ПРОИГРЫВАТЕЛЕМ КОМПАКТ ДИСКОВ KD BT11 KD BT11 ...

Page 162: ...SIDE THE UNIT European Union only Warning If you need to operate the unit while driving be sure to look around carefully or you may be involved in a traffic accident Caution on volume setting Discs produce very little noise compared with other sources Lower the volume before playing a disc to avoid damaging the speakers by the sudden increase of the output level For safety Do not raise the volume ...

Page 163: ... Waiting for about 5 seconds without pressing any of these buttons will automatically cancels the functions mode CONTENTS INTRODUCTIONS Preparation 4 OPERATIONS Basic operations 5 Using the control panel 5 Using the remote controller RM RK50 6 Listening to the radio 8 Disc operations 9 Using the Bluetooth devices 10 Using the Bluetooth cellular phone 12 Using the Bluetooth audio player 14 EXTERNAL...

Page 164: ...rent track number with the clock time Disc title performer 2 Track title 2 back to the beginning MP3 WMA Current track number with the elapsed playing time Current track number with the clock time Album name performer folder name 3 Track title file name 3 back to the beginning BLUETOOTH Current track number with the elapsed playing time Current track number with the clock time Album name performer...

Page 165: ...siftheyarenotready ornotconnected 2 Forstoringpresetphonenumber seepage14 1 FM AM Select preset station CD CD CH Select folder IPOD Enter the main menu Pause playback Confirm selection 2 Eject disc 3 Turn on the power Turn off the power Hold Attenuate the sound if the power is on 4 Volume control Turn 5 FM AM Select the bands BLUETOOTH AUDIO Start playback 6 Loading slot 7 Display window 8 Select ...

Page 166: ...l batterypower becomesstronger 2 Tr track indicator 3 Source display Track number Folder number Time countdown indicator 4 Bluetooth indicator 5 Playback source indicators CH CD changer DISC 6 Sound mode iEQ intelligent equalizer indicators CLASSIC HIP HOP JAZZ ROCK POPS USER 7 Playback mode item indicators RND random disc folder RPT repeat 8 Tuner reception indicators ST stereo MO monaural 9 LOUD...

Page 167: ...if pressed briefly Rejects calls if pressed and held 7 Searches for stations if pressed briefly Fast forwards or reverses the track if pressed and held Changes the tracks if pressed briefly While listening to an iPod in menu selecting mode Selects an item if pressed briefly Then press D to confirm the selection Skips 10 items at a time if pressed and held Reverse skip forward skip for Bluetooth au...

Page 168: ...adcast with sufficient signal strength ST lights up on the display When an FM stereo broadcast is hard to receive Reception improves but stereo effect will be lost MO lights up on the display To restore the stereo effect repeat the same procedure MONO OFF appears and MO goes off FM station automatic presetting SSM Strong station Sequential Memory You can preset up to six stations for each band 1 W...

Page 169: ...rectly 1 Presstoselectnumber1to6 holdtoselectnumber7 to12 2 Itisrequiredthatfoldersbeassignedwith2 digit numbersatthebeginningoftheirfoldernames 01 02 03 andsoon All tracks will be played repeatedly until you change the source or eject the disc After pressing M MODE press the following buttons Skip 10 tracks MP3 WMA Within the same folder TRACK RPT Repeat current track FOLDER RPT MP3 Repeat curren...

Page 170: ...he unit You can enter any number you like 1 digit to 16 digit number Initial 0000 SomedeviceshavetheirownPINcode Enterthe specifiedPINcodetotheunit Using the Bluetooth devices Bluetooth is a short range wireless radio communication technology for the mobile device such as mobile phones portable PCs and other devices The Bluetooth devices can be connected without cables and communicate with each ot...

Page 171: ...PHONE or CNNCT AUDIO or activate AUTO CNNCT to connect the same device from next time on See the following and page 22 Deleting a registered device Perform steps 1 and 2 on page 10 then 1 Select DELETE PAIR 2 Select a device you want to delete then select YES Connecting a registered device PHONE AUDIO Perform steps 1 and 2 on page 10 then 1 Select CNNCT PHONE or CNNCT AUDIO 2 Select a device you w...

Page 172: ...ring a waiting call If your cellular phone is equipped with the call waiting function you can put the current call on hold and answer the waiting call Press any button except and 0 To restore the on hold call press any button except and 0 again When you end one call you can connect to the other When a text message comes in If the cellular phone is compatible with text message notification via Blue...

Page 173: ...ant to call How to enter phone number 1 Select a number 2 Move the entry position 3 Repeat steps 1 and 2 until you finish entering the number 4 Confirm the entry To delete the phone numbers Make sure that the Bluetooth phone is connected 1 Display the phone number you want to delete by using one of the CALL items 2 Select the phone number or name 3 Select DELETE or DELETE ALL DELETE Deletes the se...

Page 174: ...ecting deleting a registered device After pressing M MODE press the following buttons Select repeat play Select random play Bluetooth Information If you wish to receive more information about Bluetooth visit the following JVC web site http www jvc victor co jp english car To call a preset number While in Bluetooth source You can also call a preset number using PRESET of the CALL items see pages 12...

Page 175: ...ly play all tracks of current disc ALL RND Randomly play all tracks of the discs in the magazine To cancel repeat play or random play select RPT OFF or RND OFF Listening to the CD changer It is recommended to use a JVC MP3 compatible CD changer separately purchased with your unit You can connect a CD changer to the CD changer jack on the rear of the unit You can only play conventional CDs includin...

Page 176: ...t tracks Hold Reverse fast forward track After pressing M MODE press the following buttons ONE RPT Functions the same as Repeat One of the iPod ALL RPT Functions the same as Repeat All of the iPod ALBUM RND Functions the same as Shuffle Albums of the iPod SONG RND Functions the same as Shuffle Songs of the iPod To cancel repeat play or random play select RPT OFF or RND OFF Functionsonlyifyouselect...

Page 177: ...Input Adapter KS U58 Preparation Make sure EXT INPUT is selected for the external input setting see page 21 AUX auxiliary input jack on the control panel 1 Select EXT INPUT or AUX IN 2 Turn on the connected component and start playing the source 3 Adjust the volume 4 Adjust the sound as you want see pages 18 and 19 Connecting an external component to the AUX input jack 3 5 mm stereo mini plug not ...

Page 178: ...kHz 00 Fix OFF ROCK 100 Hz 03 Q1 0 1 0 kHz 00 Q1 25 10 0 kHz 02 Fix CLASSIC 80 Hz 01 Q1 25 1 0 kHz 00 Q1 25 10 0 kHz 03 Fix POPS 100 Hz 02 Q1 25 1 0 kHz 01 Q1 25 10 0 kHz 02 Fix HIP HOP 60 Hz 04 Q1 0 1 0 kHz 02 Q1 0 10 0 kHz 01 Fix JAZZ 80 Hz 03 Q1 25 1 0 kHz 00 Q1 25 10 0 kHz 03 Fix Freq Frequency Q Quality slope Storing your own sound mode You can adjust the sound modes and store your own adjust...

Page 179: ... 00 VOLUME Adjust the volume 00 to 50 or 00 to 30 5 1 Displayedonlywhen L OMODE issetto SUB W seepage21 2 Ifyouareusingatwo speakersystem setthefader levelto 00 3 Thisadjustmentwillnotaffectthesubwooferoutput 4 Loudnesssettingwillbeappliedtoallsoundmodes 5 Dependingontheamplifiergaincontrolsetting See page21fordetails 3 Adjust the quality slope Q Sound elements Range selectable items BASS MID TRE ...

Page 180: ...MO OFF The display demonstration will be activated automatically if no operation is done for about 20 seconds 4 Cancels CLOCK DISP 1 Clock display CLOCK ON CLOCK OFF The clock time is always shown on the display when the power is turned off Cancels pressing DISP will show the clock time for about 5 seconds when the power is turned off 4 CLOCK HOUR Hour adjustment 1 12 Initial 1 1 00 4 CLOCK MIN Mi...

Page 181: ...o the subwoofer SUB W PHASE 3 Subwoofer phase 180 DEG 0 DEG Select either 0 DEG or 180 DEG which reproduces a better sound EXT INPUT 4 External input CHANGER EXT INPUT To connect a JVC CD changer 15 or an Apple iPod 16 To connect portable audio player to the CD changer jack 17 TAG DISPLAY Tag display TAG ON TAG OFF Shows the Tag information while playing MP3 WMA tracks Cancels AMP GAIN Amplifier g...

Page 182: ...DRESS Address of the unit VERSION Hardware and software versions of the Bluetooth module PHONE NAME 2 Name of the connected Bluetooth phone AUDIO NAME 2 Name of the connected Bluetooth audio player 1 IftheconnectedBluetoothphonedoesnotsupport textmessagenotification viaBluetooth theunitwill notreceiveanynotificationuponthearrivalofatext message 2 AppearsonlywhenaBluetoothphone audioplayeris connec...

Page 183: ...stening to a track playback will start from where it had been stopped previously next time you turn on the power Tuner operations Storing stations in memory During SSM search All previously stored stations are erased and the stations are stored anew Received stations are preset in No 1 lowest frequency to No 6 highest frequency When SSM is over the station stored in No 1 will be automatically tune...

Page 184: ... missing data etc or media conditions stained scratched warped etc CD RWs may require a longer readout time since the reflectance of CD RWs is lower than that of regular CDs Do not use the following CD Rs or CD RWs Discs with stickers labels or a protective seal stuck to the surface Discs on which labels can be directly printed by an ink jet printer Using these discs under high temperature or high...

Page 185: ...failed Connect the device again See page 11 ERROR Try the operation again If ERROR appears again check if the device supports the function you have tried PLEASE WAIT The unit is preparing to use the Bluetooth function If the message does not disappear turn off and turn on the unit then connect the device again or reset the unit PLS RESET Reset the unit and try the operation again If PLS RESET appe...

Page 186: ...ars to be trouble is not always serious Check the following points before calling a service center Symptoms Remedies Causes General Sound cannot be heard from the speakers Adjust the volume to the optimum level Check the cords and connections The unit does not work at all Reset the unit see page 3 FM AM SSM automatic presetting does not work Store stations manually Static noise while listening to ...

Page 187: ...cted by the Bluetooth device Search from the Bluetooth device again Reset the unit When WAIT PAIR appears on the display search from the Bluetooth device again The unit does not make pairing with the Bluetooth device Enter the same PIN code for both the unit and target device Phone sound quality is poor Reduce the distance between the unit and the Bluetooth cellular phone Move the car to a place w...

Page 188: ...ound is distorted Deactivate the equalizer either on this unit or the iPod NO IPOD appears on the display Check the connecting cable and its connection Charge the battery Playback stops The headphones are disconnected during playback Restart the playback operation see page 16 No sound can be heard when connecting an iPod nano Disconnect the headphones from the iPod nano Update the firmware version...

Page 189: ... disc out holding it by the edges Always hold the disc by the edges Do not touch its recording surface When storing a disc in its case gently insert the disc around the center holder with the printed surface facing up Make sure to store discs in cases after use Connectors Center holder To keep discs clean A dirty disc may not play correctly If a disc does become dirty wipe it with a soft cloth in ...

Page 190: ... range Q0 5 Q0 75 Q1 0 Q1 25 Frequency Response 40 Hz to 20 000 Hz Signal to Noise Ratio 80 dB Line Out Level Impedance 2 5 V 20 kΩ load full scale Subwoofer Out Level Impedance 2 5 V 20 kΩ load full scale Output Impedance 1 kΩ Other Terminal CD changer jack AUX auxiliary input jack Antenna input TUNER SECTION Frequency Range FM 87 5 MHz to 108 0 MHz AM 531 kHz to 1 602 kHz FM Tuner Usable Sensiti...

Page 191: ... 320 kbps WMA Windows Media Audio Decoding Format Max Bit Rate 192 kbps BLUETOOTH Version Bluetooth 1 2 certified Power Class Class 2 Radio possible distance 10 m Service Area 10 m Profile HFP 1 5 OPP 1 1 A2DP 1 2 AVRCP 1 3 GENERAL Power Requirement Operating Voltage DC 14 4 V 11 V to 16 V allowance Grounding System Negative ground Allowable Operating Temperature 0 C to 40 C Dimensions W H D appro...

Page 192: ...d Having TROUBLE with operation Please reset your unit Refer to page of How to reset your unit Затруднения при эксплуатации Пожалуйста перезагрузите Ваше устройство Для получения информации о перезагрузке Вашего устройства обратитесь на соответствующую страницу ...

Page 193: ...æß Ë ß Ÿß ÿ Ë 50 W Èß È πÀπÈ È πÀ ß Ë µÈ π π 4 Ω ß 8 Ω È ß µË Ë 50 W ÀÈ ª Ë π Ë AMP GAIN æ ËÕªÈÕß π Ë ÀÈ æß ÿ ŸÀπÈ 21 π π ªÈÕß π ß µÈÕßæ π È µ Ë Ë Ë È È È ªæ π ø ºËπ ÈÕπ ÈÕπ À ß È ßÕ Ë ª º ËÕ Õ ÿ ª Õ π È Ë πª Õ À µ µ Èß ËÕ µËÕ π Ë πª Õ µËÕ ªπ È ÀÈ ÿ ª Õ π È À Ëß Ë ÿ ª µ π ÀπË ËÕß ßµ πµÏ JVC π PRECAUTIONS on power supply and speaker connections DO NOT connect the speaker leads of the power cord to ...

Page 194: ...ß Ë ª À ÿ ªí À À ÕµÈÕß ÈÕ Ÿ Ë ÿ µ µ Èß ÿ ª ºŸÈ ËÕß ß πµÏ JVC Õß Ë πÀ Õ ÿ ª Õ È ÿ Ë πË Ë µ µ Èß ÿ ª Õ π È Ÿ µÈÕßÀ Õ Ë ÀÈÀ Ë ßºŸÈ Ë ªìπºŸÈµ µ Èß Install the unit at an angle of less than 30 µ µ Èß ÿ ª Õ Ë ÿ µË Ë 30 Õß Установите устройство под углом менее 30 Bracket 2 Ëπ Õß 2 Кронштейн 2 Removing the unit Before removing the unit release the rear section Insert the two handles then pull them as illu...

Page 195: ...ry bypassing the ignition switch constant 12 V µËÕ È Ë øøÈ π ºßø Ï ËßµËÕ µ µÕ Ë πµ ˵ÈÕß È Ï ÿ 12 Ï ß Ë К разъему фазы в блоке предохранителя минуя блок зажигания постоянный 12 В To the remote lead of other equipment 200 mA max µËÕ È Õª ÏÕË π π Ÿß 200 mA К удаленному проводу другого оборудования макс 200 мА Orange with white stripe ô Оранжевый с белой полосой To car light control switch µ Ï ÿ ø Õß...

Page 196: ... CD CH KS PD100 KS U57 KS U58 When connecting an external component ËÕ ËÕ µËÕ Ë πª Õ Õß Èπ Õπÿ Последовательное подключение двух устройств Set L O MODE to REAR See page 21 of the INSTRUCTIONS µ Èß Ë L O MODE ªìπ REAR ŸÀπÈ 21 π π Для параметра L O MODE установите значение REAR см ИНСТРУКЦИИ ПО ЭКСПЛУАТАЦИИ на стр 21 Set L O MODE to SUB W See page 21 of the INSTRUCTIONS µ Èß Ë L O MODE ªìπ SUB W ŸÀπ...

Page 197: ...ENGLISH KD BT11 CD RECEIVER KD BT11 For canceling the display demonstration see page 4 For installation and connections refer to the separate manual INSTRUCTIONS GET0507 003A UT ...

Page 198: ...SIDE THE UNIT European Union only Warning If you need to operate the unit while driving be sure to look around carefully or you may be involved in a traffic accident Caution on volume setting Discs produce very little noise compared with other sources Lower the volume before playing a disc to avoid damaging the speakers by the sudden increase of the output level For safety Do not raise the volume ...

Page 199: ... Waiting for about 5 seconds without pressing any of these buttons will automatically cancels the functions mode CONTENTS INTRODUCTIONS Preparation 4 OPERATIONS Basic operations 5 Using the control panel 5 Using the remote controller RM RK50 6 Listening to the radio 8 Disc operations 9 Using the Bluetooth devices 10 Using the Bluetooth cellular phone 12 Using the Bluetooth audio player 14 EXTERNAL...

Page 200: ...rent track number with the clock time Disc title performer 2 Track title 2 back to the beginning MP3 WMA Current track number with the elapsed playing time Current track number with the clock time Album name performer folder name 3 Track title file name 3 back to the beginning BLUETOOTH Current track number with the elapsed playing time Current track number with the clock time Album name performer...

Page 201: ...siftheyarenotready ornotconnected 2 Forstoringpresetphonenumber seepage14 1 FM AM Select preset station CD CD CH Select folder IPOD Enter the main menu Pause playback Confirm selection 2 Eject disc 3 Turn on the power Turn off the power Hold Attenuate the sound if the power is on 4 Volume control Turn 5 FM AM Select the bands BLUETOOTH AUDIO Start playback 6 Loading slot 7 Display window 8 Select ...

Page 202: ...l batterypower becomesstronger 2 Tr track indicator 3 Source display Track number Folder number Time countdown indicator 4 Bluetooth indicator 5 Playback source indicators CH CD changer DISC 6 Sound mode iEQ intelligent equalizer indicators CLASSIC HIP HOP JAZZ ROCK POPS USER 7 Playback mode item indicators RND random disc folder RPT repeat 8 Tuner reception indicators ST stereo MO monaural 9 LOUD...

Page 203: ...if pressed briefly Rejects calls if pressed and held 7 Searches for stations if pressed briefly Fast forwards or reverses the track if pressed and held Changes the tracks if pressed briefly While listening to an iPod in menu selecting mode Selects an item if pressed briefly Then press D to confirm the selection Skips 10 items at a time if pressed and held Reverse skip forward skip for Bluetooth au...

Page 204: ...adcast with sufficient signal strength ST lights up on the display When an FM stereo broadcast is hard to receive Reception improves but stereo effect will be lost MO lights up on the display To restore the stereo effect repeat the same procedure MONO OFF appears and MO goes off FM station automatic presetting SSM Strong station Sequential Memory You can preset up to six stations for each band 1 W...

Page 205: ...rectly 1 Presstoselectnumber1to6 holdtoselectnumber7 to12 2 Itisrequiredthatfoldersbeassignedwith2 digit numbersatthebeginningoftheirfoldernames 01 02 03 andsoon All tracks will be played repeatedly until you change the source or eject the disc After pressing M MODE press the following buttons Skip 10 tracks MP3 WMA Within the same folder TRACK RPT Repeat current track FOLDER RPT MP3 Repeat curren...

Page 206: ...he unit You can enter any number you like 1 digit to 16 digit number Initial 0000 SomedeviceshavetheirownPINcode Enterthe specifiedPINcodetotheunit Using the Bluetooth devices Bluetooth is a short range wireless radio communication technology for the mobile device such as mobile phones portable PCs and other devices The Bluetooth devices can be connected without cables and communicate with each ot...

Page 207: ...PHONE or CNNCT AUDIO or activate AUTO CNNCT to connect the same device from next time on See the following and page 22 Deleting a registered device Perform steps 1 and 2 on page 10 then 1 Select DELETE PAIR 2 Select a device you want to delete then select YES Connecting a registered device PHONE AUDIO Perform steps 1 and 2 on page 10 then 1 Select CNNCT PHONE or CNNCT AUDIO 2 Select a device you w...

Page 208: ...ring a waiting call If your cellular phone is equipped with the call waiting function you can put the current call on hold and answer the waiting call Press any button except and 0 To restore the on hold call press any button except and 0 again When you end one call you can connect to the other When a text message comes in If the cellular phone is compatible with text message notification via Blue...

Page 209: ...ant to call How to enter phone number 1 Select a number 2 Move the entry position 3 Repeat steps 1 and 2 until you finish entering the number 4 Confirm the entry To delete the phone numbers Make sure that the Bluetooth phone is connected 1 Display the phone number you want to delete by using one of the CALL items 2 Select the phone number or name 3 Select DELETE or DELETE ALL DELETE Deletes the se...

Page 210: ...ecting deleting a registered device After pressing M MODE press the following buttons Select repeat play Select random play Bluetooth Information If you wish to receive more information about Bluetooth visit the following JVC web site http www jvc victor co jp english car To call a preset number While in Bluetooth source You can also call a preset number using PRESET of the CALL items see pages 12...

Page 211: ...ly play all tracks of current disc ALL RND Randomly play all tracks of the discs in the magazine To cancel repeat play or random play select RPT OFF or RND OFF Listening to the CD changer It is recommended to use a JVC MP3 compatible CD changer separately purchased with your unit You can connect a CD changer to the CD changer jack on the rear of the unit You can only play conventional CDs includin...

Page 212: ...t tracks Hold Reverse fast forward track After pressing M MODE press the following buttons ONE RPT Functions the same as Repeat One of the iPod ALL RPT Functions the same as Repeat All of the iPod ALBUM RND Functions the same as Shuffle Albums of the iPod SONG RND Functions the same as Shuffle Songs of the iPod To cancel repeat play or random play select RPT OFF or RND OFF Functionsonlyifyouselect...

Page 213: ...Input Adapter KS U58 Preparation Make sure EXT INPUT is selected for the external input setting see page 21 AUX auxiliary input jack on the control panel 1 Select EXT INPUT or AUX IN 2 Turn on the connected component and start playing the source 3 Adjust the volume 4 Adjust the sound as you want see pages 18 and 19 Connecting an external component to the AUX input jack 3 5 mm stereo mini plug not ...

Page 214: ...kHz 00 Fix OFF ROCK 100 Hz 03 Q1 0 1 0 kHz 00 Q1 25 10 0 kHz 02 Fix CLASSIC 80 Hz 01 Q1 25 1 0 kHz 00 Q1 25 10 0 kHz 03 Fix POPS 100 Hz 02 Q1 25 1 0 kHz 01 Q1 25 10 0 kHz 02 Fix HIP HOP 60 Hz 04 Q1 0 1 0 kHz 02 Q1 0 10 0 kHz 01 Fix JAZZ 80 Hz 03 Q1 25 1 0 kHz 00 Q1 25 10 0 kHz 03 Fix Freq Frequency Q Quality slope Storing your own sound mode You can adjust the sound modes and store your own adjust...

Page 215: ... 00 VOLUME Adjust the volume 00 to 50 or 00 to 30 5 1 Displayedonlywhen L OMODE issetto SUB W seepage21 2 Ifyouareusingatwo speakersystem setthefader levelto 00 3 Thisadjustmentwillnotaffectthesubwooferoutput 4 Loudnesssettingwillbeappliedtoallsoundmodes 5 Dependingontheamplifiergaincontrolsetting See page21fordetails 3 Adjust the quality slope Q Sound elements Range selectable items BASS MID TRE ...

Page 216: ...MO OFF The display demonstration will be activated automatically if no operation is done for about 20 seconds 4 Cancels CLOCK DISP 1 Clock display CLOCK ON CLOCK OFF The clock time is always shown on the display when the power is turned off Cancels pressing DISP will show the clock time for about 5 seconds when the power is turned off 4 CLOCK HOUR Hour adjustment 1 12 Initial 1 1 00 4 CLOCK MIN Mi...

Page 217: ...o the subwoofer SUB W PHASE 3 Subwoofer phase 180 DEG 0 DEG Select either 0 DEG or 180 DEG which reproduces a better sound EXT INPUT 4 External input CHANGER EXT INPUT To connect a JVC CD changer 15 or an Apple iPod 16 To connect portable audio player to the CD changer jack 17 TAG DISPLAY Tag display TAG ON TAG OFF Shows the Tag information while playing MP3 WMA tracks Cancels AMP GAIN Amplifier g...

Page 218: ...DRESS Address of the unit VERSION Hardware and software versions of the Bluetooth module PHONE NAME 2 Name of the connected Bluetooth phone AUDIO NAME 2 Name of the connected Bluetooth audio player 1 IftheconnectedBluetoothphonedoesnotsupport textmessagenotification viaBluetooth theunitwill notreceiveanynotificationuponthearrivalofatext message 2 AppearsonlywhenaBluetoothphone audioplayeris connec...

Page 219: ...stening to a track playback will start from where it had been stopped previously next time you turn on the power Tuner operations Storing stations in memory During SSM search All previously stored stations are erased and the stations are stored anew Received stations are preset in No 1 lowest frequency to No 6 highest frequency When SSM is over the station stored in No 1 will be automatically tune...

Page 220: ... missing data etc or media conditions stained scratched warped etc CD RWs may require a longer readout time since the reflectance of CD RWs is lower than that of regular CDs Do not use the following CD Rs or CD RWs Discs with stickers labels or a protective seal stuck to the surface Discs on which labels can be directly printed by an ink jet printer Using these discs under high temperature or high...

Page 221: ...failed Connect the device again See page 11 ERROR Try the operation again If ERROR appears again check if the device supports the function you have tried PLEASE WAIT The unit is preparing to use the Bluetooth function If the message does not disappear turn off and turn on the unit then connect the device again or reset the unit PLS RESET Reset the unit and try the operation again If PLS RESET appe...

Page 222: ...ars to be trouble is not always serious Check the following points before calling a service center Symptoms Remedies Causes General Sound cannot be heard from the speakers Adjust the volume to the optimum level Check the cords and connections The unit does not work at all Reset the unit see page 3 FM AM SSM automatic presetting does not work Store stations manually Static noise while listening to ...

Page 223: ...cted by the Bluetooth device Search from the Bluetooth device again Reset the unit When WAIT PAIR appears on the display search from the Bluetooth device again The unit does not make pairing with the Bluetooth device Enter the same PIN code for both the unit and target device Phone sound quality is poor Reduce the distance between the unit and the Bluetooth cellular phone Move the car to a place w...

Page 224: ...ound is distorted Deactivate the equalizer either on this unit or the iPod NO IPOD appears on the display Check the connecting cable and its connection Charge the battery Playback stops The headphones are disconnected during playback Restart the playback operation see page 16 No sound can be heard when connecting an iPod nano Disconnect the headphones from the iPod nano Update the firmware version...

Page 225: ... disc out holding it by the edges Always hold the disc by the edges Do not touch its recording surface When storing a disc in its case gently insert the disc around the center holder with the printed surface facing up Make sure to store discs in cases after use Connectors Center holder To keep discs clean A dirty disc may not play correctly If a disc does become dirty wipe it with a soft cloth in ...

Page 226: ... range Q0 5 Q0 75 Q1 0 Q1 25 Frequency Response 40 Hz to 20 000 Hz Signal to Noise Ratio 80 dB Line Out Level Impedance 2 5 V 20 kΩ load full scale Subwoofer Out Level Impedance 2 5 V 20 kΩ load full scale Output Impedance 1 kΩ Other Terminal CD changer jack AUX auxiliary input jack Antenna input TUNER SECTION Frequency Range FM 87 5 MHz to 108 0 MHz AM 531 kHz to 1 602 kHz FM Tuner Usable Sensiti...

Page 227: ... 320 kbps WMA Windows Media Audio Decoding Format Max Bit Rate 192 kbps BLUETOOTH Version Bluetooth 1 2 certified Power Class Class 2 Radio possible distance 10 m Service Area 10 m Profile HFP 1 5 OPP 1 1 A2DP 1 2 AVRCP 1 3 GENERAL Power Requirement Operating Voltage DC 14 4 V 11 V to 16 V allowance Grounding System Negative ground Allowable Operating Temperature 0 C to 40 C Dimensions W H D appro...

Page 228: ... 2007 Victor Company of Japan Limited EN CT 1207DTSMDTJEIN Having TROUBLE with operation Please reset your unit Refer to page of How to reset your unit ...

Page 229: ...t to touch it when removing this unit 1207DTSMDTJEIN EN CT 2007 Victor Company of Japan Limited Heat sink 散熱片 J Handles 板條型把手 F Washer ø5 墊圈 ø5 G Lock nut M5 鎖定螺母 M5 H Mounting bolt M4 5 mm M5 12 5 mm 緊固螺栓 M4 5 mm M5 12 5 mm I Rubber cushion 橡膠防震墊 A B Hard case Control panel 硬盒 控制面板 C Sleeve 外套機殼 D Trim plate 裝飾框 E Power cord 電路連接用的配線束 Parts list for installation and connection The following parts...

Page 230: ...unit Flat head screws M5 8 mm 2 平頭螺絲釘 M5 8 mm 2 安裝 裝設 固定在儀表板內 下面的圖解表示了典型的安裝程序 如果您有問題 或需要有關配套元件的資料 請向 JVC 汽 車音響分銷商或配套元件供應公司詢問 如果您不能確定如何正確地安裝本機 應請合格的技術人員來安裝 Install the unit at an angle of less than 30 將本機安裝在少於 30 的角度 Bracket 2 托座 2 1 您豎起本機時 小心不要損壞底部的保險絲 2 不隨本機提供 TROUBLESHOOTING The fuse blows Are the red and black leads connected correctly Power cannot be turned on Is the yellow lead connected No s...

Page 231: ...ght speaker rear 右揚聲器 後置 Purple 紫色 Purple with black stripe 紫色帶有黑色條紋 Green 綠色 Green with black stripe 綠色帶有黑色條紋 Gray 灰色 Gray with black stripe 灰色帶有黑色條紋 White 白色 White with black stripe 白色帶有黑色條紋 To a live terminal in the fuse block connecting to the car battery bypassing the ignition switch constant 12 V 接至保險絲單元內的帶電端子 保險絲單元與車裝電池相連接 用於旁路點火開關 恆定 12 V To the remote lead of other equipment 200 mA max 連接...

Page 232: ... the CD changer jack JVC component Model name CD changer CD CH CH X1500 etc You can also connect the following components through the various JVC adapters Connection cords may need to be purchased separately Component Adapter Model name iPod Interface adapter for iPod KS PD100 Portable audio player with line input jacks Line input adapter KS U57 Portable audio player with 3 5 mm stereo mini jack A...

Reviews: