background image

2

3

2

1

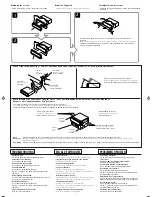
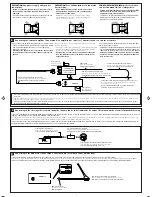
Removing the receiver

• Before removing the receiver, release the rear section.

Verwijderen van de receiver

• Voordat u het apparaat verwijdert, moet u het achtergedeelte

losmaken.

Retrait de l’appareil

Avant de retirer l’appareil, libérez la section arrière.

Insert the two handles, then pull them as illustrated so that the receiver can be
removed.

Insérez les deux poignées, puis tirez de la façon illustrée de façon à retirer l’appareil.

Plaats de twee hendels en trek ze vervolgens zoals afgebeeld naar voren zodat de
receiver kan worden verwijderd.

• When using the optional stay / Lors de l’utilisation du hauban en option / Wanneer u de steun gebruikt (facultatief)

Screw (option)

Vis (en option)

Schroef (facultatief)

Stay (option)

Hauban (en option)

Steun (facultatief)

Fire wall

Cloison

Brandscherm

Dashboard

Tableau de bord

Dashboard

Install the unit at an angle of less than 30˚.

Installez l’appareil avec un angle de moins de 30˚.

Installeer het apparaat met een hoek kleiner dan 30˚.

TROUBLESHOOTING

The fuse blows.

* Are the red and black leads connected correctly?

Power cannot be turned on.

* Is the yellow lead connected?

No sound from the speakers.

* Is the speaker output lead short-circuited?

Sound is distorted.

* Is the speaker output lead grounded?
* Are the “–” terminals of L and R speakers grounded in

common?

Noise interfere with sounds.

* Is the rear ground terminal connected to the car’s chassis

using shorter and thicker cords?

Receiver becomes hot.

* Is the speaker output lead grounded?
* Are the “–” terminals of L and R speakers grounded in

common?

This receiver does not work at all.

* Have you reset your receiver?

EN CAS DE DIFFICULTÉS

• Le fusible saute.
*

Les fils rouge et noir sont-ils racordés correctement?

• L’appareil ne peut pas être mise sous tension.
*

Le fil jaune est-elle raccordée?

• Pas de son des enceintes.
*

Le fil de sortie d’enceinte est-il court-circuité?

• Le son est déformé.
*

Le fil de sortie d’enceinte est-il à la masse?

*

Les bornes “–” des enceintes gauche et droit sont-elles
mises ensemble à la masse?

• Interférence avec les sons.
*

La prise arrière de mise à la masse est-elle connectée au
châssis de la voiture avec un cordon court et épais?

• L’appareil devient chaud.
*

Le fil de sortie d’enceinte est-il à la masse?

*

Les bornes “–” des enceintes gauche et droite sont-elles
mises ensemble à la masse?

• Cet appareil ne fonctionne pas du tout.
*

Avez-vous réinitialisé votre appareil?

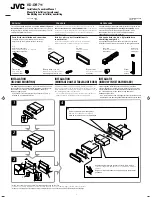
• When installing the unit without using the sleeve / Lors de l’installation de l’appareil sans utiliser de manchon /

Wanneer u het apparaat zonder huls installeert

In a Toyota for example, first remove the car radio and install the unit in its place.

Par exemple dans une Toyota, retirer d’abord l’autoradio et installer l’appareil à la place.

Voorbeeld: Bij een Toyota moet u eerst de autoradio verwijderen en daarna het apparaat installeren.

Note

:

When installing the unit on the mounting bracket, make sure to use the 8 mm-long screws. If longer screws are used, they could damage the receiver.

Remarque :

Lors de l’installation de l’appareil sur le support de montage, s’assurer d’utiliser des vis d’une longueur de 8 mm. Si des vis plus longues sont utilisées, elles peuvent
endommager l’appareil.

Opmerking :

Wanneer u het apparaat aan de bevestigingsklem vastmaakt, moet u de 8 mm lange schroeven gebruiken. Als u langere schroeven gebruikt, kan de receiver worden beschadigd.

Bracket*

Support

*

Console

*

Bracket*

Support

*

Console

*

* Not included with this unit.
*

Non fourni avec cet appareil.

*

Niet meegeleverd.

Flat type screws (M5 x 8 mm)*

Vis à tête plate (M5 x 8 mm)

*

Platkopschroeven (M5 x 8 mm)

*

Pocket

Poche

Vak

Flat type screws (M5 x 8 mm)*

Vis à tête plate (M5 x 8 mm)

*

Platkopschroeven (M5 x 8 mm)

*

PROBLEMEN OPLOSSEN

• De zekering slaat door.

*

Zijn de rode en de zwarte draden op de juiste manier
aangesloten?

• De stroom kan niet worden ingeschakeld.

*

Is de gele draad aangesloten?

• Er komt geen geluid uit de luidsprekers.

*

Is de uitgaande luidsprekerdraad kortgesloten?

• Het geluid wordt vervormd.

*

Is de uitgaande luidsprekerdraad geaard?

*

Zijn de “–” polen van de linker- en de rechterluidsprekers
gemeenschappelijk geaard?

• Geluid wordt door ruis gestoord.

*

Is de aarde-aansluiting achter met gebruik van kortere en
dikkere snoeren met het chassis van de auto verbonden?

• De receiver wordt heet.

*

Is de uitgaande luidsprekerdraad geaard?

*

Zijn de “–” polen van de linker- en de rechterluidsprekers
gemeenschappelijk geaard?

• Receiver werkt helemaal niet.

*

Heeft u de receiver teruggesteld?

01_LVT1309-009A_f.p65

05.1.12, 4:33 PM

2

Summary of Contents for KD-DB711

Page 1: ...férer au manuel séparé Bijzonderheden over de installatie en aansluiting van het apparaat vindt u in de desbetreffende handleiding INSTRUCTIONS MANUEL D INSTRUCTIONS GEBRUIKSAANWIJZING LVT1309 003A EX For canceling the display demonstration see page 7 Pour annuler la démonstration des affichages référez vous à la page 7 Zie bladzijde 7 voor het annuleren van de displaydemonstratie ...

Page 2: ...F LABEL CAUTION LABEL PLACED OUTSIDE THE UNIT Warning If you need to operate the receiver while driving be sure to look ahead carefully or you may be involved in a traffic accident How to reset your unit This will reset the microcomputer Your preset adjustments will also be erased How to forcibly eject a disc If a disc cannot be recognized by the receiver or cannot be ejected ejects the disc as fo...

Page 3: ...DAB service 15 Tracing the same programme Alternative Frequency Reception 15 Other Main DAB Features 15 Disc operations 16 Playing a disc 16 Changing the display information 18 Selecting the playback modes 19 Sound adjustments 20 Selecting preset sound modes C EQ custom equalizer 20 Adjusting the sound 21 General settings PSM 22 Basic procedure 22 Detaching the control panel 25 Using the remote co...

Page 4: ...ears the functions mode Caution on volume setting Discs produce very little noise compared with other sources Lower the volume before playing a disc to avoid damaging the speakers by the sudden increase of the output level How to read this manual The following methods are used to made the explanations simple and easy to understand Some related tips and notes are explained in More about this receiv...

Page 5: ...e button o control panel release button Number buttons Display window a Tunerreceptionindicators MO monaural ST stereo s WMA indicator d RDS indicators TP PTY AF REG f MP3 indicator g CD indicator h Playback mode item indicators RND random disc folder RPT repeat j LOUD loudness indicator k EQ equalizer indicator l Sound mode C EQ custom equalizer indicators ROCK CLASSIC POPS HIP HOP JAZZ USER also...

Page 6: ...the sound as you want See pages 20 and 21 To drop the volume in a moment ATT To restore the sound press it again To turn off the power Getting started Basic operations Turn on the power Ÿ Select a source You cannot select some sources if they are not ready For FM AM tuner For DAB tuner ...

Page 7: ... Finish the procedure To activate the display demonstration In step 3 above Setting the clock 1 2 Set the hour minute and clock system 1 Select CLOCK H hour then adjust the hour 2 Select CLOCK M minute then adjust the minute 3 Select 24H 12H then select 24H hour or 12H hour 3 Finish the procedure To check the current clock time when the power is turned off ...

Page 8: ...strength Selected band appears Start searching for a station When a station is received searching stops To stop searching press the same button again Radio operations Listening to the radio To tune in to a station manually In step on the left 1 2 Select the desired station frequencies ...

Page 9: ... flashes then disappears when automatic presetting is over Local FM stations with the strongest signals are searched and stored automatically in the FM band When an FM stereo broadcast is hard to receive 1 2 Lights up when monaural mode is activated Reception improves but stereo effect will be lost To restore the stereo effect repeat the same procedure so that MONO OFF appears The MO indicator als...

Page 10: ... 4 Preset number flashes for a while Listening to a preset station 1 2 3 Select the preset station 1 6 you want If the preset station is an FM RDS station you can use Programme Search see page 23 To check the current clock time while listening to an FM non RDS or AM station For FM RDS stations see pages 11 13 ...

Page 11: ...c LIGHT M music CLASSICS OTHER M music WEATHER FINANCE CHILDREN SOCIAL RELIGION PHONE IN TRAVEL LEISURE JAZZ COUNTRY NATION M music OLDIES FOLK M music DOCUMENT You can tune in to a station broadcasting your favorite programme by searching for a PTY code PTY Search The last selected PTY code appears Ÿ Select one of your favorite programme type or Select one of the twenty nine PTY codes Ex When ROC...

Page 12: ...TY codes into other preset numbers 4 Finish the procedure Using the standby receptions You can use two types of Standby Reception TA Standby Reception and PTY Standby Reception both for FM station and DAB services TA Standby Reception TA Standby Reception allows the receiver to switch temporarily to an FM RDS station or a DAB service broadcasting Traffic Announcement from any source other than AM ...

Page 13: ...ation PTY Standby Reception PTY Standby Reception allows the receiver to switch temporarily to your favorite PTY programme from any source other than AM To select your favorite PTY code and activate the PTY Standby Reception see page 23 PTY Standby Reception also works for searching a DAB service The PTY indicator either lights up or flashes If the PTY indicator lights up PTY Standby Reception is ...

Page 14: ...In addition each service called primary service can also be divided into its components called secondary service A typical ensemble has six or more programmes services broadcast at the same time This receiver can do the following Tracing the same programme automatically Alternative Frequency Reception see DAB AF on page 24 DAB tuner operations Listening to the DAB tuner Ÿ Start searching for an en...

Page 15: ...requency Reception You can keep listening to the same programme by activating the Alternative Frequency Reception When shipped from the factory Alternative Frequency Reception is activated To deactivate the Alternative Frequency Reception see DAB AF on page 24 Other Main DAB Features 7 PTY Search Operations are exactly the same as explained on pages 11 and 12 for FM RDS stations You cannot store P...

Page 16: ...ng an audio CD or a CD Text disc To stop play and eject the disc Total folder number Total file number Total playing time of the inserted disc Total track number of the inserted disc Elapsed playing time Current track number All tracks will be played repeatedly until you change the source or eject the disc Disc information appears automatically see page 18 Current track number Selected folder numb...

Page 17: ...s To locate a particular track for CD or folder for MP3 or WMA discs directly To select a number from 01 06 To select a number from 07 12 To use folder search on MP3 WMA discs it is required that folders are assigned with 2 digits number at the beginning of their folder names 01 02 03 and so on To select a particular track in a folder for MP3 or WMA disc after selecting a folder Prohibiting disc e...

Page 18: ... If the current disc is an audio CD NO NAME appears While playing an MP3 or WMA disc When TAG DISP is set to TAG ON see page 24 2 If an MP3 WMA file does not have ID3 tags folder name and file name appear In this case the TAG indicator will not light up When TAG DISP is set to TAG OFF ...

Page 19: ...peatedly TRK RPT The current track RPT lights up FLDR RPT All tracks of the current folder and RPT light up RPT OFF Cancels Random play Mode Plays at random Ex When DISC RND is selected while playing an MP3 disc FLDR RND All tracks of the current folder then tracks of the next folder and so on RND and light up DISC RND All tracks of the current disc RND and light up RND OFF Cancels Only while play...

Page 20: ...enre Ÿ Ex When ROCK is selected Indication pattern for each sound mode Indication For Preset values BAS 1 TRE 2 LOUD 3 USER Flat sound 00 00 OFF ROCK Rock or disco music 03 01 ON CLASSIC Classical music 01 02 OFF POPS Light music 04 01 OFF HIP HOP Funk or rap music 02 00 ON JAZZ Jazz music 02 03 OFF 1 BAS Bass 2 TRE Treble 3 LOUD Loudness ...

Page 21: ...eaker balance L06 Left only to R06 Right only LOUD 1 loudness Boost low and high frequencies to produce a well balanced sound at low volume level LOUD ON J LOUD OFF VOL 3 volume Adjust the volume 00 min to 30 or 50 max 4 1 When you adjust the bass treble or loudness the adjustment you have made is stored for the currently selected sound mode C EQ including USER 2 If you are using a two speaker sys...

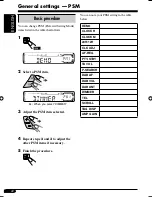
Page 22: ...ect a PSM item Ex When you select DIMMER 3 Adjust the PSM item selected 4 Repeat steps 2 and 3 to adjust the other PSM items if necessary 5 Finish the procedure You can note your PSM setting in the table below DEMO CLOCK H CLOCK M 24H 12H CLK ADJ AF REG PTY STBY TA VOL P SEARCH DAB AF DAB VOL DAB ANT DIMMER TEL SCROLL TAG DISP AMP GAIN ...

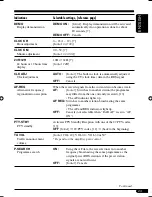
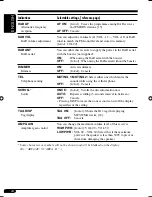
Page 23: ...nals from the current station become weak AF Initial Switches to another station the programme may differ from the one currently received 13 The AF indicator lights up AF REG Switches to another station broadcasting the same programme The AF and REG indicators light up OFF Cancels not selectable when DAB AF is set to AF ON PTY STBY PTY standby Activates PTY Standby Reception with one of the 29 PTY...

Page 24: ...tial Cancels TEL Telephone muting MUTING 1 MUTING 2 Select either one which mutes the sounds while using the cellular phone OFF Initial Cancels SCROLL Scroll ONCE Initial Scrolls the disc information once AUTO Repeats scrolling 5 seconds interval in between OFF Cancels Pressing DISP for more than one second can scroll the display regardless of the setting TAG DISP Tag display TAG ON Initial Shows ...

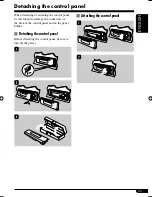
Page 25: ... panel be careful not to damage the connectors on the back of the control panel and on the panel holder Detaching the control panel Before detaching the control panel be sure to turn off the power Attaching the control panel Detaching the control panel ...

Page 26: ...lume for connection This receiver can be remotely controlled as instructed here with an optionally purchased remote controller We recommend that you use remote controller RM RK60 with your receiver When operating aim the remote controller directly at the remote sensor on the receiver Make sure there is no obstacle in between Installing the lithium coin battery CR2025 Warning Store the battery in a...

Page 27: ...lder of the case and lift the disc out holding it by the edges Always hold the disc by the edges Do not touch its recording surface When storing a disc into its case gently insert the disc around the center holder with the printed surface facing up Make sure to store discs into the cases after use To keep discs clean A dirty disc may not play correctly If a disc does become dirty wipe it with a so...

Page 28: ...stored in the same preset number FM RDS operations If you want to know more about RDS visit http www rds org uk Network Tracking Reception requires two types of RDS signals PI Programme Identification and AF Alternative Frequency to work correctly Without receiving these data correctly Network Tracking Reception will not operate If a Traffic Announcement is received the volume level TA Volume auto...

Page 29: ...at of regular CDs Do not use the following CD Rs or CD RWs Discs with stickers labels or protective seal stuck to the surface Discs on which labels can be directly printed by an ink jet printer Using these discs under high temperatures or high humidities may cause malfunctions or damages to discs Disc operations Caution for DualDisc playback The Non DVD side of a DualDisc does not comply with the ...

Page 30: ...tter case upper lower This receiver can show the names of albums artists performer and ID3 Tag Version 1 0 1 1 2 2 2 3 or 2 4 for MP3 files and for WMA files This receiver can handle only one byte characters No other characters can be correctly displayed This receiver can play back MP3 WMA files meeting the conditions below Bit rate 8 kbps 320 kbps Sampling frequency 48 kHz 44 1 kHz 32 kHz for MPE...

Page 31: ...tomatically ejects Disc is inserted upside down Insert the disc correctly CD R CD RW cannot be played back Tracks on the CD R CD RW cannot be skipped CD R CD RW is not finalized Insert a finalized CD R CD RW Finalize the CD R CD RW with the component which you used for recording Disc can be neither played back nor ejected Disc is locked Unlock the disc see page 17 The CD player may have functioned...

Page 32: ...the disc Do not add the extension code mp3 or wma to non MP3 or WMA tracks A longer readout time is required CHECK keeps flashing on the display Readout time varies due to the complexity of the folder file configuration Do not use too many hierarchies and folders Tracks cannot be played back as you have intended them to play Playback order is determined when the files are recorded Elapsed playing ...

Page 33: ...000 Hz Stereo Separation 30 dB Capture Ratio 1 5 dB MW Tuner Sensitivity 20 µV Selectivity 35 dB LW Tuner Sensitivity 50 µV DAB Tuner Sensitivity Band III 98 dBm L Band 96 dBm Selectivity 40 dB CD PLAYER SECTION Type Compact disc player Signal Detection System Non contact optical pickup semiconductor laser Number of Channels 2 channels stereo Frequency Response 5 Hz to 20 000 Hz Dynamic Range 96 d...

Page 34: ... your unit Refer to page of How to reset your unit Vous avez des PROBLÈMES de fonctionnement Réinitialisez votre appareil Référez vous à la page intitulée Comment réinitialiser votre appareil Hebt u PROBLEMEN met de bediening Stel het apparaat terug Zie de pagina met de paragraaf Het apparaat terugstellen ...

Page 35: ...cation veuillez les placer correctement A B Hard case Control panel Etui de transport Panneau de commande Houder Bedieningspaneel C Sleeve Manchon Huls D Trim plate Plaque d assemblage Sierplaat E Power cord Cordon d alimentation Stroomkabel F Washer ø5 Rondelle ø5 Sluitring ø5 J Handles Poignées Hendels I Rubber cushion Amortisseur en caoutchouc Rubberdop H Mounting bolt M5 x 20 mm Boulon de mont...

Page 36: ...ture avec un cordon court et épais L appareil devient chaud Le fil de sortie d enceinte est il à la masse Les bornes des enceintes gauche et droite sont elles mises ensemble à la masse Cet appareil ne fonctionne pas du tout Avez vous réinitialisé votre appareil When installing the unit without using the sleeve Lors de l installation de l appareil sans utiliser de manchon Wanneer u het apparaat zon...

Page 37: ...ry bypassing the ignition switch constant 12 V À une borne sous tension du porte fusible connectée à la batterie de la voiture en dérivant l interrupteur d allumage 12 V constant Naar een onder spanning staande aansluitklem in het zekeringblok die is aangesloten op de accu van de auto u passeert de contactschakelaar constant 12 V To an accessory terminal in the fuse block À une borne accessoire du...

Page 38: ...wiel afstandsbediening in de auto KD DB711 D 1 2 SMB type connector Connecteur de type SMB SMB type stekker DAB aerial with the booster not supplied Antenne DAB avec un suramplificateur non fourni DAB antenne met spanningsverhoger niet bijgeleverd KD DB711 Connecting the external amplifier Connexion d un amplificateur extérieur Aansluiten van een externe versterker You can connect an amplifier to ...

Reviews: