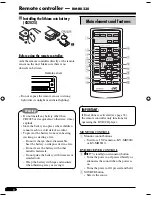
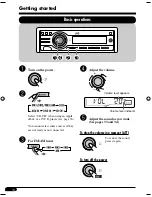
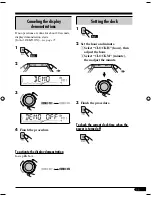
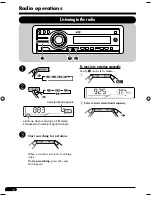
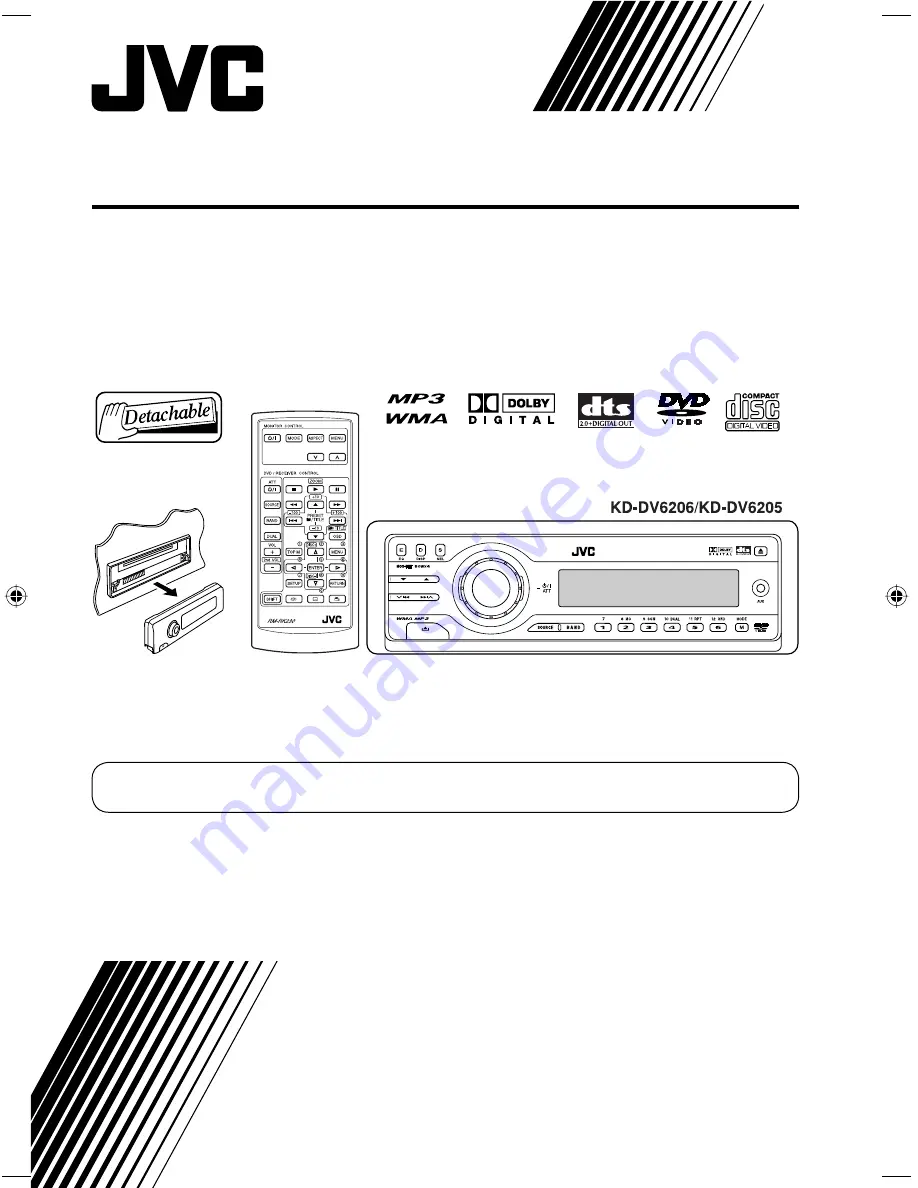
background image

DVD/CD RECEIVER

KD-DV6206/KD-DV6205

  For canceling the display demonstration, see page 11.

For installation and connections, refer to the separate manual.

INSTRUCTIONS

GET0383-004A

[A]

Cover_DV6206_004A_f.indd   2

Cover_DV6206_004A_f.indd   2

3/7/06   10:51:10 AM

3/7/06   10:51:10 AM

Summary of Contents for KD-DV6205

Page 1: ...DVD CD RECEIVER KD DV6206 KD DV6205 For canceling the display demonstration see page 11 For installation and connections refer to the separate manual INSTRUCTIONS GET0383 004A A ...

Page 2: ...e your complete understanding and to obtain the best possible performance from the unit IMPORTANT FOR LASER PRODUCTS 1 CLASS 1 LASER PRODUCT 2 CAUTION Do not open the top cover There are no user serviceable parts inside the unit leave all servicing to qualified service personnel 3 CAUTION Visible and invisible laser radiation when open and interlock failed or defeated Avoid direct exposure to beam...

Page 3: ... and no playback picture will be shown This warning appears only when the parking brake wire is connected to the parking brake system built in the car refer to the Installation Connection Manual This product incorporates copyright protection technology that is protected by U S patents and other intellectual property rights Use of this copyright protection technology must be authorized by Macrovisi...

Page 4: ...ons at the same time How to use the M MODE button If you press M MODE the unit goes into functions mode then the number buttons and 5 buttons work as different function buttons Ex When number button 2 works as MO monaural button Time countdown indicator To use these buttons for their original functions again after pressing M MODE wait for 5 seconds without pressing any of these buttons until the f...

Page 5: ... How to forcibly eject a disc 2 How to read this manual 4 How to use the M MODE button 4 How to detach attach the control panel 4 Introduction Playable discs 6 Control panel 7 Parts identification 7 Remote controller RM RK230 8 Main elements and features 8 Getting started 10 Basic operations 10 Canceling the display demonstrations 11 Setting the clock 11 Radio operations 12 Listening to the radio ...

Page 6: ...discs However the use of R double layer disc on this unit is not recommended DVD R recorded in multi border format is also playable except for dual layer discs Discs cannot be played back DVD Audio DVD ROM data DVD RAM DVD R RW R RW recorded in the DVD VR format CD ROM CD I CD I Ready Photo CD etc Playing back these discs will generate noise and damage the speakers Caution for DualDisc playback Th...

Page 7: ...M MODE button AUX auxiliary input jack Display window a Disc information indicators TAG ID3 Tag folder track file s Main display d Source display Volume level indicator f EQ equalizer indicator g Sound mode indicators ROCK CLASSIC POPS HIP HOP JAZZ USER also works as the time countdown indicator and level meter during play see page 35 h Disc type indicators WMA MP3 j Tuner reception indicators ST ...

Page 8: ...or starting a fire Do not recharge short disassemble heat the battery or dispose of it in a fire Do not leave the battery with other metallic materials Do not poke the battery with tweezers or similar tools Wrap the battery with tape and insulate when throwing away or saving it Remote sensor Main elements and features IMPORTANT If Dual Zone is activated see page 32 the remote controller only funct...

Page 9: ...ions w OSD button Shows the on screen bar Also function as the TITLE button when pressed with SHIFT button You can directly select titles for DVD or folders for MP3 WMA using the number buttons see page 18 e MENU button 1 Shows the DVD and VCD 2 disc menu r Menu operation buttons 1 Cursor fi and ENTER Makes selection settings DISC Changes discs when the source is CD CH t RETURN button 1 y Special f...

Page 10: ...ct some sources if they are not ready or not connected For FM AM tuner Adjust the volume Volume level appears Volume level indicator Adjust the sound as you want See pages 33 and 34 To drop the volume in a moment ATT To restore the sound press it again To turn off the power Getting started Basic operations ...

Page 11: ...l DEMO ON see page 35 1 2 3 4 Finish the procedure To activate the display demonstration In step 3 above Setting the clock 1 2 Set the hour and minute 1 Select CLOCK H hour then adjust the hour 2 Select CLOCK M minute then adjust the minute 3 Finish the procedure To check the current clock time when the power is turned off ...

Page 12: ...ed station frequency Radio operations Listening to the radio Ÿ Selected band appears Lights up when receiving an FM stereo broadcast with sufficient signal strength Start searching for a station When a station is received searching stops To stop searching press the same button again ...

Page 13: ...ars and the MO indicator goes off Storing stations in memory You can preset six stations for each band FM station automatic presetting SSM Strong station Sequential Memory 1 2 Select the FM band FM1 FM3 you want to store into 3 4 SSM flashes then disappears when automatic presetting is over Local FM stations with the strongest signals are searched and stored automatically in the FM band Continued ...

Page 14: ... number flashes for a while To check the current clock time while listening to an FM or AM station If no title is assigned to a station NO NAME appears To assign a title to a station see page 37 Listening to a preset station 1 2 3 Select the preset station 1 6 you want or When using the remote controller or ...

Page 15: ...ther disc operations on pages 29 31 If appears on the monitor when pressing a button the unit cannot accept an operation you have tried to do In some cases without showing operations will not be accepted The disc type is automatically detected and playback starts automatically for DVD automatic start depends on its internal program If the current disc is an audio CD CD Text MP3 WMA or VCD without ...

Page 16: ...mation appears automatically see page 30 Current folder number Current track number Total playing time of the inserted disc Total track number of the inserted disc CD Text Disc title performer Track title appears automatically see page 30 Current track number Elapsed playing time Elapsed playing time Elapsed playing time Total title number Current chapter number Total playing time of the inserted ...

Page 17: ... normal play To replay the previous scenes One Touch Replay The playback position moves back about 10 seconds before the current position This function works only within the same title For some DVDs this function does not work To stop playback When you start playback again playback starts from where it has been stopped Resume play When you start playback again playback starts from the beginning of...

Page 18: ... particular title folder Within 10 seconds press the number buttons see page 9 To go to the next or previous chapters tracks For DVD During play or pause To the following chapters tracks To go back to the beginning of the current chapter track then the previous chapters tracks To fast forward or reverse the chapter track Fast forwards Reverses The search speed changes to x2 x10 for all discs DVD V...

Page 19: ... 1 3 ENGLISH 1 3 For VCD You can select the audio channel to play This is convenient when playing a Karaoke VCD ST To listen to normal stereo left right playback L To listen to the L left audio channel R To listen to the R right audio channel Selecting multi angle views You can view the same scene at different angles if the disc has multi angle views Ex When the disc has 3 multi angle views For so...

Page 20: ...enu driven features or a VCD with the PBC PlayBack Control While playing a DVD 1 A title list or disc menu will appear on the monitor 2 Select the item you want on the menu Selected item starts playback On some discs you can also select items using the corresponding number buttons While playing a VCD When a list of items is displayed on the monitor To select a number greater than 9 see How to sele...

Page 21: ...time of the disc for DVD elapsed playing time of the current title T REM Remaining disc time for VCD remaining title time for DVD V TIME Elapsed playing time of the current chapter track REM Remaining time of the current chapter track 5 Playback condition Play Forward reverse search Forward reverse slow motion Pause Stop 6 Operation icons TIME Change time indication see 4 Time Search Enter the ela...

Page 22: ... erase the on screen bar The selectable options for Repeat Intro Random plays OFF Repeat play DVD OFF CHAP TITLE REPEAT Repeat play VCD while PBC is not in use REPEAT Canceled MP3 WMA REPEAT TRACK REPEAT FOLDER Canceled CD Text audio CD REPEAT TRACK Canceled DVD V 2ch T02 C03 TOTAL 1 25 58 TIME TITLE CHAP OFF DVD V 2ch T02 C03 TOTAL 1 25 58 TIME TITLE CHAP OFF _ _ ...

Page 23: ...TIME 0 00 58 To search for a particular point by playing time 1 Select 2 Enter the elapsed playing time of the current title or of the disc Ex To enter 1 hours 02 minutes 00 seconds press 1 0 2 0 then 0 To enter 54 minutes 00 seconds press 0 5 4 0 then 0 It is always required to enter the hour digit even 0 hour but it is not required to enter trailing zeros the last two digits in the examples abov...

Page 24: ...ar To select a track Basic control screen operations You can search for and play the desired items through the control screen The control screen automatically appears on the monitor when you insert a disc MP3 WMA control screen 1 Current folder 2 Current folder number total folder number 3 Folder list 4 Selected playback mode 5 Elapsed playing time of the current track 6 Operation mode icon play 7...

Page 25: ...st screen comes on and goes off 2 Select a track on the list List screen operations You can display the folder list track list before starting play On this list you can confirm the contents and start playing a disc Folder track list screens Folder list MP3 WMA Track list MP3 WMA CD Text audio CD 1 Current folder number total folder number only for MP3 WMA 2 Current track number total number of tra...

Page 26: ...c setting procedure While stop 1 2 Ex When selecting the AUDIO menu 3 Select an item you want to set up Ex When selecting DOWN MIX 4 5 Select an option 6 To set other items on the same menu Repeat steps 3 to 6 To set other items on other menus Repeat steps 2 to 6 To return to the normal screen DVD setup menu ...

Page 27: ...cture on your monitor 16 9 MULTI Select this when the aspect ratio of your monitor is 16 9 4 3 MULTI LETTER BOX Select this when the aspect ratio of your monitor is 4 3 While viewing a wide screen picture the black bars appear on the top and the bottom of the screen 4 3 MULTI PAN SCAN Select this when the aspect ratio of your monitor is 4 3 While viewing a wide screen picture the black bars do not...

Page 28: ...lby Digital DTS and MPEG Audio DOWN MIX When playing back a multi channel DVD disc this setting affects the signals reproduced through the LINE OUT jacks and through the DIGITAL OUT terminal when PCM ONLY is selected for DIGITAL AUDIO OUTPUT DOLBY SURROUND Select this when you want to enjoy multi channel surround audio by connecting an amplifier compatible with Dolby Surround to this unit STEREO N...

Page 29: ...acks To the beginning of the current track then the previous tracks To go to the next or previous folders To next folders To previous folders To locate a particular title chapter folder track directly For DVD During play or pause select a chapter During stop select a title For VCD While PBC see page 20 is not in use To select a number from 1 6 To select a number from 7 12 The number buttons can al...

Page 30: ...th 30th Then each time you press the button you can skip 10 chapters tracks After the last chapter track the first chapter track will be selected and vice versa 3 Each time you press the button consecutively the next or previous chapters tracks is located and played back Prohibiting disc ejection You can lock a disc in the loading slot To cancel the prohibition repeat the same procedure Changing t...

Page 31: ...ht up TRK RPT 2 The current track RPT lights up FLDR RPT 3 All tracks of the current folder and RPT light up RPT OFF For DVD Cancels Repeat play For other discs All tracks of the disc Random play For VCD While PBC see page 20 is not in use Ex When DISC RND is selected while playing an MP3 disc Mode Plays at random FLDR RND 3 All tracks of the current folder then tracks of the next folder and so on...

Page 32: ...By using the buttons on the control panel you can operate the newly selected source without affecting Dual Zone operations 2 Adjust the headphone volume through the 2nd AUDIO OUT plug 3 Operate the DVD CD player using the remote controller by referring to the monitor screen To cancel Dual Zone operations repeat step 1 DUAL OFF appears on the display On the control panel You can also activate and d...

Page 33: ...nd modes preset frequency level settings Sound mode Preset equalizing values 60 Hz 150 Hz 400 Hz 1 kHz 2 4 kHz 6 kHz 15 kHz USER 00 00 00 00 00 00 00 ROCK 03 02 00 00 01 02 01 CLASSIC 01 03 01 00 00 02 00 POPS 00 02 00 00 00 01 02 HIP HOP 04 01 01 02 00 01 00 JAZZ 03 02 01 01 01 03 01 Storing your own sound adjustments You can adjust the sound modes and store your own adjustments in memory 1 2 Ent...

Page 34: ...nd at low volume level LOUD ON J LOUD OFF SUB W 2 subwoofer Adjust the subwoofer output level 00 min to 08 max VOL A 3 volume adjust Adjust and store the volume level of each source 05 min to 05 max VOL 4 volume Adjust the volume 00 min to 30 or 50 max 5 1 If you are using a two speaker system set the fader level to 00 2 This takes effect only when a subwoofer is connected 3 You cannot make an adj...

Page 35: ...nstration will be activated automatically if no operation is done for about 20 seconds 11 DEMO OFF Cancels CLOCK H Hour adjustment 1 12 11 Initial 1 1 00 CLOCK M Minute adjustment 00 59 11 Initial 00 1 00 LEVEL Audio level meter ON Initial Activates the audio level indicator OFF Cancels sound mode indicator is shown 33 DIMMER Dimmer AUTO Initial Dims the display when you turn on the headlights ON ...

Page 36: ...connected HPF OFF Initial Cancels TAG DISP Tag display TAG ON Initial Shows the tag while playing MP3 WMA tracks 40 TAG OFF Cancels NTSC PAL 2 Video format PAL Initial Select this if your monitor is of the PAL color system NTSC Select this if your monitor is of the NTSC color system REAR SPK 3 Rear speaker output ON Initial Select this to turn on the rear speaker output OFF Cancels AMP GAIN Amplif...

Page 37: ...or an MP3 WMA disc 1 Select the source For FM AM tuner Tune into a station For a CD in this unit Insert a CD For CDs in the CD changer Select CD CH then select a disc number 2 Enter the title assignment mode Ex When you select DISC as the source 3 Assign a title 1 Select a character 2 Move to the next or previous character position 3 Repeat steps 1 and 2 until you finish entering the title 4 Finis...

Page 38: ...ou cannot use the CH X99 CH X100 and KD MK series CD changers with this unit Disc text information recorded in the CD Text can be displayed when a JVC CD Text compatible CD changer is connected Before operating your CD changer Refer also to the Instructions supplied with your CD changer You cannot control and play any DVD VCD and WMA disc in the CD changer All tracks of the inserted discs in the m...

Page 39: ...ring play For MP3 disc you can skip a track within the same folder Ex To select track 32 while playing track 6 1 When the current disc is an MP3 disc ROOT appears if no folder is included in the disc When the current disc is an audio CD or a CD Text disc Current folder number Disc information appears automatically see page 40 CD Text Disc title performer Track title appear automatically see page 4...

Page 40: ...track will be selected and vice versa 3 Changing the display information While playing an audio CD or a CD Text 1 If no title is assigned to an audio CD NO NAME appears To assign a title to an audio CD see page 37 While playing an MP3 disc When TAG DISP is set to TAG ON see page 36 2 If an MP3 file does not have ID3 tags folder name and file name appear In this case the TAG indicator will not ligh...

Page 41: ...All tracks of the current folder and RPT light up DISC RPT All tracks of the inserted discs and RPT light up RPT OFF Cancels Random play Ex When DISC RND is selected while playing an MP3 disc Mode Plays at random FLDR RND All tracks of the current folder then tracks of the next folder and so on RND and light up DISC RND All tracks of the current disc RND and light up MAG RND All tracks of the inse...

Page 42: ...nput jack on the control panel For connection see Installation Connection Manual separate volume CD CH For selecting the iPod D player connected to the CD changer jack through KS PD100 KS PD500 not supplied LINE IN For selecting the external component connected to the LINE IN plug AUX IN For selecting the external component connected to the AUX input jack NOT compatible with digital signals Ÿ Turn...

Page 43: ...on swab or cloth moistened with alcohol being careful not to damage the connectors Connector Moisture condensation Moisture may condense on the lens inside the DVD CD player in the following cases After starting the heater in the car If it becomes very humid inside the car Should this occur the DVD CD player may malfunction In this case eject the disc and leave the unit turned on for a few hours u...

Page 44: ...nately on the display Press 0 to eject the disc Playing a DVD R RW R RW or CD R RW Use only finalized discs This unit can play back only the files of the same type which is first detected if a disc includes both audio CD CD DA files and MP3 WMA files Only for CD R RW This unit can play back multi session discs however unclosed sessions will be skipped while playing Some DVD R RW R RW or CD R RW ma...

Page 45: ...l elapsed time Especially after performing the search function this difference becomes noticeable This unit cannot play back the following files MP3 files encoded with MP3i and MP3 PRO format MP3 files encoded in an inappropriate format MP3 files encoded with Layer 1 2 WMA files encoded with lossless professional and voice format WMA files which are not based upon Windows Media Audio WMA files cop...

Page 46: ...Greenlandic Cambodian Kannada Korean KOR Kashmiri Kurdish Kirghiz Latin Lingala Laothian Lithuanian Latvian Lettish Malagasy Maori MK ML MN MO MR MS MT MY NA NE NO OC OM OR PA PL PS PT QU RM RN RO RW SA SD SG SH SI SK SL SM SN Macedonian Malayalam Mongolian Moldavian Marathi Malay MAY Maltese Burmese Nauru Nepali Norwegian Occitan Afan Oromo Oriya Panjabi Polish Pashto Pushto Portuguese Quechua Rh...

Page 47: ... MIX see page 28 Through DIGITAL OUT optical Digital signals Linear PCM Dolby Digital DTS MPEG Audio are emitted through this terminal For more details see below To reproduce multi channel sounds such as Dolby Digital and DTS connect an amplifier or a decoder compatible with these multi channel sources to this terminal and set DIGITAL AUDIO OUTPUT correctly See page 28 About Dual Zone While you ar...

Page 48: ...r only functions for operating the DVD CD player FM AM SSM automatic presetting does not work Signals are too weak Store stations manually Static noise while listening to the radio The antenna is not connected firmly Connect the antenna firmly Disc playback Disc cannot be played back Disc is inserted upside down Insert the disc correctly Recordable Rewritable disc cannot be played back Tracks on t...

Page 49: ...nd distorted The disc DVD VCD is recorded in NTSC format Change the disc Change the video format to NTSC see page 36 The left and right edges of the picture are missing on the screen 4 3 MULTI PAN SCAN is selected when viewing on a conventional TV aspect ratio 4 3 Select 4 3 MULTI LETTER BOX See page 27 MP3 WMA playback Disc cannot be played back No MP3 WMA tracks are recorded on the disc Change t...

Page 50: ...d upside down Insert disc correctly NO MAG appears on the display No magazine is loaded in the CD changer Insert the magazine RESET 8 appears on the display This unit is not connected to the CD changer correctly Connect this unit and the CD changer correctly and press the reset button of the CD changer RESET 1 RESET 7 appears on the display Press the reset button of the CD changer The CD changer d...

Page 51: ...equency Range FM 87 5 MHz to 108 0 MHz AM 531 kHz to 1 602 kHz FM Tuner Usable Sensitivity 11 3 dBf 1 0 µV 75 Ω 50 dB Quieting Sensitivity 16 3 dBf 1 8 µV 75 Ω Alternate Channel Selectivity 400 kHz 65 dB Frequency Response 40 Hz to 15 000 Hz Stereo Separation 30 dB AM Tuner Sensitivity 20 µV Selectivity 35 dB DVD CD PLAYER SECTION Signal Detection System Non contact optical pickup semiconductor la...

Page 52: ... 2006 Victor Company of Japan Limited EN 0306DTSMDTJEIN Having TROUBLE with operation Please reset your unit Refer to page of How to reset your unit ...

Page 53: ...ing to prevent the speakers from being damaged see page 36 of the INSTRUCTIONS To prevent short circuit cover the terminals of the UNUSED leads with insulating tape The heat sink becomes very hot after use Be careful not to touch it when removing this unit 1 TROUBLESHOOTING The fuse blows Are the red and black leads connected correctly Power cannot be turned on Is the yellow lead connected No soun...

Page 54: ... firmly in place Removing the unit Before removing the unit release the rear section Insert the two handles then pull them as illustrated so that the unit can be removed When using the optional stay Screw option Stay option Fire wall Dashboard Install the unit at an angle of less than 30 When installing the unit without using the sleeve In a Toyota car for example first remove the car radio and in...

Page 55: ...ted otherwise power cannot be turned on Antenna connector 3 A Typical connections Before connecting Check the wiring in the vehicle carefully Incorrect connection may cause serious damage to this unit The leads of the power cord and those of the connector from the car body may be different in color 1 Connect the colored leads of the power cord in the order specified in the illustration below 2 Con...

Page 56: ...n the gain control on the external amplifier to obtain the best performance from this unit To the remote lead of other equipment or auto antenna if any Y connector not supplied for this unit Remote lead 5 Signal cord not supplied for this unit Front speakers Rear speakers JVC Amplifier JVC Amplifier Subwoofer Front speakers Remote lead Blue with white stripe 6 Firmly attach the ground wire to the ...

Reviews: