background image

ENGLISH

‰∑¬

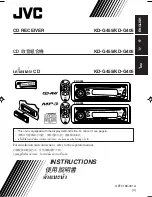
CD RECEIVER

KD-G455/KD-G405

INSTRUCTIONS

 !"

§”·π–π”

GET0180-001A

[U]

For installation and connections, refer to the separate manual.

 !"#$%&'()*+,-./0

°√ÿ≥“¥Ÿ§ŸË¡◊Õ∑’Ë·¬°µË“ßÀ“°  „π°“√µ‘¥µ—Èß·≈–°“√‡™◊ËÕ¡µËÕ

`a=

 !"

KD-G455/KD-G405

‡§√◊ËÕ߇≈Ëπ

 CD

KD-G455/KD-G405

This unit is equipped with the display demonstration. To cancel it, see page 8.

 !

 !"#$%&'("#)*+,-

 8 

‡§√◊ËÕßπ’ȉ¥È√—∫°“√µ‘¥µ—Èß°“√ “∏‘µ¿“æª√–°Õ∫ À“°µÈÕß°“√¬°‡≈‘° ‚ª√¥¥Ÿ ÀπÈ“ 

8

SOUND

VOL

VOL

SOURCE

R

F

U

D

ATT

SOUND

VOL

VOL

SOURCE

R

F

U

D

ATT

KD-G455

KD-G405

KD-G455

KD-G405

Cover001A_KD-G455_405[U]1.p65

8/12/03, 10:49 AM

1

Summary of Contents for KD-G405

Page 1: ...e separate manual 0 ÿ Ÿ ŸË Õ Ë µË ßÀ π µ µ Èß ËÕ µËÕ a KD G455 KD G405 ËÕß Ëπ CD KD G455 KD G405 This unit is equipped with the display demonstration To cancel it see page 8 8 ËÕßπ È È µ µ Èß µ æª Õ À µÈÕß ª Ÿ ÀπÈ 8 SOUND VOL VOL SOURCE R F U D ATT SOUND VOL VOL SOURCE R F U D ATT KD G455 KD G405 KD G455 KD G405 ...

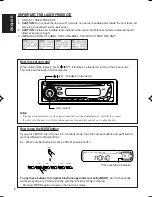
Page 2: ...x When number button 2 works as MO monaural button To use these buttons for original functions again after pressing MODE wait for 5 seconds without pressing any of these buttons until the functions mode is cleared Pressing MODE again also clears the functions mode SEL select standby on attenuator Time countdown indicator IMPORTANT FOR LASER PRODUCTS 1 CLASS 1 LASER PRODUCT 2 CAUTION Do not open th...

Page 3: ...P3 18 How are MP3 files recorded and played back 18 MP3 OPERATIONS 19 Playing an MP3 disc 19 Locating a file or a particular portion on an MP3 disc 20 Selecting MP3 playback modes 22 SOUND ADJUSTMENTS 23 Selecting preset sound modes C EQ custom equalizer 23 Adjusting the sound 24 OTHER MAIN FUNCTIONS 25 Changing the general settings PSM 25 Detaching the control panel 27 CD CHANGER OPERATIONS only ...

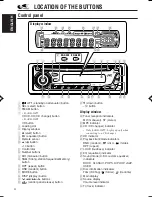
Page 4: ...OPS HIP HOP JAZZ USER Disc information indicators TAG ID3 Tag folder track file z Main display x Source display Volume level indicator c Tr track indicator Control panel 1 standby on attenuator button 2 SEL select button 3 FM AM button 4 For KD G455 CD CD CH CD changer button For KD G405 CD button 5 Loading slot 6 Display window 7 0 eject button 8 EQ equalizer button 9 Remote sensor p 5 up button ...

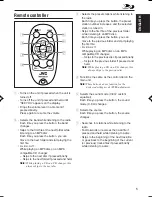
Page 5: ...ou press the button the source changes 7 Searches for stations while listening to the radio Fast forwards or reverses the track file if pressed and held while listening to a disc Skips to the beginning of the next track file or goes back to the beginning of the current or previous tracks files if pressed briefly while listening to a disc 1 Turns on the unit if pressed when the unit is turned off T...

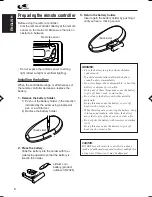
Page 6: ...hing it until you hear a clicking sound Lithium coin battery product number CR2025 Remote sensor WARNING Store the battery in a place where children cannot reach If a child accidentally swallows the battery consult a doctor immediately Do not recharge short disassemble or heat the battery or dispose of it in a fire Doing any of these things may cause the battery to give off heat crack or start a f...

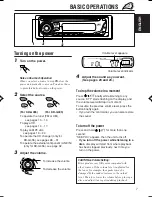
Page 7: ...he display and the volume level will drop in a moment To resume the previous volume level press the button briefly again If you turn the control dial you can also restore the sound To turn off the power Press and hold for more than one second SEE YOU appears then the unit turns off If you turn off the power while listening to a disc disc play will start from where playback has been stopped previou...

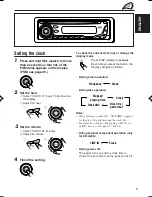
Page 8: ... demonstration before you use the unit for the first time To cancel the display demonstration follow the procedure below 1 Press and hold SEL select for more than 2 seconds so that one of the PSM items appears on the display PSM see page 25 2 Select DEMO if not shown on the display 3 Select DEMO OFF 4 Finish the setting To activate the display demonstration repeat the same procedure and select DEM...

Page 9: ...ay mode Press DISP display repeatedly Each time you press the button the display changes as follows During tuner operation During disc operation Notes While playing an audio CD NO NAME appears for the disc title performer and the track title For indication change while playing a CD Text or an MP3 disc see also pages 17 and 20 During external component operation only for KD G455 During power off Th...

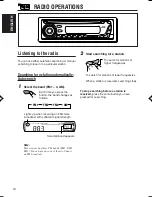
Page 10: ...te This receiver has three FM bands FM1 FM2 FM3 You can use any one of them to listen to an FM broadcast To search for stations of lower frequencies To search for stations of higher frequencies Selected band appears Lights up when receiving an FM stereo broadcast with sufficient signal strength FM1 FM2 FM3 AM 2 Start searching for a station When a station is received searching stops To stop search...

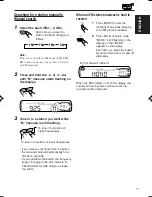
Page 11: ...e in to stations of higher frequencies MO monaural indicator FM1 FM2 FM3 AM Searching for a station manually Manual search 1 Select the band FM1 3 AM Each time you press the button the band changes as follows Note This receiver has three FM bands FM1 FM2 FM3 You can use any one of them to listen to an FM broadcast 2 Press and hold or 4 until M manual starts flashing on the display 3 Tune in to a s...

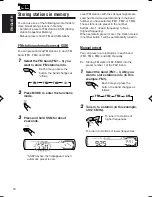
Page 12: ...de 3 Press and hold SSM for about 2 seconds SSM flashes then disappears when automatic preset is over FM1 FM2 FM3 AM Local FM stations with the strongest signals are searched and stored automatically in the band number you have selected FM1 FM2 or FM3 These stations are preset in the number buttons No 1 lowest frequency to No 6 highest frequency When automatic preset is over the station stored in ...

Page 13: ...t to select the next or previous preset stations Each time you press the 5 up or down button the next or previous preset station is tuned in Preset number flashes for a while 3 Press and hold the number button in this example 1 for more than 2 seconds 4 Repeat the above procedure to store other stations into other preset numbers Notes A previously preset station is erased when a new station is sto...

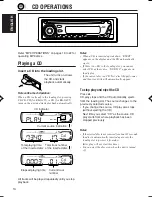
Page 14: ...lay If the current disc is a CD Text disc title performer and then track title will automatically appear To stop play and eject the CD Press 0 CD play stops and the CD automatically ejects from the loading slot The source changes to the previously selected source If you change the source CD play also stops without ejecting the CD Next time you select CD as the source CD play starts from where play...

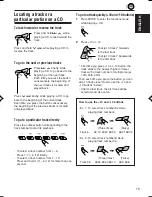
Page 15: ... a CD to go back to the beginning of the current track Each time you press the button consecutively the beginning of the previous tracks is located and played back To go to a track quickly 10 and 10 buttons 1 Press MODE to enter the functions mode while playing a CD 2 Press 10 or 10 First time you press 10 or 10 button the track skips to the nearest higher or lower track with a track number of mul...

Page 16: ...ator lights up on the display The current track starts playing repeatedly RPT indicator Selecting CD playback modes To play back tracks at random Disc Random Play You can play back all tracks on the CD at random 1 Press MODE to enter the functions mode while playing a CD 2 Press RND random while MODE is still flashing on the display so that DISC RND appears on the display Each time you press the b...

Page 17: ...own automatically when you play a CD Text To change the CD Text information manually select text display mode while playing a CD Text Press DISP display repeatedly Each time you press the button the display changes as follows Notes The display shows up to 8 characters at one time and scrolls if there are more than 8 characters See also To select the scroll mode SCROLL on page 26 Some characters or...

Page 18: ...be recorded in folders in PC terminology During recording the files and folders can be arranged in a way similar to arranging files and folders of computer data Root is similar to the root of a tree Every file and folder can be linked to and be accessed from the root The illustration below shows an example of how MP3 files are recorded on a CD R or CD RW how they are played back and how they are s...

Page 19: ...the complexity of the folder file configuration When playback starts folder and file names or ID3 tags will automatically appear See also page 20 If you change the source or turn the power off disc playback stops without ejecting the disc Next time you select the CD player as the source or turn the power on disc play starts from where playback has been stopped previously To stop play and eject the...

Page 20: ...g this operation you can only hear intermittent sounds The elapsed playing time also changes intermittently on the display To skip to the next or previous files To go to a particular file quickly within the current folder 10 and 10 buttons 1 Press MODE to enter the functions mode while playing an MP3 disc 2 Press 10 or 10 Press 4 briefly while playing to skip back to the beginning of the current f...

Page 21: ... first file will be selected and vice versa How to use the 10 and 10 buttons Ex 1 To select file number 32 while playing file number 6 Ex 2 To select file number 8 while playing file number 36 To go to a particular folder directly IMPORTANT To directly select the folders using the number button s it is required that folders are assigned 2 digit numbers at the beginning of their folder names This c...

Page 22: ... DISC RND RND and All files on the disc indicators light up RND and folder indicators To play back files repeatedly Track Repeat Folder Repeat Play You can play back the current file or all the files in the current folder repeatedly 1 Press MODE to enter the functions mode while playing an MP3 disc 2 Press RPT repeat while MODE is still flashing on the display so that TRK RPT or FLDR RPT appears o...

Page 23: ...ur preference Once you make an adjustment it is automatically stored for the currently selected sound mode See Adjusting the sound on page 24 Selecting preset sound modes C EQ custom equalizer You can select a preset sound mode C EQ custom equalizer suitable to the music genre Select the sound mode you want Each time you press the button the sound modes change as follows Ex When you select ROCK In...

Page 24: ...justment you have made is stored for the currently selected sound mode C EQ including USER 2 If you are using a two speaker system set the fader level to 00 3 Normally the control dial works as the volume control So you do not have to select VOL to adjust the volume level 4 Depending on the amplifier gain control setting See page 26 for details 2 Adjust the setting 3 Repeat steps 1 and 2 to adjust...

Page 25: ...setting 1 12 00 59 1 1 00 9 DEMO Display demonstration CLOCK H Hour adjustment CLOCK M Minute adjustment DIMMER Dimmer mode SCROLL Scroll mode EXT IN External component TAG DISP Tag display AMP GAIN Amplifier gain control Preferred Setting Mode PSM items For detailed operations of each PSM items refer to the pages listed in the table Indications Selectable values items Factory preset See settings ...

Page 26: ...er than CD changer Note For connecting the Line Input Adapter KS U57 and the external component refer to the Installation Connection Manual separate volume To turn the tag display on or off TAG DISP An MP3 file can contain file information called ID3 Tag where its album name performer track title etc are recorded There are two versions ID3v1 ID3 Tag version 1 and ID3v2 ID3 Tag version 2 If both ID...

Page 27: ...Lift and pull the control panel out of the unit 3 Put the detached control panel into the provided case Attaching the control panel 1 Insert the left side of the control panel into the groove on the panel holder 2 Press the right side of the control panel to fix it to the panel holder Note on cleaning the connectors If you frequently detach the control panel the connectors will deteriorate To mini...

Page 28: ...CH X99 and CH X100 However they are not compatible with MP3 discs so you cannot play back MP3 discs You cannot use the KD MK series CD changers with this unit Before operating your CD changer Refer also to the Instructions supplied for your CD changer If no discs are in the magazine of the CD changer or the discs are inserted upside down NO DISC will appear on the display If this happens remove th...

Page 29: ...utively the beginning of the next tracks files is located and played back Press 4 briefly during play to skip back to the beginning of the current track file Each time you press the button consecutively the beginning of the previous tracks files is located and played back Press and hold during play to fast forward the track file When the current disc is a CD Playback starts from the first track of...

Page 30: ...he button you can skip 10 tracks files see How to use the 10 and 10 buttons below After the last track file the first track file will be selected and vice versa Note If the current playing disc is an MP3 disc files are skipped within the same folder How to use the 10 and 10 buttons Ex 1 To select track file number 32 while playing track file number 6 Ex 2 To select track file number 8 while playin...

Page 31: ...able for MP3 discs To play back tracks files repeatedly Track Repeat Folder Repeat Disc Repeat Play 1 Press MODE to enter the functions mode during play 2 Press RPT repeat while MODE is still flashing on the display Each time you press the button the repeat play mode changes as follows For MP3 discs For CDs Note MP3 indicator also lights up if the current playing disc is an MP3 disc Mode Active Pl...

Page 32: ...efore operating the external component using the following procedure select the external input correctly See To select the external component to use EXT IN on page 26 1 Select the external component LINE IN If LINE IN does not appear on the display see page 26 and select the external input LINE IN Note on One Touch Operation When you press CD CD CH the power automatically comes on You do not have ...

Page 33: ...d connections Insert a disc into the loading slot Insert the disc correctly Causes The volume level is set to the minimum level Connections are incorrect The built in microcomputer may have functioned incorrectly due to noise etc Signals are too weak The antenna is not connected firmly Disc is inserted upside down CD R CD RW is not finalized Disc is locked The CD player may have functioned incorre...

Page 34: ...e played back is not an MP3 file although it has the extension code mp3 Readout time varies due to the complexity of the folder file configuration Playback order is determined when the files are recorded This sometimes occurs during play This is caused by how the files are recorded on the disc The current folder does not contain any MP3 file The current disc does not contain any MP3 file This unit...

Page 35: ...ton of the CD changer While holding SEL select press standby on attenuator for more than 2 seconds to reset the unit Your preset adjustments will also be erased See page 2 Causes No disc is in the magazine Discs are inserted upside down No magazine is loaded in the CD changer This unit is not connected to the CD changer correctly The built in microcomputer may function incorrectly due to noise etc...

Page 36: ...heir instructions or cautions carefully Use only finalized CD Rs or CD RWs Some CD Rs or CD RWs may not be played back on this unit because of their disc characteristics and for the following reasons Discs are dirty or scratched Moisture condensation on the lens inside the unit The pickup lens inside the unit is dirty CD RWs may require a longer readout time since the reflectance of CD RWs is lowe...

Page 37: ...ower Output Front 50 W per channel Rear 50 W per channel Continuous Power Output RMS Front 19 W per channel into 4 Ω 40 Hz to 20 000 Hz at no more than 0 8 total harmonic distortion Rear 19 W per channel into 4 Ω 40 Hz to 20 000 Hz at no more than 0 8 total harmonic distortion Load Impedance 4 Ω 4 Ω to 8 Ω allowance Tone Control Range Bass 10 dB at 100 Hz Treble 10 dB at 10 kHz Frequency Response ...

Page 38: ...KD G405 CD GA l u œ Ò q 1203KKSMDTJEIN EN CT TH AR 2003 VICTOR COMPANY OF JAPAN LIMITED c N U e Ë Ò œ Ð u þ O H W Ý F d A U ý W F d Æ ô G U Ë þ O H W ô Ý F d E d H W Æ SOUND VOL VOL SOURCE R F U D ATT SOUND VOL VOL SOURCE R F U D ATT KD G455 KD G405 KD G455 KD G405 ...

Page 39: ...Õ π È À ß µ Õ È ª µ Èß ËÕß ÀÈ Ÿ µÈÕß A B Hard case Control panel ß ÿ ÀπÈ ª C Sleeve ª Õ ÀÿÈ D Trim plate ºËπ À Õ µËß JVC µ µ Èß ª Õ ºßÀπÈ ª Ï È æµ Õ Ë ßµËÕ ªπ È ß ß µ µ Èß Ë ª À ÿ ª À À ÕµÈÕß ÈÕ Ÿ Ë ÿ µ µ Èß ÿ ª ºŸÈ ËÕß ß πµÏ JVC Õß Ë πÀ Õ ÿ ª Õ È ÿ Ë πË Ë µ µ Èß ÿ ª Õ π È Ÿ µÈÕßÀ Õ Ë ÀÈÀ Ë ßºŸÈ Ë ªÁπºŸÈµ µ Èß 0 Õ ÿ ª Õ ËÕπ Õ ÿ ª Õ ÀȪ ÀπÈ µ Ë π È ËÕπ O O O O O ÒÒÒÒÒ qO u ØVO d ULOKFð V qO u ØVO d...

Page 40: ...Õ ËÕπ L R 0 L R µ Õ ª À ÈÕß ø Ï ËÕ µ Ë ßÕ Ë ß Ÿ µÈÕßÀ Õ Ë Ë ª ËÕß È ËÕ µ Ë À ÕßÀ Õ Ë Ë ßÕÕ æß µ Ë Ë π ËÕÕ ß æß øøÈ ß À Õ Ë ß æ È π µ Ë Ë π ËÕÕ ß æßµËÕ ß πÀ Õ Ë È Õß æß È π È µËÕ ß πµ ª µ À Õ Ë ß π È ÈπÊ À ÕÀπ Ê µËÕ ËÕß Ë π ˵ µ Èß È πæ Èπ È πÀ ß µ ß πµÏÀ Õ Ë ÿ ª Õ ÈÕπ Èπ µ Ë Ë π ËÕÕ ß æßµËÕ ß πÀ Õ Ë È Õß æß È π È µËÕ ß πµ ª µ À Õ Ë Õö ô Ë UDŽô sŽ Y Õö ô Ë UDŽô sŽ Y Õö ô Ë UDŽô sŽ Y Õö ô Ë UDŽô sŽ ...

Page 41: ...speaker rear æß È À ß Right speaker front æß ÀπÈ Left speaker front æß È ÀπÈ Right speaker rear æß À ß Ignition switch Ï ÿ Only for KD G455 To CD changer jack or another external component see diagram KD G455 CD KD G455 Ë π Èπ ËÕß µËÕ Õß ËÕß Ëπ CD À Õÿª Ï πÕ Ÿ ºπ Ÿ Typical Connections ËÕ µËÕ ª µ 1 2 1 1 1 2 3 4 5 3 15 Antenna terminal È Õ ENGLISH 1 0 2 3 ËÕ ËÕ µËÕ µ Õ ø µÏÕ Ë ß Õ Ë ÀȺ æ ËÕ µËÕ ÿ ...

Page 42: ...Õÿª ÏÕ ËπÊ È æ ËÕ æ Ë ÿ æ ß ÀÈ µÕ Õ Õß πµÏ µËÕ µ Ë πÈ ß π È µ Ë ÕßÕÿª ÏÕ Ëπ Ê æ ËÕ ÿ ÿ ª Õ π È È À ËÕß Ë π Èπ Õ æßÕÕ ÿ ª Õ π È È µËÕ È ËÕß Èß µ Ë æß Õß ÿ ª Õ π È È Signal cord not supplied for this unit Ë È ÀÈ ÿ ª Õ π È 3 0 01 3 µËÕ π ÀÈ πËπ È µ ß À Á À Õµ ß µ ß Ë π Ë Ë Õ À Õ Õ ŸË ÀÈ Ÿ ÕÕ ËÕπ ËÕπµËÕ π À 軯 µ µ π π π È ËÕßÕ ÿ À Õ À uB rCC uB rCC uB rCC uB rCC uB rCC Èdš eNł Ë u rCC qO uð pMJ1 Æ UO...

Reviews: