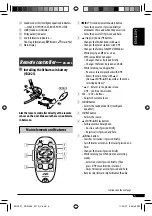
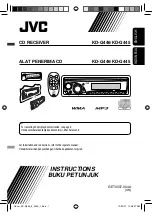
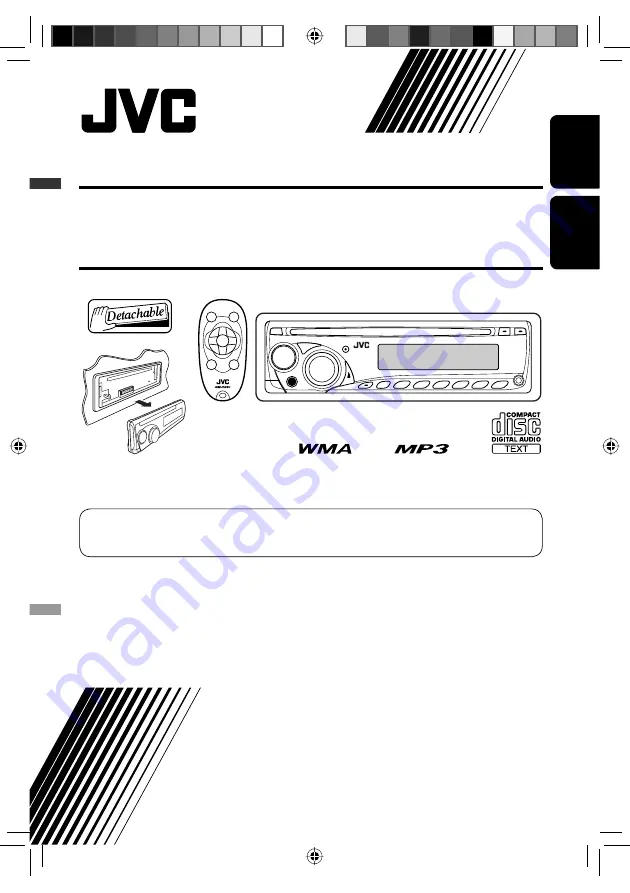
background image

ENGLISH

INDONESIA

CD RECEIVER 

KD-G446/KD-G445

ALAT PENERIMA CD 

KD-G446/KD-G445

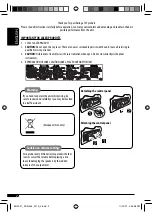
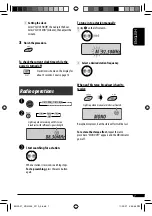
  For canceling the display demonstration, see page 6.
  Untuk membatalkan tampilan demonstrasi, lihat halaman 6.

For installation and connections, refer to the separate manual.
Untuk instalasi dan penyambungan, lihat buku pedoman terpisah.

INSTRUCTIONS

BUKU PETUNJUK

GET0537-004A

[UN]

Cover_KD-G446_5_004A_1.indd   1

Cover_KD-G446_5_004A_1.indd   1

10/29/07   10:08:27 AM

10/29/07   10:08:27 AM

Summary of Contents for KD-G445

Page 1: ...ge 6 Untuk membatalkan tampilan demonstrasi lihat halaman 6 For installation and connections refer to the separate manual Untuk instalasi dan penyambungan lihat buku pedoman terpisah INSTRUCTIONS BUKU PETUNJUK GET0537 004A UN Cover_KD G446_5_004A_1 indd 1 Cover_KD G446_5_004A_1 indd 1 10 29 07 10 08 27 AM 10 29 07 10 08 27 AM ...

Page 2: ... ensure your complete understanding and to obtain the best possible performance from the unit IMPORTANT FOR LASER PRODUCTS 1 CLASS 1 LASER PRODUCT 2 CAUTION Do not open the top cover There are no user serviceable parts inside the unit leave all servicing to qualified service personnel 3 CAUTION Visible and or invisible class 1M laser radiation when open Do not view directly with optical instrument...

Page 3: ...arted 6 Basic operations 6 Radio operations 7 Disc operations 8 Playing a disc in the unit 8 Playing discs in the CD changer 9 Sound adjustments 11 General settings PSM 13 Using the Bluetooth devices 15 Using the Bluetooth cellular phone 16 Using the Bluetooth audio player 18 Bluetooth settings 18 iPod operations 19 Other external component operations 21 Title assignment 22 More about this unit 22...

Page 4: ...quential Memory button o Number buttons RPT repeat button a RND random button s AUX auxiliary input jack d Status of Bluetooth device Device number 1 5 signal strength 0 3 battery reminder 0 3 Asthenumberincreases thesignal battery strengthbecomesstronger f Tr track indicator g Source display Track number Folder number Time countdown indicator h Bluetooth indicator j Playback source indicators CH ...

Page 5: ...anges the disc if pressed briefly Changes the folder if pressed and held While listening to an Apple iPod Pauses or resumes playback with D Enters the main menu with 5 U Now 5 U D 2 R F 3 work as the menu selecting buttons 5 U Returnstothepreviousmenu D Confirmstheselection 3 VOL VOL buttons Adjusts the volume level 4 SOUND button Selects the sound mode iEQ intelligent equalizer 5 SOURCE button Se...

Page 6: ...ise it may explode Store the battery in a place where children cannot reach to avoid risk of accident To prevent the battery from over heating cracking or starting a fire Do not recharge short disassemble heat the battery or dispose of it in a fire Do not leave the battery with other metallic materials Do not poke the battery with tweezers or similar tools Wrap the battery with tape and insulate w...

Page 7: ...hour Select CLOCK MIN minute then adjust the minute 3 Finish the procedure To check the current clock time while the power is turned off Clock time is shown on the display for about 5 seconds See also page 13 Radiooperations Ÿ Start searching for a station When a station is received searching stops To stop searching press the same button again Lights up when monaural mode is activated Lights up wh...

Page 8: ... repeatedly until you change the source or eject the disc Storing stations in memory You can preset six stations for each band FM station automatic presetting SSM Strong station Sequential Memory 1 Select the FM band FM1 FM3 you want to store into 2 3 SSM flashes then disappears when automatic presetting is over Local FM stations with the strongest signals are searched and stored automatically in ...

Page 9: ...ith this unit You cannot play any WMA disc in the CD changer Disc text information recorded in the CD Text can be displayed when a JVC CD Text compatible CD changer is connected For connection see Installation Connection Manual separate volume To fast forward or reverse the track To go to the next or previous tracks To go to the next or previous folders only for MP3 or WMA discs For MP3 discs For ...

Page 10: ...urrentdiscisanaudioCD NONAME appears 2 IfanMP3 WMAfiledoesnothaveTaginformation foldernameandfilenameappear Inthiscase the TAGindicatorwillnotlightup Other main functions Skipping tracks quickly during play Only possible on JVC MP3 compatible CD changer For MP3 or WMA discs you can skip tracks within the same folder Ex To select track 32 while playing a track whose number is a single digit 1 to 9 ...

Page 11: ...tracks of the discs in the magazine RND OFF Cancels 1 OnlywhileplayinganMP3oraWMAdisc 2 OnlywhileplayingdiscsintheCDchanger Corresponding indicator lights up on the display Continuedonthenextpage Soundadjustment You can select a preset sound mode suitable to the music genre iEQ intelligent equalizer Storing your own sound mode You can adjust the sound modes and store your own adjustments in memory...

Page 12: ...speaker output balance L06 to R06 LOUD 4 loudness Boost low and high frequencies to produce a well balanced sound at a low volume level LOUD ON or LOUD OFF SUB W 1 subwoofer Adjust the subwoofer output level 00 to 08 initial 04 VOL ADJ volume adjust Adjust the volume level of each source except FM compared to the FM volume level The volume level will automatically increase or decrease when you cha...

Page 13: ...d automatically if no operation is done for about 20 seconds 6 Cancels CLOCK DISP 1 Clock display CLOCK ON CLOCK OFF The clock time is shown on the display at all times when the power is turned off Cancels pressing DISP will show the clock time for about 5 seconds when the power is turned off 6 CLOCK HOUR Hour adjustment 1 12 Initial 1 1 00 6 CLOCK MIN Minute adjustment 00 59 Initial 00 1 00 6 1 I...

Page 14: ...an 90 Hz are sent to the subwoofer Frequencies lower than 135 Hz are sent to the subwoofer Frequencies lower than 180 Hz are sent to the subwoofer EXT INPUT 4 External input CHANGER EXT INPUT To use a JVC CD changer 8 an Apple iPod 19 To use any other external component 21 TAG DISPLAY Tag display TAG ON TAG OFF Shows the Tag information while playing MP3 WMA tracks 10 Cancels AMP GAIN Amplifier ga...

Page 15: ... the countries where you may use the Bluetooth function To use a Bluetooth device through the unit BT PHONE and BT AUDIO for the first time you need to establish Bluetooth wireless connection between the unit and the device Once the connection is established it is registered in the unit even if you reset your unit Up to five devices can be registered in total Only one device can be connected at a ...

Page 16: ... device through the unit The device remains registered even after you disconnect the device Use CONNECT or activate AUTO CNNCT to connect the same device from next time on See the following and pages 18 and 19 Connecting a device Perform steps 1 and 2 on page 15 then 1 Select SEARCH to search for available devices The unit searches and displays the list of the available devices If no available dev...

Page 17: ... make a call using the following methods Select BT PHONE then follow the following steps to make a call 1 Display the Dial Menu 2 Call history 1 Select a call history REDIAL RECEIVED MISSED 2 Then select a name if it is acquired or phone number Phone book 1 Select PHONE BOOK The list of phone number appears 2 Select a name from the list Direct dialing 1 Select NUMBER 2 Enter the phone number Displ...

Page 18: ...er to pause playback if playback does not pause when you change the source Reverse skip forward skip Pause start playback Operationmaybedifferentaccording totheconnectedphone Enter setting menu Device list Refer also to page 16 for connecting disconnecting deleting a registered device Bluetooth Information If you wish to receive more information about Bluetooth visit the following JVC web site htt...

Page 19: ...y for the device being connected for BT PHONE AUTOMATIC The unit informs you of the arrival of a message by ringing and displaying RCV MESSAGE receiving message MANUAL The unit does not inform you of the arrival of a message MIC SETTING microphone setting Only for the device being connected for BT PHONE Adjust microphone volume connected to the Bluetooth adapter LEVEL 01 02 03 VERSION The Bluetoot...

Page 20: ...If the selected item has another layer you will enter the layer Repeat steps 2 and 3 until the desired track is played Holding 4 can skip 10 items at a time Themenuselectingmodewillbecanceled If no operations are done for about 5 seconds When you confirm the selection of a track Selecting the playback modes 1 2 Select your desired playback mode 7 Repeat play ONE RPT Functions the same as Repeat On...

Page 21: ...external component to the AUX input jack For selecting the external component connected to AUX input jack You can also select AUX IN as the playback source by pressing the SRC source button CD changer jack on the rear using KS U57 or KS U58 If EXT IN does not appear see page 14 and select the external input EXT INPUT Ÿ Turn on the connected component and start playing the source Adjust the volume ...

Page 22: ... same preset number Disc operations Caution for DualDisc playback The Non DVD side of a DualDisc does not comply with the Compact Disc Digital Audio standard Therefore the use of Non DVD side of a DualDisc on this product may not be recommended General This unit has been designed to reproduce CDs CD Texts and CD Rs Recordable CD RWs Rewritable in audio CD CD DA MP3 and WMA formats MP3 and WMA trac...

Page 23: ...ter Using these discs under high temperature or high humidity may cause malfunctions or damage to the unit Playing an MP3 WMA disc This unit can play back MP3 WMA files with the extension code mp3 or wma regardless of the letter case upper lower This unit can show the names of albums artists performer and Tag Version 1 0 1 1 2 2 2 3 or 2 4 for MP3 files and for WMA files This unit can display only...

Page 24: ...his unit may not work for some Bluetooth devices Connecting condition may vary depending on the circumstances around you When the unit is turned off the device is disconnected Warning messages for Bluetooth operations ERROR CNNCT Error Connection The device is registered but the connection has failed Use CONNECT to connect the device again See page 16 ERROR Try the operation again If ERROR appears...

Page 25: ... 1 0 kHz 00 Q1 25 7 5 kHz 00 Q1 25 OFF ROCK 100 Hz 03 Q1 0 1 0 kHz 00 Q1 25 10 0 kHz 02 Q1 25 CLASSIC 80 Hz 01 Q1 0 1 0 kHz 00 Q1 25 10 0 kHz 03 Q1 25 POP 100 Hz 02 Q1 0 1 0 kHz 01 Q1 25 10 0 kHz 02 Q1 25 HIP HOP 60 Hz 04 Q1 0 1 0 kHz 02 Q1 0 10 0 kHz 01 Q1 25 JAZZ 80 Hz 03 Q1 0 1 0 kHz 00 Q1 25 10 0 kHz 03 Q1 25 Freq Frequency Q Quality slope General settings PSM If you change the AMP GAIN settin...

Page 26: ...ng surface When storing a disc in its case gently insert the disc around the center holder with the printed surface facing up Make sure to store discs in cases after use Connectors Center holder To keep discs clean A dirty disc may not play correctly If a disc does become dirty wipe it with a soft cloth in a straight line from center to edge Do not use any solvents for example conventional record ...

Page 27: ...e neither played back nor ejected Unlock the disc see page 10 Eject the disc forcibly see page 3 Disc sound is sometimes interrupted Stop playback while driving on rough roads Change the disc Check the cords and connections NO DISC appears on the display PLEASE and EJECT appear alternately on the display Insert a playable disc into the loading slot MP3 WMA playback Disc cannot be played back Use a...

Page 28: ...he unit to connect the device See page 15 The unit does not make pairing with the Bluetooth device Enter the same PIN code for both the unit and target device Select the device name from SPECIAL then try to connect again See page 16 Try to pair connect from the Bluetooth device Echo or noise occurs Adjust the microphone unit position Phone sound quality is poor Reduce the distance between the unit...

Page 29: ... or the iPod NO IPOD appears on the display Check the connecting cable and its connection Charge the battery Playback stops The headphones are disconnected during playback Restart the playback operation using the control panel see pages 19 and 20 No sound can be heard when connecting an iPod nano Disconnect the headphones from the iPod nano Update the firmware version of the iPod nano NO FILE appe...

Page 30: ...Hz to 20 000 Hz Signal to Noise Ratio 70 dB Line Out Level Impedance 2 5 V 20 kΩ load full scale Subwoofer Out Level Impedance 2 5 V 20 kΩ load full scale Output Impedance 1 kΩ Other Terminal AUX auxiliary input jack CD changer jack TUNER SECTION Frequency Range FM 87 5 MHz to 108 0 MHz AM 531 kHz to 1 602 kHz FM Tuner Usable Sensitivity 11 3 dBf 1 0 μV 75 Ω 50 dB Quieting Sensitivity 16 3 dBf 1 8...

Page 31: ...ayer 3 Max Bit Rate 320 kbps WMA Windows Media Audio Decoding Format Max Bit Rate 320 kbps GENERAL Power Requirement Operating Voltage DC 14 4 V 11 V to 16 V allowance Grounding System Negative ground Allowable Operating Temperature 0 C to 40 C Dimensions W H D approx Installation Size 182 mm 52 mm 160 mm Panel Size 187 mm 58 mm 6 mm Mass 1 3 kg excluding accessories Designandspecificationsaresubj...

Page 32: ...sikan untuk memastikan anda memahami secara keseluruhan dan mendapatkan performansi terbaik dari unit ini PENTING UNTUK PRODUK PRODUK LASER 1 PRODUK LASER KELAS 1 2 PERHATIAN Jangan membuka penutup atas Tidak ada bagian yang dapat diperbaiki oleh pengguna di dalam unit tersebut biarkanlah semua bagian yang diperbaiki untuk memenuhi syarat perbaikan teknis 3 PERHATIAN Apabila terbuka radiasi laser ...

Page 33: ...ai 6 Pengoperasian dasar 6 Pengoperasian radio 7 Pengoperasian disk 8 Memutar sebuah disk di dalam unit 8 Memutar disk di dalam CD changer 9 Penyetelan suara suara 11 Pengaturan pengaturan umum PSM 13 Menggunakan perangkat Bluetooth 15 Menggunakan ponsel Bluetooth 16 Menggunakan pemutar audio Bluetooth 18 Pengaturan Bluetooth 18 Pengoperasian iPod 19 Pengoperasian komponen eksternal lainnya 21 Pen...

Page 34: ...mono i Tombol SSM Memori Urutan Stasiun Kuat o Tombol nomor Tombol RPT ulang a Tombol RND acak s Konektor input AUX auxiliary d Status perangkat Bluetooth Nomor perangkat 1 5 kekuatan sinyal 0 3 pengingat baterai 0 3 Semakinnaikangkanya kekuatansinyal baterai semakinkuat f Indikator Tr trek g Tampilan sumber Nomor trek Nomor folder Indikator hitung mundur waktu h Indikator Bluetooth j Indikator in...

Page 35: ...n secara singkat Mengubah folder folder jika ditekan dan ditahan Sewaktu mendengarkan Apple iPod Jeda atau melanjutkan pemutaran dengan D Masuk ke menu utama dengan 5 U Sekarang 5 U D 2 R F 3 berfungsi sebagai tombol pemilihan menu 5 U Kembalikemenusebelumnya D Mengkonfirmasipemilihan 3 Tombol tombol VOL VOL Menyetel level volume 4 Tombol SOUND Memilih mode suara iEQ equalizer cerdas 5 Tombol SOUR...

Page 36: ...u lama karena dapat meledak Simpan baterai pada tempat dimana anak anak tidak dapat mencapainya untuk menghindari resiko kecelakaan Untuk mencegah baterai dari kelebihan panas keretakan atau mulai terbakar Jangan mengisi ulang hubung pendek ambil bagian memanaskan baterai atau menempatkannya dalam api Jangan meninggalkan baterai dengan bahan bahan dari logam Jangan mendorong baterai dengan penjepi...

Page 37: ...O OFF muncul dan indikator MO hilang 2 Pengaturan jam Pilih CLOCK HOUR kemudian setel jam Pilih CLOCK MIN menit kemudian setel menit 3 Prosedur selesai Untuk mengecek waktu jam yang berlaku sekarang sewaktu daya dimatikan Waktu jam ditunjukkan pada layar sekitar 5 detik Lihat juga halaman 13 Pengoperasianradio Ÿ Mulai mencari sebuah stasiun Ketika sebuah stasiun diterima pencarian berhenti Untuk m...

Page 38: ...au mengeluarkan disk Menyimpan stasiun stasiun dalam memori Anda dapat preset mengatur awal enam stasiun untuk setiap jalur Mempreset Mengatur awal secara otomatis stasiun FM SSM Memori Urutan Stasiun Kuat 1 Pilih jalur FM FM1 FM3 yang anda ingin simpan di dalamnya 2 3 SSM berkedip kemudian hilang ketika mempreset mengatur awal secara otomatis selesai Stasiun stasiun FM lokal dengan sinyal sinyal ...

Page 39: ...uatu disk WMA dalam CD changer Informasi teks disk yang direkam di dalam Teks CD dapat ditampilkan ketika sebuah Teks CD JVC yang kompatibel dengan CD changer telah dihubungkan Untuk penyambungan lihat Manual Pemasangan Penyambungan bagian yang terpisah Untuk maju cepat atau mundur trek Pergi ke trek trek sesudah atau sebelumnya Untuk pergi ke folder folder berikut atau sebelumnya hanya untuk disk...

Page 40: ...ahsebuahCDAudio NO NAME muncul 2 JikasebuahfileMP3 WMAtidakmempunyai informasitag namafolderdannamafilemuncul DalamkasusiniindikatorTAGtidakakanmenyala Fungsi fungsi utama yang lain Melewatkan trek trek secara langsung sementara memutar Hanya dimungkinkan pada CD changer JVC yang kompatibel dengan MP3 Untuk disk disk MP3 atau WMA anda dapat melewati trek trek dengan folder yang sama Misalnya Untuk...

Page 41: ...CH Semua trek dari disc dalam magazine RND OFF Batal 1 HanyasementaramemutarsebuahdiskMP3 atauWMA 2 HanyasementaramemutardiskdidalamCD changer Indikator yang bersangkutan akan menyala pada tampilan Bersambungkehalamanberikutnya Penyetelansuara suara Anda dapat memilih sebuah mode preset pengaturan awal yang sesuai untuk jenis musik iEQ equalizer cerdas Menyimpan mode suara milik Anda Anda dapat me...

Page 42: ...06 ke R06 LOUD 4 kekerasan Menguatkan frekuensi frekuensi rendah dan tinggi untuk menghasilkan keseimbangan suara yang baik pada level volume rendah LOUD ON atau LOUD OFF SUB W 1 subwoofer Setel level keluaran subwoofer 00 ke 08 permulaan 04 VOL ADJ Penyetelan volume Menyesuaikan tingkat volume dari masing masing sumber kecuali FM diperbandingkan dengan tingkat volume FM Tingkat volume akan secara...

Page 43: ...nstrasi DEMO ON DEMO OFF Tampilan demonstrasi akan diaktifkan secara otomatis jika tidak ada pengoperasian yang dilakukan untuk sekitar 20 detik 6 Batal CLOCK DISP 1 Tampilan waktu CLOCK ON CLOCK OFF Waktu jam diperlihatkan setiap saat pada layar meskipun daya dimatikan Batal dengan menekan DISP waktu jam akan ditunjukkan sekitar 5 detik apabila daya dimatikan 6 CLOCK HOUR Penyetelan jam 1 12 Perm...

Page 44: ...ri 90 Hz dikirim ke subwoofer Frekuensi frekuensi yang lebih rendah dari 135 Hz dikirim ke subwoofer Frekuensi frekuensi yang lebih rendah dari 180 Hz dikirim ke subwoofer EXT INPUT 4 Input eksternal CHANGER EXT INPUT Untuk menggunakan JVC CD changer 8 Apple iPod 19 Untuk menggunakan komponen eksternal yang lain 21 TAG DISPLAY Display tag TAG ON TAG OFF Menunjukkan informasi tag sementara memutar ...

Page 45: ...mbolehkan penggunaan fungsi Bluetooth Jika menggunakan perangkat Bluetooth BT PHONE dan BT AUDIO melalui unit untuk pertama kali Anda harus melangsungkan dulu koneksi nirkabel Bluetooth antara unit dan perangkat Setelah koneksi terjalin koneksi ini akan terdaftar di unit meskipun Anda menyetel ulang unitnya Total perangkat yang dapat didaftarkan adalah lima buah Hanya satu perangkat yang dapat dih...

Page 46: ...nakan perangkat melalui unit Perangkat tetap terdaftar meskipun Anda telah memutuskan perangkat Gunakan CONNECT atau aktifkan AUTO CNNCT untuk menghubungkan perangkat yang sama di waktu berikutnya Lihat yang berikut serta hal 18 dan 19 Menghubungkan perangkat Lakukan langkah 1 dan 2 pada halaman 15 kemudian 1 Pilih SEARCH untuk mencari perangkat yang tersedia Unit mencari dan menampilkan daftar pe...

Page 47: ...a berikut ini Pilih BT PHONE lalu ikuti langkah langkah berikut untuk melakukan panggilan 1 Tampilkan Dial Menu 2 Call history Riwayat panggilan 1 Pilih riwayat panggilan REDIAL RECEIVED MISSED Sambung Ulang Diterima Tidak Dijawab 2 Kemudian pilih nama jika sudah diperoleh atau nomor telepon Phone book Buku telepon 1 Pilih PHONE BOOK Daftar nomor telepon muncul 2 Pilih nama dari daftar Direct dial...

Page 48: ...k menjeda pemutaran jika pemutaran tidak berhenti bila Anda mengubah sumbernya Melompat mundur melompat maju Pause start playback Jeda mulai pemutaran Pengoperasianmungkinberbeda menurutteleponyangterhubung Masuk ke menu pengaturan Daftar perangkat Lihat halaman 16 untuk menghubungkan memutuskan menghapus perangkat terdaftar Informasi Bluetooth Jika ingin menerima informasi lebih lanjut mengenai B...

Page 49: ...at yang dihubungkan untuk BT PHONE AUTOMATIC Unit memberitahu Anda mengenai pesan yang diterima lewat deringan serta menampilkan RCV MESSAGE menerima Pesan MANUAL Unit tidak memberitahu Anda mengenai pesan yang diterima MIC SETTING pengaturan mikrofon Hanya perangkat yang dihubungkan untuk BT PHONE Menyesuaikan volume mikrofon yang dihubungkan ke adaptor Bluetooth LEVEL 01 02 03 VERSION VERSI Vers...

Page 50: ...g dipilih memiliki lapisan lainnya Anda akan memasuki lapisan tersebut Ulangi langkah 2 dan 3 sampai trek yang dikehendaki diputar Dengan menahan tombol 4 Anda dapat meloncati 10 item sekaligus Modepemilihanmenuakandibatalkan Jika tidak ada operasi sama sekali selama sekitar 5 detik Jika Anda mengkonfirmasi pemilihan trek Memilih mode mode putar ulang 1 2 Pilih mode putar ulang yang anda inginkan ...

Page 51: ...l Menghubungkan komponen eksternal ke jack input AUX Untuk memilih komponen eksternal yang terhubung ke Konektor input AUX Anda juga dapat memilih AUX IN sebagai sumber pemutaran dengan menekan tombol SRC sumber Konektor CD changer di bagian belakang gunakan KS U57 atau KS U58 Jika EXT IN tidak muncul lihat halaman 14 dan pilih input eksternal EXT INPUT Ÿ Hidupkan komponen yang telah tersambung da...

Page 52: ...M Semua stasiun radio yang disimpan sebelumnya akan dihapus dan stasiun radio yang baru akan disimpan Stasiun stasiun yang diterima dipreset diatur awal dalam No 1 frekuensi terendah ke No 6 frekuensi tertinggi Ketika SSM selesai stasiun yang telah disimpan dalam No 1 akan secara otomatis diterima Ketika menyimpan sebuah stasiun secara manual preset pengaturan awal stasiun ini terhapus ketika sebu...

Page 53: ...an sebuah printer ink jet Menggunakan disk ini di bawah suhu tinggi atau kelembapan tinggi dapat menyebabkan malafungsi atau kerusakan pada unit Memutar sebuah disk MP3 WMA Unit ini dapat memutar ulang file file MP3 WMA dengan kode perpanjangan mp3 atau wma mengabaikan jenis huruf huruf besar kecil Unit ini dapat mempertunjukkan nama nama album artis artis pemain dan ujung versi 1 0 1 1 2 2 2 3 at...

Page 54: ...dapat dihubungkan ke unit ini bergantung versi perangkat Bluetooth yang digunakan Unit ini tidak dapat berfungsi pada beberapa perangkat Bluetooth Kondisi penyambungan dapat beragam bergantung keadaan di sekitar Anda Apabila unit dimatikan perangkat terputus Pesan peringatan untuk pengoperasian Bluetooth ERROR CNNCT Koneksi Salah Perangkat terdaftar tetapi koneksi gagal Gunakan CONNECT untuk mengh...

Page 55: ... Q1 25 7 5 kHz 00 Q1 25 OFF ROCK 100 Hz 03 Q1 0 1 0 kHz 00 Q1 25 10 0 kHz 02 Q1 25 CLASSIC 80 Hz 01 Q1 0 1 0 kHz 00 Q1 25 10 0 kHz 03 Q1 25 POP 100 Hz 02 Q1 0 1 0 kHz 01 Q1 25 10 0 kHz 02 Q1 25 HIP HOP 60 Hz 04 Q1 0 1 0 kHz 02 Q1 0 10 0 kHz 01 Q1 25 JAZZ 80 Hz 03 Q1 0 1 0 kHz 00 Q1 25 10 0 kHz 03 Q1 25 Freq Frekuensi Q Quality slope Slope kualitas Pengaturan pengaturan umum PSM Jika anda mengganti...

Page 56: ...sukkan disk tersebut ke sekeliling penahan tengah dengan permukaan yang tercetak menghadap ke atas Pastikan untuk menyimpan disk disk ke dalam wadah wadahnya setelah digunakan Konektor Penahan tengah Untuk menjaga disk disk bersih Sebuah disk yang kotor mungkin tidak dapat diputar secara benar Jika sebuah disk menjadi kotor lap dengan sebuah kain lembut dalam satu garis lurus dari tengah ke pinggi...

Page 57: ...t diputar maupun dikeluarkan Buka kunci disk lihat halaman 10 Keluarkan disk secara paksa lihat halaman 3 Suara disk kadang kadang terinterupsi Hentikan putar ulang sementara mengemudi pada jalan yang kasar Ganti disk tersebut Cek kabel kabel dan penyambungan penyambungan NO DISC muncul pada tampilan PLEASE dan EJECT muncul secara alternatif pada tampilan Masukkan disk yang dapat diputar ke dalam ...

Page 58: ...at mendeteksi unit pilih OPEN pada unit untuk menghubungkan perangkat Lihat halaman 15 Unit tidak melakukan pairing dengan perangkat Bluetooth Masukkan kode PIN yang sama untuk unit dan perangkat sasaran Pilih nama perangkat dari SPECIAL lalu coba hubungkan lagi Lihat halaman 16 Cobalah untuk memasangkan menghubungkan dari perangkat Bluetooth Terdengar bunyi echo atau desis Sesuaikan posisi unit m...

Page 59: ...da unit atau iPod NO IPOD muncul pada tampilan Periksalah kabel penghubung dan sambungannya Isikan baterai Pemutaran berhenti Sambungan headphone terputus selama pemutaran Mulai lagi operasi pemutaran dengan menggunakan panel kontrol lihat halaman 19 dan 20 Tidak ada suara yang terdengar sewaktu menghubungkan iPod nano Lepaskan headphone dari iPod nano Mutakhirkan versi firmware dari iPod nano NO ...

Page 60: ...000 Hz Perbandingan Sinyal ke desis 70 dB Tingkat Line Out Impedansi 2 5 V 20 kΩ beban skala penuh Tingkat Keluaran Subwoofer Impedansi 2 5 V 20 kΩ beban skala penuh Impedansi Output 1 kΩ Terminal lain Jack input AUX auxiliary Jack CD changer SEKSI TUNER Cakupan Frekuensi FM 87 5 MHz sampai 108 0 MHz AM 531 kHz sampai 1 602 kHz Tuner FM Sensitivitas yang dapat digunakan 11 3 dBf 1 0 µV 75 Ω 50 dB ...

Page 61: ...patan Bit 320 kbps Format Penguraian Sandi WMA Windows Media Audio Maksimum Kecepatan Bit 320 kbps UMUM Power yang Diperlukan Voltase Pengoperasian DC 14 4 V 11 kelonggaran 11 V sampai 16 V Sistem Pertanahan Tanah negatif Temperatur pengoperasian yang diizinkan 0 C sampai 40 C Dimensi L T T kira kira Ukuran instalasi 182 mm 52 mm 160 mm Ukuran panel 187 mm 58 mm 6 mm Massa 1 3 kg tidak termasuk ak...

Page 62: ...eration Please reset your unit Refer to page of How to reset your unit Ada MASALAH dengan cara pengoperasian Setel kembali unit Anda Lihat halaman mengenai Bagaimana mereset unit anda Rear_KD G446_5_004A_1 indd 2 Rear_KD G446_5_004A_1 indd 2 10 29 07 10 09 54 AM 10 29 07 10 09 54 AM ...

Reviews: