background image

4

ENGLISH

LOCATION OF THE BUTTONS

*

The control panel slides out when you press ON CLOSE.

*

When you press OFF 

0

, the display panel moves down and the CD loading slot appears.

9

BAND MODE (M) button

• Also functions as SSM buttons when pressed

together with the DISP (D) button.

p

SOURCE ATT (attenuator) button

q

EQ (equalization) button

w

MONO (monaural) button

e

INT (intro scan) button

r

RPT (repeat) button

t

RND (random) button

y

OFF 

0

 (eject) button

u

Number buttons

1

Control dial

2

CD loading slot

3

Display panel

4

Remote sensor

5


¢

 / 

4


 buttons


¢

 / 

4


 also functions as ON or

CLOSE button.

6

SEL (S) (select) button

7

TP/PTY (T) (Traffic Programme/Programme
Type) button

8

DISP (D) (display) button

• Also functions as SSM buttons when pressed

together with the BAND MODE (M) button.

Control panel

u

SSM

RND

 RPT

 INT

 EQ

 SEL

 TP/PTY

 DISP

 BAND
MODE

 ATT

 MONO

SOURCE

9

3

S

T

D

M

OFF

6 7 8 9

p

q

w

r

t

e

1

7

8

2

10

11

5

12

6

y

1

2

5

4

3

4

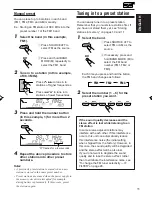
How to use the number buttons:

After pressing BAND MODE (M), the number buttons work as different function buttons (while
“MODE” remains on the display).

To use these buttons as number buttons after pressing BAND MODE (M), wait for 5 seconds
without pressing any number button so that “MODE” disappears from the display.
• Pressing BAND MODE (M) again also erases “MODE” from the display.

Ex.: When you press button 6 to enter the

Random function mode.

DIRECTORY

FILEDISC

TRACK

CEQ

MO

ST

RPT

RND

AF REG

TP

PTY

BBE

Time countdown indicator

RND

 RPT

 INT

 EQ

 MONO

1

10

11

12

7

8

9

2

3

5

6

M

 BAND
MODE

EN04-06KD-LX333_111R[E]4.pm5

12/22/01, 6:15 PM

4

Summary of Contents for KD-LX333R

Page 1: ...onderlijke handleiding voor details aangaande het installeren en verbinden van het toestel KD LX333R KD LX333R SSM 10 7 8 9 11 12 OFF S T D M MODE BAND TP PTY DISP SEL INT RPT RND MONO EQ ATT SOURCE KD LX111R SSM 10 7 8 9 11 12 OFF S T D M MODE BAND TP PTY DISP SEL INT RPT RND MONO EQ ATT SOURCE KD LX111R This unit is equipped with the display demonstration To cancel it see page 8 Dieses Gerät ist...

Page 2: ...service personnel 4 CAUTION This CD player uses invisible laser radiation and is equipped with safety switches to prevent radiation emission when unloading CDs It is dangerous to defeat the safety switches 5 CAUTION Use of controls adjustments or performance of procedures other than those specified herein may result in hazardous radiation exposure CAUTION on Volume Setting CDs produce very little ...

Page 3: ...hat is BBEII 22 Selecting preset sound modes CEQ custom equalizer 23 Storing your own sound adjustments 24 OTHER MAIN FUNCTIONS 25 Changing the general settings PSM 25 Controlling the volume automatically Audio Cruise only for KD LX333R 29 Assigning names to the sources 30 Using the security lock 32 CD CHANGER OPERATIONS 34 Playing CDs 34 Selecting CD playback modes 35 EXTERNAL COMPONENT OPERATION...

Page 4: ...button 8 DISP D display button Also functions as SSM buttons when pressed together with the BAND MODE M button Control panel u SSM RND RPT INT EQ SEL TP PTY DISP BAND MODE ATT MONO SOURCE 9 3 S T D M OFF 6 7 8 9 p q w r t e 1 7 8 2 10 11 5 12 6 y 1 2 5 4 3 4 How to use the number buttons After pressing BAND MODE M the number buttons work as different function buttons while MODE remains on the disp...

Page 5: ...t the battery is fixed in the holder 3 Return the battery holder Insert again the battery holder pushing it until you hear a clicking sound WARNING Store the battery in a place where children cannot reach If a child accidentally swallows the battery consult a doctor immediately Do not recharge short disassemble or heat the battery or dispose of in a fire Doing any of these things may cause the bat...

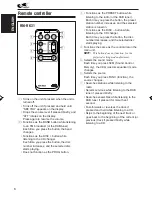
Page 6: ...while listening to the DAB tuner if pressed briefly Searches ensembles while listening to the DAB tuner if pressed for more than 1 second Fast forwards or reverses the track if pressed and held while listening to a CD Skips to the beginning of the next track or goes back to the beginning of the current or previous track if pressed briefly while listening to a CD 1 2 3 4 6 7 5 1 Turns on the unit i...

Page 7: ... RND MONO EQ ATT SOURCE 2 3 To increase the volume To decrease the volume Turning on the power 1 Turn on the power The display illuminates and the control panel and control dial come out 2 Select the source Each time you press the button the source changes as follows For KD LX333R FM DAB tuner CD CD changer External component AM back to the beginning For KD LX111R FM DAB tuner CD CD changer or ext...

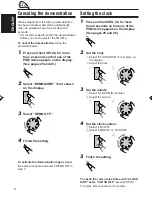
Page 8: ...time is shown for 5 seconds Canceling the demonstration When shipped from the factory demonstration has been activated and starts automatically when no operations are done for about 20 seconds It is recommended to cancel the demonstration before you use the unit for the first time To cancel the demonstration follow the procedure below 1 Press and hold SEL S for more than 2 seconds so that one of t...

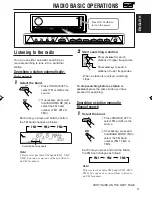
Page 9: ...g a station manually Manual search 1 Select the band 1 Press SOURCE ATT to select FM or AM as the source 2 If necessary press and hold BAND MODE M to select the FM band number FM1 FM2 or FM3 Each time you press and hold the button the FM band changes as follows Note This receiver has three FM bands FM1 FM2 FM3 You can use any one of them to listen to an FM broadcast SSM 10 7 8 9 11 OFF S T D M MOD...

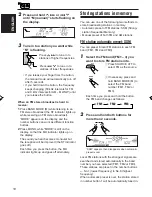
Page 10: ...manual starts flashing on the display 3 Tune in to a station you want while M is flashing If you release your finger from the button the manual mode will automatically turn off after 5 seconds If you hold down the button the frequency keeps changing 50 kHz intervals for FM and 9 kHz intervals for AM MW LW until you release the button When an FM stereo broadcast is hard to receive 1 Press BAND MODE...

Page 11: ...0 and 11 1 Select the band 1 Press SOURCE ATT to select FM or AM as the source 2 If necessary press and hold BAND MODE M to select the FM band number FM1 FM2 or FM3 Each time you press and hold the button the FM band changes as follows 2 Select the number 1 6 for the preset station you want If the sound quality decreases and the stereo effect is lost while listening to an FM station In some areas ...

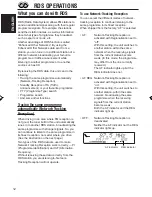
Page 12: ... its finest reception no matter where you drive See the illustration on the next page Two types of the RDS data are used to make Network Tracking Reception work correctly PI Programme Identification and AF Alternative Frequency Without receiving these data correctly from the RDS station you are listening to Network Tracking Reception will not operate To use Network Tracking Reception You can selec...

Page 13: ... either lights up or flashes If the TP indicator lights up TA Standby Reception is activated If a station starts broadcasting a traffic announcement TRAFFIC appears on the display and this unit automatically tunes in to the station The volume changes to the preset TA volume level see page 17 and the traffic announcement can be heard If the TP indicator flashes TA Standby Reception is not yet activ...

Page 14: ... When the current source is FM the PTY indicator either lights up or flashes If the PTY indicator lights up PTY Standby Reception is activated If a station starts broadcasting the selected PTY programme this unit automatically tunes in to the station If the PTY indicator flashes PTY Standby Reception is not yet activated since the station being received does not provide the signals used for PTY St...

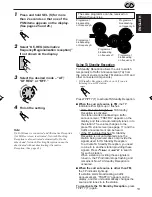
Page 15: ... store your favorite programme types 1 Press and hold TP PTY T for more than 2 seconds 2 Select one of the twenty nine PTY codes See page 18 Selected code name appears on the display 3 Press and hold the number button for more than 2 seconds to store the PTY code selected into the preset number you want Preset number flashes for a few seconds 4 Press and hold TP PTY T for more than 2 seconds POP M...

Page 16: ...rent will happen If the signals from that preset station are not sufficient for good reception this unit using the AF data tunes in to another frequency broadcasting the same programme as the original preset station is broadcasting Programme search The unit takes some time to tune in to another station using Programme search To activate programme search follow the procedure below See also Changing...

Page 17: ... hold SEL S for more than 2 seconds so that one of the PSM items appears on the display 2 Press or 4 to select TA VOL volume 3 Turn the control dial to set to the desired volume You can set it from TA VOL 00 to TA VOL 50 4 Press SEL S to finish the setting Automatic clock adjustment When shipped from the factory the clock built in this unit is set to be readjusted automatically using the CT Clock ...

Page 18: ...ommerce trading the Stock Market etc CHILDREN Entertainment programmes for children SOCIAL Programmes on social activities RELIGION Programmes dealing with any aspect of belief or faith or the nature of existence or ethics PHONE IN Programmes where people can express their views either by phone or in a public forum TRAVEL Programmes about travel destinations package tours and travel ideas and oppo...

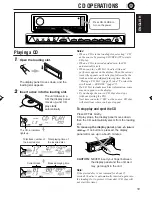
Page 19: ...anel will move up in about 5 minutes CAUTION NEVER insert your finger between the display panel and the unit as it may get caught in the unit Note If the ejected disc is not removed for about 15 seconds the disc is automatically inserted again into the loading slot to protect it from dust CD play will not start this time Playing a CD 1 Open the loading slot The display panel moves down and the loa...

Page 20: ...You can play back the current track repeatedly 1 Press BAND MODE M while playing a CD MODE appears on the display and the number buttons can work as different function buttons 2 Press RPT repeat while MODE is still on the display so that the RPT indicator lights up on the display Each time you press the button CD repeat play mode turns on and off alternately When the repeat mode is turned on the R...

Page 21: ...tton CD intro scan mode turns on and off alternately When the intro scan mode is turned on INTRO appears on the display for 5 seconds and the track number flashes Prohibiting CD ejection You can prohibit CD ejection and can lock a CD in the loading slot While pressing SOURCE ATT press and hold OFF 0 for more than 2 seconds NO EJECT flashes on the display for about 5 seconds and the CD is locked an...

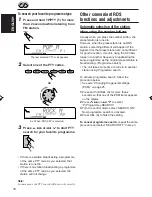
Page 22: ... dependent phase shifting causing high frequency sounds to take longer to reach the ear than low frequency sounds The BBEII function adjusts the phase relationship between the low mid and high frequencies by adding a progressively longer delay time to the low and mid frequencies so that all frequencies reach the listener s ears at the proper time In addition the BBEII function boosts low and high ...

Page 23: ...on page 24 To adjust the bass and treble reinforcement levels or to turn on off the BBEII function temporarily see page 22 To store a sound mode separately for each playback source CEQ Link You can select a sound mode and store it in memory It will be recalled every time you select the same source and will be shown on the display A sound mode can be stored for each of the following sources FM1 FM2...

Page 24: ...ect applies to any source Storing your own sound adjustments You can adjust the sound modes to your preference and store your own adjustments in memory There is a time limit in doing the following procedure If the setting is canceled before you finish start from step 1 again 1 Press BAND MODE M to make the number buttons work as different function buttons 2 Activate custom equalizer CEQ The last s...

Page 25: ...FF 27 Back Advance Back Advance 8 0 00 Set Factory preset settings See page DEMO ON 8 DEMO OFF DEMO ON Counter clockwise Clockwise Select Hold SEL S 24HOUR 8 24HOUR 12HOUR ADJUST ON 17 ADJUST ON ADJUST OFF CLOCK ON CLOCK ON 27 CLOCK OFF DEMO MODE Demo mode CLOCK HOUR Hour adjustment CLOCK MIN Minute adjustment CEQ LINK Custom equalizer memory linkage 24H 12H 24 12 hour time display AUTO ADJ Automa...

Page 26: ...one CONTRAST Display contrast SCROLL Scroll mode WooferFreq Subwoofer only for cutoff frequency KD LX333R LINE ADJ Line input level only for adjustment KD LX333R EXT INPUT External component only for KD LX111R FLAT PANEL Flat panel IF FILTER Intermediate frequency filter CRUISE OFF CRUISE 1 CRUISE 2 800 rpm 30 BOOST 01 15 BOOST 05 29 MUTING OFF 27 BEEP OFF BEEP ON BEEP ON 27 CONTRAST 1 10 CONTRAST...

Page 27: ... dims the display Note on Auto Dimmer Auto Dimmer equipped with this unit may not work correctly on some vehicles particularly on those having a control dial for dimming In this case set the dimmer mode to ON or OFF To select the telephone muting TELEPHONE This mode is used when a cellular phone system is connected Depending on the phone system used select either MUTING 1 or MUTING 2 whichever mut...

Page 28: ...to use When shipped from the factory CD changer is selected as the external component LINE INPUT To use the external component other than CD changer CD CHANGER To use the CD changer Note For connecting the Line Input Adaptor KS U57 and the external component refer to the Installation Connection Manual separate volume To make the front panel look flat hiding the control panel FLAT PANEL When operat...

Page 29: ...ay See pages 25 and 26 2 Select CRUISE if not shown on the display 3 Select the desired setting As you turn the control dial the Audio Cruise mode changes as follows 4 Finish the setting To adjust the volume increase rate If you find Audio Cruise increases or decreases the volume either too much or too little as the driving speed changes you can adjust the increase rate by changing the boost level...

Page 30: ... memory backup lead yellow lead directly to the car battery to prevent these noises from affecting Audio Cruise 1 Start the engine and let it warm up 2 Press and hold SEL S for more than 2 seconds so that one of the PSM items appears on the display 3 Press or 4 repeatedly until CRUISE appears on the display 4 Turn the control dial to select either CRUISE 1 or CRUISE 2 5 Press or 4 to select OR SET...

Page 31: ...ch time you press the button the character set changes as follows 4 Select a character See right column for available characters 5 Move the cursor to the next or previous character position 6 Repeat steps 3 to 5 until you finish inputting the name 7 Press the button while the last selected character is flashing The input name is stored in memory To erase the input characters Insert spaces using th...

Page 32: ...an use the following characters Capital letters A Z small letters a z and numbers 0 9 1 Press and hold both buttons for more than 2 seconds The unit enters password entry mode 2 Select the character set you want to use Each time you press the button the character set changes as follows 3 Select a letter 4 Move the character entry position to the next 5 Repeat steps 2 to 4 until you enter all 4 cha...

Page 33: ...e this unit you must enter the correct password by following the procedure below 1 Press DISP D to select the character set you want 2 Turn the control dial to enter a character 3 Press or 4 to move the character entry position 4 Repeat steps 1 to 3 to enter the entire password 4 letters correctly then press SEL S If you enter the correct password the security lock is canceled and you can use the ...

Page 34: ...press the reset button of the CD changer Playing CDs Select the CD automatic changer CD CH Each time you press the button the source changes as described on page 7 Playback starts from the first track of the first disc All tracks of all discs are played back To fast forward or reverse the track To go to the next tracks or the previous tracks SSM 10 7 8 9 11 OFF S T D M MODE BAND TP PTY DISP SEL IN...

Page 35: ...ed before you finish start from step 1 again To play back tracks at random Random Play 1 Press BAND MODE M while playing a CD MODE appears on the display 2 Press RND random while MODE is still on the display so that the RND indicator lights up on the display Each time you press the button CD random play mode changes as follows Ex When disc number 3 is selected RND RPT INT EQ MONO 1 10 11 12 7 8 9 ...

Page 36: ...ess the button CD intro scan mode changes as follows M BAND MODE M BAND MODE RPT 11 5 REPEAT1 REPEAT2 Canceled REPEAT1 Lights The current track or specified track REPEAT2 Flashes All tracks of the current disc or specified disc Mode RPT Indicator Plays repeatedly Track number of the currently playing track DIRECTORY FILEDISC CEQ MO ST RPT RND AF REG TP PTY RPT indicator INT 10 DIRECTORY FILEDISC T...

Page 37: ...ct the external input correctly See To select the external component to use EXT INPUT on page 28 1 Select the external component Each time you press the button the source changes as described on page 7 2 Operate the external component Using a subwoofer This section is only for KD LX333R By connecting a subwoofer to the SUBWOOFER OUT plugs on the rear you can enjoy enhanced bass sounds and a more r...

Page 38: ...ore programmes services broadcast at the same time After tuning in to an ensemble you can select a service you want to listen to 1 Select the DAB tuner DAB1 3 Each time you press the button the source changes as described on page 7 2 Select the DAB band DAB1 DAB2 or DAB3 Each time you press and hold the button the DAB band changes as follows Note This receiver has three DAB bands DAB1 DAB2 DAB3 Yo...

Page 39: ... 4 Press or 4 repeatedly until the ensemble you want is reached If you hold down the button the ensemble keeps changing until you release the button Storing DAB services in memory You can preset up to 6 DAB services in each DAB band DAB1 DAB2 and DAB3 manually 1 Select the DAB tuner DAB1 3 1 Press SOURCE ATT to select DAB tuner as the source 2 If necessary press and hold BAND MODE M repeatedly to ...

Page 40: ... services again Tuning in to a preset DAB service You can easily tune in to a preset DAB service Remember that you must store services first If you have not stored them yet see page 39 1 Select the DAB tuner DAB1 3 1 Press SOURCE ATT to select DAB tuner as the source 2 If necessary press and hold BAND MODE M repeatedly to select the DAB band number DAB1 DAB2 or DAB3 Each time you press and hold th...

Page 41: ...o adjust the volume level each time you change the source When shipped from the factory DAB volume level is set at 00 See also Changing the general settings PSM on page 25 1 Press and hold SEL S for more than 2 seconds so that one of the PSM items appears on the display 2 Press or 4 to select DAB VOL volume 3 Turn the control dial to set to the desired volume You can set it from 12 to 12 4 Press S...

Page 42: ... Finalize the CD R CD RW with the component which you used for recording Press and hold 4 for more than 5 seconds While holding press the reset button Release the reset button then release Be careful not to drop the CD when ejecting Adjust it to the optimum level Check the cords and connections Store stations manually Connect the antenna firmly Symptoms CD cannot be played back CD sound is sometim...

Page 43: ... 33 Press the reset button on the front panel See page 2 Causes No magazine is loaded in the CD changer No CD is in the magazine This unit is not connected to a CD changer correctly There is something blocking the control cover movement Security lock is in use The built in microcomputer may function incorrectly due to noise etc Symptoms NO MAG appears on the display NO DISC appears on the display ...

Page 44: ... heater in the car If it becomes very humid inside the car Should this occur the CD player may malfunction In this case eject the CD and leave the unit turned on for a few hours until the moisture evaporates When playing a CD R or CD RW User edited CD Rs Recordable and CD RWs Rewritable can be played back only if they are already finalized You can play back your original CD Rs or CD RWs recorded i...

Page 45: ...W 522 kHz to 1 620 kHz LW 144 kHz to 279 kHz FM Tuner Usable Sensitivity 11 3 dBf 1 0 µV 75 Ω 50 dB Quieting Sensitivity 16 3 dBf 1 8 µV 75 Ω Alternate Channel Selectivity 400 kHz 65 dB Frequency Response 40 Hz to 15 000 Hz Stereo Separation 30 dB Capture Ratio 1 5 dB MW Tuner Sensitivity 20 µV Selectivity 35 dB LW Tuner Sensitivity 50 µV CD PLAYER SECTION Type Compact disc player Signal Detection...

Page 46: ...eb Bitte setzen Sie Ihr Gerät zurück Siehe Seite Zurücksetzen des Geräts Vous avez des PROBLÈMES de fonctionnement Réinitialisez votre appareil Référez vous à la page intitulée Comment réinitialiser votre appareil Hebt u PROBLEMEN met de bediening Stel het apparaat terug Zie de pagina met de paragraaf Het apparaat terugstellen 0102MNMMDTTKR EN GE FR NL J VC ...

Page 47: ...l n apparaît pas sur l affichage 3 Choisissez DEMO OFF 4 Terminez le réglage Pour mettre de nouveau la démonstration en service répétez la même procédure et choisissez DEMO ON à l étape 3 NEDERLANDS Wanneer dit product de fabriek verlaat is demonstratie geactiveerd De demonstratie zal automatisch starten wanneer er 20 seconden lang geen handelingen worden uitgevoerd Het is raadzaam de demonstratie...

Page 48: ...iqué pour désengagé les verrous de manchon 3 Retirer le manchon Remarque S assurer de garder les poignées pour une utilisation ultérieur après l installation de l appareil 3 Attachez la plaque d assemblage 4 Installer le manchon dans le tableau de bord Après installation correcte du manchon dans le tableau de bord plier les bonnes pattes pour maintenir fermement le manchon en place comme montré 5 ...

Page 49: ...e Si cela arrive raccorder la borne arrière de masse de l appareil au châssis de la voiture voir le diagramme de raccordement en utiliscant des cordons les plus gros et les plus courts possibles telle qu une barre de cuivre ou une tresse Si le bruit persiste consulter votre revendeur d autoradios JVC La puisscance admissible des enceintes devrait n être pas plus qu c 50 W à l arrière et à 50 W l a...

Page 50: ...ere Erdungscan schlußklemme Borne arrière de masse Massaklem aan de achterkant To power aerial if any Zur Motorantenne sofern vorhanden À l antenne automatique s il y en a une Naar de antenne indien aanwezig Cut the ISO connector Den ISO Stecker abscheiden Coupez le connecteur ISO Knip de connector los B3 A3 A1 A2 A4 B4 B1 B2 A3 A1 B1 B2 B3 A2 A4 B4 From the car body Von der Karosserie De la carro...

Page 51: ...angsniveau van het geluid is hoog om het hifi geluid van deze eenheid te behouden Wanneer u een extern apparaat op deze eenheid aansluit moet u erop letten dat u de versterkingsfactor van de externe versterker laag houdt zodat deze eenheid de beste prestaties levert SUBWOOFER OUT R L KD LX333R Amplifier Verstäker Amplificateur Versterker Subwoofer Subwoofer Caisson de grave Subwoofer Signal cord n...

Reviews: