background image

2

INDONESIA

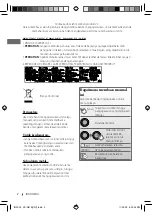
Terima kasih telah membeli produk JVC.

Harap membaca seluruh petunjuk dengan teliti sebelum mengoperasikan, untuk memastikan anda 

memahami secara keseluruhan dan mendapatkan performansi terbaik dari unit ini.

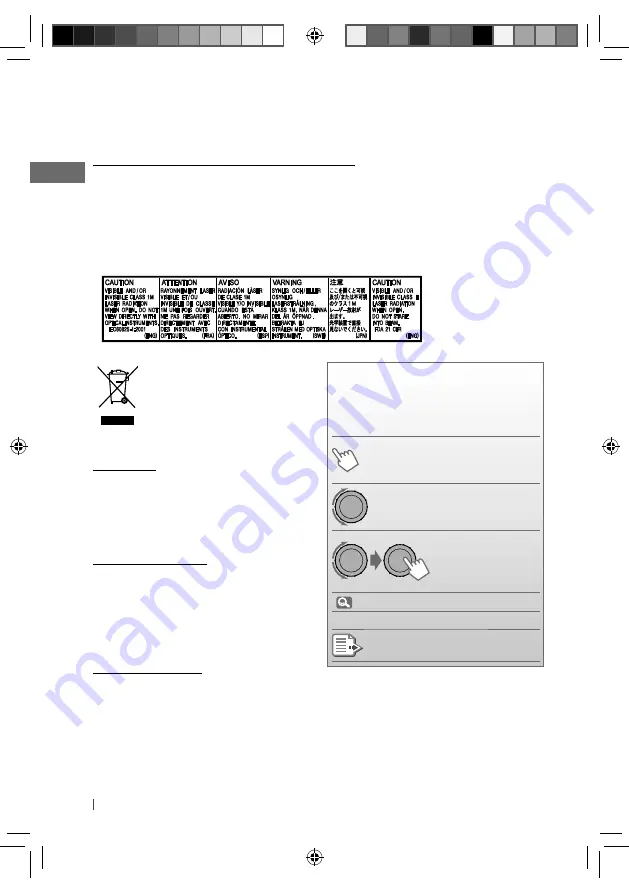
PENTING UNTUK PRODUK-PRODUK LASER

1. PRODUK LASER KELAS 1
2. 

PERHATIAN:

 Jangan membuka penutup atas. Tidak ada bagian yang dapat diperbaiki oleh    

  pengguna di dalam unit tersebut; biarkanlah semua bagian yang diperbaiki untuk  
  memenuhi syarat perbaikan teknis.

3. 

PERHATIAN:

 Apabila terbuka, radiasi laser kelas 1M dapat terlihat dan/atau tidak terlihat. Jangan  

  langsung melihatnya dengan alat optik.

4. REPRODUKSI DARI LABEL: LABEL PERHATIAN, TEMPATKAN DI LUAR UNIT TERSEBUT.

[Hanya Uni Eropa]

Peringatan:

Jika Anda harus mengoperasikan unit selagi 
mengemudi, pastikan Anda melihat ke 
sekeliling dengan cermat, jika tidak, Anda 
berisiko mengalami kecelakaan lalu lintas.

Untuk keselamatan...

• Jangan menaikkan level volume terlalu tinggi 

karena akan menghalangi suara dari luar, dan 
membahayakan perjalanan anda.

• Hentikan mobil sebelum melakukan 

pengoperasian yang rumit.

Suhu dalam mobil...

Jika anda telah memarkir mobil terlalu lama 
dalam cuaca yang panas atau dingin, tunggu 
hingga suhu dalam mobil menjadi normal 
kembali sebelum mengoperasikan unit ini.

Bagaimana membaca manual 
ini

Ikon/simbol berikut ini digunakan untuk 
menunjukkan:

Tekan terus tombol hingga 
pengoperasian yang diinginkan 
dimulai.

Putar dial kontrol.

Putar dial kontrol 
untuk memilih, 
lalu tekan untuk 
mengonfirmasi.

 XX)

Nomor halaman referensi

<XXXX>

Item pengaturan menu

Bersambung ke halaman 
berikutnya

[Tahan]

IN02-09_KD-R516[UN]1.indd   2

IN02-09_KD-R516[UN]1.indd   2

11/26/09   5:00:26 PM

11/26/09   5:00:26 PM

Summary of Contents for KD-R515

Page 1: ...IONS BUKU PETUNJUK For installation and connections refer to the separate manual Untuk instalasi dan penyambungan lihat buku pedoman terpisah Having TROUBLE with operation Please reset your unit Refer to page of How to reset your unit Ada MASALAH dengan cara pengoperasian Setel kembali unit Anda Lihat halaman mengenai Bagaimana mereset unit anda CoverRear_KD R516_004A_f indd 1 2 CoverRear_KD R516_...

Page 2: ...while driving be sure to look around carefully or you may be involved in a traffic accident For safety Do not raise the volume level too much as this will block outside sounds making driving dangerous Stop the car before performing any complicated operations Temperature inside the car If you have parked the car for a long time in hot or cold weather wait until the temperature in the car becomes no...

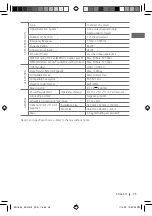
Page 3: ... external components 12 Selecting a preset sound mode 13 Menu operations 18 Maintenance 19 More about this unit 21 Troubleshooting 24 Specifications How to attach detach the control panel How to reset your unit Your preset adjustments will also be erased How to forcibly eject a disc You can forcibly eject the loaded disc even if the disc is locked To lock unlock the disc 9 Be careful not to drop t...

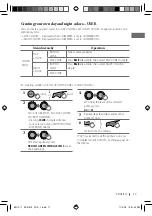
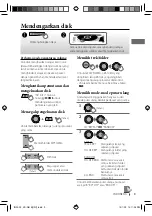
Page 4: ...ect CLOCK SET 5 Adjust the hour 6 Adjust the minute 7 Finish the procedure 4 Select DEMO OFF 5 6 Finish the procedure Canceling the display demonstration Initial setting Hold Initial setting Hold EN02 09_KD R516_001A_1 indd 4 EN02 09_KD R516_001A_1 indd 4 11 4 09 12 52 16 PM 11 4 09 12 52 16 PM ...

Page 5: ...trol function Before operating connect an exclusive remote adapter not supplied which matches your car to the steering wheel remote input terminal on the rear of the unit For details refer also to the instructions supplied with the remote adapter Preparing the remote controller RM RK50 When you use the remote controller for the first time pull out the insulation sheet If the effectiveness of the r...

Page 6: ...back Turns off if pressed and held Selects the available sources if the power is turned on If the source is ready playback also starts Adjusts the volume level Selects items Mutes the sound while listening to a source If the source is CD or USB playback pauses Press the control dial again to cancel muting or resume playback Confirms selection Selects the sound mode Enters tone level adjustment dir...

Page 7: ...tations with the strongest signals are searched and stored automatically To preset another 6 stations repeat the above procedure by selecting one of the other 6 SSM setting ranges Main unit Remote controller General operation Enters COLOR setting directly 16 Enters COLOR SETUP setting directly 17 if pressed and held Returns to the previous menu Power off Checks the current clock time Power on Chan...

Page 8: ...ns Hold Title assignment You can assign titles up to 30 station frequencies FM and AM using 8 characters maximum for each title If you try to assign titles to more than 30 station frequencies NAME FULL appears Delete unwanted titles before assignment 1 FM or AM 2 Show the title entry screen 3 Select a character 4 Move to the next or previous character position 5 Repeat steps 3 and 4 until you have...

Page 9: ...sired folder then the desired track by repeating the control dial procedures To return to the previous menu press BACK Selecting the playback modes You can use only one of the following playback modes at a time 1 2 REPEAT j RANDOM 3 REPEAT TRACK RPT Repeats current track FOLDER RPT Repeats current folder RANDOM FOLDER RND Randomly plays all tracks of current folder then tracks of next folders ALL ...

Page 10: ...nput jack USB memory Changing the display information Disc title Album name performer folder name Track title file name Current track number with the elapsed playing time Current track number with the clock time back to the beginning If the current disc is an audio CD NO NAME appears If an MP3 WMA file does not have Tag information or TAG DISPLAY is set to TAG OFF 13 folder name and file name appe...

Page 11: ... deformation or cause damages to the device Some USB devices may not work immediately after attaching USB device or turn on the power For more details about USB operations 20 21 AUX IN Ÿ Turn on the connected component and start playing the source Adjust the volume Adjust the sound as you want 12 Connecting an external component to the AUX input jack 3 5 mm stereo mini plug not supplied Portable a...

Page 12: ...60 Hz 80 Hz 100 Hz 200 Hz 06 to 06 Q1 0 Q1 25 Q1 5 Q2 0 MIDDLE 0 5 kHz 1 0 kHz 1 5 kHz 2 5 kHz 06 to 06 Q0 75 Q1 0 Q1 25 TREBLE 10 0 kHz 12 5 kHz 15 0 kHz 17 5 kHz 06 to 06 Q FIX Storing your own sound mode You can store your own adjustments in memory 1 2 PRO EQ BASS MIDDLE TREBLE 3 Adjust the sound elements of the selected tone table on the left 4 Repeat steps 2 and 3 to adjust other tones The ad...

Page 13: ...OLL ONCE SCROLL AUTO SCROLL OFF Scrolls the displayed information once Repeats scrolling at 5 second intervals Cancels Pressing DISP for more than one second can scroll the display regardless of the setting TAG DISPLAY TAG ON TAG OFF Shows the Tag information while playing MP3 WMA tracks Cancels TUNER SSM 2 Strong station Sequential Memory SSM 01 06 SSM 07 12 SSM 13 18 For settings 7 MONO 2 Monaur...

Page 14: ...s Cancels AUDIO FADER 3 R06 F06 00 Adjust the front and rear speaker output balance BALANCE 4 L06 R06 00 Adjust the left and right speaker output balance LOUD Loudness LOUD ON LOUD OFF Boost low and high frequencies to produce a well balanced sound at a low volume level Cancels VOL ADJUST Volume adjust VOL ADJ 05 VOL ADJ 05 VOL ADJ 00 Preset the volume adjustment level of each source except FM com...

Page 15: ...P OFF Activates the keypress tone Deactivates the keypress tone AMP GAIN 6 Amplifier gain control LOW POWER HIGH POWER VOLUME 00 VOLUME 30 Select if the maximum power of each speaker is less than 50 W to prevent damaging the speakers VOLUME 00 VOLUME 50 SRC SELECT AM 7 AM station AM ON AM OFF Enable AM in source selection Disable AM in source selection AUX IN 8 Auxiliary input AUX ON AUX OFF Enabl...

Page 16: ... 3 Select your preferred color from one of the 29 preset colors or USER color Button zone All zone Display zone Hold 4 Repeat steps 2 and 3 to select a different zone and your preferred color If ALL ZONE is selected in step 2 the buttons and display illumination changed to the current selected BUTTON ZONE color You can also change the ALL ZONE color to one of your preferred color by performing ste...

Page 17: ...ay Creating your own day and night colors USER You can create your own colors for DAY COLOR and NIGHT COLOR to apply to button zone and display zone DAY COLOR Displayed when DIMMER is set to DIMMER OFF NIGHT COLOR Displayed when DIMMER is set to DIMMER ON Menu hierarchy Operation COLOR SETUP DAY COLOR BUTTON ZONE Follow example below DISP ZONE Press BACK after step 5 then select DISP ZONE in step ...

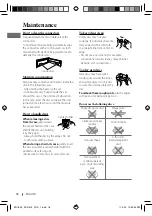
Page 18: ...ectors To minimize this possibility periodically wipe the connectors with a cotton swab or cloth moistened with alcohol being careful not to damage the connectors Moisture condensation Moisture may condense on the lens inside the unit in the following cases After starting the heater in the car If it becomes very humid inside the car Should this occur the unit may malfunction In this case eject the...

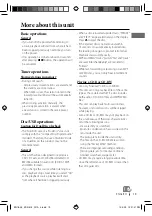
Page 19: ...viously When a disc is inserted upside down PLEASE and EJECT appear alternately on the display Press 0 to eject the disc If the ejected disc is not removed within 15 seconds it is automatically inserted into the loading slot again to protect it from dust Playback starts automatically MP3 and WMA tracks words file and track are used interchangeably are recorded in folders While fast forwarding or r...

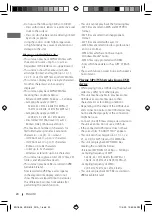
Page 20: ...e elapsed time display and do not show the actual elapsed time In particular this difference becomes noticeable after performing the search function This unit cannot play back the following files MP3 files encoded in MP3i and MP3 PRO format MP3 files encoded in an inappropriate format MP3 files encoded with Layer 1 2 WMA files encoded in lossless professional and voice format WMA files which are n...

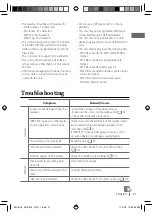
Page 21: ...P3 files encoded with Layer 1 2 WMA files encoded in lossless professional and voice format WMA files which are not based upon Windows Media Audio Troubleshooting Symptom Remedy Cause General Sound cannot be heard from the speakers Adjust the volume to the optimum level Make sure the unit is not muted paused 6 Check the cords and connections PROTECT appears on the display and no operations can be ...

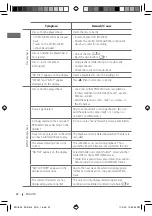
Page 22: ... track or change the disc Do not add the extension code mp3 or wma to non MP3 or WMA tracks A longer readout time is required READING keeps flashing on the display Do not use too many hierarchical levels and folders Tracks do not play back in the order you have intended them to play The playback order is determined when the files are recorded The elapsed playing time is not correct This sometimes ...

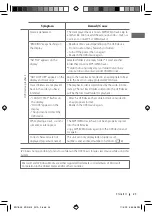
Page 23: ... playback order is determined by the write in time stamp The first track folder written into the USB device will be the first track folder for playback CANNOT PLAY flashes on the display NO USB appears on the display The unit cannot detect the USB device Attach a USB device that contains tracks encoded in an appropriate format Reattach the USB device again While playing a track sound is sometimes ...

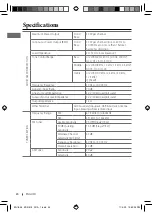
Page 24: ...0 000 Hz Signal to Noise Ratio 70 dB Line Out Level Impedance 5 0 V 20 kΩ load full scale Subwoofer Out Level Impedance 5 0 V 20 kΩ load full scale Output Impedance 1 kΩ Other Terminal AUX auxiliary input jack USB input jack Antenna input Steering wheel remote input TUNER SECTION Frequency Range FM 87 5 MHz to 108 0 MHz AM 531 kHz to 1 602 kHz FM Tuner Usable Sensitivity 9 3 dBf 0 8 μV 75 Ω 50 dB ...

Page 25: ...ndard USB 1 1 USB 2 0 Data Transfer Rate Full Speed Max 12 Mbps Compatible Device Mass storage class Compatible File System FAT 32 16 12 Playable Audio Format MP3 WMA Max Current DC 5 V 500 mA GENERAL Power Requirement Operating Voltage DC 14 4 V 11 V to 16 V allowance Grounding System Negative ground Allowable Operating Temperature 0 C to 40 C Dimensions W H D approx Installation Size 182 mm 52 m...

Page 26: ...rasikan unit selagi mengemudi pastikan Anda melihat ke sekeliling dengan cermat jika tidak Anda berisiko mengalami kecelakaan lalu lintas Untuk keselamatan Jangan menaikkan level volume terlalu tinggi karena akan menghalangi suara dari luar dan membahayakan perjalanan anda Hentikan mobil sebelum melakukan pengoperasian yang rumit Suhu dalam mobil Jika anda telah memarkir mobil terlalu lama dalam c...

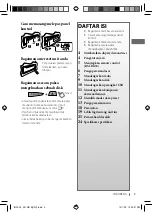
Page 27: ...t 13 Pengoperasian menu 18 Perawatan 19 Lebih lagi tentang unit ini 21 Pemecahan Masalah 24 Spesifikasi spesifikasi Cara memasang melepas panel kontrol Bagaimana mereset unit anda Penyesuaian prasetel yang Anda lakukan pun akan dihapus Bagaimana secara paksa mengeluarkan sebuah disk Anda dapat mengeluarkan disk secara paksa meskipun disk tersebut terkunci Untuk mengunci membuka kunci disk 9 Hati h...

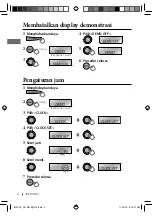
Page 28: ...h CLOCK 4 Pilih CLOCK SET 5 Setel jam 6 Setel menit 7 Prosedur selesai 4 Pilih DEMO OFF 5 6 Prosedur selesai Membatalkan display demonstrasi Pengaturan awal Tahan Pengaturan awal Tahan IN02 09_KD R516 UN 1 indd 4 IN02 09_KD R516 UN 1 indd 4 11 26 09 5 00 27 PM 11 26 09 5 00 27 PM ...

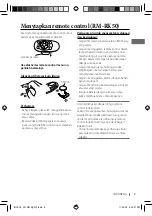
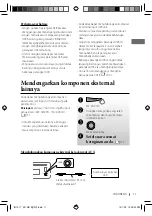
Page 29: ...emote control roda kemudi Sebelum mengoperasikan hubungkan remote adapter khusus tidak disediakan yang sesuai untuk mobil Anda ke terminal input remote control roda kemudi ini yang ada di bagian belakang unit Untuk rincian selengkapnya lihat juga buku petunjuk yang disediakan bersama remote adapter Menyiapkan remote control RM RK50 Jika Anda menggunakan remote control untuk pertama kali lepaskan l...

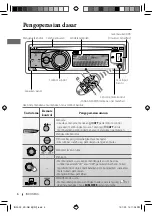
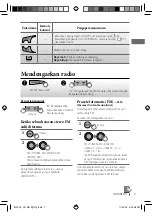
Page 30: ...ka ditekan terus Pilih sumber yang tersedia jika daya menyala Jika sumber sudah siap pemutaran ulang akan mulai Menyetel level volume Pilih item Membungkam suara ketika mendengarkan sumber Jika sumbernya adalah CD atau USB pemutaran berhenti Tekan lagi dial kontrol untuk membatalkan pembungkaman suara atau melanjutkan pemutaran Mengkonfirmasi pemilihan Memilih mode suara Memasukkan penyesuaian tin...

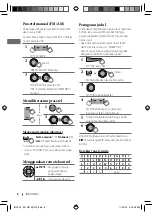
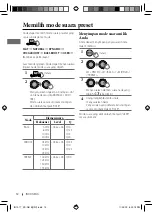
Page 31: ...tasiun lokal yang memiliki sinyal terkuat akan dicari dan disimpan secara otomatis Untuk memprasetel 6 stasiun lainnya ulangi prosedur di atas dengan memilih salah satu dari 6 kisaran pengaturan SSM lainnya Unit utama Remote kontrol Pengoperasian umum Masukkan pengaturan COLOR secara langsung 16 Masukkan pengaturan COLOR SETUP secara langsung 17 jika ditekan terus Kembali ke menu sebelumnya Daya m...

Page 32: ...l Anda dapat menentukan judul untuk maksimal 30 frekuensi stasiun FM dan AM dengan panjang 8 karakter maksimum untuk setiap nama judul Jika Anda menentukan judul untuk lebih dari 30 frekuensi stasiun NAME FULL akan muncul Hapus judul judul yang tidak diinginkan sebelum penetapan judul 1 FM atau AM 2 Menampilkan layar entri judul 3 Pilih sebuah karakter 4 Pindahkan ke posisi karakter berikutnya ata...

Page 33: ... diinginkan dengan mengulangi prosedur dial kontrol Untuk kembali ke menu sebelumnya tekan BACK Memilih mode mode putar ulang Anda dapat menggunakan hanya satu dari mode putar ulang berikut pada saat yang sama 1 2 REPEAT j RANDOM 3 REPEAT TRACK RPT Mengulangi trek yang sekarang diputar FOLDER RPT Mengulangi folder yang sekarang diputar RANDOM FOLDER RND Memutar secara acak semua trek dari folder y...

Page 34: ... input USB Memori USB Mengganti tampilan informasi Judul disk Judul album pemain nama Folder Judul trek nama File Nomor trek yang sekarang dengan waktu putaran yang sudah berlalu Nomor trek yang sekarang dengan waktu jam kembali ke permulaan Jika disk yang sekarang adalah sebuah CD Audio NO NAME muncul Jika file MP3 WMA tidak memiliki informasi Tag atau TAG DISPLAY disetel ke TAG OFF 13 nama folde...

Page 35: ...u suhu tinggi karena bisa mengubah bentuk perangkat atau menyebabkan kerusakan Beberapa perangkat USB mungkin tidak langsung berfungsi setelah memasangkan perangkat USB atau menghidupkan daya Untuk rincian selengkapnya mengenai pengoperasian USB 20 21 AUX IN Ÿ Hidupkan komponen yang telah tersambung dan mulai memutar sumber tersebut Setel volume Setel suara sesuai keinginan anda 12 Menghubungkan k...

Page 36: ... 60 Hz 80 Hz 100 Hz 200 Hz 06 ke 06 Q1 0 Q1 25 Q1 5 Q2 0 MIDDLE 0 5 kHz 1 0 kHz 1 5 kHz 2 5 kHz 06 ke 06 Q0 75 Q1 0 Q1 25 TREBLE 10 0 kHz 12 5 kHz 15 0 kHz 17 5 kHz 06 ke 06 Q FIX Menyimpan mode suara milik Anda Anda dapat menyimpan penyesuaian Anda dalam memori 1 2 PRO EQ BASS MIDDLE TREBLE 3 Menyesuaikan elemen suara nada yang dipilih tabel di kiri 4 Ulangi langkah 2 dan 3 untuk menyesuaikan nad...

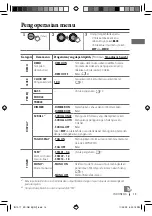
Page 37: ...LL 1 SCROLL ONCE SCROLL AUTO SCROLL OFF Menggulir informasi yang ditampilkan sekali Mengulangi penggulungan selang waktu 5 detik Batal Tekan DISP untuk lebih dari satu detik dapat menggulung tampilan dengan mengabaikan pengaturan TAG DISPLAY TAG ON TAG OFF Menunjukkan informasi tag sementara memutar trek trek MP3 WMA Batal TUNER SSM 2 Memori Urutan Stasiun Kuat SSM 01 06 SSM 07 12 SSM 13 18 Untuk ...

Page 38: ... 3 R06 F06 00 Menyesuaikan keseimbangan output speaker depan dan belakang BALANCE 4 L06 R06 00 Menyesuaikan keseimbangan output speaker kiri dan kanan LOUD Kenyaringan LOUD ON LOUD OFF Menguatkan frekuensi frekuensi rendah dan tinggi untuk menghasilkan keseimbangan suara yang baik pada level volume rendah Batal VOL ADJUST Penyetelan volume VOL ADJ 05 VOL ADJ 05 VOL ADJ 00 Prasetel tingkat penyesua...

Page 39: ... BEEP OFF Mengaktifkan suara sentuh kunci Menonaktifkan suara sentuh kunci AMP GAIN 6 Kontrol penguatan penguat LOW POWER HIGH POWER VOLUME 00 VOLUME 30 Pilih jika daya maksimal masing masing speaker kurang dari 50 W agar tidak merusak speaker VOLUME 00 VOLUME 50 SRC SELECT AM 7 Stasiun AM AM ON AM OFF Aktifkan AM dalam pemilihan sumber Nonaktifkan AM dalam pemilihan sumber AUX IN 8 Masukan auxili...

Page 40: ... warna favorit Anda dari 29 warna prasetel atau warna USER Zona tombol Semua zona Zona tampilan Tahan 4 Ulangi langkah 2 dan 3 untuk memilih zona yang berbeda dan warna favorit Anda Jika ALL ZONE SEMUA ZONA dipilih pada langkah 2 sinar tombol dan tampilan berubah menjadi warna BUTTON ZONE ZONA TOMBOL saat ini yang dipilih Anda juga dapat mengubah warna ALL ZONE SEMUA ZONA menjadi salah satu warna ...

Page 41: ...iang dan malam yang Anda inginkan USER Anda dapat membuat sendiri warna Anda untuk DAY COLOR WARNA SIANG dan NIGHT COLOR WARNA MALAM untuk menerapkan zona tombol dan zona tampilan DAY COLOR Ditampilkan bila DIMMER diatur ke DIMMER OFF NIGHT COLOR Ditampilkan bila DIMMER diatur ke DIMMER ON Hierarki menu Pengoperasian COLOR SETUP DAY COLOR BUTTON ZONE Ikuti contoh di bawah ini DISP ZONE Tekan BACK ...

Page 42: ...ruk konektor konektor Untuk meminimalkan kemungkinan ini secara periodik lap konektor konektor dengan sebuah lap kapas atau kain yang sudah di basahi dengan alkohol hati hati untuk tidak merusak konektor konektor Pengembunan uap air Uap air mungkin mengembun pada lensa di dalam unit dalam kasus kasus berikut Setelah menyalakan pemanas di dalam mobil Jika ini menjadi sangat lembab di dalam mobil Ji...

Page 43: ... terakhir pemutaran dihentikan sebelumnya Ketika sebuah disk disisipkan terbalik PLEASE dan EJECT muncul secara alternatif pada tampilan Tekan 0 untuk mengeluarkan disk Jika disk yang dikeluarkan tidak diambil dalam 15 detik disk itu secara otomatis dimasukkan lagi ke dalam slot loading untuk melindunginya dari debu Putar ulang mulai secara otomatis Trek kata file dan trek digunakan secara bergant...

Page 44: ...k disk dengan stiker stiker label label atau sebuah stiker segel perlindungan pada permukaannya Disk disk dengan label label dapat langsung diprint dengan sebuah printer ink jet Menggunakan disk ini di bawah suhu tinggi atau kelembapan tinggi dapat menyebabkan malafungsi atau kerusakan pada unit Memutar sebuah disk MP3 WMA Unit ini dapat memutar ulang file file MP3 WMA dengan kode perpanjangan mp3...

Page 45: ...um untuk Nama folder 32 karakter Nama file 32 karakter MP3 Tag 64 karakter WMA Tag 32 karakter Unit ini dapat mengenali total 5 000 file 255 folder 255 file per folder termasuk folder tanpa file yang tidak didukung dan dari 8 hierarki Unit ini tidak mendukung pembaca kartu SD Unit ini tidak dapat mengenali perangkat USB yang pentarafannya di luar 5 V dan melampaui 500 mA Perangkat USB yang dilengk...

Page 46: ...sis dibangkitkan Lewatkan ke trek yang lain atau ganti disk tersebut Jangan tambahkan kode perpanjangan mp3 atau wma ke trek trek bukan MP3 atau WMA Waktu yang lama diperlukan READING tetap berkedip pada tampilan Jangan menggunakan terlalu banyak tingkat hierarki dan folder Trek tidak berputar ulang dalam urutan yang Anda inginkan Urutan putar ulang ditentukan ketika file file direkam Waktu putar ...

Page 47: ...utan yang Anda maksudkan Urutan pemutaran ditentukan oleh cap waktu tertulis Trek folder pertama yang ditulis ke perangkat USB akan menjadi trek folder pertama yang diputar kembali CANNOT PLAY berkedip pada display NO USB muncul pada tampilan Unit tidak dapat mendeteksi perangkat USB Pasang perangkat USB yang berisikan trek yang disandi dalam format yang sesuai Memasang ulang perangkat USB Sewaktu...

Page 48: ...20 000 Hz Perbandingan sinyal desis 70 dB Tingkat Line Out Impedansi 5 0 V 20 kΩ beban skala penuh Tingkat Keluaran Subwoofer Impedansi 5 0 V 20 kΩ beban skala penuh Impedansi Output 1 kΩ Terminal lain Jack input AUX auxiliary Jack input USB Antena input Input remote roda kemudi SEKSI TUNER Cakupan Frekuensi FM 87 5 MHz sampai 108 0 MHz AM 531 kHz sampai 1 602 kHz Tuner FM Sensitivitas yang dapat ...

Page 49: ...d USB 1 1 USB 2 0 Laju Transfer Data Kecepatan Penuh Maks 12 Mbps Perangkat Kompatibel Kelas penyimpanan massal Sistem File Kompatibel FAT 32 16 12 Format Audio yang Dapat Diputar MP3 WMA Arus Maks DC 5 V 500 mA UMUM Power yang Diperlukan Voltase Pengoperasian DC 14 4 V kelonggaran 11 V sampai 16 V Sistem Pertanahan Tanah negatif Temperatur pengoperasian yang diizinkan 0 C sampai 40 C Dimensi L x ...

Reviews: