background image

40

ENGLISH

MAINTENANCE

Center holder

Handling discs

This unit has been designed to reproduce CDs,
CD-Rs (Recordable), CD-RWs (Rewritable), and
CD Texts.

• This unit is also compatible with MP3 discs.

How to handle discs

When removing a disc
from its case,

 press down

the center holder of the case
and lift the disc out, holding
it by the edges.
• Always hold the disc by the edges. Do not

touch its recording surface.

When storing a disc into its case,

 gently insert

the disc around the center holder (with the
printed surface facing up).
• Make sure to store discs into the cases after

use.

To keep discs clean

A dirty disc may not play correctly.
If a disc does become dirty, wipe it
with a soft cloth in a straight line
from center to edge.

To play new discs

New discs may have some rough
spots around the inner and outer
edges. If such a disc is used, this
unit may reject the disc.
To remove these rough spots, rub
the edges with a pencil or ball-point pen, etc.

Moisture condensation

Moisture may condense on the lens inside the
CD player in the following cases:
• After starting the heater in the car.
• If it becomes very humid inside the car.
Should this occur, the CD player may
malfunction. In this case, eject the disc and leave
the unit turned on for a few hours until the
moisture evaporates.

When playing a CD-R or CD-RW

Before playing back CD-Rs or CD-RWs, read
their instructions or cautions carefully.
• Use only “finalized” CD-Rs or CD-RWs.
• Some CD-Rs or CD-RWs may not play back on

this unit because of their disc characteristics,
and for the following reasons:
– Discs are dirty or scratched.
– Moisture condensation on the lens inside the

unit.

– The pickup lens inside the unit is dirty.

• CD-RWs may require a longer readout time

since the reflectance of CD-RWs is lower than
that of regular CDs.

• CD-Rs or CD-RWs are susceptible to high

temperatures or high humidity, so do not leave
them inside your car.

• Do not use following CD-Rs or CD-RWs:

– Discs with stickers, labels, or protective seal

stuck to the surface.

– Discs on which labels can be directly printed

by an ink jet printer.

Using these discs under high temperatures or
high humidity may cause malfunctions or
damage to discs. For example,
– Stickers or labels may shrink and warp a

disc.

– Stickers or labels may peel off so discs

cannot be ejected.

– Print on discs may get sticky.
Read instructions or cautions about labels and
printable discs carefully.

CAUTIONS:

• Do not insert 8 cm (3-3/16") discs (single CDs)

into the loading slot. (Such discs cannot be
ejected.)

• Do not insert any disc of unusual shape—like a

heart or flower; otherwise, it will cause a
malfunction.

• Do not expose discs to direct sunlight or any

heat source or place them in a place subject to
high temperature and humidity. Do not leave
them in a car.

• Do not use any solvent (for example,

conventional record cleaner, spray, thinner,
benzine, etc.) to clean discs.

Sticker

Sticker
residue

Disc

Stick-on
label

Warped
disc

EN37-41KD-SX9350_990[J]f.p65

12/27/02, 5:36 PM

40

Summary of Contents for KD-SX9350

Page 1: ...nes refiérase al manual separado Pour l installation et les raccordements se référer au manuel séparé RECEPTEUR CD KD SX9350 KD SX990 RECEPTOR CON CD KD SX9350 KD SX990 For customer Use Enter below the Model No and Serial No which are located on the top or bottom of the cabinet Retain this information for future reference Model No Serial No KD SX9350 SOUND VOL VOL SOURCE R F U D ATT KD SX990 SOUND...

Page 2: ...n unloading CDs It is dangerous to defeat the safety switches 5 CAUTION Use of controls adjustments or performance of procedures other than those specified herein may result in hazardous radiation exposure INFORMATION For USA This equipment has been tested and found to comply with the limits for a Class B digital device pursuant to Part 15 of the FCC Rules These limits are designed to provide reas...

Page 3: ... on an MP3 disc 19 Selecting MP3 playback modes 21 SOUND ADJUSTMENTS 23 Selecting preset sound modes C EQ custom equalizer 23 Adjusting the sound 24 OTHER MAIN FUNCTIONS 25 Changing the general settings PSM 25 Assigning names to the sources 29 Detaching the control panel 30 CD CHANGER OPERATIONS 31 Playing discs 31 Selecting the playback modes 34 EXTERNAL COMPONENT OPERATIONS 36 Playing an externa...

Page 4: ...tons when pressed together with DISP display button o DISP display button Also functions as SSM buttons when pressed together with MODE button EQ equalizer button a Auxiliary input jack MP3 INPUT Display window s Disc information indicators TAG ID3 Tag folder track file d CD in indicator f Main display g Playback item indicators disc folder h Source clock display j EQ equalizer indicator k Sound m...

Page 5: ... press the button the source changes 7 Searches for stations while listening to the radio Fast forwards or reverses the track file if pressed and held while listening to a disc Skips to the beginning of the next track file or goes back to the beginning of the current or previous tracks files if pressed briefly while listening to a disc 1 Turns on the unit if pressed when the unit is turned off Tur...

Page 6: ...the battery holder Insert again the battery holder by pushing it until you hear a clicking sound WARNING Store the battery in a place where children cannot reach If a child accidentally swallows the battery consult a doctor immediately Do not recharge short disassemble or heat the battery or dispose of it in a fire Doing any of these things may cause the battery to give off heat crack or start a f...

Page 7: ...and the volume level will drop in a moment To resume the previous volume level press the button briefly again If you turn the control dial you can also restore the sound To turn off the power Press and hold for more than one second SEE YOU appears then the unit turns off If you turn off the power while listening to a disc disc play will start from where playback has been stopped previously next ti...

Page 8: ...t the hour 3 Set the minute 1 Select CLOCK M minute 2 Adjust the minute 4 Finish the setting Note To show the clock time on the display see page 27 To check other information during play press DISP display Each time you press the button the other information will be shown on the upper part of the display See page 27 for details Pressing DISP display with the unit turned off will show the clock tim...

Page 9: ...rching to tune in to a particular station Searching a station automatically Auto search 1 Select the band FM1 3 AM Each time you press the button the band changes as follows When CLOCK is set to ON see page 27 the current indication will soon change to the clock time Note This receiver has three FM bands FM1 FM2 FM3 You can use any one of them to listen to an FM broadcast 2 Start searching a stati...

Page 10: ...ll be automatically tuned in SSM appears then disappears when automatic preset is over 3 Tune in to a station you want while MANU manual is flashing If you release your finger from the button the manual mode will automatically turns off after 5 seconds If you hold down the button the frequency keeps changing in 200 kHz intervals for FM and 10 kHz for AM until you release the button When an FM ster...

Page 11: ...n is stored in the same preset number Preset stations are erased when the power supply to the memory circuit is interrupted for example during battery replacement If this occurs preset the stations again Tuning in to a preset station You can easily tune in to a preset station Remember that you must store stations first If you have not stored them yet see Storing stations in memory on pages 10 and ...

Page 12: ...on will soon change to the clock time Notes When a CD is inserted upside down the CD automatically ejects if the control panel is open If the control panel is closed the source changes to the tuner PLEASE and EJECT appear alternately on the display When you open the control panel by pressing 0 the CD automatically ejects If there is no CD in the loading slot you cannot select CD as the source NO D...

Page 13: ... and hold 1 7 6 12 for more than one second To go to a track quickly 10 and 10 buttons 1 Press MODE to enter the functions mode while playing a CD MODE flashes on the upper part of the display 2 Press 10 or 10 The first time you press 10 or 10 button the track skips to the nearest higher or lower track with a track number of multiple ten ex 10th 20th 30th Then each time you press the button you ca...

Page 14: ...Each time you press the button track intro scan mode turns on and off alternately When track intro scan is turned on the INT indicator lights up on the display The first 15 seconds of each track is played sequentially How to use the 10 and 10 buttons Ex 1 To select track number 32 while playing track number 6 Ex 2 To select track number 8 while playing track number 36 Selecting CD playback modes T...

Page 15: ...rformer and track title is recorded This CD Text information will be shown automatically when you play a CD Text To change the CD Text information manually select text display mode while playing a CD Text Each time you press the button the display changes as follows Notes The display shows up to 8 characters at a time and scrolls if there are more than 8 characters See also To select the scroll mo...

Page 16: ...t A playlist is a simple text file used on a PC which enables users to make their own playback order without physically rearranging the files What is MP3 MP3 is an abbreviation of Motion Picture Experts Group or MPEG Audio Layer 3 MP3 is simply a file format with a data compression ratio of 1 10 128 Kbps That means by using MP3 format one CD R or CD RW can contain 10 times as much data volume as a...

Page 17: ...ide the folders indicate the playback order and search order of the folders on an MP3 disc Normally this unit plays back MP3 files in the folders in the recorded order Note There is no limit on the number of the hierarchy levels nested folders However up to 8 hierarchy levels is recommanded for stable operations 13 12 18 19 17 23 22 24 11 10 21 20 1 2 5 6 3 4 02 04 ROOT 15 16 14 06 07 05 09 01 08 ...

Page 18: ...ge 27 the current indication will soon change to the clock time Notes MP3 discs require a longer readout time It differs due to the complexity of the folder file configuration When playback starts folder and file names or ID3 tags will automatically appears See also page 19 If you change the source or turn the power off disc playback stops without ejecting the disc Next time you select the CD play...

Page 19: ... briefly while playing to skip ahead to the beginning of the next file Each time you press the button consecutively the beginning of the next files is located and played back Locating a file or particular portion on an MP3 disc For MP3 playback search order see page 17 To fast forward or reverse the file To skip to the next or previous files Press 4 briefly while playing to skip back to the beginn...

Page 20: ...T To directly select the folders using the number button s it is required that folders are assigned 2 digit numbers at the beginning of their folder names This can only be done during the recording of CD Rs or CD RWs Ex If folder name is 01 ABC Press 1 to go to Folder 01 ABC If folder name is 1 ABC pressing 1 does not work If folder name is 12 ABC Press and hold 6 12 to go to Folder 12 ABC Press t...

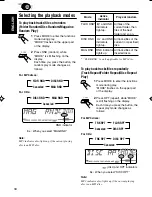
Page 21: ...s Mode Active Plays at random indicator FLDR RND and RND All files of the indicators current folder then light up files of the next folder and so on DISC RND and RND All files on the disc indicators light up To skip to the next or previous folder Note If the folder does not contain any MP3 files it is skipped Press down while playing an MP3 disc to skip back to the previous folder Each time you pr...

Page 22: ...t folder repeatedly 1 Press MODE to enter the functions mode while playing an MP3 disc MODE flashes on the upper part of the display 2 Press RPT repeat while MODE is still flashing on the display so that TRK RPT or FLDR RPT appears on the display Each time you press the button the repeat play mode changes as follows RPT indicator Ex When you select TRK RPT Mode Active Plays repeatedly indicator TR...

Page 23: ... custom equalizer suitable to the music genre Select the sound mode you want When you press the button once the last selected sound mode is recalled and applied to the current source Then each time you press the button the sound modes change as follows Note You can adjust each sound mode to your preference Once you make an adjustment it is automatically stored for the currently selected sound mode...

Page 24: ...nt you have made is stored for the currently selected sound mode C EQ including USER 2 If you are using a two speaker system set the fader level to 00 3 Only for KD SX9350 This takes effect only when a subwoofer is connected 4 Normally the control dial work as the volume control So you do not have to select VOL to adjust the volume level 2 Adjust the setting 3 Repeat steps 1 and 2 to adjust the ot...

Page 25: ...tting Mode control Basic Procedure 1 Press and hold SEL select for more than 2 seconds so that one of the PSM items appears on the display See page 26 2 Select the PSM item you want to adjust See page 26 3 Adjust the PSM item selected 4 Repeat steps 2 and 3 to adjust the other PSM items if necessary 5 Finish the setting Ex When you select LEVEL ...

Page 26: ...touch tone SCROLL Scroll mode EXT IN External component AUX ADJ Auxiliary level adjustment TAG DISP Tag display Preferred Setting Mode PSM items Press SEL select to finish the setting Displayed only when one of the following sources is selected FM AM and CD OFF ON AUDIO 1 AUDIO 2 OFF ON A ADJ 00 A ADJ 05 A ADJ 00 CHANGER LINE IN TAG OFF TAG ON CHANGER TAG ON AUTO AUTO OFF ON ON AUDIO 2 ON 1 3 27 2...

Page 27: ... select the level meter LEVEL You can select the level display according to your preference When shipped from the factory AUDIO 2 is selected AUDIO 1 Shows the audio level indicator AUDIO 2 Alternates AUDIO 1 setting and illumination display OFF Erases the audio level indicator To select the dimmer mode DIMMER When you turn on the car head lights the display automatically dims Auto Dimmer When shi...

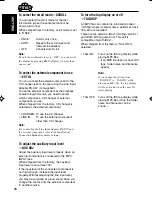
Page 28: ...Connection Manual separate volume To adjust the auxiliary input level AUX ADJ Adjust the auxiliary input level properly when an external component is connected to the MP3 INPUT jack When shipped from the factory the auxiliary input level is set at level 00 If the input level of the connected component is not high enough increase the input level properly Without adjusting the line input level you m...

Page 29: ...s can also be shown on the display if you insert the CDs in this unit Ex When you select CD as the source Maximum number of characters Sources Assigning names to the sources You can assign names to station frequencies and CDs both in this unit and in the CD changer After assigning a name it will appear on the display when you select the source Station frequencies Up to 8 characters up to 30 statio...

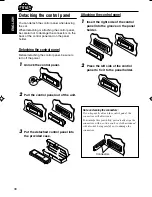
Page 30: ...el 2 Pull the control panel out of the unit 3 Put the detached control panel into the provided case Attaching the control panel 1 Insert the right side of the control panel into the groove on the panel holder 2 Press the left side of the control panel to fix it to the panel holder Note on cleaning the connectors If you frequently detach the control panel the connectors will deteriorate To minimize...

Page 31: ...H X99 and CH X100 However they are not compatible with MP3 discs so you cannot play back MP3 discs You cannot use the KD MK series CD changers with this unit Before operating your CD changer Refer also to the Instructions supplied with your CD changer If no discs are in the magazine of the CD changer or the discs are inserted upside down NO DISC will appear on the display If this happens remove th...

Page 32: ...ou press the button consecutively the beginning of the previous tracks files is located and played back Press and hold during play to fast forward the track file When the current disc is a CD Playback starts from the first track of the current disc When CLOCK is set to ON see page 27 the current indication will soon change to the clock time Notes When you press CD CD CH the power automatically com...

Page 33: ...ile playing a disc MODE flashes on the upper part of the display 2 Press 10 or 10 The first time you press 10 or 10 button the track file skips to the nearest higher or lower track file with a track file number of multiple ten ex 10th 20th 30th Then each time you press the button you can skip 10 tracks files see How to use the 10 and 10 buttons below After the last track file the first track file ...

Page 34: ... of the next folder and so on DISC RND and RND All tracks files of the indicators current or specified light up disc MAG RND RND indicator All tracks files of the lights up inserted discs Canceled MAG RND DISC RND FLDR RND is only applicable for MP3 disc To play back tracks files repeatedly Track Repeat Folder Repeat Disc Repeat Play 1 Press MODE to enter the functions mode during play MODE flashe...

Page 35: ...ions mode during play MODE flashes on the upper part of the display 2 Press INT intro while MODE is still flashing on the display Each time you press the button the intro scan mode changes as follows For MP3 discs For CDs Note MP3 indicator also lights up if the current playing disc is an MP3 disc FLDR INT is only applicable for MP3 disc Canceled DISC INT TRK INT DISC INT TRK INT FLDR INT Canceled...

Page 36: ...crease the input level properly See To adjust the auxiliary input level AUX ADJ on page 28 1 Select the external component LINE IN or AUX IN To select LINE IN component connected to the CD changer jack on the rear press CD CD CH repeatedly If LINE IN does not appear on the display see page 28 and select the external input LINE IN Displayed only when one of the following sources is selected FM AM a...

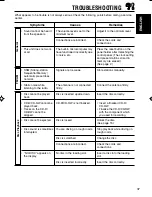
Page 37: ... into the loading slot Insert the disc correctly Causes The volume level is set to the minimum level Connections are incorrect The built in microcomputer may have functioned incorrectly due to noise etc Signals are too weak The antenna is not connected firmly Disc is inserted upside down CD R CD RW is not finalized Disc is locked You are driving on rough roads Disc is scratched Connections are inc...

Page 38: ...e played back is not an MP3 file although it has the extension code mp3 Readout time varies due to the complexity of the folder file configuration Playback order is determined when the files are recorded This sometimes occurs during play This is caused by how the files are recorded on the disc The current folder does not contain any MP3 file The current disc does not contain any MP3 file This unit...

Page 39: ...e magazine Discs are inserted upside down No magazine is loaded in the CD changer This unit is not connected to the CD changer correctly The built in microcomputer may function incorrectly due to noise etc Symptoms NO DISC appears on the display NO MAG appears on the display RESET 8 appears on the display RESET 1 RESET 7 appears on the display The CD changer does not work at all CD Changer About m...

Page 40: ...eir instructions or cautions carefully Use only finalized CD Rs or CD RWs Some CD Rs or CD RWs may not play back on this unit because of their disc characteristics and for the following reasons Discs are dirty or scratched Moisture condensation on the lens inside the unit The pickup lens inside the unit is dirty CD RWs may require a longer readout time since the reflectance of CD RWs is lower than...

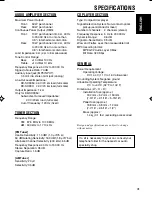
Page 41: ... 11 3 dBf 1 0 µV 75 Ω 50 dB Quieting Sensitivity 16 3 dBf 1 8 µV 75 Ω Alternate Channel Selectivity 400 kHz 65 dB Frequency Response 40 Hz to 15 000 Hz Stereo Separation 35 dB Capture Ratio 1 5 dB AM Tuner Sensitivity 20 µV Selectivity 35 dB CD PLAYER SECTION Type Compact disc player Signal Detection System Non contact optical pickup semiconductor laser Number of channels 2 channels stereo Frequen...

Page 42: ......

Page 43: ......

Page 44: ......

Page 45: ......

Page 46: ......

Page 47: ......

Page 48: ......

Page 49: ......

Page 50: ......

Page 51: ......

Page 52: ......

Page 53: ......

Page 54: ......

Page 55: ......

Page 56: ......

Page 57: ......

Reviews: