background image

10

BAHASA

INDONESIA

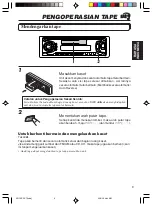
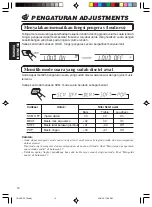
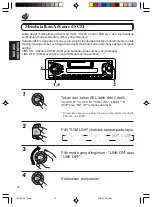
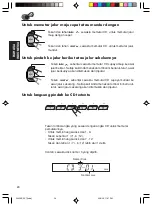
Untuk memutar tape maju cepat dan mundur

Sewaktu memainkan tape

Tentukan berapa lagu sebelum dan
sesudah lagu sekarang yang ingin
Anda temukan.

Tiap kali Anda menyetel lagu, angka akan
berubah sampai ±9.

Sewaktu awal suatu lagu tertentu ditemukan, tape mulai bermain secara otomatis.

Catatan:

• Sewaktu mencari lagu tertentu:

– Jika tape diputar mundur sampai awal, tape mulai bermain dari awal sisi tersebut.
– Jika tape diputar maju dengan cepat sampai akhir, tape akan berputar sebaliknya dan

dimainkan dari awal sisi yang lain.

• Pada kasus-kasus berikut, fungsi Multi Music Scan mungkin tidak dapat beroperasi dengan benar.

– Tape dengan lagu-lagu yang mempunyai bagian pianissimo (bagian yang suaranya sangat

lembut) yang lama atau bagian tape tanpa rekaman di antara lagu.

– Tape dengan bagian tanpa rekaman yang pendek.
– Tape dengan tingkat kebisingan tinggi atau dengungan di antara lagu.

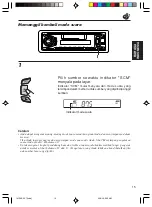
Untuk mencari lagu
sebelum lagu yang
sedang dimainkan
pada tape

Untuk mencari lagu
sesudah lagu yang
sedang dimainkan
pada tape

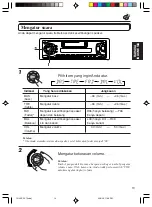
  Mencari awal lagu

Multi Music Scan memungkinkan Anda memainkan tape secara otomatis mulai dari awal
suatu lagu tertentu. Anda dapat merinci hingga 9 lagu sesudah atau sebelum lagu yang
sedang dimainkan.

¢

4


Tape direction

• Tekan 

¢


 lebih dari 1 detik untuk memutar tape maju

cepat.
Sewaktu tape sampai pada akhir rekaman, tape berputar
sebaliknya dan mulai bermain di awal sisi yang lain.

• Tekan 

4


 lebih dari 1 detik untuk memutar tape mundur.

Sewaktu tape sampai pada akhir rekaman, tape mulai
bermain di awal sisi tersebut.

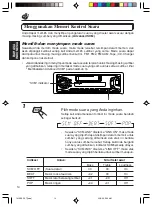
Untuk berhenti memutar tape maju cepat dan mundur pada posisi tape manapun,

tekan TAPE 

2 3

.

Tape mulai bermain dari posisi tersebut.

09-11KS-FX7[Indo]

25/3/05, 4:44 AM

10

Summary of Contents for KS-FX7

Page 1: ...SSETTE RECEIVER KS FX7 For installation and connections refer to the separate manual Untuk instalasi dan penyambungan lihat buku pedoman terpisah RM RK31 Scan Music Multi MO DISP DISP SCAN SCAN LOUD LOUD 8 9 10 11 12 7 CD CHANGER CONTR CD CHANGER CONTROL OL Cover KS FX7 UN 25 3 05 4 20 AM 3 ...

Page 2: ...Selecting FM reception sound 8 TAPE OPERATIONS 9 Listening to a tape 9 Finding the beginning of a tune 10 Other convenient tape functions 11 Prohibiting tape ejection 11 Skipping the blank portions on the tape 11 Repeat Function 11 SOUND ADJUSTMENTS 12 Turning on off the loudness function 12 Selecting preset sound modes 12 Adjusting the sound 13 Using the Sound Control Memory 14 Selecting and Stor...

Page 3: ...urce ATT starts flashing on the display and the volume level will drop in a moment To resume the previous volume level press the button briefly again To turn off the power Press for more than 1 second BASIC OPERATIONS Note When you use this unit for the first time set the built in clock correctly see page 18 Note on One Touch Operation When you select a source in step 2 below the power automatical...

Page 4: ...while M is flashing 3 Press or 4 repeatedly until the frequency you want is reached If you hold down the button the frequency keeps changing in 50 kHz intervals for FM and 9 kHz intervals for AM MW until you release the button RADIO OPERATIONS Listening to the radio 1 Select the band FM1 FM2 FM3 or AM You can select any one of FM1 FM2 and FM3 to listen to an FM station To search stations of lower ...

Page 5: ...o 6 highest frequency When automatic preset is over the station stored in number button 1 will be automatically tuned in Storing stations in memory You can use one of the following two methods to store broadcasting stations in memory Automatic preset of FM stations SSM Strong station Sequential Memory Manual preset of both FM and AM stations FM station automatic preset SSM You can preset 6 local F...

Page 6: ...ss and hold the button for more than 2 seconds 4 Repeat the above procedure to store other station into other preset numbers Notes A previously preset station is erased when a new station is stored in the same preset number Preset stations are erased when the power supply to the memory circuit is interrupted for example during battery replacement If this occurs preset the stations again Preset num...

Page 7: ...he number 1 6 for the preset station you want Tuning into a preset station You can easily tune into a preset station Remember that you must store stations first If you have not stored them yet see pages 5 and 6 FM1 FM2 FM3 AM 1 2 1 EN04 08KS FX7 UN 25 3 05 7 33 PM 7 ...

Page 8: ...k what program is now being broadcasted If you want to listen to that program press the same button again to stop scanning Selecting FM reception sound When an FM stereo broadcast is hard to receive Press MO RND while listening to an FM stereo broadcast The sound you hear becomes monaural but reception will be improved To restore the stereo effect press the same button again MO RND SCAN Lights up ...

Page 9: ...anges alternatively forward and reverse To stop play and eject the cassette Press 0 Tape play stops and the cassette automatically ejects from the cassette compartment If you change the source to FM AM or CD CH the tape play also stops without ejecting the cassette this time You can also eject the tape with the unit turned off Note on One Touch Operation When a cassette is already in the cassette ...

Page 10: ...matically Notes While locating a specified tune If the tape is rewound to its beginning playback starts from the beginning of that side If the tape is fast forwarded to the end it is reversed and played from the beginning of the other side In the following cases the Multi Music Scan function may not operate correctly Tapes with tunes having long pianissimo passages very quiet parts or non recorded...

Page 11: ...e with the control dial The Blank Skip mode alternates between on and off ON Ô OFF Note When the tape reaches its end while fast forwarding the tape direction will be changed automatically Repeat Function Press the RPT button while a tune you would like to hear over again is being played back When the tape reaches the end of the tune the tape is automatically rewound to the beginning of that tune ...

Page 12: ...nt suitable to the music genre Each time you press SCM the sound mode changes as follows Indication For Preset values Bass Treble Loudness SCM OFF Flat sound 00 00 On BEAT Rock or disco music 02 00 On SOFT Quiet background music 01 03 Off POP Light music 04 01 Off Notes You can adjust the preset sound mode as you like and store in memory If you want to adjust and store your original sound mode see...

Page 13: ...e front and rear speaker R06 rear only F06 front only Fader balance BAL Adjust the left and right speaker L06 left only R06 right only Balance balance VOL Adjust the volume 00 min 50 max Volume Note If you are using a two speaker system set the fader level to 00 2 Adjust the level Note Normally the control dial work as the volume control buttons So you do not have to select VOL to adjust the volum...

Page 14: ...d mode for all the sources see Canceling Advanced SCM on page 16 1 Select the sound mode you want Each time you press the button the sound mode changes as follows When SCM LINK is set to LINK ON the selected sound mode can be stored in memory for the current source and the effect applies only to the current source Each time you change the playback source the SCM indicator flashes on the display Wh...

Page 15: ...n adjust each sound mode to your preference and store it in memory If you want to adjust and store your original sound mode see Storing your own sound adjustments on page 17 To adjust the bass and treble reinforcement levels or to turn on off the loundness function temporarily see page 12 and 13 Your adjustments will be canceled if another source is selected Sound mode indicators 1 1 EN14 15KS FX7...

Page 16: ...y changing the sources LINK ON Advanced SCM different SCM for different sources LINK OFF Conventional SCM one SCM for all sources 1 Press and hold SEL for more than 2 seconds CLOCK H CLOCK M SCM LINK LEVEL B SKIP or EXT IN appears on the display Displayed only when one of the following sources is selected FM AM and TAPE 2 Select SCM LINK if not shown on the display 3 Select the desired mode LINK O...

Page 17: ...s and hold SCM until the sound mode you have selected in step 1 flashes on the display Your setting is stored in memory 5 Repeat the same procedure to store other settings To reset to the factory settings Repeat the same procedure and reassign the preset values listed in the table on page 12 Storing your own sound adjustments You can adjust the sound modes BEAT SOFT POP see page 12 as you like and...

Page 18: ...e setting To check the current clock time changing the display mode Press DISP repeatedly Each time you press the button the display mode changes as follows If the unit is not in use when you press DISP the power turns on the clock time is shown for 5 seconds then the power turns off 1 2 Clock Frequency During tuner operation During tape operation Clock Play mode Clock LINE IN Número de disco Hora...

Page 19: ...etting and illumination display OFF Erases the audio level indicator 1 Press and hold SEL for more than 2 seconds CLOCK H CLOCK M SCM LINK LEVEL B SKIP or EXT IN appears on the display 2 Select LEVEL if not shown on the display 3 Select the desired mode AUDIO 1 AUDIO 2 or OFF 4 Finish the setting Displayed only when one of the following sources is selected FM AM and TAPE 1 4 2 3 1 EN18 22KS FX7 UN...

Page 20: ... the panel holder Detaching the control panel You can detach the control panel when leaving the car When detaching or attaching the control panel be careful not to damage the connectors on the back of the control panel and on the panel holder Note on cleaning the connectors If you frequently detach the control panel the connectors will deteriorate To minimize this possibility periodically wipe the...

Page 21: ... not leave the batteries with other metallic materials Doing this may cause the batteries to give off heat crack or start a fire When throwing away or saving the batteries wrap in tape and insulate otherwise it may cause the batteries to give off heat crack or start a fire Do not poke the batteries with tweezers or similar tools Doing this may cause the batteries to give off heat crack or start a ...

Page 22: ...e disc number decreases and the selected disc starts playing 4 Functions the same as the control dial on the main unit Note These buttons cannot be used for the clock CLOCK H CLOCK M SCM LINK LEVEL B SKIP and EXT IN adjustments see pages 18 16 19 11 and 27 5 Selects the sound mode Each time you press SCM Sound Control Memory the mode changes 6 Selects the source Each time you press FUNC function t...

Page 23: ... supplied with your CD changer If no discs are in the magazine of the CD changer or the discs are inserted upside down NO CD or NO DISC will appear on the display If this happens remove the magazine and set the discs correctly If RESET 1 RESET 8 appears on the display something is wrong with the connection between this unit and the CD changer If this happens check the connection connect the connec...

Page 24: ...s is located and played back Press 4 briefly while playing a CD to go back to the beginning of the current track Each time you press the button consecutively the beginning of the current tracks is located and played back To go to a particular disc directly Press the number button corresponding to the disc number to start its playback To select a disc number from 1 6 Press 1 7 6 12 briefly To selec...

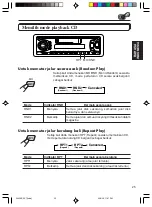
Page 25: ...ext disc and so on RND2 Flashes All tracks of all discs inserted in the magazine To play back tracks repeatedly Repeat Play Each time you press RPT Repeat while playing a CD CD repeat play mode changes as follows Mode RPT Indicator Plays repeatedly RPT1 Lights The current track or specified track RPT2 Flashes All tracks of the current disc or specified disc RND1 RND2 Canceled Random1 Random2 RPT1 ...

Page 26: ...onent using the following procedure select the external input correctly See Selecting the external component to use on page 27 1 Select the external component If LINE IN does not appear on the display see page 27 and select the external input EXT IN 2 Turn on the connected device and start playing the source 3 Adjust the volume Note on One Touch Operation When you press CD CH the power automatical...

Page 27: ...ource through this receiver you need to select which device CD changer or external component to use When shipped from the factory CD changer is selected as the external component LINE IN To use the external component other than CD changer CHANGER To use the CD changer 1 Change the source to FM AM or TAPE 2 Press and hold SEL for more than 2 seconds CLOCK H CLOCK M SCM LINK LEVEL B SKIP or EXT IN a...

Page 28: ...y dirty or dusty tapes Do not touch the highly polished head with any metallic or magnetic tools To keep the tape clean Always store the tapes to their storage cases after use Do not store tapes in the following places Subject to direct sunlight With high humidity At extremely hot temperatures CAUTIONS Do not play the tapes with peeling labels otherwise they can damage the unit Tighten tapes to re...

Page 29: ...ons are not good The volume control is turned to the minimum level Connections are incorrect Signals are too weak The antenna is not connected firmly No CD is in the magazine CDs are inserted incorrectly This unit is not connected to a CD changer correctly The built in microcomputer may function incorrectly due to noise etc Remedies Insert the cassette with the exposed tape facing right Clean it w...

Page 30: ...ensitivity 16 3 dBf 1 8 µV 75 Ω Alternate Channel Selectivity 400 kHz 65 dB Frequency Response 40 Hz to 15 000 Hz Stereo Separation 30 dB Capture Ratio 1 5 dB AM Tuner Sensitivity 20 µV Selectivity 30 dB CASSETTE DECK SECTION Wow Flutter 0 11 WRMS Fast Wind Time 100 sec C 60 Frequency Response 30 Hz to 16 000 Hz 3 dB Signal to Noise Ratio Normal tape 56 dB Stereo Separation 40 dB GENERAL Power Req...

Page 31: ...akan Memori Kontrol Suara 14 Memilih dan menyimpan mode suara 14 Memanggil kembali mode suara 15 Membatalkan Advanced SCM 16 Menyimpan pengaturan suara Anda sendiri 17 FUNGSI UTAMA LAIN 18 Menyetel waktu 18 Memilih tingkat tampilan 19 Melepaskan panel pengendali 20 PENGOPERASIAN JARAK JAUH 21 Memasang baterai 21 Menggunakan remote control 22 PENGOPERASIAN CD CHANGER 23 Memainkan CD 23 Memilih mode...

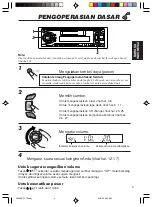
Page 32: ...umber manapun ATT mulai berkedip di layar dan tingkat volume akan segera mengecil Untuk kembali ke tingkat volume semula tekan tombol sekali lagi Untuk mematikan power Tekan lebih dari 1 detik PENGOPERASIAN DASAR Note Jika Anda baru memakai unit ini untuk pertama kali setel waktu pada jam built in dengan benar lihat hal 18 Catatan tentang Pengoperasian Sekali Sentuh Sewaktu Anda memilih sumber pad...

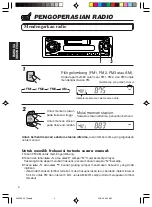
Page 33: ...kan atau 4 berulang ulang sampai menemukan frekuensi yang Anda inginkan Jika Anda menekan tombol tersebut maka frekuensi akan terus berubah dalam interval 50 kHz untuk FM dan interval 9 kHz untuk AM MW sampai Anda melepaskan tombol tersebut PENGOPERASIAN RADIO Mendengarkan radio 1 Pilih gelombang FM1 FM2 FM3 atau AM Anda dapat memilih salah satu FM1 FM2 dan FM3 untuk mendengar stasiun FM Untuk men...

Page 34: ...sudah setel awal otomatis selesai stasiun yang disimpan dalam tombol nomor 1 akan menyala secara otomatis Menyinpan statsiun dalam memori Anda dapat menggunakan salah satu dari dua cara ini untuk menyimpan stasiun siaran dalam memori Setel awal preset stasiun FM secara otomatis SSM Strong station Sequential Memory Setel awal stasiun FM dan AM secara manual Setel awal stasiun FM secara otomatis SSM...

Page 35: ...ilih stasiun siaran 3 Tekan dan tahan tombol lebih dari 2 detik 4 Ulangi langkah di atas untuk menyimpan stasiun lain pada nomor setel awal lain Catatan Stasiun yang disetel awal sebelumnya akan terhapus sewaktu stasiun baru disimpan pada nomor setel awal yang sama Stasiun yang disetel awal akan terhapus sewaktu pasokan daya ke memori terputus misalnya sewaktu mengganti baterai Jika hal ini terjad...

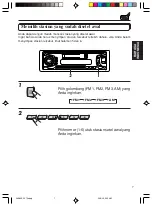
Page 36: ... awal yang Anda inginkan Memilih stasiun yang sudah disetel awal Anda dapat dengan mudah mencari stasiun yang disetel awal Ingat bahwa Anda harus menyimpan stasiun tersebut terlebih dahulu Jika Anda belum menyimpan stasiun tersebut lihat halaman 5 dan 6 FM1 FM2 FM3 AM 1 2 06 08KS FX7 Indo n 25 3 05 5 25 AM 7 ...

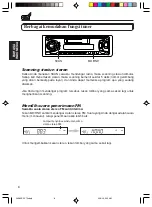
Page 37: ... apa yang sedang disiarkan Jika Anda ingin mendengar program tersebut tekan tombol yang sama sekali lagi untuk menghentikan scanning Memilih suara penerimaan FM Sewaktu suatu siaran stereo FM sulit diterima Tekan MO RND sambil mendengar siaran stereo FM Suara yang Anda dengar adalah suara mono monoaural tetapi penerimaan akan lebih baik Untuk mengembalikan kesan stereo tekan tombol yang sama sekal...

Page 38: ...tape akan berubah maju dan mundur Untuk berhenti bermain dan mengeluarkan kaset Tekan 0 Tape akan berhenti dan secara otomatis keluar dari bagian ruang kaset Jika Anda mengganti sumber dari FM AM atau CD CH maka tape juga akan berhenti kali ini tanpa mengeluarkan kaset Anda juga dapat mengeluarkan tape tanpa mematikan unit Catatan untuk Pengoperasian Sekali Sentuh Sewaktu kaset berada dalam bagian...

Page 39: ...tanpa rekaman di antara lagu Tape dengan bagian tanpa rekaman yang pendek Tape dengan tingkat kebisingan tinggi atau dengungan di antara lagu Untuk mencari lagu sebelum lagu yang sedang dimainkan pada tape Untuk mencari lagu sesudah lagu yang sedang dimainkan pada tape Mencari awal lagu Multi Music Scan memungkinkan Anda memainkan tape secara otomatis mulai dari awal suatu lagu tertentu Anda dapat...

Page 40: ...au 4 3 Pilih mode yang diinginkan dengan tombol pengendali Mode Blank Skip akan berganti antara on dan off ON Ô OFF Catatan Sewaktu tape sampai pada akhir rekaman ketika memutar maju tape dengan cepat arah putar tape akan otomatis berubah Fungsi Pengulangan Tekan tombol RPT sewaktu lagu yang ingin Anda dengar ulang sedang dimainkan Sewaktu tape sampai pada akhir lagu secara otomatis tape berputar ...

Page 41: ...ah disetel awal sesuai dengan jenis musik tertentu Setiap kali Anda menekan SCM mode suara berubah sebagai berikut Indikasi Untuk Nilai Setel awal Bass Treble Loudness SCM OFF Suara datar 00 00 On BEAT Musik rock atau disco 02 00 On SOFT Musik latar belakang lembut 01 03 Off POP Musik ringan 04 01 Off Catatan Anda dapat mengatur mode suara yang disetel awal sesuai keinginan Anda dan menyimpannya d...

Page 42: ... hanya belakang F06 Fader depan dan belakang hanya depan BAL Mengatur keseimbangan speaker L06 hanya kiri R06 Balance kiri dan kanan hanya kanan VOL Mengatur volume 00 min 50 max Volume Catatan Jika Anda memakai sistem dua speaker setel kekerasan fader menjadi 00 2 Mengatur kekerasan volume Catatan Tombol pengendali biasanya berperan sebagai tombol pengatur volume suara Oleh karena itu Anda tidak ...

Page 43: ...akai mode suara yang sama untuk semua sumber lihat Membatalkan Advanced SCM pada halaman 16 1 Pilih mode suara yang Anda inginkan Setiap kali Anda menekan tombol ini mode suara berubah sebagai berikut Sewaktu SCM LINK disetel ke LINK ON maka mode suara yang dipilih dapat disimpan dalam memori untuk sumber yang sedang dimainkan dan efek ini berlaku hanya untuk sumber tersebut Setiap kali Anda berga...

Page 44: ...asing mode suara sesuai keinginan Anda dan menyimpannya dalam memori Jika Anda ingin mengatur dan menyimpan mode suara asli Anda lihat Menyimpan pengaturan suara Anda sendiri di halaman 17 Untuk mengatur tingkat pendukung bass dan treble atau menyalakan mematikan fungsi pengeras untuk sementara lihat halaman 12 dan 13 Pengaturan yang Anda lakukan akan dibatalkan jika ada sumber lain yang dipilih I...

Page 45: ... suara hanya dengan berganti sumber LINK ON Advanced SCM SCM yang berbeda untuk sumber yang berbeda LINK OFF SCM konvensional satu SCM utuk semua sumber 1 Tekan dan tahan SEL lebih dari 2 detik CLOCK H CLOCK M SCM LINK LEVEL B SKIP atau EXT IN tampak pada layar Ditampilkan hanya sewaktu salah satu sumber berikut ini dipilih FM AM dan TAPE 2 Pilih SCM LINK jika tidak tampak pada layar 3 Pilih mode ...

Page 46: ...n SCM sampai mode suara yang Anda pilih di langkah 1 berkedip pada layar Setelan Anda tersimpan dalam memori 5 Ulangi langkah yang sama untuk menyimpan setelan lainnya Untuk menyetel ulang setelan pabrik Ulangi langkah yang sama dan kembalikan nilai nilai setel awal yang ada pada tabel di halaman 12 Menyimpan pengaturan suara Anda sendiri Anda dapat mengatur mode suara BEAT SOFT POP lihat halaman ...

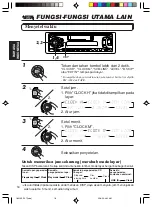
Page 47: ... Untuk memeriksa jam sekarang merubah mode layar Tekan DISP berkali kali Setiap kali Anda menekan tombol mode layar berganti sebagai berikut Jika unit tidak dipakai sewaktu anda menekan DISP daya akan menyala jam menunjukkan waktu selama 5 menit kemudian daya mati 1 2 Clock Frequency Sewaktu pengoperasian tuner Sewaktu pengoperasian tape Clock Play mode Clock LINE IN Número de disco Hora Tiempo de...

Page 48: ...nti penyetelan pada AUDIO1 dan tampilan penerangan OFF Menghapus indikator tingkat audio 1 Tekan dan tahan SEL lebih dari 2 detik CLOCK H CLOCK M SCM LINK LEVEL B SKIP atau EXT IN tampak pada layar 2 Pilih LEVEL jika tidak ada pada layar 3 Pilih mode yang diinginkan AUDIO 1 AUDIO 2 atau OFF 4 Selesaikan penyetelan Ditampilkan hanya sewaktu salah satu sumber berikut ini dipilih FM AM dan TAPE 1 4 2...

Page 49: ...g pada penampung panel Melepaskan panel pengendali Anda dapat melepas panel pengendali sewaktu meninggalkan kendaraan Sewaktu melepas atau memasang panel pengendali hati hati jangan sampai merusak konektor di belakang panel pengendali dan penampung panel Catatan tentang cara membersihkan konektor Jika Anda sering melepas panel pengendali maka konektor akan cepat rusak Untuk mengurangi kemungkinan ...

Page 50: ...rai bersama dengan barang barang logam lain Tindakan ini dapat menyebabkan baterai memancarkan panas pecah atau menyebabkan kebakaran Sewaktu membuang atau menyimpan baterai bungkus dalam plester dan diisolasi jika tidak dapat menyebabkan baterai memancarkan panas pecah atau menyebabkan kebakaran Jangan menusuk baterai dengan penjepit atau alat serupa Tindakan ini dapat menyebabkan baterai memanca...

Page 51: ...etiap kaliAnda menekan tombol ini angka disk berkurang dan disk yang dipilih mulai dimainkan 4 Sama fungsinya seperti tombol kendali yang ada pada unit utama Catatan Tombol tombol ini tidak dapat digunakan untuk pengaturan jam CLOCK H CLOCK M SCM LINK LEVEL B SKIP dan EXT IN lihat halaman 18 16 19 11 dan 27 5 Pilih mode suara Setiap kali Anda menekan SCM Sound Control Memory mode akan berganti 6 P...

Page 52: ...t petunjuk yang ada pada CD changer Anda Jika tidak ada disket yang ada dalam tempat pengisian magazine CD changer atau disk dimasukkan terbalik NO CD atau NO DISC akan tampil pada layar Jika hal ini terjadi keluarkan magazine dan pasang CD dengan benar Jika RESET 1 RESET 8 muncul pada layar ada sesuatu yang salah dengan sambungan antara unit ini dengan CD changer Jika hal ini terjadi periksa samb...

Page 53: ...turut awal jalur berikutnya akan ditemukan dan diputar Tekan 4 sebentar sewaktu memutar CD supaya mundur ke awal jalur sekarang Setiap kali Anda menekan tombol ini berturut turut awal jalur sekarang akan ditemukan dan diputar Untuk langsung pindah ke CD tertentu Tekan tombol angka yang sesuai dengan angka CD untuk memulai pemutarannya Untuk memilih angka disk dari 1 6 Tekan sebentar 1 7 6 12 Untuk...

Page 54: ...a dan seterusnya RND2 Berkedip Semua jalur dari semua disk yang dimasukkan dalam magazine Untuk memutar jalur berulang kali Repeat Play Setiap kali Anda menekan RPT Repeat sewaktu memainkan CD mode pemutaran ulang CD berganti sebagai berikut Mode Indikator RPT Bermain secara berulang RPT1 Menyala Jalur sekarang atau jalur tertentu RPT2 Berkedip Semua jalur dari disk sekarang atau disk tertentu RND...

Page 55: ...nen eksternal dengan mengikuti langkah langkah berikut ini pilihlah input eksternal dengan benar Lihat Memilih komponen eksternal yang akan digunakan di halaman 27 1 Pilih komponen eksternal Jika LINE IN tidak tampak pada layar lihat halaman 27 dan pilih input eksternal EXT IN 2 Nyalakan alat yang sudah terhubung dan mulai memainkan sumbernya 3 Sesuaikan volume suara Catatan tentang Pengoperasian ...

Page 56: ...nal sebagai sumber yang dimainkan melalui alat penerima ini Anda perlu memilih alat mana yang ingin digunakan CD changer atau komponen eksternal Sewaktu dikirim dari pabrik yang dipilih sebagai komponen eksternal adalah CD changer LINE IN Untuk menggunakan komponen eksternal selain CD changer CHANGER Untuk menggunakan CD changer 1 Ganti sumber ke FM AM atau TAPE 2 Tekan dan tahan SEL lebih dari 2 ...

Page 57: ...Jangan memainkan tape yang kotor atau berdebu Jangan menyentuh kepala dengan alat magnetis atau alat logam Untuk menjaga supaya tape tetap bersih Selalu menyimpan tape dalam kotaknya sesudah digunakan Jangan menyimpan tape ditempat tempat berikut ini Yang langsung terkena sinar matahari Yang tingkat kelembabannya tinggi Pada suhu yang sangat panas PERHATIAN Jangan memainkan tape dengan label yang ...

Page 58: ...idak baik Pengendali volume diputar pada tingkat paling rendah Sambungannya tidak benar Sinyal terlalu lemah Antena tidak tersambung dengan kuat Tidak ada CD dalam magazine Salah memasukkan CD Sambungan unit dengan CD changer tidak benar Komputer mikro yang terpasang di dalam tidak berfungsi dengan benar karena ada suara dsb Penyelesaian Masukkan tape dengan pita menghadap ke kiri Bersihkan dengan...

Page 59: ...an Diam 50 dB 16 3 dBf 1 8 µV 75 Ω Tingkat Pemilihan Saluran secara bergantian 400 kHz 65 dB Respon Frekuensi 40 Hz sampai15 000 Hz Pemisahan Stereo 30 dB Rasio Tangkapan 1 5 dB Tuner AM Tingkat Kepekaan 20 µV Tingkat Pemilihan 30 dB BAGIAN CASSETTE DECK Wow Flutter 0 11 WRMS Waktu Kecepatan Putar 100 detik C 60 Respon Frekuensi 30 Hz sampai 16 000 Hz 3 dB Rasio Sinyal ke Suara Tape normal 56 dB P...

Page 60: ...BLE with operation Please reset your unit Refer to page of How to Reset your unit Still having trouble Ada MASALAH dengan cara pengoperasian Setel kembali unit Anda Lihat halaman mengenai Cara melakukan Penyetelan Ulang Masih bermasalah Cover KS FX7 UN 25 3 05 4 20 AM 2 ...

Reviews: