


4
INPUT
R
L
L
R
L
R
L
R
*
2
R
L
R
L
INPUT
R
L
LINE
REAR FRONT
OUT
R
L
*
2
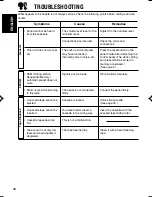
TROUBLESHOOTING
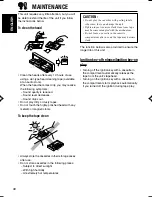
•
The fuse blows.
* Are the red and black leads connected correctly?
•
Power cannot be turned on.
* Is the yellow lead connected?
•
No sound from the speakers.
* Is the speaker output lead short-circuited?
•
Sound is distorted.
* Is the speaker output lead grounded?
* Are the “–” terminals of L and R speakers grounded in common?
•
Unit becomes hot.
* Is the speaker output lead grounded?
* Are the “–” terminals of L and R speakers grounded in common?
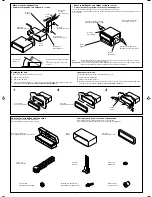
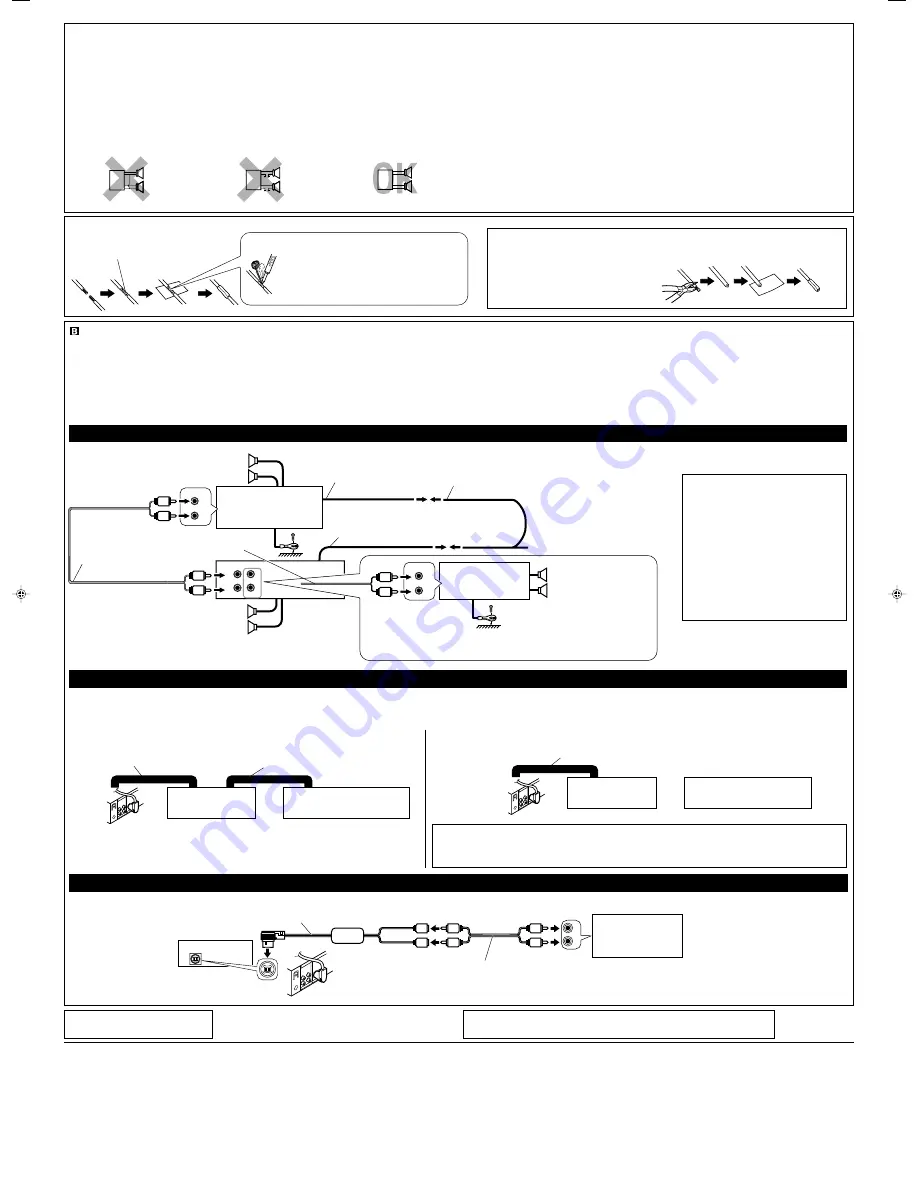
You can connect an amplifier to upgrade your car stereo system.
• Connect the remote lead (blue with white stripe) to the remote lead of the other equipment so that it can be
controlled through this unit.
• For amplifier only:
– Connect this unit’s line-out terminals to the amplifier’s line-in terminals.
–
Disconnect the speakers from this unit, connect them to the amplifier. Leave the speaker leads of
this unit unused. (Cover the terminals of these unused leads with insulating tape, as illustrated
above.)
Connections Adding Other Equipment /
Подключение других устройств
Amplifier /
Усилитель
Twist the core wires when connecting.
Закрутите концы проводов при соединении.
CAUTION /
ПРЕДОСТЕРЕЖЕНИЕ
:
• To prevent short-circuit, cover the terminals of the UNUSED leads with insulating tape.
•
Для предотвращения короткого замыкания заклейте НЕИСПОЛЬЗУЕМЫЕ концы
изолирующей лентой.
Connecting the leads /
Подключение контактов
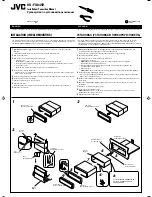
PRECAUTIONS on power supply and speaker connections:
•
DO NOT connect the speaker leads of the power cord to the car battery; otherwise, the unit will be
seriously damaged.
• Connect the black lead (ground), yellow lead (to car battery, constant 12 V), and red lead (to an accessory
terminal) correctly.
• BEFORE connecting the speaker leads of the power cord to the speakers, check the speaker wiring in your
car.
–
If the speaker wiring in your car is as illustrated in Fig. 1 and Fig. 2 below,
DO NOT connect the unit
using that original speaker wiring. If you do, the unit will be seriously damaged.
Redo the speaker wiring so that you can connect the unit to the speakers as illustrated in Fig. 3.
–
If the speaker wiring in your car is as illustrated in Fig. 3,
you can connect the unit using the original
speaker wiring in your car.
– If you are not sure of the speaker wiring of your car, consult your car dealer.
Signal cord (not supplied with this unit)
Кабель сигнала (не входит в комплект)
KS-FX845R
Rear speakers
Задние громкоговорители
Front speakers
Передние громкоговорители
To power aerial if any
К питанию антенны, если есть
Y-connector (not supplied with this unit)
Разъем Y (не входит в комплект)
Blue with white stripe
Синий с белой полосой
Remote lead
Провод внешнего устройства
Fig. 2
Fig. 3
Fig. 1
*2 : Firmly attach the ground wire to the
metallic body or to the chassis of the
car—to the place not coated with paint
(if coated with paint, remove the paint
before attaching the wire). Failure to do
so may cause damage to the unit.
*2 : Плотно прикрепите заземляющий
провод к металлическому кузову
или шасси автомобиля—в месте, не
покрытом краской (если оно
покрыто краской, удалите краску
перед тем, как прикреплять
провод). Невыполнение этого
требования может привести к
повреждению данного устройства.
ПРЕДОСТЕРЕЖЕНИЯ по питанию и подключению громкоговорителей:
•
НЕ подключайте провода громкоговорителей к аккумулятору автомобиля, иначе
устройство будет повреждено.
• Правильно подключите черный провод (земля), желтый провод (в аккумулятор, постоянный ток
12 В) и красный провод (в вспомогательный разъем).
• ПЕРЕД подключением проводов громкоговорителей к кабелю питания громкоговорителя
проверьте схему соединений громкоговорителей в Вашем автомобиле.
–
Если проводка громкоговорителей в Вашем автомобиле такая, как показано на
приводимых ниже Fig. 1 и Fig. 2,
НЕ подключайте устройство с помощью первоначальной
проводки громкоговорителей.
Если Вы это сделаете, устройство будет серьезно повреждено. Переделайте проводку
громкоговорителей так, чтобы Вы могли подключить устройство к громкоговорителям, как это
показано на Fig. 3.
–
Если проводка громкоговорителей в Вашем автомобиле такая, как показано на Fig. 3,
Вы
можете подключить устройство с помощью первоначальной проводки громкоговорителей в
Вашем автомобиле.
– Если Вы не знаете соединение громкоговорителей в Вашем автомобиле, обратитесь к Вашему
автомобильному дилеру.
Для обновления автомобильной стереосистемы Вы можете подключить усилитель.
• Подсоедините провод внешнего устройства (синий с белой полосой) к проводу внешнего
устройства другого оборудования так, чтобы им можно было управлять с этого устройства.
• Только для усилителя:
– Подключите выходные клеммы данного устройства к входным клеммам усилителя.
–
Отсоедините громкоговорители от данного устройства, подключите их к усилителю.
Оставьте провода громкоговорителей данного устройства неиспользованными. (Замотайте
клеммы этих неиспользованных проводов изоляционной лентой, как показано выше.)
BЫЯВЛЕНИЕ НЕИСПРАВНОСТЕЙ
•
Сработал предохранитель.
* Правильно ли подключены черный и красный провода?
•
Питание не включается.
* Подключен ли желтый провод?
•
Звук не выводится через громкоговорители.
* Нет ли короткого замыкания на кабеле выхода громкоговорителей?
•
Звук искажен.
* Заземлен ли провод выхода громкоговорителей?
* Заземлены ли разъемы “–” правого (R) и левого (L) громкоговорителей?
•
Устройство нагревается.
* Заземлен ли провод выхода громкоговорителей?
* Заземлены ли разъемы “–” правого (R) и левого (L) громкоговорителей?
L
R
+
-
+
-
+
-
+
-
L
R
+
-
+
-
+
-
+
-
L
R
+
-
+
-
+
-
+
-
JVC Amplifier
JVC-усилитель
Front speakers
Передние
громкоговорители
JVC Amplifier
JVC-усилитель
You can connect another power amplifier for front speakers.
Вы можете подключить еще один усилитель мощности для передних динамиков.
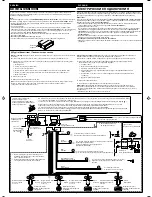
You can connect a JVC CD changer and/or a JVC DAB (Digital Audio Broadcasting) tuner.
• For their connections, refer to the instructions supplied with them.
External Component /
Внешний компонент
CD Changer and DAB Tuner /
Проигрыватель-автомат компакт-дисков и тюнер DAB
Connecting cord supplied with your DAB tuner
Соединительный шнур входит в комплект
поставки приобретенного Вами тюнера DAB.
Connecting cord supplied with your CD changer
Соединительный кабель, поставляемый с
Вашим проигрывателем-автоматом компакт-
дисков
JVC CD changer
Проигрывателем-автоматом
компакт-дисков JVC
JVC DAB tuner
Тюнер DAB JVC
• You can connect both components in series as illustrated above.
• Вы можете подключить оба компонента параллельно, как проиллюстрировано выше.
KS-FX845R
Connecting cord supplied with your DAB tuner or CD changer
Соединительный кабель, поставляемый с Вашим тюнером DAB или проигрывателем-
автоматом компакт-дисков
CAUTION /
ПРЕДУПРЕЖДЕНИЕ
:
• Before connecting the CD changer and/or the DAB tuner, make sure that the unit is turned off.
• Перед подключением проигрывателя-автомата компакт-дисков и/или тюнера DAB убедитесь, что данное
устройство выключено.
JVC CD changer
Проигрывателем-автоматом
компакт-дисков JVC
JVC DAB tuner
Тюнер DAB JVC
Signal cord (not supplied with this unit)
Кабель сигнала (не входит в комплект)
CD changer jack
Гнездо проигрывателя-
автомата компакт-дисков
External component
Внешний компонент
Line Input Adapter KS-U57 (not supplied with this unit)
Адаптер входной линии KS-U57 (не входит в комплект)
KS-FX845R
Вы можете подключить проигрыватель-автомат компакт-дисков JVC и/или тюнер DAB (цифровое
радиовещание) JVC.
• Порядок их подключения смотрите в прилагаемых к ним инструкциях.
or
или
Solder the core wires to connect them
securely.
Спаяйте провода для надежного
соединения.
KS-FX845R
See the INSTRUCTIONS (separate
volume) for how to use the external
component with this unit.
Для получения информации об
использовании внешнего устройства см.
ИНСТРУКЦИИ ПО ЭКСПЛУАТАЦИИ (в
отдельном издании).
L
R
L
R
L
R
L
R
Instal_KS-FX845R[EE]_002A_f.p65
3/13/03, 3:58 PM
4


