background image

3

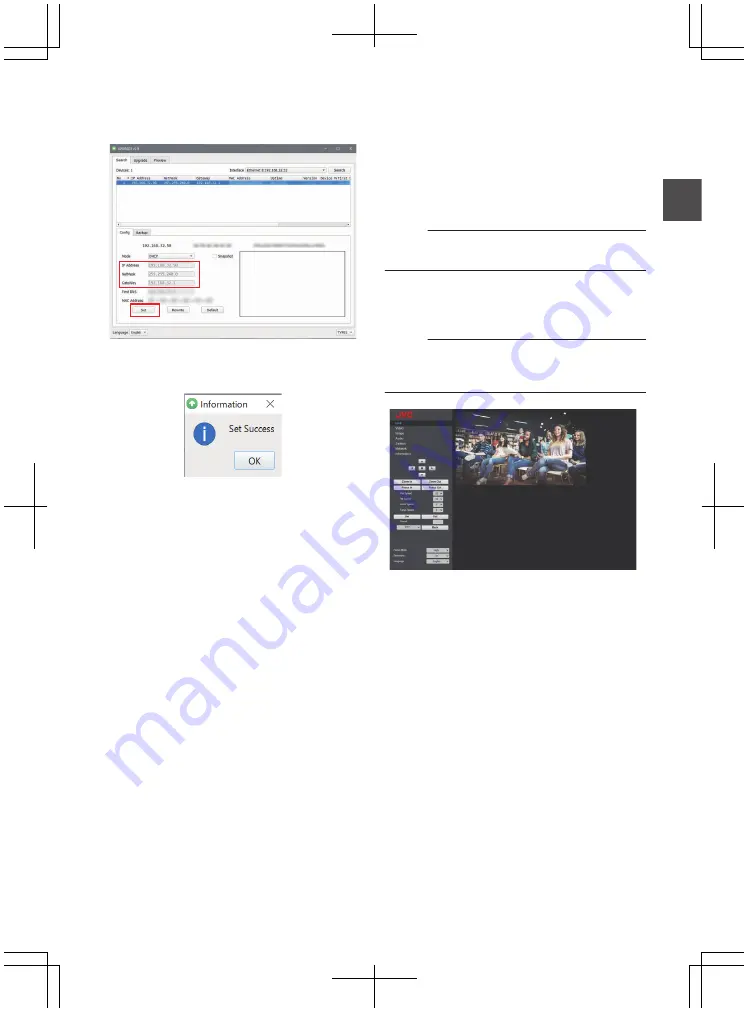
After changing of “IP Address”, “NetMask”,

and “GateWay” is complete, click the [Set]

button.

.

0

When the setting is successful, the following

display appears and the camera recorder

restarts.

.

Confirming the

Connection

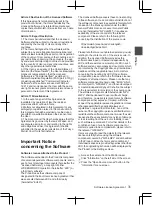
1

Start up the web browser on the terminal

you wish to connect to the camera

recorder, and enter the IP address in the

address field.

(Example: http://192.168.0.10)

Memo : 

0

The default IP address of camera is

192.168.0.10.

2

Enter the user name and password.

Enter the user name (jvc) and the password

(initial password: 0000) on the login screen to

display the Live View screen.

Memo : 

The screen for changing the password is displayed

when you log in for the first time. Please change the

password.

.

Network Features 

25

Installation/Connection

Summary of Contents for KY-PZ400NBE

Page 1: ... and Canada E for Europe Only U models KY PZ400NWU KY PZ400NBU have been evaluated by UL Please read the following before getting started North America Europe North America http pro jvc com prof main jsp Europe https eu jvc com pro For details on settings and operation refer to INSTRUCTIONS on the website Please check the latest INSTRUCTIONS tools etc from the URL below Details IM 1 02 4K PTZ REMO...

Page 2: ...2 ...

Page 3: ... amplifiers that produce heat Protect the power cord from being walked on or pinched particularly at plugs convenience receptacles and the point where they exit from the apparatus Only use attachments accessories specified by the manufacturer Use only with the cart stand tripod bracket or table specified by the manufacturer or sold with the apparatus When a cart is used use caution when moving the...

Page 4: ...er qu avec le chariot le stand le trépied le support ou la table spécifié par le fabricant ou vendu avec l appareil Lorsqu un chariot est utilisé faire attention pour déplacer la combinaison chariot appareil pour éviter des blessures causées par un basculement Débrancher cet appareil pendant un orage ou quand il n est pas utilisé pendant une longue durée L entretien ou la réparation de l appareil ...

Page 5: ...g the appliance RISK OF ELECTRIC SHOCK DO NOT OPEN POUR CANADA RISQUE D ELECTROCUTION NE PAS OUVRIR ATTENTION POUR EVITER TOUT RISQUE D ELECTROCUTION NE PAS OUVRIR LE BOITER AUCUNE PIECE INTERIEURE N EST A REGLER PAR L UTILISATEUR SE REFERER A UN AGENT QUALIFIE EN CAS DE PROBLEME ATTENTION Le symbole de l éclair à l intérieur d un triangle équilatéral est destiné à alerter l utilisateur sur la pré...

Page 6: ...rque Personne responsable Adresse Numéro de téléphone Déclaration de conformité du fournisseur KY PZ400NWU KY PZ400NBU JVC JVCKENWOOD USA Corporation 500 Valley Road Suite 203 Wayne NJ 07470 973 317 5000 Cet ensemble se conforme à la partie 15 des règles de la FCC Federal Communications Commission Le fonctionnement est sujet aux deux conditions suivantes 1 Cet appareil ne peut pas causer d interfé...

Page 7: ...ionnelle Débranchez immédiatement la fiche secteur si le caméscope ne fonctionne pas normalement Avertissement Évitez d exposer la batterie le caméscope avec la batterie insérée ou la télécommande avec la batterie insérée à une chaleur excessive telle que celle des rayons directs du soleil d un feu ou de tout autre source de chaleur AVERTISSEMENT POUR EVITER LES RISQUES D INCENDIE OU D ELECTROCUTI...

Page 8: ...n damage Si le matériel est installé dans un coffret ou sur une étagère s assurer qu il y a un espace suffisant sur tous les côtés pour permettre la ventilation 10 cm 3 15 16 ou plus sur les deux côtés au dessus et à l arrière Ne pas boucher les orifices de ventilation Si les orifices de ventilation sont bouchés par un journal un tissu etc la chaleur peut ne pas s éliminer Aucune source à flamme n...

Page 9: ...Lorsque vous utilisez l adaptateur secteur ailleurs qu aux États Unis L adaptateur secteur fourni dispose d une sélection de tension automatique dans la plage CA de 110 V à 240 V UTILISATION D UN ADAPTATEUR SECTEUR DE PRISE DOMESTIQUE Si vous raccordez le cordon d alimentation de l appareil à une prise secteur autre que le modèle standard américain de série C73 utilisez un adaptateur de prise sect...

Page 10: ...l coded L Live or coloured Red If in doubt consult a competent electrician CAUTIONS To prevent shock do not open the cabinet No user serviceable parts inside Refer servicing to qualified personnel When you are not using the AC adapter for a long period of time it is recommended that you disconnect the power cord from AC outlet Blue to N Neutral or Black Brown to L Live or Red CAUTION Where there a...

Page 11: ...or screen In the worst scenario the camera may even fall off and hit somebody resulting in serious accidents Mount the camera correctly When mounting the unit to the ceiling make sure to use a ceiling mounting bracket Be sure to connect the fall prevention wire sold separately and tighten the fixing screws or nuts securely Using the correct power and voltage To supply power to this unit use a DC 1...

Page 12: ...Unauthorized duplication or reprinting of this manual in whole or in part is strictly prohibited 0 Illustrated designs specifications and other contents of this manual are subject to change for improvement without prior notice 0 The terms HDMI and HDMI High Definition Multimedia Interface and the HDMI Logo are trademarks or registered trademarks of HDMI Licensing Administrator Inc in the United St...

Page 13: ...ed 0 Near equipment that emits strong magnetic fields such as transformers or motors 0 Near equipment that emits radio waves such as transceivers and mobile phones 0 Locations with excessive dust and sand 0 Locations that are subject to vibration such as inside the car or ship 0 Locations prone to moisture such as window side 0 Locations subject to steam or oil such as kitchens 0 Special environme...

Page 14: ...om position o Do not subject the lens to strong light source such as sun rays This may cause the equipment to malfunction o During audio input output noise may occur when the rotation mechanism is rotated horizontally vertically when zooming is performed or when the power is turned on off This is not a malfunction o The pan operation range of this product is limited to 170 Regardless of the functi...

Page 15: ...the lens color divergence phenomena magnification chromatic aberration may occur at the periphery of the image This is not a camera malfunction o Noise may appear in the image when switching modes o Use the supplied AC adapter for the power supply DC 12 V Do not use the supplied AC adapter on other devices o Use the supplied power cord And do not use the supplied power cord for any other devices 0...

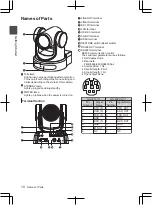
Page 16: ...inal E USB 2 0 terminal F 3G SDI terminal G HDMI terminal H RESTORE switch Reset switch I RS232 OUT terminal J RS232 IN terminal RS232 communication control The serial port parameters are as follows 0 Half duplex mode 0 Baud rate 2400 4800 9600 38400 bps 0 Start position 1 bit 0 Data bit length 8 bits 0 Stop bit length 1 bit 0 Check digit None 1 2 5 4 3 6 7 8 RS 232C IN RS 232C OUT Pin Number Sign...

Page 17: ...0 Check digit None L SYSTEM SELECT switch For selecting a video format for the HDMI or 3G SDI output Terminal Number Video Format HDMI 3G SDI 0 1920x1080 60p 1920x1080 60p 1 1920x1080 50p 1920x1080 50p 2 1920x1080 60i 1920x1080 60i 3 1920x1080 50i 1920x1080 50i 4 1920x1080 30p 1920x1080 30p 5 1280x720 60p 1280x720 60p 6 1920x1080 29 97p 1920x1080 29 97p 7 1920x1080 59 94i 1920x1080 59 94i 8 1920x1...

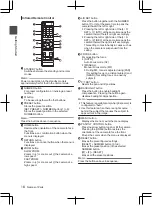
Page 18: ...at the same time pans the camera toward the left or right accordingly 0 Pressing the left or right side of the L R SET 2 REV at the same time pans the camera toward the right or left accordingly This setting comes in handy in cases such as when the camera is suspended from the ceiling I FOCUS button For adjusting the focus 0 AUTO Auto Focus mode AF 0 MANUAL Manual Focus mode MF 0 During MF focus i...

Page 19: ... Do not throw the batteries into fire or place them at a location that is subject to high temperature Otherwise the batteries may explode 0 When replacing the batteries use ones that are of the same model or type Using a different type of battery may cause it to explode Image freeze feature Pressing the F4 button freezes the video image and displays a Freeze caption at the top left corner of the s...

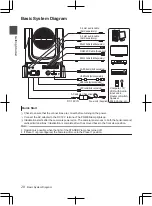
Page 20: ...ble Sold separately Quick Start A Check to ensure that the connections are correct before turning on the power B Connect the AC adapter to the DC 12 V terminal The POWER lamp lights up C Initialization starts after the camera is powered on The camera lens moves to both the horizontal and vertical limit positions Initialization is complete after it has moved back to the front view position Memo 0 O...

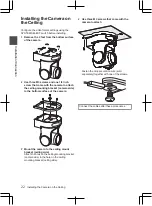
Page 21: ...amera does not come with mounting screws for attaching it to the ceiling Make appropriate use of the M5 expansion screws x4 according to the thickness of the ceiling 1 Place the ceiling mounting bracket ceiling side against the ceiling and mark the mounting position on the ceiling Memo Take note of the front direction of the camera when placing the marks 2 Drill holes into the ceiling at the marke...

Page 22: ...ng bracket camera side to the bottom surface of the camera 3 Mount the camera to the ceiling mount bracket ceiling side Attach the hook on the ceiling mounting bracket camera side to the hole on the ceiling mounting bracket ceiling side 4 Use three M3 screws that come with the camera to attach Fasten the drop prevention wire sold separately together with one of the screws Connect the cables after ...

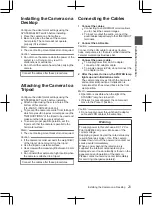
Page 23: ...ter these procedures Connecting the Cables 1 Connect the cables 0 Connecting to an HDMI SDI monitor allows you to check the camera images 0 To input or output the audio connect the audiocablesrespectivelytotheLINEIN OUT terminals 2 Connect the LAN cable Caution Connect to the LAN cable to devices routers hubs computers etc that are certified under the Telecommunications Business Act 3 Connect the ...

Page 24: ...tor connected to the monitor B Connect the camera to a PC using a network cable and run upgrade_standard exe to search for the IP address Memo 0 Download the upgrade_standard exe from the URL stated on the cover page IP address settings There are two ways to configure the IP address of the camera A Log in to the web page and select Network B LAN Settings to make changes to the IP address subnet ma...

Page 25: ...nect to the camera recorder and enter the IP address in the address field Example http 192 168 0 10 Memo 0 The default IP address of camera is 192 168 0 10 2 Enter the user name and password Enter the user name jvc and the password initial password 0000 on the login screen to display the Live View screen Memo The screen for changing the password is displayed when you log in for the first time Plea...

Page 26: ...he network connect the camera and the PC separately and reset the IP address of the PC C Check the IP address subnet mask and gateway settings of the camera D Check to ensure that there is no conflict in the MAC address E Check whether the HTTP port is occupied by a different device I forgot the IP address or login password Manage the password properly to avoid forgetting it If you forgot the pass...

Page 27: ...Use only Standard network LAN terminal RJ 45 PoE power supply DC 37 V to 57 V Ethernet 10BASE T 100BASE TX 1000BASE T Item Description 3G SDI terminal BNC type 720p 1080i 1080p embedded audio 3G SDI SMPTE ST424 compliant HD SDI SMPTE ST292 compliant HDMI output terminal Type A USB 2 0 terminal USB A type DC 12 V terminal For use with the supplied AC adapter Lens Camera Item Description Lens 12x f ...

Page 28: ...aming RTSP RTP RTMP RTMPS NDI HX SRT Infrared Remote Control Item Description Remote control system Infrared type Battery AAA dry cell battery x 2 Battery life Approx 1 year varies with the frequency of use Operating distance 8 m horizontal distance from the front Allowable operating temperature 0 C to 40 C 32 F to 104 F Dimensions W H D 46 mm 20 8 mm 168 1 mm Mass Approx 90 g Accessories Accessor...

Page 29: ...Dimensional Outline Drawing Unit mm 168 4 141 5 164 5 Φ70 7 The specifications and appearance of this product are subject to changes for further improvement without prior notice Specifications 29 Others ...

Page 30: ...tinue in the possession of the User and that the User shall cause the transferee to comply with this Software License Agreement 2 The User shall not carry out reverse engineering disassembling decompiling or any other code analysis works in connection with the Licensed Software Article 4 Right pertaining to the Licensed Software 1 Any and all copyrights and other rights pertaining to the Licensed ...

Page 31: ... Agreement that was executed between JKC and a third party hereinafter EULA The Licensed Software covers those corresponding to free software and as a condition of distribution of the software component in executable format which is based on the license granted under the GNU General Public License or Lesser General Public License hereinafter GPL LGPL it requires an availability of the source code ...

Page 32: ...32 ...

Page 33: ... à nossa saúde e meio ambiente Aviso O sinal Pb abaixo do símbolo para baterias indica que esta bateria contém chumbo Informazioni sull eliminazione dei prodotti elettrici ed elettronici e delle batterie per i Paesi che adottano la raccolta differenziata dei rifiuti I prodotti e le batterie recanti questa icona bidone carrellato della spazzatura con il simbolo della croce non devono essere elimina...

Page 34: ...izvod Ako vaš korišćeni proizvod sadrži baterije ili akumulatore molimo vas da ih unapred odložite zasebno u skladu sa lokalnim zahtevima Za poslovne korisnike Ako želite da odložite ove proizvode molimo vas da kontaktirate vašeg prodavca ili dobavljača za više informacija Naznaka Hemijski simbol Pb ispod simbola za baterije ukazuje na to da li baterija sadrži olovo Информации за Отстранување на с...

Page 35: ...35 ...

Page 36: ... KY PZ400NWU KY PZ400NBU KY PZ400NWU KY PZ400NBU 2021 JVCKENWOOD Corporation B5A 3984 00 ...

Reviews: