background image

29

EN

INTRODUCTION

PREPARATION

WATCHING TV

OPTIONAL SETTING

TROUBLESHOOTING

INFORMATION

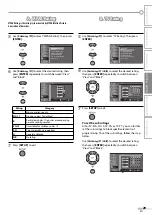
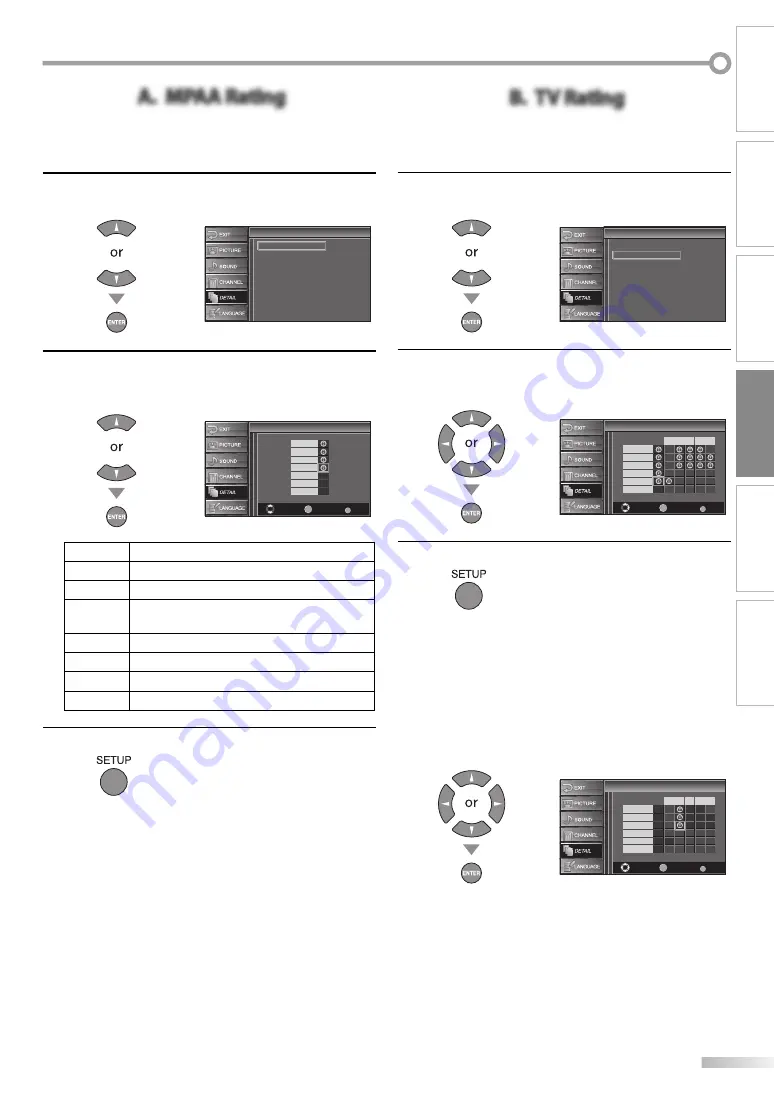
A.  MPAA Rating

A.  MPAA Rating

MPAA Rating is the rating system created by MPAA (Motion Picture 
Association of America).

5

Use 

[Cursor 

/

 L

]

 to select “MPAA Rating”, then press 

[ENTER]

.


MPAA Rating

TV Rating

Canadian English Rating

Canadian French Rating

Downloadable Rating

Clear Downloadable Rating

New Password

V-chip

V-chip

6

Use 

[Cursor 

/

 L

]

 to select the desired rating, then 

press 

[ENTER]

 repeatedly to switch between “View” 

and “Block”.


Select

View/Block

Back

BACK

ENTER

X

NC-17

R

PG-13

PG

G

NR

V-chip

V-chip

Rating

Category

X

Mature audience only

NC-17

No one under 17 admitted

R

Restricted; under 17 requires accompanying 
parent or adult guardian

PG-13

Unsuitable for children under 13

PG

Parental guidance suggested

G

General audience

NR

No rating

7

Press 

[SETUP]

 to exit.


B.  TV Rating

B.  TV Rating

5

Use 

[Cursor 

/

 L

]

 to select “TV Rating”, then press 

[ENTER]

.


MPAA Rating

TV Rating

Canadian English Rating

Canadian French Rating

Downloadable Rating

Clear Downloadable Rating

New Password

V-chip

V-chip

6

Use 

[Cursor 

/

 L 

/

 s 

/

 B

]

 to select the desired rating, 

then press 

[ENTER]

 repeatedly to switch between 

“View” and “Block”.


Select

View/Block

Back

BACK

ENTER

TV-MA

TV-14

TV-PG

TV-G

TV-Y7

TV-Y

FV V

S

L

D

V-chip

V-chip

7

Press 

[SETUP]

 to exit.


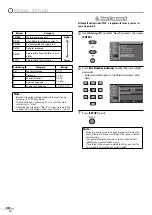
To set the sub ratings

As for TV-MA, TV-14, TV-PG, or TV-Y7, you can further 
set the sub ratings to block specific elements of 
programming. To set the sub ratings, follow the step 
below.

Use 

[Cursor 

/

 L 

/

 s 

/

 B

]

 to select the desired rating, 

then press 

[ENTER]

 repeatedly to switch between 

“View” and “Block”.


Select

View/Block

Back

BACK

ENTER

TV-MA

TV-14

TV-PG

TV-G

TV-Y7

TV-Y

FV V

S

L

D

V-chip

V-chip

Summary of Contents for LT-32EM20

Page 1: ...Note In the spaces below enter the model and serial number of your television located at the rear of the television cabinet Staple your sales receipt or invoice to the inside cover of this guide Keep this user s guide in a convenient place for future reference Keep the carton and original packaging for future use Serial Number HIGH DEFINITION TELEVISION Model Number ...

Page 2: ...ons are expressly approved in the manual The user could lose the authority to operate this apparatus if an unauthorized change or modification is made RADIO TV INTERFERENCE This apparatus has been tested and found to comply with the limits for a Class B digital device pursuant to Part 15 of the FCC Rules These limits are designed to provide reasonable protection against harmful interference in a r...

Page 3: ...not install the unit in direct sunlight near strong magnetic fields or in a place subject to dust or strong vibration Avoid a place with drastic temperature changes Install the unit in a horizontal and stable position Do not place anything directly on top or bottom of the unit Depending on your external devices noise or disturbance of the picture and or sound may be generated if the unit is placed...

Page 4: ...to it Make sure not to damage the screen At least two people are required at this step 2 Insert the stand all the way to the main unit slowly until it clicks Make sure not to put the AC power cord between the stand and the unit 3 Drive Phillips pan screws in the 3 threaded holes at the bottom of the stand with a screwdriver tightly To remove the stand from this unit Unscrew the Phillips pan screws...

Page 5: ...ur on screen language English Spanish or French Stereo Sound Function PLL Frequency Synthesized Tuning Provides free and easy channel selection and lets you tune directly to any channel using the channel number buttons on the remote control HDMI Input PC Input Component Video Input S video Input AV Input Digital Audio Coaxial Output Features 5 INTRODUCTION Precautions 2 TrademarkInformation 3 Supp...

Page 6: ...DIO p 15 Digital Mode DTV Press to select the audio language Analog Mode TV Press to select the audio mode 11 SLEEP p 14 Press to activate the sleep timer 12 STILL p 15 Press to pause screen image 13 CH RETURN p 14 Press to return to the previously viewed channel 14 SCREEN MODE p 17 Press to select aspect ratio available for the TV screen 15 BACK p 16 Press to return to the previous menu operation...

Page 7: ...input jack p 8 HDMI connection for HDMI devices 3 AC power cord Connect to a standard AC outlet to supply power to this unit 4 coaxial digital audio output jack p 11 Coaxial digital audio connection for a decoder or an audio receiver 5 S video input jack p 10 S video connection for external devices 6 video input jack p 11 RCA video connection for external devices 7 audio input jack for PC connecti...

Page 8: ...ller Connection to Cable Receiver or Satellite Box Use an HDMI or an RCA component video cable to connect the HDMI or the component video input jack of the unit to the HDMI or the component video output jack of the cable receiver satellite box If you connect to the unit s COMPONENT1 or COMPONENT2 video input jack connect an RCA audio cable to the audio L R jack of COMPONENT1 or COMPONENT2 accordin...

Page 9: ...signal LPCM You need to select PCM for the digital audio output of the device connected or the check HDMI audio setting There may be no audio output if you select Bitstream etc This unit only accepts signals compliant with EIA861 HDMI DVI Connection Use an HDMI DVI conversion cable to connect the unit to external video devices equipped with DVI output jack e g AUDIO R L HDMI IN STEREO PCM DVI OUT ...

Page 10: ...e green green blue red Note This unit accepts 480i 480p 720p 1080i video signals When the noise appears on the TV screen disconnecting the VGA cable may reduce it S video Connection S video connection offers good picture quality for video devices connected to the unit Use an S video cable to connect the unit to external video devices equipped with S video output jack If you connect to the unit s V...

Page 11: ...AXIAL AUDIO HDMI IN PC IN AUDIO OUT R L VIDEO OUT STEREO STAND BY camcorder video game VCR RCA video cable RCA audio cable rear of this unit Note If you connect to the S video input jack and the video input jack at the same time the S video connection will have priority Audio Output Connection À Digital for digital broadcasting only If you connect this unit to an external digital audio device you ...

Page 12: ...1 280 x 768 60Hz 1 360 x 768 60Hz Other formats or non standard signals will not be displayed correctly Note Please purchase the VGA cable that has a ferrite core The following operations may reduce noise Attach a ferrite core to the AC power cord of your PC Unplug the AC power cord and use the built in battery of your PC Cables not included Please purchase the necessary cables at your local store...

Page 13: ... want backlight to be brighter Select Home to reduce the power consumption When the initial setup is completed the lowest memorized channel with the confirmation message of the energy saving mode will be displayed on the TV screen Note If you connect the cable system directly contact the CATV installer If you press POWER or SETUP during auto channel scan this setting will be canceled The initial a...

Page 14: ...dcasting technology distinguishes between multiple channels broadcast by a single network Note No Signal will appear on the TV screen after the minor channel broadcast is over Audio only program message will appear on the TV screen when you receive only sound signal 5 Volume Adjustment This section describes how to adjust the volume The mute function which turns the sound off and on is also descri...

Page 15: ...ck on the unit select HDMI1 To use the HDMI2 input jack on the unit select HDMI2 To use the PC input jack on the unit select PC 5 5 Switching Audio Mode This section describes how to switch the audio in the analog mode and how to switch the audio language in the digital mode TV Press AUDIO to display the currently selected audio mode While receiving an MTS broadcast press repeatedly to cycle throu...

Page 16: ...ies A Day of Memories KABC KABC A quarter century ago which may now qualify as the good old days of newspapering run of paper sales accounted for 80 percent of the industry s advertising revenues Department stores and supermarket were 1 2 4 3 9 5 6 7 8 10 1 program title 2 broadcast station 3 program guide The program guide added to broadcasting information is displayed to a maximum of 4 lines 4 c...

Page 17: ...the screen This crops out the top and bottom of the picture Wide Display the picture with its center at the original size and the edges stretched horizontally 5 For 16 9 video signal Full normal Zoom Expand Cinema Full Display a 16 9 picture at its original size Zoom Display a 16 9 picture at its maximum size without changing its horizontal and vertical ratio Cinema Display a vertically stretched ...

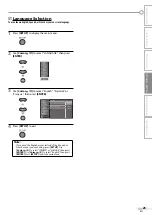
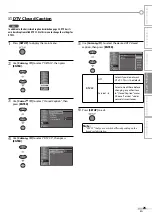
Page 18: ...You can select the energy saving mode Refer to Energy Saving Mode on page 32 LANGUAGE You can change the language English Spanish French displayed on the main menu Refer to Language Selection on page 21 5 Auto Channel Scan If you switch wires e g between antenna and CATV or if you move the unit to a different area after the initial setup or if you restore the DTV channel you deleted you will need ...

Page 19: ...s SETUP to display the main menu 2 Use Cursor K L to select CHANNEL then press ENTER 3 Use Cursor K L to select Channel List then press ENTER Channel Channel Autoscan Channel List Manual Register Antenna 4 Use Cursor K L to select the channel you want to skip then press ENTER Channel List Channel List DTV 8 DTV 8 9 9 DTV 48 DTV 48 58 58 DTV 6 DTV 6 27 DTV 67 Ch Select Watch Skip Back BACK ENTER Hi...

Page 20: ...sfully Registered to the channel list is displayed If external input is used it is not possible to register the channel and Unavailable will be displayed on the TV screen By using CHANNEL you can select the memorized channels only 5 Antenna Confirmation DTV This function lets you check the digital signal strength of each channel 1 Press SETUP to display the main menu 2 Use Cursor K L to select CHA...

Page 21: ... Cursor K L to select English Español or Français then press ENTER Language Language Select the language for setup display Elija el idioma de ajuste Sélectionner langue écran config Español Français English 4 Press SETUP to exit Note If you need the English menus instead of the Spanish or French menus you are having press SETUP Use Cursor K L to select IDIOMA or LANGUE then press ENTER Use Cursor ...

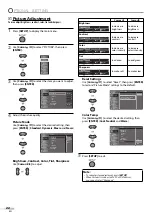
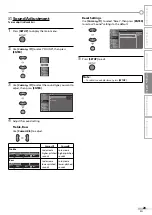
Page 22: ... 30 Move Enter ENTER to decrease brightness to increase brightness Contrast Adjust Move Enter ENTER Contrast 30 to decrease contrast to increase contrast Color Adjust Move Enter ENTER Color 30 to decrease color intensity to increase color intensity Tint Adjust Move Enter ENTER Tint 0 to add red to add green Sharpness Adjust Move Enter ENTER 0 Sharpness to make soft to make clear Reset Settings Use...

Page 23: ...the sound setting Treble Bass Use Cursor s B to adjust Cursor s Cursor B Treble ENTER Adjust Treble Move Enter 0 to decrease higher pitched sounds to increase higher pitched sounds Bass ENTER Adjust Bass Move Enter 0 to decrease lower pitched sounds to increase lower pitched sounds 5 Reset Settings Use Cursor K L to select Reset then press ENTER to restore Sound settings to the default Reset Setti...

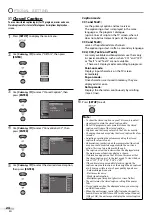
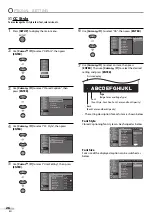
Page 24: ...e Once characters are stored in memory they are displayed all at once Roll up mode Displays the characters continuously by scrolling max 4 lines 6 Press SETUP to exit Note To show the closed caption on your TV screen broadcast signal must contain the closed caption data Not all TV programs and commercials have the closed caption or all types of the closed caption Captions and texts may not match t...

Page 25: ...PC Settings HDMI1 Audio Energy Saving Mode On 4 Use Cursor K L to select DTV CC then press ENTER Closed Caption Closed Caption Off Off Conventional CC DTV CC CC Style 5 5 Use Cursor K L to select the desired DTV closed caption then press ENTER Closed Caption Closed Caption Off Conventional CC Service1 Service2 Service3 Service4 Service5 Service6 DTV CC CC Style DTV CC Off Select if you do not want...

Page 26: ...then press ENTER CC Style CC Style Font Style Font Size Font Color Font Opacity Back Color Back Opacity Edge Color Edge Type User Setting Off Closed Caption On 7 Use Cursor K L to select an item then press ENTER Then use Cursor K L to select the desired setting and press ENTER ABCDEFGHIJKL ABCDEFGHIJKL The setting description for each item is shown below Font Style Closed Captioning font style can...

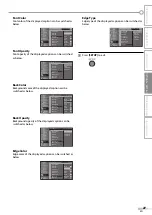
Page 27: ...low Magenta Cyan Closed Caption User Setting Font Style Font Size Font Color Font Opacity Back Opacity Edge Color Edge Type Back Color Back Opacity Background opacity of the displayed caption can be switched as below CC Style CC Style Flash Translucent Transparent Solid Closed Caption User Setting Font Style Font Color Font Opacity Back Color Edge Color Edge Type Font Size Back Opacity Edge Color ...

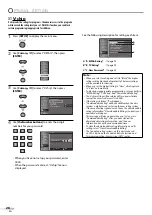
Page 28: ... D page 30 Note When you select a rating and set it to Block the higher ratings will be blocked automatically The lower ratings will be available for viewing When you set the highest rating to View all ratings turn to View automatically To block any inappropriate programming set your limits in MPAA Rating TV Rating and Downloadable Rating The V chip setting will be retained after a power failure e...

Page 29: ...e for children under 13 PG Parental guidance suggested G General audience NR No rating 7 Press SETUP to exit B TV Rating B TV Rating 5 Use Cursor K L to select TV Rating then press ENTER MPAA Rating TV Rating Canadian English Rating Canadian French Rating Downloadable Rating Clear Downloadable Rating New Password V chip V chip 6 Use Cursor K L s B to select the desired rating then press ENTER repe...

Page 30: ...e same Block or View C New Password C New Password Although the default code 0000 is supplied with the unit you can set your own password 5 Use Cursor K L to select New Password then press ENTER MPAA Rating TV Rating Canadian English Rating Canadian French Rating Downloadable Rating Clear Downloadable Rating New Password V chip V chip 6 Press the Number buttons to enter the new 4 digit password En...

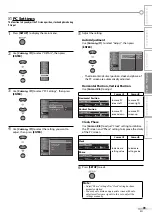
Page 31: ...omatically adjusts the position clock and phase of the picture element The Horizontal Vertical position clock and phase of the PC screen are automatically adjusted Horizontal Position Vertical Position Use Cursor s B to adjust Cursor s Cursor B Horizontal Position ENTER H Position Adjust Move Enter 0 to move PC screen left to move PC screen right Vertical Position ENTER V Position Adjust Move Ente...

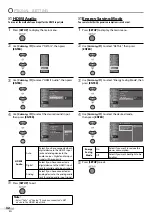
Page 32: ...ice to the HDMI1 input jack for digital audio input signal Analog Select if you have connected an analog device to the analog audio jack for analog audio input signal 5 Press SETUP to exit Note Select Auto or Analog if you have connected a DVI device to the HDMI1 input jack 5 Energy Saving Mode You can set whether the power consumption is saved or not 1 Press SETUP to display the main menu 2 Use C...

Page 33: ... to a location where previously unavailable channels are broadcast The selected channel may not be broadcasting When auto channel scan is interrupted and not completed some channels will not be received Make sure to complete Refer to Auto Channel Scan on page 18 The selected channel cannot be viewed by the V chip setting Refer to V chip on page 28 The unit requires some kind of antenna input An in...

Page 34: ... the input mode of this unit is in PC mode Tap any key on the keyboard to wake up your computer Make sure that the sound is not muted Press MUTE so that the volume bar and current volume level will appear on the TV screen Make sure that the volume is NOT set to 0 or Mute If so use VOLUME to adjust the desired volume No color View other TV channels The problem might be limited to the broadcasting s...

Page 35: ...ions are displayed as a white box No caption is displayed in the Closed Caption supported program Interference from buildings or weather conditions may cause captioning to be incomplete Broadcasting station may shorten the program to insert advertisement The closed caption decoder cannot read the information of the shortened program No caption is displayed when playing back a disc or a cassette ta...

Page 36: ...hat stands for Advanced Television Systems Committee and the name of the digital broadcasting standards Aspect Ratio The width of a TV screen relative to its height Conventional TVs are 4 3 in other words the TV screen is almost square widescreen models are 16 9 the TV screen is almost twice as wide as its height Component Video This is a video signal format that conveys each of 3 principal colors...

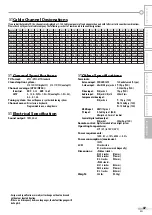
Page 37: ... W 30 6 inches 776mm D 4 3 inches 108mm With stand H 21 4 inches 543mm W 30 6 inches 776mm D 8 7 inches 220mm Weight 22 8 lbs 10 3kg 5 If you subscribe to cableTV the channels are displayed as 1 135 Cable companies often designate channels with letters or letter number combinations Please check with your local cable company The following is a chart of common cable channel designations 5A 1 2 2 3 3...

Page 38: ......

Page 39: ......

Page 40: ...JVC COMPANY OF AMERICA Division of JVC Americas Corp 1700 Valley Road Wayne New Jersey 07470 JVC Loves the Earth Printed in China A8AFRUH 1EMN24099 ...

Reviews: