background image

13

USE

SETT

ING

TR
O

U

B

LE

?

PREPARE

IM

PORTANT

Ini

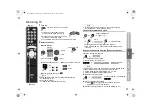
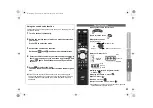
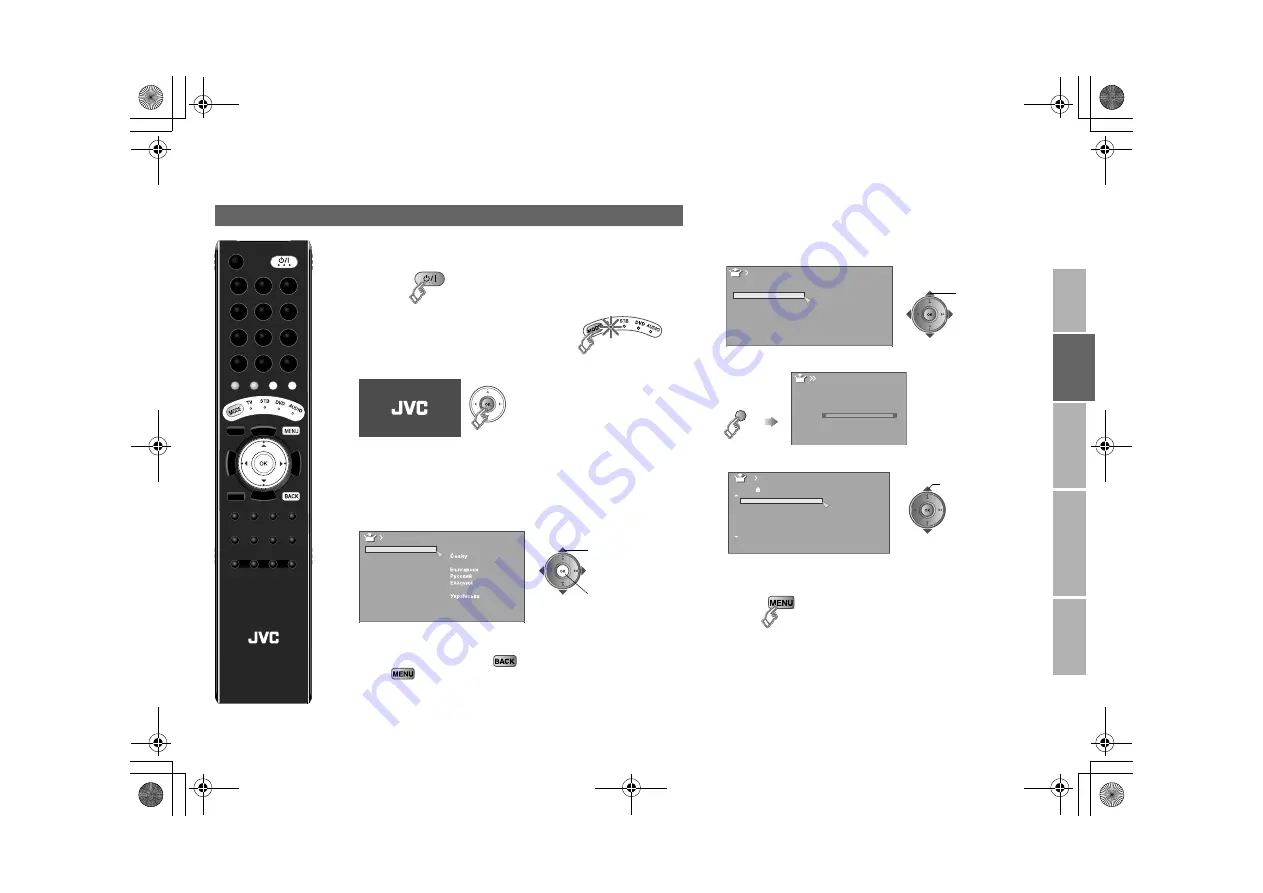
The initial settings will begin automatically when the TV is turned 

on for the very first time. Follow the on-screen instructions to 

perform the settings.

1

Turn on 

z

If the remote control doesn’t work, 

confirm that the mode is set to “TV”.

2

Start initial settings

z

If the JVC logo does not appear, refer to “To perform initial 

settings again”.

3

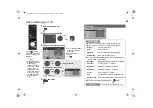
Select a language

This TV is designed for the European market and does not 

support languages other than the European languages. The 

on-screen displays shown in this manual are in English so 

please select “English” for better understanding.

To the previous screen 

g


Exit 

g


If you wish to make changes later

g

“Language” and “Auto Program” (P. 28)

4

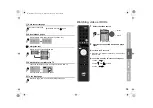
Select the country of installation

Although your country is not listed in the “Country” menu, 

selecting “Deutschland” and performing “Auto Program” will 

correctly register the programmes in your country.

5

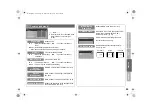
Automatically register channels

6

Check what was registered

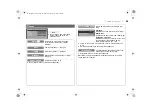
To edit channels

g

“Editing channels” (P. 14)

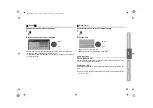
7

Finish 

To perform initial settings again
Take note that performing initial settings again will cause all 

channel related settings to be lost. Press the “MENU” button to 

display the menu, then press and hold the number button “1” 

for more than 3 seconds to start initial settings.

Initial settings

Suomi
Român

ă

Türkçe

Language

Svenska

Norsk

Dansk

Nederlands

Castellano

Italiano

Deutsch

Français

English

Català

Português

Magyar

Polski

B

set

A

select

select

Belgium

Nederland

Italia
España

France

Deutschland

United Kingdom

Country

Norge
Suomi

Sverige
Österreich

Danmark

Switzerland

Ireland

Auto Program

(blue)

Auto Program

CH  02

0%

select a channel

_ _ _ _ _ _

AV

PR

ID

Edit

CH/CC

01

CH

02

CH

03

CH

04
05
06
07

CH
CH
CC
CC

02

03
04
05
06
01
02

LCD

LT-42S90B_Asia.book  Page 13  Wednesday, March 12, 2008  1:07 PM

Summary of Contents for LT-42S90B

Page 1: ...INSTRUCTIONS WIDE LCD PANEL TV LT 42S90B LCT2426 001A H LT 42S90B_Asia book Page 0 Wednesday March 12 2008 1 07 PM ...

Page 2: ...LT 42S90B_Asia book Page 0 Wednesday March 12 2008 1 07 PM ...

Page 3: ...at the following items are not supported 0 On screen display and teletext in languages other than the European languages P 13 18 0 Country setting for countries other than the European countries P 13 28 0 Refer to Using the cable adapter provided P 8 Note LT 42S90B_Asia book Page 1 Wednesday March 12 2008 1 07 PM ...

Page 4: ...ocedures z JVC assumes no responsibility for damage due to improper mounting Do not allow the TV to fall z Do not rest your elbows on or allow children to hang from the TV There is a risk that the TV will fall and cause injuries z Make use of the hole on the back of the stand to prevent the TV from falling easily P 8 If the TV is damaged or behaving strangely stop using it at once g Unplug the pow...

Page 5: ...PAGE First things first z Warning 2 Getting started z Remote control 4 z Names and functions of parts 6 z Getting started 8 Let s try it out Try the advanced features z Enjoy your new TV 16 z Watching TV 17 z Viewing teletext 18 z Watching videos DVDs 19 z Useful functions 20 Just the way you like it z Configuring your remote control 22 z Customising your TV 24 Picture 24 Features sub menu 25 Soun...

Page 6: ...os DVDs P 19 Colour buttons Select a page when viewing teletext Operate functions in menus Switch between TV STB DVD AUDIO P 22 STB AUDIO Return to TV Display on screen menu Customising your TV P 24 Select and confirm settings in menus Change channel page Volume control View teletext Viewing teletext P 18 To the previous channel Hold the current page when viewing teletext P 19 Display your favouri...

Page 7: ...xt P 19 Choose a favourite channel P 17 Display sub pages when viewing teletext P 18 Save your favourite page when viewing teletext P 18 Switch briefly from teletext to TV when viewing teletext P 19 Display the index page when viewing teletext P 19 Change the aspect ratio P 20 Turn on 3D Cinema Sound P 20 Change the sound mode or language P 21 Set the sleep timer P 21 Note LT 42S90B_Asia book Page...

Page 8: ... menu operations refer to Customising your TV P 24 Change the direction of TV Power lamp ON Lit OFF Unlit z When Power Lamp is set to Off the power lamp will not light up g Power Lamp P 27 Remote control sensor Eco Sensor g What is Eco Sensor P 32 Note Volume Switch to an external input P 19 Change channel Menu operation Turn on off standby the TV z You will hear a beep if you have touched the but...

Page 9: ... dirty clear the dust off the glossy finish first Then wipe softly with the cleaning cloth provided If you do not clear the dust first or you wipe the glossy finish too hard or a cleaning cloth other than the one provided is used the glossy finish may be scratched Attach the stand to the TV 1 2 When attaching the TV to the wall Handling the glossy finish of the TV Seal up the two holes at the bott...

Page 10: ...ll mounting unit M6 x 4 400 mm x 200 mm Depth of screw hole is 10 mm from the surface of the TV z Seal up the two holes at the bottom of the TV with the plates provided P 7 Use two AAA R03 dry cell batteries Insert the batteries from the end making sure the and polarities are correct Check accessories Remote control RM C1932 AAA R03 Batteries For confirming the TV works Cleaning cloth For details ...

Page 11: ...g your external devices Note Audio system Satellite broadcast tuner VCR DVD recorder EXT 1 AUDIO OUT EXT 4 HDMI 1 EXT 5 HDMI 2 EXT 6 HDMI 3 HD Video camera Digital Satellite broadcast tuner DVD player Video camera Game consoles Not available For service adjustments DVD player D E F D E F C G A B A A H EXT 2 EXT 3 Headphones A B C For connection D F use the cable adapter provided to connect the aud...

Page 12: ...HD 1080i 1125i 1080p 1125p 24Hz 1080p 1125p 50Hz 1080p 1125p 60Hz 720p 750p Audio L R If there is no sound change the HDMI 1 Audio Setting P 28 B DVI Audio DVI HDMI cable Audio cable EXT 4 EXT 3 L and R jacks Input z DVI digital ED 576p 625p 480p 525p HD 1080i 1125i 1080p 1125p 24Hz 1080p 1125p 50Hz 1080p 1125p 60Hz 720p 750p z Audio L R analogue If there is no sound change the HDMI 1 Audio Settin...

Page 13: ...dio EXT 2 Input z S Video analogue z Audio L R analogue This connection does not support outputs from the EXT terminals Set EXT 2 in the Ext Setting to S In P 29 Set the input selector switch to Y C P 8 F Video and audio EXT 1 EXT 2 Input z Composite video analogue z Audio L R analogue This connection does not support outputs from the EXT terminals Set the input selector switch to CVBS P 8 Good G ...

Page 14: ...om a device with connection A and B Connecting the aerial AERIAL z After all the connections have been made insert the plug into an AC outlet Connect the aerial AERIAL Connect a VCR DVD recorder z After all the connections have been made insert the plug into an AC outlet VCR DVD recorder EXT 2 EXT 1 Getting started LT 42S90B_Asia book Page 12 Wednesday March 12 2008 1 07 PM ...

Page 15: ...menu selecting Deutschland and performing Auto Program will correctly register the programmes in your country 5 Automatically register channels 6 Check what was registered 䡵 To edit channels g Editing channels P 14 7 Finish 䡵 To perform initial settings again Take note that performing initial settings again will cause all channel related settings to be lost Press the MENU button to display the men...

Page 16: ... function ID Insert Delete Manual Move Next Move Move a channel s position PR ID Edit a channel name ID Insert Insert a new channel directly by entering the CH CC number Delete Delete a channel z Pressing the button deletes the channel set select 䡵 When selecting a preset name from the ID List B set A select character B move position C set A select enter the first character blue 䡵 Naming a channel...

Page 17: ...evious steps until the desired channel is displayed A Search a channel Fine tune B Set Select a system z If necessary press X to change the broadcasting system g Sound and colour system in your country or region P 32 AV PR ID Manual CH CC 01 02 03 CH 03 04 CH 04 05 06 07 05 CH 06 CH 01 CC 02 CC B G _ _ _ _ _ _ 02 CH LT 42S90B_Asia book Page 15 Wednesday March 12 2008 1 07 PM ...

Page 18: ...settings Stereo t u 3D Cinema Sound etc 䡵 Set Up settings Auto Program Language etc 䡵 Features settings Sleep Timer Child Lock etc Customising your TV 䡵 Change the aspect ratio 䡵 Change the sound mode or language 䡵 3D Cinema Sound 䡵 Emphasize the bass sound 䡵 Set the sleep timer PR List 09 08 07 06 05 04 03 02 01 _ _ _ _ _ _ AV PR ID LT 42S90B_Asia book Page 16 Wednesday March 12 2008 1 07 PM ...

Page 19: ...ove up or down a channel E g 15 1 up down PR List 09 08 07 06 05 04 03 02 01 _ _ _ _ _ _ AV PR ID Note While the channel is displayed Press the number to register it on The following Picture and Sound menu settings applied to the channel will be stored in the favourite channel as well z Picture Mode Digital VNR DigiPure P 24 25 z Surround Bass Boost MaxxBass P 26 䡵 Recall the favourite channel 䡵 C...

Page 20: ...wn a page 䡵 Release g Press again F T L 1 Display your favourites list 2 Select a coloured button to save your page to 3 Enter the number of the page to save 4 Save 䡵 Recall your favourite page 1 Display your favourites list 2 Press a coloured button red green yellow blue 䡵 Exit g red green yellow blue Viewing teletext 1 2 Enter a teletext page 䡵 Move up or down a page TEXT TV TEXT up down When wa...

Page 21: ...watch TV z Useful when running a page search Returns to page 100 or a previously designated page 䡵 To return to TV channels z Press the TV button or select ATV from the Ext Mode menu 䡵 To operate using the TV s touch sensor panel 1 Touch 2 Touch and to select 3 Touch 1 Select the video source 2 Operate the connected device and play a video Ext Mode ATV EXT 1 EXT 2 EXT 3 HDMI1 HDMI2 HDMI3 0 1 2 3 4...

Page 22: ...headphones Hyper Sound P 26 Ambient sound z Hyper Sound and 3D Cinema Sound cannot be set to On simultaneously z Hyper Sound does not work with headphones 1 2 Select the aspect ratio 3 z When Slim is selected a 4 3 image stretched out to 16 9 will revert back to its original aspect ratio with black bands z When Panoramic Zoom is selected a 4 3 image with black bands will be stretched out to 16 9 z...

Page 23: ...re are more functions available in the menus see Customising your TV P 24 29 1 2 Select the sound mode or language z When viewing a bilingual broadcast programme you can select either Bilingual I Sub I or Bilingual II Sub II sound z If the stereo broadcast reception is poor you can change to mono sound for clearer sound A select B set Sound Off Off Bass Treble Balance Hyper Sound 3D Cinema Sound M...

Page 24: ... control code for your device according to its brand from the Remote control codes list Refer to P I X at the back of this manual 4 Set the remote control code 5 Point the remote control at your device press and confirm that your device is turned off If your device does not respond try entering another available code TV STB AUDIO DVD Press and hold Enter four digit number Release the button MODE A...

Page 25: ...o select the mode 3 Activate the search code function Hold down and until the mode indicator blinks 4 Point the remote control at your device and press If there is no response try the next code by pressing and press again Repeat the process until your device turns off 5 Press to register the code The code is now set Confirm that the mode indicator goes out 䡵 If your TV s remote control still does ...

Page 26: ...uction Colour System 4 3 Auto Aspect Off Off Auto On On On On On Picture Mode Bright in a fairly bright room Soft in a dark room Standard in a room with standard brightness Game Mode when playing video games Backlight Backlight brightness Darker l Brighter Contrast Contrast Lower l Higher Brightness Brightness Darker l Brighter Sharpness Sharpness Softer l Sharper Colour Colour Lighter l Deeper Hu...

Page 27: ...as On Off Dynamic Backlight Reduce the brightness of the backlight when the screen is dark On Off Features sub menu Digital VNR DigiPure Movie Theatre Colour Management Picture Management Smart Picture Dynamic Backlight MPEG Noise Reduction Colour System 4 3 Auto Aspect Off Off Auto On On On On On Features MPEG Noise Reduction Reduce MPEG video noise On Off Colour System When there is no colour ch...

Page 28: ...oost Emphasize the bass sound Low Mid High Auto Volume Control Maintains a uniform sound volume even if the sound becomes loud suddenly during commercial breaks etc On Off z To turn on off the 3D Cinema Sound refer to 3D Cinema Sound P 20 z 3D Cinema Sound does not work with headphones MaxxBass Compensates low frequencies to widen the frequency band Low High Off z MaxxBass does not work with headp...

Page 29: ... 0 0 C set A select a number B to the next column _ _ _ _ _ _ AV PR ID CH CC 01 02 CH 02 03 CH 03 04 CH 04 05 06 07 05 CH 06 CH 01 CC 02 CC Child Lock select blue Lock Release Blue Back Displays a blue screen and mutes the sound when the signal is weak or absent On Off P 30 Favourite Setting Remove a channel from the Favourite channel list 䡵 For more details g Register a channel to a button Favour...

Page 30: ... Auto Program blue Auto Program CH 02 0 _ _ _ _ _ _ AV PR ID Edit CH CC 01 CH 02 CH 03 CH 04 05 06 07 CH CH CC CC 02 03 04 05 06 01 02 Edit Manual g Editing channels P 14 Language Select a language for the menus This TV is designed for the European market and does not support languages other than the European languages The on screen displays shown in this manual are in English so please select Eng...

Page 31: ...t S In Arrow Select an EXT Select the arrow select select S In Switch to S Video input ID List Edit names of connected devices Dubbing Set up dubbing on EXT 2 A Select EXT 3 B Set to component input 䡵 Cancel this mode g Press yellow again z mark will appear at the selected EXT z The device selection display will change from E2 to S2 yellow A Show the name list B Select a name from the list 䡵 Clear...

Page 32: ...Troubleshooting Severe noise or snow z Is the TV connected correctly to the aerial z Change the direction of the aerial z Is the aerial or its cable damaged g Consult your retailer Patterns stripes or noise z Is the aerial receiving interference from high voltage power lines or wireless transmitters g Consult your retailer z Are connected devices too close to the TV g Place a minimum distance betw...

Page 33: ... the left and right sound from one side of the speaker even after adjusting the speaker balance to one side set Hyper Sound and 3D Cinema Sound to Off P 20 26 Functions Some functions do not work z It is not a malfunction Depending on the situation some function items will be displayed in black colour and will not work P 24 Problem Actions HDMI Wrong screen size z Read the user manual of the conne...

Page 34: ... the Eco Sensor on the screen z With the full HD LCD display and Full Native you can enjoy full native HD resolution of 1920 x 1080 It exposes flaws in the video that were hidden when viewing on Full The illustrations are emphasised to make clear differences between Full and Full Native z Dark bar or noise may appear at the edges of the screen when viewing in Full Native for some videos This is re...

Page 35: ...3 CH 24 E24 CH 64 E64 CH 25 E25 CH 65 E65 CH 26 E26 CH 66 E66 CH 27 E27 CH 67 E67 CH 28 E28 CH 68 E68 CH 29 E29 CH 69 E69 CH 30 E30 CH 31 E31 CH 32 E32 CH 33 E33 CH 34 E34 CH 35 E35 CH 36 E36 CH 37 E37 CH 38 E38 CH 39 E39 CH 40 E40 CH 41 E41 CC Channel CC Channel CCIR ORIT CCIR ORIT CC 01 S 1 CC 41 S 41 CC 02 S 2 CC 42 CC 03 S 3 CC 43 CC 04 S 4 CC 44 CC 05 S 5 CC 45 CC 06 S 6 CC 46 CC 07 S 7 CC 47...

Page 36: ...d system Power requirements AC 220 V 240 V 50 60 Hz Audio output Rated power output 10 W 10 W Speakers 4 5 cm x 13 cm x 2 Power consumption standby 183 W 0 5 W Screen size visible area size measured diagonally 105 cm Connectors HDMI x 3 RCA x 7 component or composite video audio L R Euroconnector SCART x 2 For details g P 10 11 Headphone jack Stereo mini jack 3 5 mm in diameter x 1 Dimensions W x ...

Page 37: ...0501 0713 0847 1113 1175 1693 Anglo 0713 Ankaro 0713 Anttron 0613 Apollo 0455 Apro 1672 Arcon 1075 Armstrong 0200 Arnion 1300 Asat 0200 ASCI 0114 1334 ASLF 0713 AssCom 0853 Aston 1261 Astra 0607 0713 Astratec 1743 Astro 0173 0501 0607 0613 0658 1099 1100 1113 1816 Atsat 1300 AtSky 1334 Audioline 1672 Audioton 0613 Austar 0642 1259 Avalon 0396 Axil 1457 1659 Axis 1111 B ytronic 1412 Beko 0455 Best ...

Page 38: ... iCan 1367 ID Digital 1176 ILLUSION sat 1557 Imperial 1334 1429 1672 Indovision 0856 1887 2108 Ingelen 0114 0396 International 0132 Interstar 1214 Intervision 0607 ITT Nokia 0455 0723 Jaeger 1334 K SAT 0713 Kamm 0713 Kaon 1300 KaTelco 1111 Kathrein 0114 0173 0200 0480 0504 0553 0613 0658 0713 0818 1416 1561 1567 Kenwood 0853 Key West 0132 Kiton 0114 Konig 0607 KR 0613 Kreiling 0114 0658 1480 Kreis...

Page 39: ...erd 1412 Serino 0610 Servimat 1611 ServiSat 0713 1251 Siemens 0173 0396 1334 1429 Silva 0299 Skantin 0713 SKR 0713 SKY 0099 0847 1175 1662 1693 1848 1850 SKY Italia 0853 1693 1848 Sky XL 1251 1412 Sky 1175 SkyLife 0796 Skymaster 0713 1075 1200 1334 1409 1567 1611 Skymax 0200 Skyplus 1232 1334 1412 SkySat 0114 0501 0607 0713 Skyvision 1334 SL 0132 0299 1294 1672 SM Electronic 0713 1200 1409 Smart 0...

Page 40: ...er 1075 1412 Sedea Electronique 1206 SEG 1993 Serd 1412 SKY 1175 1693 1848 1850 SKY Italia 1848 Sky XL 1412 Skymaster 1075 Skyplus 1334 1412 Sunny 1300 TechniSat 1195 1197 Thomson 1175 1534 1662 Topfield 1206 1545 Vaova 1993 Xtreme 1300 Yamada 1993 Zehnder 1075 1412 DVD 3D LAB 0539 4Kus 1158 A Trend 0714 Acoustic Solutions 0713 0730 1316 AEG 0770 0788 0790 1233 1434 1923 AFK 1051 1152 1923 Aiko 17...

Page 41: ... Firstline 0713 0843 0869 1530 Fisher 0670 Funai 0675 0695 Gateway 1158 Germatic 1051 Giec 1221 Global Link 1224 Global Solutions 0768 Global Sphere 1152 Go Video 0783 0869 GoldStar 0591 0741 Goodmans 0651 0713 0723 0730 0783 0790 0879 1004 1140 1221 1316 1423 1530 1730 1923 2014 GoWell 1643 GPX 0699 0741 Graetz 0665 Gran Prix 0831 0898 Grandin 0713 1233 Grundig 0539 0551 0651 0670 0695 0713 0775 ...

Page 42: ...0831 ProCaster 1004 1513 Proline 0651 0672 0710 1004 1316 1483 Proscan 0522 Proson 0713 Prosonic 0699 0752 ProVision 0699 0730 1163 1321 1484 1923 Pye 0539 0646 QONIX 1051 Radionette 0741 0869 1906 2024 Raite 0665 RCA 0522 REC 0490 Redstar 0763 0770 0788 0898 1394 1923 Relisys 1347 Reoc 0752 0768 Revoy 0699 0841 Richmond 1233 Roadstar 0672 0699 0713 0730 0818 0879 0898 1051 1227 1434 2014 Ronin 07...

Page 43: ...ndy Sam 0573 Woxter 1005 1151 1224 X Waves 1513 Xbox 0522 1708 Xenius 0790 Xoceco 1231 Xoro 1183 1221 Yakumo 1004 Yamada 0872 1004 1151 1158 1416 Yamaha 0490 0539 0646 Yamakawa 0665 0710 0872 Yukai 0730 1730 Zenith 0503 0591 Blu Ray DVD LG 0741 Panasonic 1641 Philips 2084 Pioneer 0142 Samsung 0199 Sony 1516 HD DVD LG 0741 Onkyo 1769 Toshiba 1769 DVD R 4Kus 1158 Airis 1321 Alba 1530 Aristona 0646 B...

Page 44: ... 1923 Radionette 1906 2024 Redstar 1923 Roadstar 2014 Samsung 1932 Sanyo 0670 Schneider 0779 0790 Scott 1923 SEG 1994 Sharp 2015 2024 Sony 1824 1934 1981 2020 2132 Tandberg 1994 Targa 1906 Technics 1905 Techwood 1994 Tevion 1923 2014 Thomson 0522 Tokai 0790 Toshiba 2006 United 1832 Universum 0779 0790 1913 Venturer 0790 Vestel 1994 Wharfedale 0790 1832 Xenius 0790 TV DVD Combination Akura 1367 Alb...

Page 45: ...oxx Sound 1611 LG 1293 1869 Lifetec 0797 Lumatron 1772 LXI 0744 Magnat 1389 Magnavox 1089 1189 Magnum 1611 Marantz 0189 1089 1189 1269 1289 1346 2114 Matsui 0744 0797 MBO 1352 Medion 0797 1420 MEI 1390 Metz 1554 Micromaxx 1420 Micromega 1189 Microstar 0797 Mitsubishi 1393 Musicmagic 1089 Mustek 1352 Mx Onda 0744 0797 Myryad 1189 NAD 0320 0609 Nikkai 1389 Nikkei 0744 Norcent 1389 NTDE Geniesom 0744...

Page 46: ... 0074 1374 1676 2000 2001 Kenwood 1313 KXD 1389 Lenoxx 1611 Lenoxx Sound 1611 LG 1293 1869 Lumatron 1772 Magnat 1389 Magnum 1611 MBO 1352 Medion 1420 MEI 1390 Metz 1554 Micromaxx 1420 Mustek 1352 NAD 0609 Nikkai 1389 Norcent 1389 Onkyo 0135 Palladium 1220 1293 1344 1390 Panasonic 1316 1763 1765 1779 Philips 1269 1673 Pioneer 1459 Proline 1390 ProVision 1389 QONIX 1420 Radionette 1293 1634 Redstar ...

Page 47: ...A5_07_BlankPage fm Page 1 Wednesday March 12 2008 1 30 PM ...

Page 48: ...0308TKH SW MT 2008 Victor Company of Japan Limited LT 42S90B_Asia book Page 35 Wednesday March 12 2008 1 07 PM ...

Reviews: