background image

EN 

25

CC Converter

This is a data-band expansion system JVC has developed for audio applications.  It reproduces
the timbre of the original sound from high-quality and compressed music data as well.
The CC converter operates as a system filter so that it takes effect regardless of the playback
application.

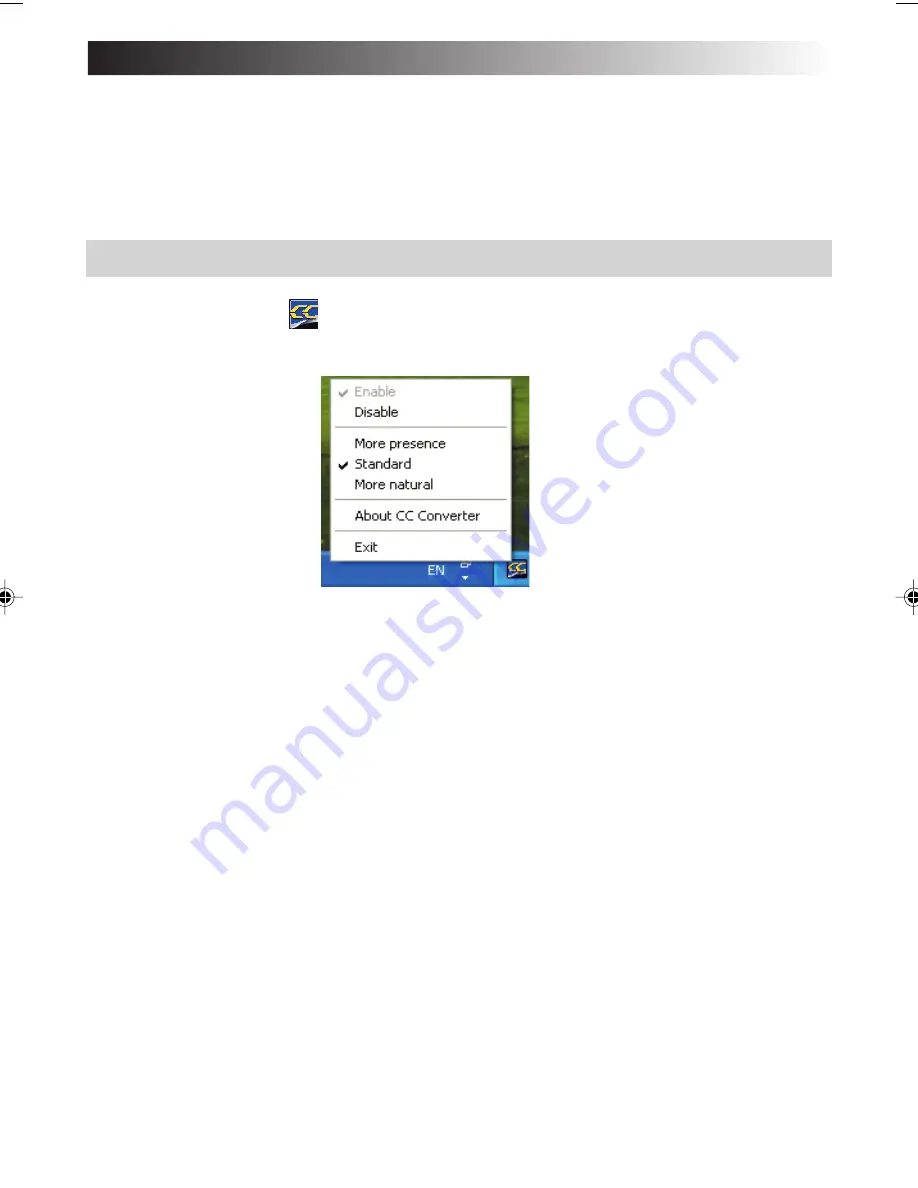
To make the effect valid or invalid or to change the effect level:

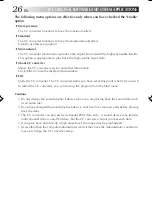
1. Open a shortcut of 

 (CC Converter) icon in the task tray (by clicking the right

mouse button).

2.  When the menu above appears, click on the desired option.

Cautions

• If you have disabled the effect, the CC Converter icon is shown in monochrome color in the

task tray.

• The actual sound playback may slightly be delayed due to processing of playback data.

Explanation of menu options

¡

Enable

Makes the CC converter processing valid.

¡

Disable

Makes the CC converter processing invalid.

XP7210/3210EN-21-29

02.8.6, 7:51 PM

25

Summary of Contents for MP-XP3210

Page 1: ...s of this manual to use your Mobile mini note PC correctly Always read the Safety Precautions and Operation Notes Keep his manual and the warranty card for further reference ank you for purchasing the JVC MP XP7210GB MP XP3210GB obile mini note PC 0GB MP XP3210GB PC ...

Page 2: ......

Page 3: ... the best results and safety is to be assured DO read the operating instructions before you attempt to use the equipment DO ensure that all electrical connections including the mains plug extension leads and interconnections between pieces of equipment are properly made and in accordance with the manufacturer s instructions Switch off and withdraw the mains plug when making or changing connections...

Page 4: ...a cordless type during an electrical storm There may be a remote risk of electric shock from lightning 2 Do not use the telephone to report a gas leak in the vicinity of the leak 3 Use only the power cord and batteries indicated in this manual Do not dispose of batteries in a fire They may explode Check with local codes for possible special disposal instructions ...

Page 5: ...n leak or explode 5 Do not dispose of the batteries in a fire CAUTIONS Battery Packs The supplied battery pack is a lithium ion battery Before using the supplied battery pack or an optional battery pack be sure to read the following cautions 1 To avoid hazards do not burn do not short circuit the terminals When transporting make sure the provided battery cap is attached to the battery If the batte...

Page 6: ...ING INVENTORY Before using your Mobile mini note PC hereinafter Mobile PC make sure that all of the following system components have been included in the container If you have found any shortage or problem contact the sales shop Modem cable 2 meters long AC power cord Two stick caps Protection cover of battery terminal Telephone adapter External display cable ...

Page 7: ... Agreement JVC grants to You a non exclusive right to use the Software 2 You may install and or use the Software on a HDD or other storage devices incorporated in the Product only 3 You may make a single copy of the Software for the back up and storage purpose if a back up copy of the Software has not been included with the Product on physical media such as CD ROM You may use such back up copy sol...

Page 8: ...2 Should this Agreement be terminated You should immediately destroy the Software including any copy including erasure from any memory in the Product and any associated Materials and then will not possess them 9 Export Control You agree that You will not ship transfer or export the Software or underlying information and technology to any countries to which Japan and other relevant countries have e...

Page 9: ...l and use the Software in Your PC 3 You may make a copy of the Software in whole or in part for the back up and storage purpose 3 Restriction 1 You may not modify reverse engineer decompile or disassemble except to the extent as permitted by the applicable laws the Software in any manner 2 You may not copy or use the Software in whole or in part other than as expressly specified in this Agreement ...

Page 10: ... relevant countries have embargoed goods 9 Restricted Rights Legend The Software including related documentation has been developed at private expense of Sharp Corporation and is commercially available If the Software is acquired by You under a United States Department of Defense contract the use duplication or disclosure by the Government is subject to the restrictions as set forth in subparagrap...

Page 11: ...ction Setup 33 Connecting to the Internet 38 Disconnection from the Internet 39 Accessing a Web Page 40 E MAILING 41 Setting up E Mail Software 41 Sending and Receiving E mails 44 HARDWARE Using the Pointing Device 48 Using Hot Keys 50 Using the Numeric Keypad 50 Increasing the Optional Memory Capacity 51 Adding or Removing a Memory Board 52 Checking the Additional Memory Board 54 Using the SD Mem...

Page 12: ... Link connector MP XP7210 only RESET button Keyboard Speakers Ventilation slots PC card slot SD card slot PC card eject button Stick Scroll button Headphone output Microphone input USB connectors External monitor output BN LS11E standard lithium ion battery pack Modem jack DC Input connector LAN connector On Off Key Left button Right button ...

Page 13: ...EN13 SETTING UP ...

Page 14: ... Lock lever A Battery terminal jumper pin Unplug the jumper pin using the tip of a ball point pen or similar Tips Cover the battery terminal with the protection cover of accessory kit if you use the Mobile PC without using the standard lithium ion battery pack or the optional large capacity lithium ion battery pack Holes for mounting optional large capacity lithium ion battery pack 1 Slide lock le...

Page 15: ...le You can open the display panel to 180 degrees 4 Recharge the built in battery pack by plugging the AC cord into DC Input connector When recharging the built in battery pack 1 Plug the AC power cord into the AC adapter 2 Plug the DC cord of the adapter into the DC Input connector of the Mobile PC 3 Plug the AC cord of the AC adapter into the power receptacle 3 2 1 DC cord ...

Page 16: ...ck If you have unplugged the DC cable of the AC adapter and if you drive your PC with the lithium battery pack the battery indicator goes out Standard recharging time 80 recharging time 100 recharging time Built in battery pack Approximately 60 minutes Approximately 90 minutes Both built in battery pack and BN LS11E standard battery pack Approximately 170 minutes Approximately 250 minutes Both bui...

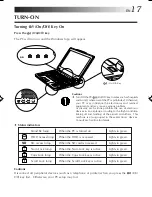
Page 17: ...nding of the aircraft and others This machine is also grouped in these electronic devices Consult each airline for details Status indicators SD Stand By lamp When the PC is turned on Lights in green HDD access lamp When the HDD is accessed Lights in green SD access lamp When the SD card is accessed Lights in green Num Lock lamp When the Num Lock key is active Lights in green Caps Lock lamp When th...

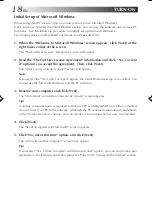
Page 18: ...ll appear Note If you select the No I don t accept it option the initial Windows setup is cancelled You cannot use the Microsoft Windows and the PC software 3 Rename your computer and click Next The An Internet connection could not be chosen screen appears Tips A unique computer name is required so that your PC is distinguished from other computers if you connect your PC to the network Although th...

Page 19: ...assed after initial startup of the Microsoft Windows a confirmation screen asking for the deletion of desktop icons appears This is the Desktop Cleanup program that can delete icons that you have not used for a certain period from the desktop screen The software is not deleted even if you have cleared its icon from the desktop screen Use the following procedure to change the Windows date and time ...

Page 20: ...C may fail 1 Click start The start menu will appear 2 Click Turn Off computer The Turn off computer screen will appear 3 Click Turn Off The PC will be turned off automatically and Stand By lamp will go out Before closing the LCD panel make sure that Stand By lamp has turned off TURN ON ...

Page 21: ...EN 21 JVC ORIGINAL SOFTWARE AND SYSTEM APPLICATIONS ...

Page 22: ...disk For DVC connection and operations see its instruction manual Setup of JVC Original Software Before starting the software setup quit and save the currently active application if any Otherwise your working data will be lost 1 Click start and click Run first at the right lower end of the Menu The Preparing to Install screen will appear and the software setup will start up 2 Read the License Agre...

Page 23: ...rt up DVC s USB Drivers The DVC connection and the USB driver to be set up vary depending on the DVC model you use For details see the DVC instruction manual 1 Connect the DVC to the USB connector of your PC 2 The hardware installation screen will appear 3 Select the Install the software automatically option and click Next Cautions The driver to be set up depends on the DVC operation mode There is...

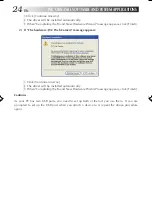
Page 24: ... appears 1 Click Continue Anyway 2 The driver will be installed automatically 3 When Completing the Found New Hardware Wizard message appears click Finish Cautions As your PC has two USB ports you need to set up both of them if you use them If you are prompted to set up the USB port when you attach a device to it repeat the above procedure again JVC ORIGINAL SOFTWARE AND SYSTEM APPLICATIONS ...

Page 25: ...fect valid or invalid or to change the effect level 1 Open a shortcut of CC Converter icon in the task tray by clicking the right mouse button 2 When the menu above appears click on the desired option Cautions If you have disabled the effect the CC Converter icon is shown in monochrome color in the task tray The actual sound playback may slightly be delayed due to processing of playback data Expla...

Page 26: ...The CC converter status you have set at this point is held If you wish to restart the CC converter you can start up the program from the Start menu Cautions Do not change the sound playback device when you are playing back the sound data such as an audio file If you have changed the sound playback device wait five 5 or more seconds before playing back the data The CC converter can process two chan...

Page 27: ... definition Cautions At the third startup after the Windows initial setup a Norton AntiVirus Information Wizard screen appears Follow the on screen instructions to set up this application program You can update the antivirus definition file of this application within 90 days Pixela ImageMixer Can edit an original movie You can pick up movie pictures using a digital video camera DVC and edit them b...

Page 28: ...ions Use the system CD ROM on a CD ROM compatible player only Otherwise your ears or speaker system may be damaged due to loud noise To Uninstall a Standard Application Use the following procedure to uninstall a standard application program 1 Click the start button then Control Panel 2 Click the Add or Remove Programs icon The programs currently installed are listed 3 Click an application program ...

Page 29: ...EN 29 NAVIGATE IN THE INTERNET WORLD ...

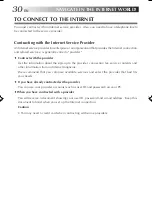
Page 30: ...ider Get the information about the sign up to the provider connection fee service contents and other information from an Internet magazine We recommend that you compare available services and select the provider that best fits your needs If you have already contracted with a provider You can use your provider accounts such as user ID and password on your PC When you have contracted with a provider...

Page 31: ...able connector into the jack in the correct direction Modem cable 2 Plug the other end of the modem cable into the telephone line wall jack If a telephone set is already connected to the telephone line unplug the cable of the telephone set Tips Purchase a line splitter if you wish to plug in your telephone set and your PC to the same telephone line Remember that you cannot use the telephone set an...

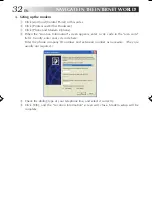
Page 32: ...creen appears enter a city code in the area code field Usually enter your city code here Enter the phone company ID number and extension number as necessary They are usually not required 5 Check the dialing type of your telephone line and select it correctly 6 Click OK and the Location Information screen will close Modem setup will be complete NAVIGATE IN THE INTERNET WORLD ...

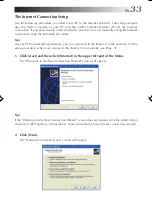
Page 33: ...ure Tips As your PC has networking functions you can connect it to the Internet via the network For the setup procedure when you connect to the Internet via a network see Page 57 1 Click start and then click Internet in the upper left part of the Menu The Welcome to the New Connection Wizard screen will appear Tips If the Welcome to the New Connection Wizard screen does not appear click the start ...

Page 34: ... and click Next The Internet Connection screen will appear 5 Click Connect using a dial up modem option and click Next The Connection Name screen will appear 6 Enter the ISP name and click Next The Phone Number to Dial screen may appear Tips It is convenient to use the contracted provider name as the ISP name NAVIGATE IN THE INTERNET WORLD ...

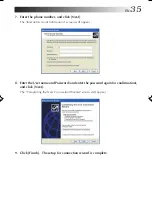
Page 35: ...net Account Information screen will appear 8 Enter the User name and Password and enter the password again for confirmation and click Next The Completing the New Connection Wizard screen will appear 9 Click Finish The setup for connection wizard is complete ...

Page 36: ...ot set these addresses 10 Click start and Control Panel in this order The Pick a category screen of the Control panel will appear 11 Click Network and Internet Connection icon The or pick a Control Panel icon screen will appear 12 Click Network Connection The ISP name you have set in Step 6 is shown in the Dial up tag 13 Double Click the dialup connection icon Connect Dial up Connection screen wil...

Page 37: ...tomatically click Use the following DNS server addresses and enter the DNS server address printed on the document sent from the provider 18 After you have entered the addresses click OK 19 Respond with OK to the Dial up Connection Properties 20 Click x at the upper right corner of the Network Connection screen All screens will close and the Internet connection is complete ...

Page 38: ...eft upper end of the Menu Then select Internet Properties 2 Click the Connections tab and make sure that the ISP name you have created in Step 6 The Internet Connection Setup on page 34 has been set to default in the Dial up and Virtual Private Network settings If not set as default select the ISP and click Set Default 3 Click Always dial my default connection and click OK 2 Click Connect The dial...

Page 39: ...t your PC from the Internet in one of the following ways when you are finished using the Internet Double click the task tray connection icon at the bottom right corner of the desktop screen When the Auto Disconnect dialog box appears click Disconnect Now Quit the Microsoft s Internet Explorer IE When the Auto Disconnect dialog box appears click Disconnect Now ...

Page 40: ...efore starting the following steps connect your PC to the Internet using the Connecting to the Internet procedure on Page 38 When Microsoft s Internet Explorer is active you can access a Web site in one of the following ways 1 Directly enter the URL in the address bar 2 Jump to the destination link 3 Click Favorites and select Call a Web site from the Favorites Method 1 Method 2 Method 3 NAVIGATE ...

Page 41: ...ress installed on your PC Tips It is convenient for E mail setup if you have the document sent from the provider to hand 1 Click start and click E mail on the Menu Outlook Express will start and the Internet Connection Wizard screen will appear 2 Enter the name you wish to display in the Display name and click Next The Internet E mail Address screen will appear ...

Page 42: ...dress field and click Next The E mail Server Name screen will appear 4 Enter the Incoming mail server and Outgoing mail server and click Next Usually select POP3 as the My incoming mail server is a server but you can change it if necessary The Internet Mail Logon screen will appear ...

Page 43: ...ck Next The Congratulations screen will appear 6 Click Finish The Congratulations screen will close and Outlook Express will start up The setup for the E mail software is complete 7 To quit Outlook Express click x at the upper right corner of the screen ...

Page 44: ...ion 1 Click start and click E mail on the Menu Outlook Express will start 2 Click Create a new Mail message on the screen or click Create Mail in the toolbar The New Message screen will appear Tips To minimize the access fee to the provider and the use of the telephone line create your E mail messages before connecting to the Internet Disconnect from the provider Connect to the provider Create a r...

Page 45: ... the Internet You will be connected to the Internet and the created mail will be sent to the specified address 6 If your mail transmission is successful try to receive E mail When you are connected to the Internet click Send Recv at the left upper end of the screen Your PC will be connected to the provider s mail server and you can receive E mail Assuming you have set your E mail address correctly...

Page 46: ...sages click Inbox on the screen The received E mail messages will be displayed 8 To quit Outlook Express click x at the upper right corner of the screen Caution Disconnect your PC from the Internet after you have transmitted E mail and finished accessing a Web site ...

Page 47: ...EN 47 HARDWARE ...

Page 48: ...press the stick harder the mouse pointer moves more quickly Notes If you press the stick slightly and move the pointer slowly for several seconds the pointer may return backward This is not a fault Two stick caps are included in the PC accessory pack When the cap has deteriorated replace it with a new one How to press the buttons Usually press the three buttons using your thumb Click Press the mou...

Page 49: ...ouse left button and move it to the desired position and release the mouse button Notes The pointing devices have initially been set for the right handed person on the Mouse properties tab Scroll buttons You can scroll the screen in the desired direction by holding down the scroll button and moving the stick horizontally or vertically Notes Some applications may not support the scroll buttons ...

Page 50: ...ck key on or off Ins Issues the Print Screen PrtSc command The screens displayed in the Windows are copied onto the clipboard You can select a window and copy it using the Alt key together Note The hot keys are not supported in the MS DOS environment is default setting Power Options Properties Advanced tab see page 61 Function of F3 can be charged according to When I press the sleep button on my c...

Page 51: ...ins precision components If you have damaged the memory board by adding a memory it is not covered by the warranty Also if you have damaged your PC you will be charged for its repair Take care not to cause excessive static electricity Do not add a memory board in a place where static electricity may be generated When you add or replace a memory board take care not to drop water or other liquids on...

Page 52: ...ilt in lithium ion battery pack 3 Open the memory expansion cover 1 3 Remove the battery pack by sliding it in this direction 2 Cautions Screw 1 10 mm is different in length from screws 2 to 4 3 mm Using a wrong screw can damage your PC Do not loosen any other screws otherwise your PC may fail 3 Discharge any static electricity from your body by touching something metallic nearby Not on the PC 4 A...

Page 53: ...oard make sure that the board has been inserted securely Do not apply excessive force to it or the memory board may be damaged 2 Removing the memory board 1 Open the right and left support levers of the memory board by pressing them outward 2 Pull out the memory board in the arrow direction 5 Return the memory expansion cover mount the battery pack and retighten the four screws Caution The screws ...

Page 54: ... and Maintenance icon 4 Click the System icon The System Properties screen will appear 5 The total amount of memory appears on the screen 368 MB RAM appears when 384 MB 128 MB 256 MB of memory is installed 240 MB RAM appears when 256 MB 128 MB 128 MB of memory is installed Note If you change the factory set video memory size assignment the total amount of memory differs from the value in Step 5 ab...

Page 55: ...n Notes The SD memory card and multimedia card are optional The SD memory card slot of your PC does not support the SD I O function and data transfer using the copyright protection functions If you do not use an SD memory card on your PC keep the dummy card inserted in the slot to prevent dust or other foreign bodies getting into the PC 1 Press the dummy card slightly and it will be ejected 2 Hold...

Page 56: ...itor and the LCD panel of your PC see Using the hot keys on Page 50 Note The display max resolution you can set for the external monitor is 1600 x 1200 x 32 bits which depends on monitor performance When the display resolution is set to 1024 x 600 x 32 bit colours enabling the simultaneous display of internal and external monitors automatically changes the number of display colours to 16 bit colou...

Page 57: ...rect type for your LAN environment You must contract with an Internet service provider Using a LAN cable connect the LAN connector on the unit with a communication device hub or router See the following for setting Setting for network connection Setting the IP address manually Important This PC will acquire the necessary initial settings automatically When you use this PC in a home network environ...

Page 58: ...he OK button to save the setting Setting a computer name or work group Tips To share data or a printer among a group of computers you must set the computers in the same work group This enables you to transfer data between computers 1 Click the start button and Control Panel 2 Click the Performance and Maintenance icon 3 Click the System icon The System Properties screen will appear 4 Click the Com...

Page 59: ...e MAC address you have to set a LAN local area connection in the Network connection screen 1 Click the start button and Control Panel 2 Click the Network and Internet Connections icon 3 Click the Network Connections icon With the correct LAN connection the following screen will appear 4 Check that Local Area Connection is enabled Tips it is disabled move the mouse pointer to Local Area Connection ...

Page 60: ...al Area Connection The Local Area Connection Status screen will appear 6 Click the Support tab and the Details button The Network Connection Details screen will appear 7 The MAC address is displayed as the Physical Address on the list ...

Page 61: ...d Maintenance icon 3 Click the Power Options icon The Power Option Properties screen will appear 4 Click the Power Meter tab Battery gauges 1 built in battery and 2 external battery and the total level of these two batteries are displayed Important Battery gauge 2 external battery is displayed only when a standard lithium ion battery pack or large capacity lithium ion battery pack is used Note tha...

Page 62: ... minutes 5 minutes 4 System hibernates 3 hours 2 hours The LCD screen turns off The Stand By lamp is still lit in green The hard disk power is turned off with the LCD screen kept off The Stand By lamp is still lit in green The PC stores the current system status on the hard disk The Stand By lamp will go out The LCD screen is turned off The Stand By lamp flashes in green Tips To exit status 1 or 2...

Page 63: ... the following periods 1 About 10 hours with the built in battery pack alone 2 About 20 hours with the built in and standard battery packs System in halt status Continued operation on the PC displaying a battery low warning causes the result as follows 1 When the halt status is enabled The PC turns off while maintaining the current data 2 When the halt status is disabled The PC does not save the c...

Page 64: ...oints to keep in mind are DO NOT attempt to delete a hard disk area shown as an Unknown partition using the Windows XP Administrative Tools or to assign it as another drive name DO NOT attempt to delete the recovery area using specific software available in the market by initializing or changing any partition in the hard disk Should you delete the recovery area and ask us to re setup your PC you w...

Page 65: ...EN 65 PC RECOVERY REPEATED PC SETUP ...

Page 66: ... backup If you have recovered your PC it will have been returned to the status before shipment All files you have created applications you have added and various parameters you have set will have been cleared and lost Before starting system recovery back up any important files you have created on CD R disk or hard disk drive D of your PC If you have backed up the important information in drive D y...

Page 67: ...nd the Windows OS will start up 3 Select the recovery method disk partitioning When message Select the recovery method A Recommended C appears respond with the 1 or 2 key as follows 1 If you respond with A All disk partitions and files of the hard disk are recovered and the entire PC system is initialized to its original state 2 If you respond with C The files of drive C are recovered and initiali...

Page 68: ...m recovery has been completed the message Turn Power switch off and restart the PC appears Restart your PC Your PC has been returned to the original state before shipment 6 Set up the Windows OS by following the Initial Setup of Windows OS procedure on Page 18 ...

Page 69: ...EN 69 TROUBLESHOOTING ...

Page 70: ...or the phone number Power Q The power does not turn on A Check the following Check that the Power key is pressed Press the On Off key to turn on your PC See Turning On Off key On on page 17 When you are using your PC on AC power Check that the AC adapter is connected For connection see 4 Recharge the built in battery pack by plugging the AC cord into DC Input connector on page 15 When you are usin...

Page 71: ... confirmation message for terminating the application appears click End Now 5 Click x on the Windows Task Manager screen Tips When the application cannot be terminated forcibly restart Windows To restart Windows forcibly start Windows Task Manager click Shut Down on the toolbar then click Restart If your PC does not restart through the above procedure press the RESET button on the side of the unit...

Page 72: ... operating system to start screen Press Enter 5 When you see the To begin click your user name message click an account with which you want to start the PC in the safe mode 6 Clicking Yes starts your PC in the safe mode TROUBLESHOOTING Q If Windows will not start A When Power On Self Test is carried out at the time of power on and something wrong or out of order is detected an error code 2 digits ...

Page 73: ...0 Each time you do this you can change between external display and LCD modes To adjust the LCD display brightness Pressing Fn and F1 turns the screen darker Pressing Fn and F2 turns the screen brighter When the Stand By lamp is flashing The PC is in standby mode The power saving mode is working Press the On Off key or any key on the keyboard Important Pressing the On Off key for more than 4 secon...

Page 74: ...dy For details refer to the instruction manual for your terminal adapter Check that the modem is recognized properly 1 Click the start button and Control Panel 2 Click the Printers and Other Hardware icon 3 Click the Phone and Modem Options icon then the Modems tab 4 Select the modem by clicking it click Properties then the Diagnostics tab 5 Click Query Modem When the modem is recognized properly ...

Page 75: ...nnections icon 3 Click the Network Connections icon 4 Right click the icon for the destination of connection to bring up a pop up menu Click Properties in the menu 5 Check the setting according to the instruction manual provided from your ISP On the General tab check the Connect using and Phone number settings Tips Some ISPs have different phone numbers for access points via ISDN lines from those ...

Page 76: ...f communication or fail to dial up depending on the condition of the telephone line The way to solve this problem is to select a setting other than Max Battery or presentation ex Portable Laptop Q The PC cannot send or receive e mail messages A If you are using the Outlook Express software check the e mail software settings If you are using any other mailer than Outlook Express refer to the pertin...

Page 77: ...Mounting Dismounting the Lithium Ion Battery Pack on page 14 If you are still unable to charge the battery pack check the following Check that the AC adapter is connected correctly to an appropriate power socket and the PC unit For connection see 4 Recharge the built in battery pack by plugging the AC cord into DC Input connector on page 15 Q Battery discharge faster than expected A This device co...

Page 78: ...ministrator password 1 When a password deleting disk has been prepared You can delete the password using the disk For how to prepare a password deleting disk see Help and Support Centre from the start menu 2 When another computer administrator account has been created If an additional computer administrator a user who has the administrator rights is created other than the user who forgot the passw...

Page 79: ...may require hard disk drive replacement To bring up the BIOS menu turn on the PC and press the Alt and F2 keys while the Victor logo screen is shown Do not change the BIOS setting unless you have adequate knowledge of computers A wrong setting can make your PC unable to start up again or worse damage it Q Setting procedure does not complete A If Internet e mail or any other setting does not comple...

Page 80: ...80EN FRANGE ANTWORTEN ...

Page 81: ...EN 81 APPENDIX ...

Page 82: ...1 Acrobat Reader http www adobe com support readguide html 2 Pixela ImageMixer http www imagemixer com 3 Norton AntiVirus 2002 http www symantec com region reg eu techsupp index html 4 Real Player http www service real com APPENDIX ...

Page 83: ...red trademark or pending trademark of RealNetworks Inc in the U S and other countries 4 Adobe the Adobe logo and Adobe Acrobat are trademarks of Adobe Systems Incorporated 5 Symantec the Symantec logo and product names are trademarks or registered trademarks of Symantec Corporation in the U S and other countries 6 Symantec the Symantec logo and Norton AntiVirus are registered trademarks of Symante...

Page 84: ...Approx 1 5 2 0 hours approx 1 5 hours by JEITA 1 0 Approx 1 5 2 5 hours approx 2 0 hours by JEITA 1 0 Approx 3 5 5 5 hours approx 4 0 hours by JEITA 1 0 Approx 3 5 6 0 hours approx 4 5 hours by JEITA 1 0 Approx 5 5 9 0 hours approx 6 5 hours by JEITA 1 0 Approx 5 5 9 5 hours approx 7 0 hours by JEITA 1 0 Built in battery standard battery pack Built in battery optional battery pack Battery charging...

Page 85: ...External display cable MP VGX1E 1 Connected with a PC card and powered from the InterLink unit Maximum read speed is 16x 2 Same items as those supplied with the product 3 Enables 10 hours of continuous operation when used with the built in battery It comes with a carrying case 4 High speed battery charger It supplies power to the InterLink unit and charges the built in battery pack while charging ...

Page 86: ...86EN ...

Page 87: ...EN 87 ...

Page 88: ...88EN ...

Page 89: ...EN 89 ...

Page 90: ......

Reviews: