1-22 (No.YA098)
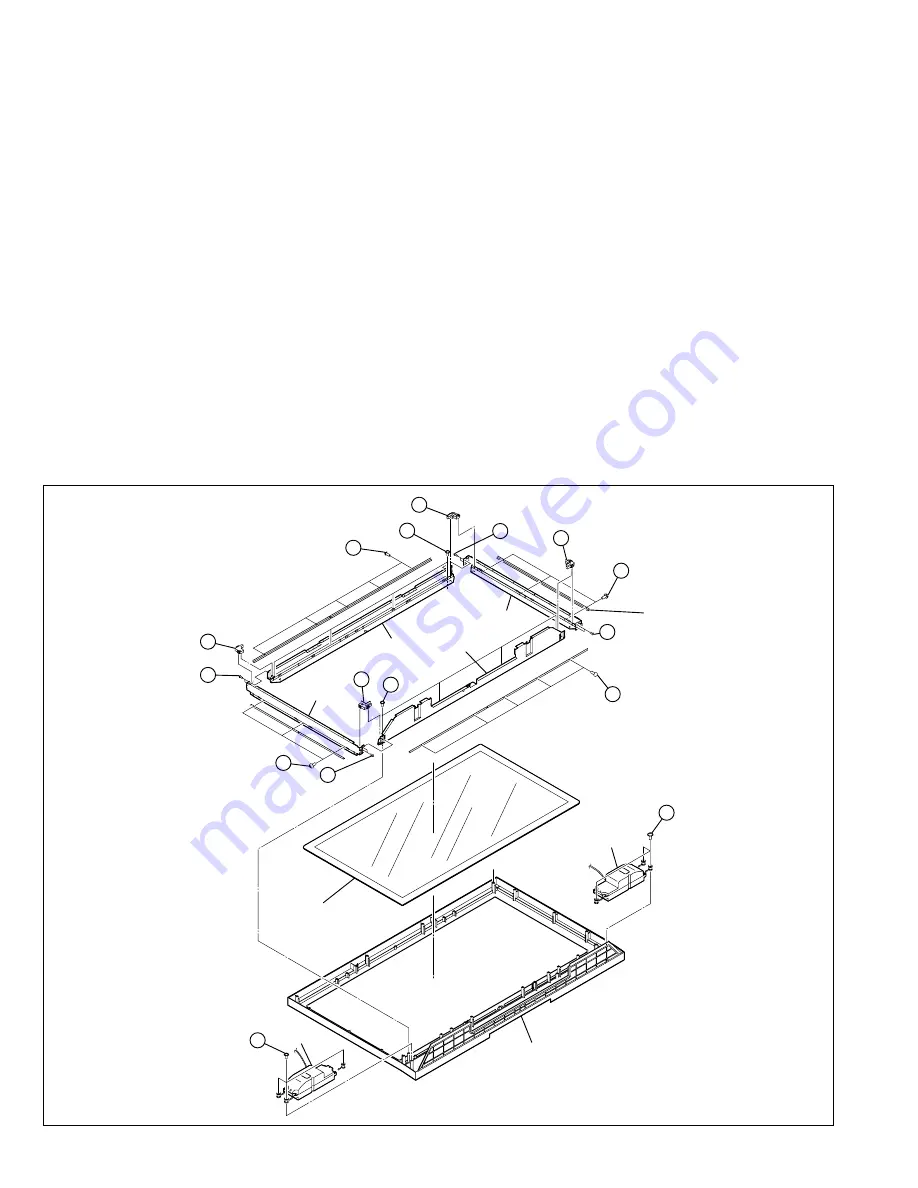
(1) Remove the 8 screws [x].
(2) Lift the FRAME BRACKETS and FRONT FILTER upright
and remove it with enough care not to damage the FRONT
FILTER.
(3) Remove the FRONT PANEL.
(4) Remove the 16 screws [y], and remove the FILTER
BRACKET.
(5) Remove the FRONT FILTER.
3.1.21 REMOVING THE TOP FRAME, BOTTOM FRAME AND SIDE
FRAME (Fig.5)
•
Remove the REAR COVER
•
Remove the CENTER COVER.
•
Remove the CHASSIS SHIELD COVER.
•
Remove the TERMINAL COVER.
•
Remove the MAIN BASE, CHASSIS BASE and AUDIO PWB
BASE (with each PWB affixed on the MAIN BASE, CHASSIS
BASE and AUDIO PWB BASE).
•
Remove the PDP UNIT.
•
Remove the FRONT FILTER.
(1) Remove the 4 bosses [z] and the 8 screws [AA], and remove
the TOP FRAME, BOTTOM FRAMEand SIDE FRAME.
y
z
z
z
z
FILTER
BRACKET
FRONT FILTER
(x5)
AA
(x2)
x
(x4)
y
(x3)
AA
(x2)
y
(x5)
w
(x3)
w
SPEAKER
(x3)
AA
(x2)
y
(x3)
x
(x4)
AA
(x2)
TOP FRAME
BOTTOM
FRAME
SIDE FRAME
SIDE FRAME
f
FRONT PANEL
SPEAKER
Fig. 5
f
3.1.19 REMOVING THE SPEAKER (Fig.5)
•
Remove the REAR COVER
•
Remove the CENTER COVER.
•
Remove the CHASSIS SHIELD COVER.
•
Remove the TERMINAL COVER.
•
Remove the MAIN BASE, CHASSIS BASE and AUDIO PWB
BASE (with each PWB affixed on the MAIN BASE, CHASSIS
BASE and AUDIO PWB BASE).
(1) Remove the 3 screws [w], and remove the SPEAKER.
(2) Follow the same steps when removing the other hand
SPEAKER.
CAUTION:
•
Please do not disassembly the SPEAKER.
3.1.20 REMOVING THE FRONT PANEL AND THE FRONT FILTER
(Fig.5)
•
Remove the REAR COVER
•
Remove the CENTER COVER.
•
Remove the CHASSIS SHIELD COVER.
•
Remove the TERMINAL COVER.
•
Remove the MAIN BASE, CHASSIS BASE and AUDIO PWB
BASE (with each PWB affixed on the MAIN BASE, CHASSIS
BASE and AUDIO PWB BASE).
•
Remove the PDP UNIT.


