PD-42DX
1-12 (No.52088)
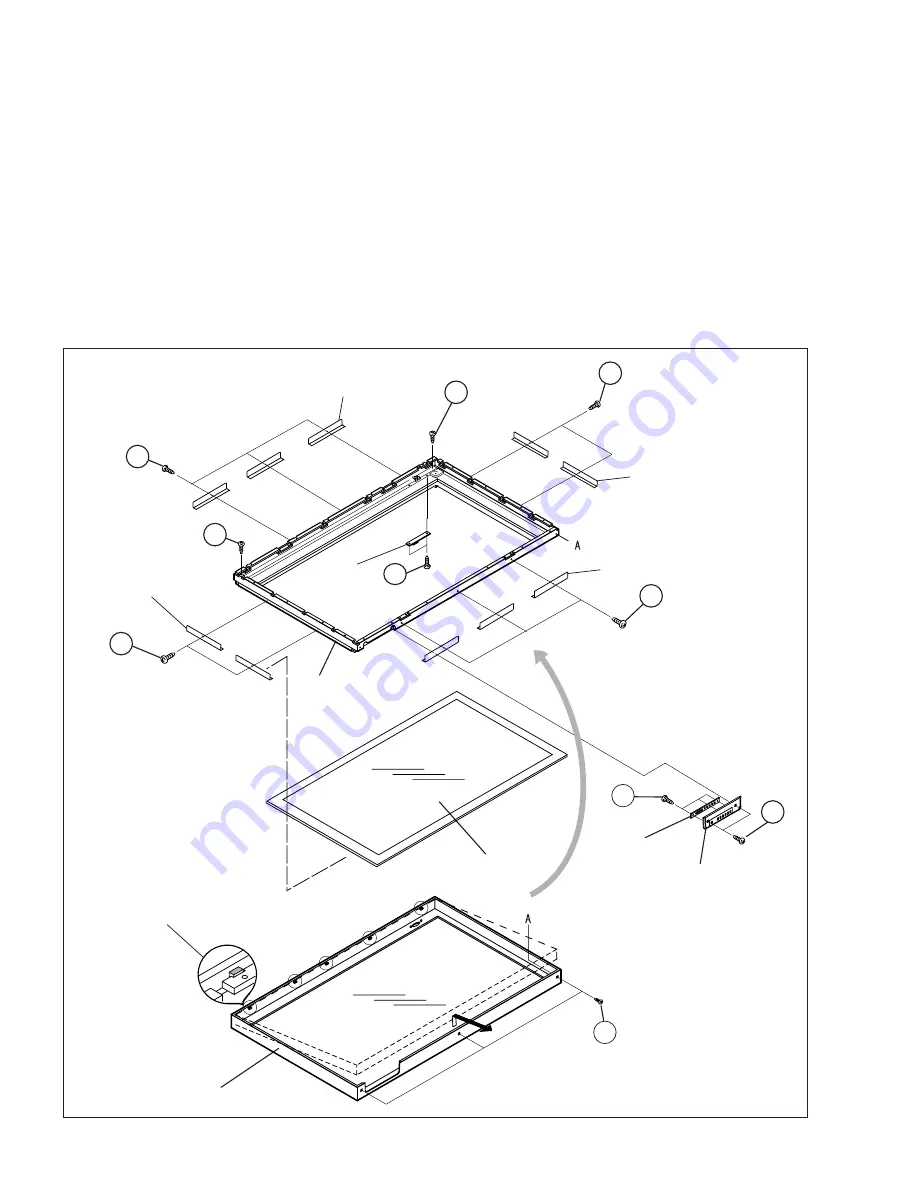
2.4.10 REMOVING THE INNER CASE (Fig.6)
• Remove the REAR COVER.
• Remove the TERMINAL COVER.
• Remove the the CHASSIS BASE (with each PWB attached to
the CHASSIS BASE).
• Remove the PDP unit.
(1) Remove the 2 screws [V] and 3 screws [W].
(2) Lift the INNER CASE to about the height of the FRONT
PANEL frame, withdraw it in a front direction and remove it
from the 5 guiding bosses located at the top of the FRONT
PANEL.
CAUTION:
• The INNER CASE is attached with the filter (made of
glass). Be careful not to impose shock to it.
2.4.11 REMOVING THE DISPLAY SW PWB (Fig.6)
• Remove the INNER CASE.
(1) Remove the 2 screws [X], and remove the DISPLAY LED
PWB.
2.4.12 REMOVING THE PANEL SW PWB (Fig.6)
• Remove the INNER CASE.
(1) Remove the 2 screws [Y], and remove the CONTROL
BASE.
(2) Remove the 3 screws [Z], and remove the DISPLAY
SWITCH PWB.
2.4.13 REMOVING THE FRONT FILTER (Fig.6)
• Remove the INNER CASE.
(1) Remove the 10 screws [a], and remove the 10 FILTER
BRACKETS.
(2) Remove the FRONT FILTER with enough care not to
damage it.
Fig.6
Y
Z
DISPLAY LED
PWB
DISPLAY
SWITCH PWB
CONTROL BASE
FRONT FILTER
INNER CASE
FRONT PANEL
(x2)
(x3)
FILTER BRACKET
X
(x2)
W
V
(x3)
V
(x2)
BOSS
(x5)
a
(x2)
a
(x2)
a
(x3)
FILTER BRACKET
(x3)
FILTER BRACKET
(x2)
a
(x3)
FILTER BRACKET
(x3)
Summary of Contents for PD-42DX
Page 47: ...PD 42DX No 52088 1 47 ...


