background image

English

20

Action

Check all connections and make corrections.
(See page 4.)

Disconnect the headphones.

Cover the holes on the back edge of the cassette
with tape.

Fully extend the FM telescopic antenna and turn it
for the best reception.

Clean or replace the CD.

Put the CD in with the label side up.

Remove the obstruction.

Replace the batteries.

Unplug the System then plug it back in after a few
minutes.

Plug in the AC adaptor and press the 
STANDBY/ON button.

Possible Cause

Connections are incorrect, or loose.

Headphones are connected.

Cassette record protect tabs are removed.

The FM telescopic antenna is not properly
extended and positioned.

The CD is dirty or scratched.

The CD is upside down.

The path between the Remote Control and the
sensor on the Unit is blocked.

The batteries have lost their charge.

The built-in microprocessor has malfunctioned
due to external electrical interference.

During tape playing, the AC adaptor was
unplugged.

Symptom

No sound is heard.

Unable to record.

Poor FM reception

The CD skips.

The CD does not play.

Unable to operate the Remote Control.

Operations are disabled.

The cassette holder cannot be opened.
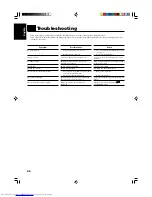
Troubleshooting

If you are having a problem with your System, check this list for a possible solution before calling for service.

If you cannot solve the problem from the hints given here, or the System has been physically damaged, call a qualified person, such as
your dealer, for service.

Summary of Contents for RS-WP1WT

Page 1: ... CLOCK TIMER TIMER ON OFF PROGRAM RANDOM REPEAT BAND DISPLAY AHB PRO REVERSEMODE MULTI CONTROL FM MODE REW FF RM SRSWP1J REMOTE CONTROL TAPE TUNER C D DOWN UP SET AUX VOLUME BASS TREBLE STAND BY ON AUTO PRESET VOLUM E VOLUM E AUX T U NER TAPE CD ASP SPL A S H R E S I S T A N T A N T I S H O C K P R O T E C TION O P E N O N E TOUCH R E C MULTI CONTROL REW FF STANDBY CD PORTABLE SYSTEM RS WP1 BAND S...

Page 2: ...e product s enclosure that may be of sufficient magnitude to constitute a risk of electric shock to persons The exclamation point within an equilateral triangle is intended to alert the user to the presence of important operating and maintenance servicing instructionsintheliteratureaccompanying the appliance Reorient or relocate the receiving antenna Increase the separation between the equipment a...

Page 3: ...r secteur et de la télécommande est fourni avec une fonction étanche aux gouttes L étanchéité n est néanmoins plus garantie dans les conditions suivantes Si l un des capuchons de protection des prises casque DC IN et AUX IN est absent Si le volet est ouvert Lorsque le couvercle de la batterie est détaché Si l appareil est humide essuyez le avec un chiffon doux et sec avant de le réutiliser Respect...

Page 4: ...rt recording LV42605 001B Remarques Cet appareil est susceptible d être bruyant en fonction de la position de l adaptateur secteur Installez l appareil et l adaptateur CA comme indiqué sur la figure Cet appareil est équipé de deux capteurs de signaux de télécommande un sur le panneau avant et l autre sur le panneau arrière Si vous utilisez la télécommande pour piloter votre appareil alors que vous...

Page 5: ...the table of contents to look up specific information you require We ve enjoyed making this manual for you and hope it serves you in enjoying the many features built into your System IMPORTANT CAUTIONS 1 Where to place the System Select a place which is level dry and neither too hot nor too cold Between 0 C and 40 C or 32 F and 104 F Leave sufficient distance between the System and a TV When insta...

Page 6: ...ave all of the following items which are supplied with the System AC adaptor 1 Remote Control 1 Shoulder Strap 1 If any of these items are missing contact your dealer immediately How To Carry the System To carry the System attach the supplied shoulder strap to the System as shown in the figure To remove the strap reverse the attaching procedure The shoulder strap is adjustable in length and has th...

Page 7: ...el within 1 m 3 3 feet When remote controlling this Unit while carrying it piggyback point the Remote Control to the remote sensor on the rear panel Notes If you point the Remote Control from the slant direction the above distance will be shortened When you use the Remote Control from a short distance while receiving broadcasting noise may occur However this is not malfunction The Remote Control o...

Page 8: ... a soft surface so as not to damage it and facilitate insertion CAUTION Handle batteries properly To avoid battery leakage or explosion Remove 8 batteries when the System will not be used for a long time When you need to replace the batteries replace all batteries at the same time with new ones Don t use an old battery with new ones Don t use different types of batteries together CAUTIONS ONLY USE...

Page 9: ...ou use the car adaptor otherwise the car battery will be exhausted During transport stabilize the System in a box etc To prevent malfunctions do not leave the System in a car for a long time Attaching the removed door To prevent the unit from toppling down accidentally the door has been designed to come off when it is pushed with a strong force from the upper direction while it is open When the do...

Page 10: ... Batteries STANDBY indicator Display The STANDBY indicator lights when the power is turned off Backlighting of the display is illuminated when power is turned on The STANDBY indicator does not light Backlighting of the display is not illuminated However the backlighting is illuminated for a few seconds after operation PHONES PHONES Some power is always consumed even though power is turned off call...

Page 11: ...your hearing speakers and or headphones For private listening Connect a pair of headphones to the PHONES jack No sound comes out of the speakers Be sure to turn down the volume before connecting or putting on headphones Note Do not pull the headphone cord with a strong force when headphones are connected to the System Otherwise the System may fall down Active Hyper Bass Pro You can enhance the bas...

Page 12: ...play using the 7 button on the Unit or the number keys on the Remote control After 1 second the display will show the preset number s band and frequency On the Unit 7 button Each time you press the button the preset number increases On the Remote Control Number keys To select P 5 press 5 To select P 15 press 10 then 5 To select P 20 press 10 once then press 10 3 Turn the FM antenna for the best re...

Page 13: ...nt to store in memory with a preset number To change the preset stations repeat the same steps as above to overwrite a new station Auto Presetting In each band you can automatically preset FM 30 AM 15 stations Preset numbers will be allocated as stations are found starting from the lowest station and moving up the frequency 1 Select a band either AM or FM FM MONO by pressing the TUNER BAND button ...

Page 14: ... need to know to play a CD and locate the different tracks on it The Quickest Way To Start a CD Is With the One Touch Operation effective only when the System is operated on AC power or car battery DC12V Press the CD 6 button The power is automatically turned on If a CD is already inserted it will start playing from the first track If no CD is inserted NO DISC appears on the display and the CD Pla...

Page 15: ... in the programmed order To delete all the tracks in the program press the 7 button on the Remote Control repeatedly until all the tracks are cleared Turning off the power or opening the door will also clear the programmed tracks To exit Program mode while the CD Player is stopped press the PROGRAM button to turn off the PRGM indicator To restore Program mode in Stop mode press the same button to ...

Page 16: ...kwise and open the cassette holder by pressing the 0 button To Fast Wind A Tape Press the or 4 button to fast wind the tape The Tape Direction indicator 3 or 2 will rapidly blink on the display The Cassette Deck automatically stops when the tape reaches its end The following table shows the relationship between the Tape Direction indicator and the actual tape travelling direction in each mode The ...

Page 17: ...ng If you record on a tape with the volume level kept at a high level recorded sounds may be distorted To avoid this turn down the volume level before you start recording SLEEP CLOCK TIMER TIMER ON OFF PROGRAM RANDOM REPEAT BAND DISPLAY AHB PRO REVERSEMODE MULTI CONTROL FM MODE REW FF RM SRSWP1U REMOTE CONTROL TAPE TUNER C D DOWN UP SET AUX VOLUME BASS TREBLE STAND BY ON AUTO PRESET 7 6 TAPE TUNER...

Page 18: ...erasable cassette tape into the Cassette Deck 2 Play the track on the CD you wish to record 3 Press the ONE TOUCH REC button on the Unit for more than two seconds The CD Player returns to the beginning of that track and the track is recorded on the tape After recording the CD Player and the Cassette Deck automatically stop Tape Direction indicator Tape insertion direction Front view 2 If you want ...

Page 19: ...sired listening level 4 Apply sound effects if you wish Adjust the BASS TREBLE to control the tone See Active Hyper Bass Pro and Tone Control BASS TREBLE on page 8 Note For operation of the auxiliary equipment refer to its Instructions SLEEP CLOCK TIMER TIMER ON OFF PROGRAM RANDOM REPEAT BAND DISPLAY AHB PRO REVERSEMODE MULTI CONTROL FM MODE REW FF RM SRSWP1U REMOTE CONTROL TAPE TUNER C D DOWN UP ...

Page 20: ...r Once you have set the Timer the timer will be activated at the same time every day except for the Tuner REC timer which is used to record a broadcast on the tape It can be cancelled and reactivated whenever you wish The Timer indicator on the display shows when the Timer you have set is in effect Use the Remote Control to set the Timer Note Perform each setting within 30 seconds Otherwise settin...

Page 21: ...imer settings press the TIMER button Then press the SET button repeatedly to see the current timer settings ON time OFF time source and volume To change the timer setting repeat the setting procedure from the beginning Note It is recommended to power the System from the AC adaptor when you set recording by timer CAUTION If no battery is loaded in the unit and it left with the AC adaptor unplugged ...

Page 22: ...ble from a camera store to blow dust off the lens If there are fingerprints etc on the lens gently wipe clean with a cotton swab Moisture Condensation Moisture may condense on the lens inside the System in the following cases After turning on heating in the room In a damp room If the System is brought directly from a cold to a warm place Should this occur the System may malfunction In this case le...

Page 23: ...operly extended and positioned The CD is dirty or scratched The CD is upside down The path between the Remote Control and the sensor on the Unit is blocked The batteries have lost their charge The built in microprocessor has malfunctioned due to external electrical interference During tape playing the AC adaptor was unplugged Symptom No sound is heard Unable to record Poor FM reception The CD skip...

Page 24: ...ning Range 87 5 MHz 108 0 MHz AM Tuner Tuning Range 530 kHz 1 710 kHz Antenna FM telescopic antenna Ferrite core antenna for AM Speakers Full range 10 cm 4 2 4 Ω Passive cone 10 cm 4 2 General Dimensions 411 mm 456 mm 234 mm W H D 16 3 16 18 9 1 4 Mass 5 1 kg 11 3 lbs without batteries 5 9 kg 13 1 lbs with batteries Accessories AC adaptor 1 Remote Control 1 Shoulder Strap 1 Power Specifications Po...

Page 25: ...0201SKMWSTJEM EN VICTOR COMPANY OF JAPAN LIMITED ...

Reviews: