background image

12

Setting the Speakers for the DSP Modes

To obtain the best possible surround sound of the DSP modes, you
have to register the information about the speakers arrangement
after all connections are completed.

Before you start, remember...
• There is a time limit in doing the following steps. If the setting is

canceled before you finish, start from step 1 again.

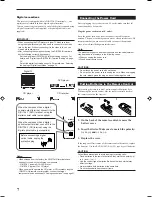
Front, Center, and Rear Speaker Setting

Register the sizes of all the connected speakers.
• When you change your speakers, you need to register the

information about the speakers again.

On the front panel ONLY:

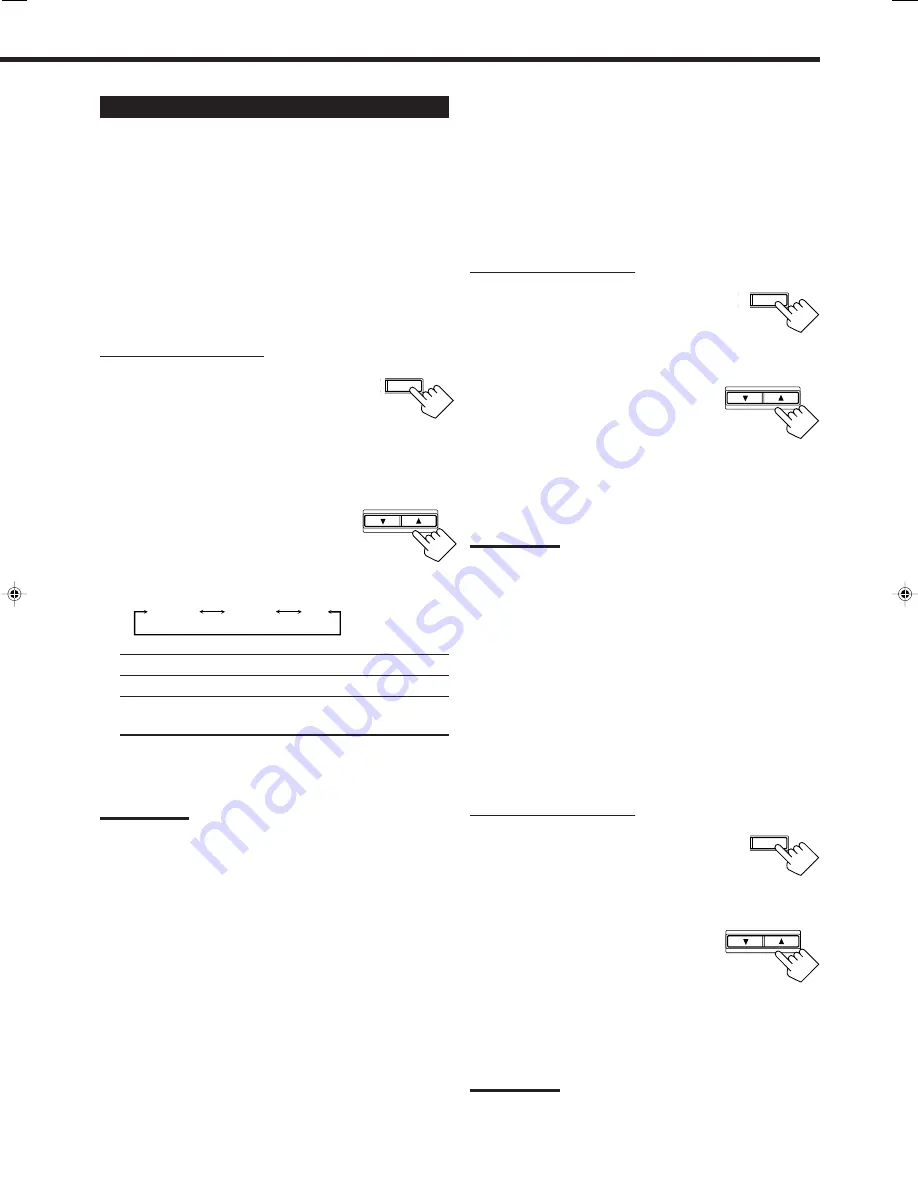
1. Press SETTING repeatedly until

“FRONT SPK” (Front Speaker),
“CENTER SPK” (Center Speaker),
or “REAR SPK” (Rear Speaker)
appears on the display.

The display changes to show the current setting.

2. Press CONTROL UP 

5

/DOWN 

to select the appropriate item
about the speaker selected in the
above step.

• Each time you press the button, the display changes

to show the following:

LARGE: Select this when the speaker size is relatively large.

SMALL: Select this when the speaker size is relatively small.

NO:

Select this when you have not connected a speaker.
(Not selectable for the front speakers)

3. Repeat steps 1 and 2 to select the appropriate

items for the other speakers.

Notes:

• Keep the following comment in mind as reference when adjusting.

– If the size of the cone speaker unit built in your speaker is greater

than 4 

3

/

4

 inches (12 cm ), select “LARGE,” and if it is smaller

than 4 

3

/

4

 inches (12 cm ), select “SMALL.”

• If you have selected “NO” for the subwoofer setting, you can only

select “LARGE” for the front speaker setting.

• If you have selected “SMALL” for the front speaker setting, you

cannot select “LARGE” for the center and rear speaker settings.

ST SETTING

CONTROL

DOWN

UP

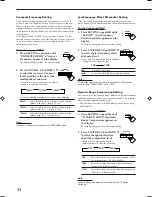
Center Delay Time Setting

Register the delay time of the sound from the center speaker,
comparing to that of the sound from the front speakers.
If the distance from your listening point to the center speaker is
equal to that to the front speakers, select 0 msec. As the distance to
the center speaker becomes shorter, the delay time increases .
• 1 msec increase (or decrease) in delay time corresponds to

11 

13

/

16

 inches (30 cm) decrease (or increase) in distance.

• When shipped from the factory, delay time is set to 0 msec.

On the front panel ONLY:

1. Press SETTING repeatedly until

“CENTER DELAY” appears on
the display.

The display changes to show the current setting.

2. Press CONTROL UP 

5

/DOWN 

to select the delay time of the
center speaker output.

• Pressing CONTROL UP 

5

 increases the

delay time from 0 msec (“C_DELAY 0MS”)
to 5 msec (“C_DELAY 5MS”).

• Pressing CONTROL DOWN 

 decreases the

delay time from 5 msec (“C_DELAY 5MS”)
to 0 msec (“C_DELAY 0MS”).

Note:

You cannot adjust the center delay time when you have set “CENTER
SPK” to “NO.”

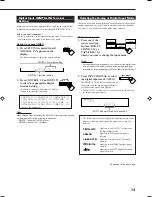
Rear Delay Time Setting

Register the delay time of the sound from the rear speakers,
comparing to that of the sound from the front speakers.
If the distance from your listening point to the rear speakers is equal
to that to the front speakers, select 0 msec. As the distance to the
rear speakers becomes shorter, the delay time increases.
• 1 msec increase (or decrease) in delay time corresponds to

11 

13

/

16

 inches (30 cm) decrease (or increase) in distance.

• Rear delay time for Dolby Digital and DTS Digital Surround is to

be set to 5 msec.

• When shipped from the factory, delay time is set to 5 msec.

On the front panel ONLY:

1. Press SETTING repeatedly until

“REAR DELAY” appears on the
display.

The display changes to show the current setting.

2. Press CONTROL UP 

5

/DOWN 

to select the delay time of the rear
speaker output.

• Pressing CONTROL UP 

5

 increases the

delay time from 0 msec (“R_DELAY 0MS”)
to 15 msec (“R_DELAY 15MS”).

• Pressing CONTROL DOWN 

 decreases the

delay time from 15 msec (“R_DELAY 15MS”)
to 0 msec (“R_DELAY 0MS”).

Note:

You cannot adjust the rear delay time when you have set “REAR SPK”
to “NO.”

ST

SETTING

CONTROL

DOWN

UP

T

SETTING

LARGE

SMALL

NO

CONTROL

DOWN

UP

EN08-20.RX-6010&6012R[B]_f

01.1.9, 6:39 PM

12

Summary of Contents for RX-6010RBK

Page 1: ...ENTER 5 9 8 REAR L VCR CH 5 TV VCR AUDIO SLEEP 10 10 REAR R MENU ENTER 5 TAPE CDR FM AM MUTING CD TV SOUND VCR ANALOG DIGITAL TV VOL TV CH DVD VOLUME 8 7 P RM SRX6010R A V CONTROL RECEIVER 3 2 PTY PTY PTY SEARCH DVD VCR TV SOUND ADJUST AUDIO VIDEO CONTROL RECEIVER SETTING MASTER VOLUME CONTROL DOWN UP CD TAPE CDR SOURCE NAME INPUT DIGITAL INPUT ANALOG SPEAKERS ON OFF DSP MODE PHONES SURROUND ON OF...

Page 2: ...plug proceed as follows The wire which is coloured blue must be connected to the terminal which is marked with the letter N or coloured black The wire which is coloured brown must be connected to the terminal which is marked with the letter L or coloured red IF IN DOUBT CONSULT A COMPETENT ELECTRICIAN CAUTION To reduce the risk of electrical shocks fire etc 1 Do not remove screws covers or cabinet...

Page 3: ...s may need to be made for infirm or handicapped people DON T use equipment such as personal stereos or radios so that you are distracted from the requirements of traffic safety It is illegal to watch television whilst driving DON T listen to headphones at high volume as such use can permanently damage your hearing DON T obstruct the ventilation of the equipment for example with curtains or soft fu...

Page 4: ... Name 11 Setting the Speakers for the DSP Modes 12 Digital Input DIGITAL IN Terminal Setting 14 Selecting the Analog or Digital Input Mode 14 Storing the Basic Settings and Adjustments 15 Using the Sleep Timer 15 Receiving Radio Broadcasts 16 Tuning in Stations Manually 16 Using Preset Tuning 16 Selecting the FM Reception Mode 17 Using the RDS Radio Data System to Receive FM Stations 18 Searching ...

Page 5: ...IDEO button 30 7 CD DISC button 30 8 Source selecting buttons 8 9 15 DVD TV SOUND VCR CD TAPE CDR FM AM 9 TV VOL buttons 30 p TV CH buttons 30 q 10 keys for selecting preset channels 17 10 keys for adjusting sound 24 26 29 10 keys for operating audio video components 29 30 w ANALOG DIGITAL button 15 e MUTING button 9 r VOLUME buttons 9 t RDS operation buttons 18 19 PTY SEARCH PTY DISPLAY Operating...

Page 6: ...cessories Check to be sure you have all of the following items which are supplied with the receiver The number in the parentheses indicates the quantity of the pieces supplied Remote Control 1 Batteries 2 AM MW LW Loop Antenna 1 FM Antenna 1 If anything is missing contact your dealer immediately Connecting the FM and AM MW LW Antennas FM Antenna Connections ANTENNA AM LOOP FM 75 COAXIAL AM EXT AM ...

Page 7: ... emphasize human voices One subwoofer to enhance the bass IMPORTANT After connecting the speakers listed above set the speaker setting information properly to obtain the best possible DSP effect For details see page 12 For each speaker except for a subwoofer connect the and terminals on the rear panel to the and terminals marked on the speakers For connecting a subwoofer see page 5 CAUTION Use spe...

Page 8: ...ctions Audio component connections Use the cables with RCA pin plugs not supplied Connect the white plug to the audio left jack and the red plug to the audio right jack CAUTION If you connect a sound enhancing device such as a graphic equalizer between the source components and this receiver the sound output through this receiver may be distorted Audio Components Video Components CD player DVD pla...

Page 9: ...r DTS Digital Surround you must connect the DVD player using the digital terminal on the rear of this receiver See Digital connections on page 7 TV VIDEO VCR OUT REC IN PLAY MONITOR OUT DVD VCR OUT REC IN PLAY TAPE CDR CD OUT REC IN PLAY AUDIO RIGHT LEFT TV SOUND TV To audio output To video input Connect the TV to the MONITOR OUT jack to view the playback picture from the other connected video com...

Page 10: ...time Do not expose batteries to heat or flame Digital connections This receiver is equipped with two DIGITAL IN terminals one digital coaxial terminal and one digital optical terminal You can connect any component to one of the digital terminals using a digital coaxial cable not supplied or digital optical cable not supplied IMPORTANT When connecting the DVD player or digital TV broadcast tuner us...

Page 11: ...es When connecting a CD recorder to the TAPE CDR jacks change the source name that appears on the display See page 11 for details When you have connected some digital source components using the digital terminals see page 7 you need to select the digital input mode When you press one of the source selecting buttons on the remote control marked above with an asterisk the receiver automatically turn...

Page 12: ...with Headphones You must turn off speakers when you listen with headphones 1 Connect a pair of headphones to the PHONES jack on the front panel 2 Press SPEAKERS ON OFF so that the SPK indicator disappears from the display This cancels the DSP mode currently selected and activates the HEADPHONE mode see below HEADPHONE appears and H PHONE indicator lights up on the display HEADPHONE mode This mode ...

Page 13: ...ceiver memorizes the adjustment On the front panel ONLY Press and hold INPUT ATT so that the INPUT ATT indicator lights up on the display Each time you press and hold the button the Input Attenuator mode turns on INPUT ATT ON or off INPUT NORMAL ADJUST SETTIN L S WFR SPK ANALOG R L S WFR SPK ANALOG R CONTROL DOWN UP SOUND 3 2 SUBWOOFER INPUT ANALOG INPUT ATT L SPK INPUT ATT ANALOG R L SPK ANALOG R...

Page 14: ... Setting the Subwoofer Information Register whether you have connected a subwoofer or not Before you start remember There is a time limit in doing the following steps If the setting is canceled before you finish start from step 1 again On the front panel ONLY 1 Press SETTING repeatedly until SUBWOOFER appears on the display The display changes to show the current setting 2 Press CONTROL UP 5 DOWN ...

Page 15: ...m the front speakers If the distance from your listening point to the center speaker is equal to that to the front speakers select 0 msec As the distance to the center speaker becomes shorter the delay time increases 1 msec increase or decrease in delay time corresponds to 11 13 16 inches 30 cm decrease or increase in distance When shipped from the factory delay time is set to 0 msec On the front ...

Page 16: ...Frequency Effect Attenuator Setting If the bass sound is distorted while playing back a source using Dolby Digital or DTS Digital Surround follow the procedure below On the front panel ONLY 1 Press SETTING repeatedly until LFE ATT Low Frequency Effect Attenuator appears on the display The display changes to show the current setting 2 Press CONTROL UP 5 DOWN to select the low frequency effect atten...

Page 17: ...l source components using both the analog connection see page 5 and the digital connection methods see page 7 you need to select the input mode correctly On the front panel 1 Press one of the source selecting buttons DVD TV SOUND CD or TAPE CDR for which you want to change the input mode Note Among the sources listed above you can select the digital input only for the sources which you have select...

Page 18: ...the Sleep Timer CONTROL DOWN UP DTS Digital AUTO Digital INPUT ANALOG INPUT ATT TAPE CDR CD TV SOUND DVD ANALOG DIGITAL When playing a software encoded with the DTS Digital Surround AUTO may not work properly and the following symptoms may occur Sound does not come out at the beginning of playback Noise comes out while using the searching or skipping function In this case press CONTROL UP 5 DOWN t...

Page 19: ...ternates between FM and AM MW LW 2 Press FM AM TUNING 5 until you find the frequency you want Pressing FM AM TUNING 5 increases the frequency Pressing FM AM TUNING decreases the frequency Notes When you hold FM AM TUNING 5 in step 2 the frequency keeps changing until a station is tuned in When a station of sufficient signal strength is tuned in the TUNED indicator lights up on the display When an ...

Page 20: ... AUTOMUTING TUNED STEREO ANALOG R L SPK TUNED ANALOG R To tune in a preset station On the front panel 1 Press FM AM to select the band FM or AM MW LW The last received station of the selected band is tuned in 2 Press FM AM PRESET 5 until you find the channel you want Pressing FM AM PRESET 5 increases the channel numbers Pressing FM AM PRESET decreases the channel numbers From the remote control 1 ...

Page 21: ...ters A for instance may stand for accented A s like Å Ä Ã Á À and  Searching for a Program by PTY Codes One of the advantages of the RDS service is that you can locate a particular kind of program from the preset channels see page 16 by specifying the PTY codes To search for a program using the PTY codes Before you start remember The PTY Search is only applicable to preset stations To stop search...

Page 22: ...TA and or INFO from a different station except in the following cases When you are listening to non RDS stations all AM MW LW and some FM stations When the last received FM station is a non RDS station When the receiver is in standby mode Before you start remember The EON function is only applicable to preset stations On the front panel ONLY 1 Press EON so that the last selected program type appea...

Page 23: ... currently tuned station is received finally and the indication of the EON program type flashing on the display disappears CASE 1 If there is no station broadcasting the program you have selected The receiver continues playing the current source all sources except AM MW LW When a station starts broadcasting the program you have selected the receiver automatically switches to the station The indica...

Page 24: ...terference therefore you can obtain much better sound quality with much stereo and surround effects The Dolby Digital decoder built in this receiver can create much more realistic sound field in your listening room You may feel as if you were in a real theater In addition Dolby Digital enables stereo rear sounds and sets the cutoff frequency of the rear treble at 20 kHz compared to 7 kHz for Dolby...

Page 25: ...CLUB Gives the feeling of a live music club with a low ceiling DANCE CLUB Gives a throbbing bass beat HALL Gives clear vocal and the feeling of a concert hall PAVILION Gives the spacious feeling of a pavilion with a high ceiling Reproducing the Sound Field The sound heard in a concert hall or club consists of direct sound and indirect sound early reflections and reflections from behind Direct soun...

Page 26: ...sing SURROUND MODE SURROUND ON DOLBY PRO LOGIC DOLBY DIGITAL or DTS SURROUND THEATER LIVE CLUB DANCE CLUB HALL PAVILION DSP OFF DSP mode is canceled Each time you press DSP MODE on the front panel or SURROUND MODE on the remote control the DSP modes change as follows Each time you press DSP MODE on the front panel or SURROUND MODE on the remote control the DSP modes change as follows By pressing D...

Page 27: ...tment is memorized for each Surround mode Dolby and DTS Surround adjustments Before you start remember Make sure that you have set the speaker information correctly see page 12 There is a time limit in doing the following steps If the setting is canceled before you finish start from step 3 again You cannot adjust the rear speaker output levels when you have set REAR SPK to NO See page 12 You canno...

Page 28: ...ess REAR L from 10 dB to 10 dB To adjust the right rear speaker level press REAR R from 10 dB to 10 dB 5 Press TEST again to stop the test tone 6 Press EFFECT to select an effect level you want Each time you press the button the effect level changes as follows As the number increases JVC Theater Surround becomes stronger normally set it to DSP EFFECT 3 On the front panel You can also use the butto...

Page 29: ...djust the other speaker output level 3 Adjust the effect level 1 Press ADJUST repeatedly until DSP EFFECT appears on the display The display changes to show the current setting 2 Press CONTROL UP 5 DOWN to select the effect level Each time you press the button the effect level changes as follows As the number increases the selected DAP mode becomes stronger normally set it to DSP EFFECT 3 CONTROL ...

Page 30: ... Pro Logic play back a software encoded with Dolby Surround and labeled with DOLBY SURROUND mark To enjoy Dolby Digital play back a software encoded with Dolby Digital and labeled with D I G I T A L mark To enjoy DTS Digital surround play back a software encoded with DTS Digital Surround and labeled with mark To cancel the Dolby DTS Surround mode Press SURROUND again SURROUND OFF appears on the di...

Page 31: ...PU LINK 4 SYNCHRO Cassette deck or CD recorder CD player To use this remote control system you need to connect JVC audio components through the COMPU LINK SYNCHRO jacks see below in addition to the connections using cables with RCA pin plugs see page 5 Make sure that the AC power cords of these components are unplugged before connection Plug the AC power cords only after all connections are comple...

Page 32: ...lifier You can always perform the following operations SURROUND Turns on or off the Surround modes Dolby Pro Logic Dolby Digital and DTS Digital Surround SURROUND MODE Selects the DSP modes After pressing SOUND you can perform the following operations SUBWOOFER Adjusts the subwoofer output level CENTER Adjusts the center speaker output level REAR L Adjusts the left rear speaker output level REAR R...

Page 33: ...discs or the DVD player TV You can always perform the following operations TV Turns on or off the TV in the standby on section TV VIDEO Sets the input mode either TV or VIDEO TV VOL Adjusts the volume TV CH Changes the channels CD changer After pressing CD DISC you can perform the following operations on a CD changer 3 3 3 3 3 Starts playing 4 4 4 4 4 Returns to the beginning of the current or pre...

Page 34: ...e front panel then check the speaker wiring If OVERLOAD does not disappear unplug the AC power cord then plug it back again If speaker wiring is not short circuited contact your dealer Press STANDBY ON on the front panel to turn off the receiver After unplugging the power cord consult your dealer Press STANDBY ON on the front panel to turn off the receiver After unplugging the power cord consult y...

Page 35: ... CD TAPE CDR TV SOUND VCR DVD 20 Hz to 20 kHz 1 dB Tone Control Bass 100 Hz 10 dB Treble 10 kHz 10 dB Video Video Input Sensitivity Impedance Composite video VCR DVD 1 V p p 75 Ω Video Output Level Composite video VCR MONITOR OUT 1 V p p 75 Ω Synchronization Negative Signal to Noise Ratio 45 dB FM tuner IHF Tuning Range 87 50 MHz to 108 00 MHz Usable Sensitivity Monaural 17 0 dBf 1 95 µV 75 Ω 50 d...

Page 36: ...EN 0301NHMMDWJEIN J VC VICTOR COMPANY OF JAPAN LIMITED ...

Reviews: