background image

VICTOR COMPANY OF JAPAN, LIMITED

EN, FR

0202NHMMDWJEIN

J

V

C

RX-7520VBK[C]Cover.pm5

02.2.14, 4:30 PM

2

Summary of Contents for RX-7520VBK

Page 1: ...X 7520VBK DVD VCR TV SOUND ADJUST RX 7520V AUDIO VIDEO CONTROL RECEIVER SETTING MASTER VOLUME CONTROL DOWN UP CD TAPE CDR SOURCE NAME BASS BOOST INPUT ANALOG DIGITAL SPEAKERS ON OFF SURROUND MODE PHONES SURROUND ON OFF FM AM TUNING STANDBY STANDBY ON FM AM PRESET FM MODE MEMORY INPUT ATT AM DVD MULTI FM 1 2 COMPULINK Remote FM MODE MANUAL D INSTRUCTIONS AUDIO VIDEO CONTROL RECEIVER RECEPTEUR DE CO...

Page 2: ...s Reorient or relocate the receiving antenna Increase the separation between the equipment and receiver Connect the equipment into an outlet on a circuit different from that to which the receiver is connected Consult the dealer or an experienced radio TV technician for help Changes or modifications not expressly approved by the manufacturer for compliance could void the user s authority to operate...

Page 3: ... plus RX 7520VBK Front Avant Wall or obstructions Mur ou obstruction Floor Plancher Stand height 15 cm or more Hauteur du socle 15 cm ou plus Attention Ventilation Correcte Pour éviter les chocs électriques l incendie et tout autre dégât Disposerl appareilentenantcomptedesimpératifssuivants Avant Rien ne doit gêner le dégagement Flancs Laisser 10 cm de dégagement latéral Dessus Laisser 10 cm de dé...

Page 4: ...put Signal 19 Adjusting the Front Speakers Output Balance 19 Adjusting the Tone 20 Adjusting the Subwoofer Output Level 20 Reinforcing the Bass 20 Tuner Operations 21 Tuning in Stations Manually 21 Using Preset Tuning 21 Selecting the FM Reception Mode 22 Creating Realistic Sound Fields 23 About Relations between Speaker Layouts and Surround Modes 25 Using Dolby Pro Logic II Dolby Digital and DTS ...

Page 5: ...ton 25 27 29 e SURROUND MODE button 25 27 29 r INPUT ANALOG DIGITAL button 15 INPUT ATT button 19 t SPEAKERS ON OFF 1 and 2 buttons 11 12 y BASS BOOST button 20 u SOURCE NAME button 11 i Source selecting buttons 10 11 14 21 22 30 DVD MULTI DVD VCR TV SOUND CD TAPE CDR FM AM o CONTROL UP5 DOWN buttons 14 16 20 27 30 Remote Control 1 TV CATV selector 36 37 2 10 keys for selecting preset channels 22 ...

Page 6: ...ose the unit to rain or moisture Locations Install the unit in a location that is level and protected from moisture The temperature around the unit must be between 5 C and 35 C 23 F and 95 F Make sure there is good ventilation around the unit Poor ventilation could cause overheating and damage the unit Handling the unit DO NOT touch the power cord with wet hands DO NOT pull on the power cord to un...

Page 7: ...or FM antenna Standard type outdoor FM antenna not supplied Supplied FM antenna or FM antenna supplied Extend the supplied FM antenna horizontally Snap the tabs on the loop into the slots of the base to assemble the AM loop antenna AM antenna connection Connect the supplied AM loop antenna to the AM LOOP terminals Turn the loop until you have the best reception If the reception is poor connect an ...

Page 8: ...ofer set the speaker setting information properly to obtain the best possible Surround effects For details see pages 16 to 18 CAUTION Use speakers with the SPEAKER IMPEDANCE indicated by the speaker terminals Connecting the front speakers You can connect two pairs of front speakers one pair to the FRONT SPEAKERS 1 terminals and the other pair to the FRONT SPEAKERS 2 terminals About the speaker imp...

Page 9: ...ur subwoofer Since bass sound is non directional you can place a subwoofer wherever you like Normally place it in front of you Connecting Audio Video Components Turn off all components before connecting You can connect the following audio video components to this unit Refer also to the manuals supplied with your components You can connect these components using the methods described in Analog conn...

Page 10: ... connected to the unit through the different types of video terminals you cannot record the picture from the playing component onto the recording component In addition if the TV and a playing video component are connected to the unit through the different types of video terminals you cannot view the playback picture from the playing component on the TV VCR Note You can connect either a cassette de...

Page 11: ...ponent video output Å To front left right channel audio output ı To composite video output Ç To S video output Î To component video output When you connect the DVD player with stereo output jacks DVD player TV COMPONENT VIDEO MONITOR OUT VCR DVD Y PB CB PR CR AUDIO VIDEO TV SOUND VCR VCR OUT REC OUT REC IN PLAY IN PLAY TAPE CDR CD OUT REC IN PLAY MONITOR OUT RIGHT LEFT DVD S VIDEO VIDEO REAR RIGHT...

Page 12: ...ponent has a digital optical output terminal connect it to the DIGITAL 2 CD terminal using the digital optical cable not supplied Notes When shipped from the factory the DIGITAL IN terminals have been set for use with the following components DIGITAL 1 coaxial For DVD player DIGITAL 2 optical For CD player When you want to operate the CD player or CD recorder using the COMPU LINK remote control sy...

Page 13: ...Changing the source name on page 11 When you have connected some digital source components using the digital terminals see page 9 you need to select the digital input mode see page 14 When you press one of the source selecting buttons on the remote control marked above with an asterisk the receiver automatically turns on On the front panel From the remote control DVD VCR TV SOUND CD TAPE CDR SOURC...

Page 14: ...as the source while using both the speakers connected to the FRONT SPEAKERS 1 and 2 terminals the speakers connected to the FRONT SPEAKERS 2 terminals are deactivated When selecting DVD MULTI as the source you can only select either the speakers connected to the FRONT SPEAKERS 1 or 2 terminals Remote NOT MASTER VOLUME VOLUME TAPE CDR SOURCE NAME TAPE CDR SOURCE NAME From the remote control On the ...

Page 15: ...on the display HEADPHONE appears and H PHONE indicator lights up on the display This cancels the Surround modes currently selected and activates the HEADPHONE mode see below HEADPHONE mode When using the headphones the following signals are output regardless of your speaker setting For 2 channel sources the front left and right channel signals are output directly from the headphones For multichann...

Page 16: ...to the VCR jacks at the same time While recording you can listen to the selected sound source at whatever sound level you like without affecting the sound levels of the recording Note The output volume level bass boost see page 20 tone adjustment see page 20 and Surround modes see page 23 cannot affect the recording Signal and speaker indicators on the display The following signal indicators light...

Page 17: ...ote control TAPE CDR CD DVD DVD MULTI FM AM TV SOUND VCR DVD VCR TV SOUND CD TAPE CDR SOURCE NAME AM DVD MULTI FM Display SETTING Source Selecting Buttons INPUT ANALOG DIGITAL ANALOG DIGITAL ADJUST RX 7520V AUDIO VIDEO CONTROL RECEIVER SETTING MASTER VOLUME CONTROL DOWN UP SURROUND MODE PHONES SURROUND ON OFF FM AM TUNING STANDBY FM AM PRESET FM MODE MEMORY STANDBY ON DVD VCR TV SOUND CD TAPE CDR ...

Page 18: ...n the display Each time you press the button the digital input mode changes as follows To play back software encoded with Dolby Digital select DOLBY DIGITAL To play back software encoded with DTS Digital Surround select DTS SURROUND Note When you turn off the power or select another source DOLBY DIGITAL and DTS SURROUND are canceled and the digital input mode is automatically reset to DIGITAL AUTO...

Page 19: ...nitial settings To get best possible sound change the subwoofer and speaker settings to fit your listening conditions Setting the Speaker Information To obtain the best possible sound or effect from Surround modes see pages 26 to 29 register the following speakers and subwoofer information after all connections are completed The following are items you can set Subwoofer information SUBWOOFER Speak...

Page 20: ...istening point If you have set the unit before start from step 3 Speaker distance is not valid for the DVD MULTI playback mode T SETTING 3 0 m 10 feet Left front speaker Right front speaker Right rear speaker Left rear speaker Center speaker 2 7 m 9 feet 2 4 m 8 feet 2 1 m 7 feet Example In this case set FRNT DIS to 3 0m or 10FT set CNTR DIS to 2 7m or 9FT and set REAR DIS to 2 4m or 8FT Note If y...

Page 21: ...gned from the small speaker to large speakers To use this function properly set this crossover frequency level according to the size of the small speaker connected If you have selected LARGE for all speakers this function will not take effect Crossover frequency is not valid for the DVD MULTI playback mode and HEADPHONE mode 1 Press SETTING repeatedly until CROSS Crossover with the current setting...

Page 22: ...ll be distorted If this happens you need to attenuate the input signal level to prevent the sound distortion 1 Press and hold INPUT ATT INPUT ANALOG DIGITAL so that the INPUT ATT indicator lights up on the display Each time you press and hold the button the Input Attenuator mode turns on INPUT ATT ON or off INPUT NORMAL Note When selecting DVD MULTI as the source this effect does not work Display ...

Page 23: ...ion turns on BASSBOOST ON and off BASSBOOST OFF Select BASSBOOST ON to activate the bass boost function The BASS BOOST indicator lights up on the display Select BASSBOOST OFF to cancel it The indicator goes off Note This function affects the front speaker sounds only BASSBOOST From the remote control On the front panel BASS BOOST Sound Adjustments Adjusting the Tone You can adjust the bass and tre...

Page 24: ...ption mode for this station select the FM reception mode you want See Selecting the FM Reception Mode on page 22 2 Press MEMORY The CH indicator lights up and the channel number position starts flashing on the display for about 5 seconds 3 Press FM AM PRESET 5 to select a channel number while the channel number position is flashing L C S WFR LS RS CH S LFE SPK AUTOMUTING TUNED STEREO VOLUME ANALOG...

Page 25: ...while the selected channel number is flashing on the display The selected channel number stops flashing The station is assigned to the selected channel number 5 Repeat steps 1 to 4 until you store all the stations you want To erase a stored preset station Storing a new station on a used number erases the previously stored one To tune in a preset station On the front panel 1 Press FM or AM The last...

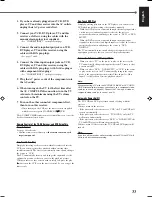
Page 26: ...igital Used to reproduce multichannel sound tracks of the software encoded with Dolby Digital D I G I T A L To enjoy the software encoded with Dolby Digital connect the source component using the digital terminal on the rear of this receiver See page 9 Dolby Digital 5 1 ch encoding method so called discrete multichannel digital audio format records and digitally compresses the left front channel r...

Page 27: ...ng DAP modes are provided with this receiver LIVE CLUB Gives the feeling of a live music club with a low ceiling DANCE CLUB Gives a throbbing bass beat HALL Gives clear vocal and the feeling of a concert hall PAVILION Gives the spacious feeling of a pavilion with a high ceiling These DAP modes can be used to add the acoustic surround effects while reproducing 2 channel stereo software either analo...

Page 28: ...I MUSIC has been selected Each time you press SURROUND MODE Surround modes change as follows Selecting the Surround modes L C S WFR LS RS S LFE SPK PROLOGIC ΙΙ DSP H PHONE AUTOMUTING TUNED STEREO INPUT ATT DIGITAL AUTO LINEAR PCM 1 R PL II MOVIE PL II MUSIC Note When the digital multichannel software such as Dolby Digital or DTS Digital Surround is played back the appropriate multichannel Surround...

Page 29: ... each source When playing back digital multichannel software Dolby Digital 5 1 ch or DTS Digital Surround the SURROUND MODE button does not work From the remote control It will be convenient for you to use the remote control for adjustments since you can make adjustments from your listening point by using the test signal For selecting Panorama mode for Pro Logic II Music use the button on the fron...

Page 30: ...CENTER To adjust the center speaker output level 10 to 10 REAR L To adjust the left rear speaker output level 10 to 10 REAR R To adjust the right rear speaker output level 10 to 10 2 Press CONTROL UP 5 DOWN to adjust the selected speaker output levels 3 Repeat steps 1 and 2 to adjust the other speaker levels SURROUND MODE SURROUND ON OFF SOUND ADJUST SETTING L C S WFR LS RS CH S LFE SPK PROLOGIC Ι...

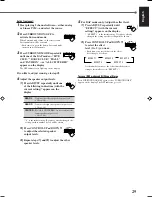
Page 31: ...he remote control It will be convenient for you to use the remote control for adjustments since you can make adjustments from your listening point 1 Start playing 2 channel software either analog or Linear PCM and select the source 2 Press SURROUND ON OFF to activate Surround mode When the Surround mode turns on the last selected Surround mode will be activated Each time you press the button Surro...

Page 32: ...L CH STEREO only to adjust the center speaker output level 10 to 10 0 is the initial setting If you have already changed the setting another number level will be shown 2 Press CONTROL UP 5 DOWN to adjust the selected speaker output levels 3 Repeat steps 1 and 2 to adjust the other speaker levels 5 For DAP modes only Adjust the effect level 1 Press ADJUST repeatedly until EFFECT with the current se...

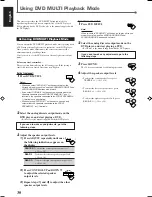
Page 33: ... discrete output mode on the DVD player and start playing a DVD Refer also to the manual supplied with the DVD player If you need to make any adjustments go to the following steps 3 Adjust the speaker output levels 1 Press ADJUST repeatedly until one of the following indications appears on the display CENTER To adjust the center speaker output level 10 to 10 REAR L To adjust the left rear speaker ...

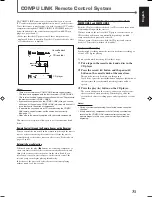
Page 34: ...eceiver To use this remote control system you need to connect JVC s audio components through the COMPU LINK 4 SYNCHRO jacks see below in addition to the connections using cables with RCA pin plugs see pages 6 and 7 Make sure that the AC power cords of these components are unplugged before connection Plug the AC power cords only after all connections are completed Notes There are four versions of C...

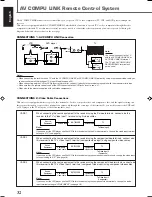
Page 35: ...VD player and the VCR to this receiver using the component video terminals change the video input terminal setting to COMPONENT see page 16 CASE 3 CASE 2 To Video Input 1 TV RX 7520VBK S video cable S video cable Source Equipment CONNECTIONS 2 Video Cable Connections This receiver is equipped with three types of video terminals S video composite video and component video and the signals coming int...

Page 36: ... VCR and DVD player will turn off Note If you turn off the receiver while recording on the VCR the VCR will not turn off but continue recording 1 If you have already plugged your VCR DVD player TV and this receiver into the AC outlets unplug their AC power cords first 2 Connect your VCR DVD player TV and this receiver as follows using the cables with the monaural mini plugs not supplied See CONNEC...

Page 37: ...lowing buttons for sound adjustment SUBWOOFER Adjust the subwoofer output level CENTER Adjust the center speaker output level REAR L Adjust the left rear speaker output level REAR R Adjust the right rear speaker output level EFFECT Select the DAP effect level TEST Turn on or off the test tone output Note After adjusting sounds press the corresponding source selecting button or CD DISC to operate y...

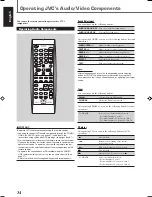
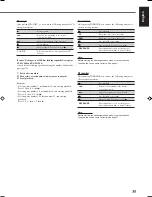
Page 38: ...ecording pause Press this button then 3 to start recording Note Before starting the above operations make sure that you have changed the source name correctly See page 11 CD changer After pressing CD DISC you can use the following buttons for CD changer operations 3 3 3 3 3 Start playback 4 Return to the beginning of the current or previous track Skip to the beginning of the next track 7 7 7 7 7 S...

Page 39: ...SE Press this button to enter recording pause Press this button then 3 to start recording Operating JVC s Audio Video Components TEST EFFECT MENU ENTER CENTER REAR L SUBWOOFER REAR R 1 4 7 P 10 2 5 8 0 3 6 9 10 100 RETURN DVD player You can always perform the following operations STANDBY ON DVD Turn on or off a DVD player After pressing DVD or DVD MULTI source selecting button you can use the foll...

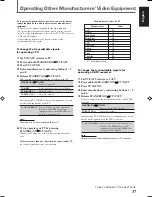
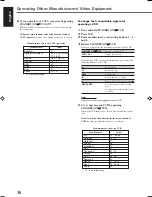
Page 40: ...uipment requires pressing ENTER after selecting a channel number Note Refer also to the manual supplied with your TV 6 Try to operate your TV by pressing STANDBY ON TV CATV When your TV turns on or off you have entered the correct code If there are more than one code listed for your brand of TV try each one until the correct one is entered TO BE CONTINUED TO THE NEXT PAGE Manufacturers codes for T...

Page 41: ...Y ON VCR When your VCR turns on or off you have entered the correct code If there are more than one code listed for your brand of VCR try each one until the correct one is entered Operating Other Manufacturers Video Equipment 6 Try to operate your CATV converter by pressing STANDBY ON TV CATV When your CATV converter turns on or off you have entered the correct code If there are more than one code...

Page 42: ...n you can use the following buttons on the DVD player 3 Start playback 7 Stop playback 4 Return to the beginning of the current or previous chapter Skip to the beginning of the next chapter 8 Pause playback To release it press 3 DVD menu operations After pressing DVD source selecting button you can use the following buttons for DVD menu operations MENU Display or erase the menu screen 5 5 5 5 5 3 ...

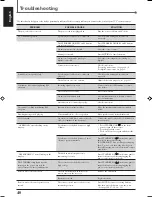
Page 43: ... your dealer Remove the obstruction Replace batteries Press SOUND or source selecting buttons first then press the button you want to use See pages 20 27 28 34 39 POSSIBLE CAUSE The power cord is not plugged in Speaker signal cables are not connected The SPEAKERS ON OFF 1 and 2 buttons are not set correctly An incorrect source is selected Muting is activated An incorrect input mode analog or digit...

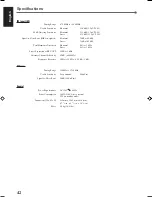
Page 44: ...ical DIGITAL 2 CD 21 dBm to 15 dBm 660 nm 30 nm Corresponding to Linear PCM Dolby Digital and DTS Digital Surround with sampling frequency 32 kHz 44 1 kHz 48 kHz Audio Output Level TAPE CDR VCR 220 mV Signal to Noise Ratio 66 IHF 78 IHF CD TAPE CDR VCR TV SOUND DVD 87 dB 78 dB Frequency Response 8 Ω CD TAPE CDR VCR TV SOUND DVD 20 Hz to 20 kHz 1 dB Bass boost 3 dB 1 dB at 100 Hz Tone Control Bass ...

Page 45: ... 0 4 at 1 kHz Stereo 0 6 at 1 kHz Stereo Separation at REC OUT 35 dB at 1 kHz Alternate Channel Selectivity 45 dB 400 kHz Frequency Response 30 Hz to 15 kHz 0 5 dB 3 dB AM tuner Tuning Range 530 kHz to 1 710 kHz Usable Sensitivity Loop antenna 400 µV m Signal to Noise Ratio 50 dB 100 mV m General Power Requirements AC 120V 60 Hz Power Consumption 180 W 230 VA at operation 2 W in standby mode Dimen...

Page 46: ...VICTOR COMPANY OF JAPAN LIMITED EN FR 0202NHMMDWJEIN J VC ...

Reviews: