background image

25

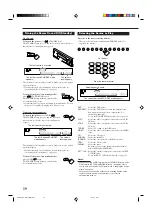
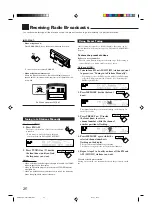
Receiving Radio Broadcasts

You can browse through all the stations or use the preset function to go immediately to a particular station.

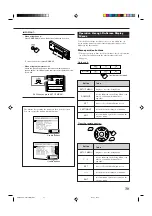
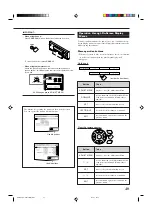
Tuning in to Stations Manually

On the unit ONLY:

1. Press FM/AM.

The last received station of the last selected band
is tuned in.
• Each time you press the button, the band

alternates between FM and AM (MW/LW).

2. Press TUNING 

5

 / 

 (inside

the front door) until you find
the frequency you want.

Notes:

• When a station of sufficient signal strength is tuned in, the TUNED

indicator lights up on the display.

• When an FM stereo program is received, the STEREO indicator

also lights up.

• When you hold the button (and release it) in step 2, the frequency

keeps changing until a station is tuned in.

FM/AM

L

ANALOG

TUNED

SPEAKERS

VOLUME

1

SUBWFR

R

dB

AUTO MUTING

dB

Using Preset Tuning

Once a station is assigned to a channel number, the station can be
quickly tuned in. You can preset up to 30 FM and 15 AM (MW/LW)
stations.

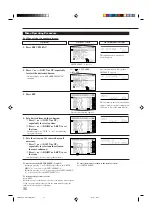
To store the preset stations

Before you start, remember...

• There is a time limit in doing the following steps. If the setting is

canceled before you finish, start from step 1 again.

On the unit ONLY:

1. Tune in to an FM or AM (MW/LW) station you want

to preset (see “Tuning in to Stations Manually”).

• If you want to store the FM reception mode for an FM station,

select the FM reception mode you want. See “Selecting the
FM Reception Mode.”

2. Press MEMORY (inside the front

door).

The channel number position starts flashing on the display for
about 10 seconds.

3. Press PRESET 

5

 / 

 (inside

the front door) to select a
channel number while the channel
number position is flashing.

4. Press MEMORY again while the

selected channel number is
flashing on the display.

The selected channel number stops flashing.
The station is assigned to the selected channel number.

5. Repeat steps 1 to 4 until you store all the FM and

AM (MW/LW) stations you want.

To erase a stored preset station

Storing a new station on a used number erases the previously stored
one.

DOWN

/ TUNING   

UP

/ TUNING   

L

ANALOG

STEREO

TUNED

SPEAKERS

VOLUME

1

SUBWFR

R

dB

AUTO MUTING

dB

L

ANALOG

STEREO

TUNED

SPEAKERS

VOLUME

1

SUBWFR

R

dB

AUTO MUTING

dB

L

ANALOG

STEREO

TUNED

SPEAKERS

VOLUME

1

SUBWFR

R

dB

AUTO MUTING

dB

SET

MEMORY

LEFT

PRESET


RIGHT

PRESET


SET

MEMORY

IMPORTANT:

When using the unit:

Press DOOR DOWN to use the buttons inside the front door.

To close the front door, press DOOR UP.

When using the remote control:

Check the indication shown on the remote’s display when you
press a button—this indicates the remote control operation mode
for a while.

Ex. When you press FM/AM

DVD

TV/DBS

VCR 1

AUDIO

TRANSMIT

LEARN

TRANSMIT

LEARN

DOOR

DOWN

EN25-28_RX-DP20VSL[B]f.pm5

03.5.21, 18:52

25

Summary of Contents for RX-DP20VSL

Page 1: ...VIDEO L AUDIO R VIDEO CHANNEL TV VIDEO MUTING DVD DVD TV DBS VCR 1 AUDIO DVD MULTI CD CDR PHONO TAPE MD EXT 7 1CH ANALOG DIGITAL CC CONVERTER EFFECT LIVENESS SOUND TEST THX EX ES 7 1 ANALOG DIRECT SLEEP DIMMER FM MODE DSP SURR DSP SURROUND RETURN 100 OFF INPUT SET SETUP MENU ADJUST MENU DVD MENU EXIT TEXT DISPLAY 1 2 3 4 5 6 7 P 8 9 10 10 0 TV VOL VOLUME PTY SEARCH STOP PAUSE TA NEWS INFO DISPLAY ...

Page 2: ...ich is marked with the letter N or coloured black The wire which is coloured brown must be connected to the terminal which is marked with the letter L or coloured red IF IN DOUBT CONSULT A COMPETENT ELECTRICIAN CAUTION To reduce the risk of electrical shocks fire etc 1 Do not remove screws covers or cabinet 2 Do not expose this appliance to rain or moisture Caution STANDBY ON switch Disconnect the...

Page 3: ...e made for infirm or handicapped people DON T use equipment such as personal stereos or radios so that you are distracted from the requirements of traffic safety It is illegal to watch television whilst driving DON T listen to headphones at high volume as such use can permanently damage your hearing DON T obstruct the ventilation of the equipment for example with curtains or soft furnishings Overh...

Page 4: ...stic reduction in digital distortion by processing the digital music data in 24 bit quantization and by expanding the sampling frequency to 128 kHz for fs 32 kHz signals 176 4 kHz for fs 44 1 kHz signals 192 kHz for fs 48 kHz signals By using the CC Converter you can obtain a natural sound field from any source ZIST Zero Interference audio Signal Transmission circuit The ZIST circuit incorporated ...

Page 5: ... Digital Input Output Terminals DIGITAL IN OUT 36 p Setting the Video Input Terminals VIDEO INPUT 37 q Turning On and Off theVideo Output VIDEO POWER 37 w Setting the Speakers 2 Usage SPEAKER 2 37 e Superimposing the Menus SUPERIMPOSE 38 r Showing the Text Information on the Display FL DISPLAY 38 t Memorizing the Volume Level for Each Source ONE TOUCH OPE 38 Sound Adjustments 39 Adjustment Menu Co...

Page 6: ... 7 8 9 i u y t r e w q p k g SPEAKERS 1 SPEAKERS 2 SURROUND THX RIGHT PRESET 5 EXIT FM MODE LEFT PRESET UP TUNING 5 SET MEMORY DOWN TUNING SURR DSP OFF ANALOG DIRECT INPUT MODE INPUT ATT EX ES 7 1 DSP ADJUST MENU SETUP MENU DOOR DOWN Parts Identification Front Panel Display Window To open the front door press DOOR DOWN For more details see page 18 6 7 4 1 L DGTL AUTO 96 24 DUAL ANALOG STEREO TUNED...

Page 7: ...digital signal format of incoming signals Main display Shows the source name station frequency Surround THX DSP mode etc PARAMETRIC EQ indicator 42 Lights up when Parametric Equalizer is in use VOLUME level indicator Indicates the volume level Goes off while muting sounds MIDNIGHT MODE indicator 43 Lights up when Midnight Mode is in use Refer to the pages in parentheses for details Front Panel 1 S...

Page 8: ... input output jacks 13 15 Input 1 IN DVD 2 IN 3 IN Output MONITOR OUT 6 EXT 7 1CH IN audio input jacks 12 EXT 7 1CH IN R L RIGHT LEFT SURR BACK SUB WOOFER SURR FRONT CENTER RIGHT MM LEFT PHONO CD CDR TAPE MD OUT REC IN PLAY OUT REC FRONT CENTER L R IN PLAY SUB WOOFER VIDEO RIGHT LEFT DVD IN TV SOUND DBS IN OUT REC IN PLAY VCR 1 L R VCR 2 S VIDEO VIDEO Y PB PR 1IN DVD Y PB PR 3IN Y PB PR MONITOR OU...

Page 9: ...ay Remote control operation mode such as DVD CD SOUND etc appears When the remote control operation mode changes it is shown on this display for about 10 seconds When showing the remote control operation mode just for confirmation it is shown only for about 5 seconds e g when pressing Number button 1 while the remote control operation mode is CD CD appears for about 5 seconds Remote s display wind...

Page 10: ...ied for the receiver The number in parentheses indicates the quantity of each piece supplied Remote Control 1 Batteries 2 AM MW LW Loop Antenna 1 FM Antenna 1 Front Terminal Cover 1 AC Power Cord 1 If any item is missing contact your dealer immediately FM 75 COAXIAL ANTENNA AM EXT AM LOOP AM LOOP ANTENNA AM EXT FM 75 COAXIAL AM LOOP ANTENNA AM EXT FM 75 COAXIAL AM LOOP A Using the Supplied FM Ante...

Page 11: ...ANCE indicated by the speaker terminals When connecting to both of the FRONT 1 and FRONT 2 SPEAKERS terminals use speakers with an impedance of 8 Ω to 16 Ω When connecting to either the FRONT 1 or FRONT 2 SPEAKERS terminals use speakers with an impedance of 4 Ω to 16 Ω Basic connecting procedure 1 Cut twist and remove the insulation at the end of each speaker signal cable not supplied 2 Turn the k...

Page 12: ...he diagram below is a recommended typical example Left front speaker s L Right front speaker s R Center speaker C Surround back speakers LSB RSB Left surround speaker LS Right surround speaker RS Subwoofer IMPORTANT After connecting the speakers set the speaker setting information properly To obtain the best possible Surround THX DSP effect see Basic Settings on pages 29 to 38 To connect the speak...

Page 13: ... see w Setting the Speakers 2 Usage SPEAKER 2 on page 37 When this connection is used you cannot use the surround back speakers In this case no sounds come out of the SURR BACK PREOUT jacks Connecting a subwoofer You can enhance the bass by connecting a subwoofer Connect the input jack of a powered subwoofer to the SUBWOOFER PREOUT jack on the rear panel using a cable with RCA pin plugs not suppli...

Page 14: ...ote control system CD recorder Turntable Rear view Set the MM MC selector correctly to match it to the turntable connected If an MM moving magnet type cartridge is used by your turntable push out the selector MM If an MC moving coil type cartridge is used by your turntable push in the selector _ MC If an earth cable is provided for your turntable connect the cable to the screw marked H on the rear...

Page 15: ... D E R L R L R L Decoder or DVD player How to view the pictures through an external component connected to the EXT 7 1CH IN audio input jacks The EXT 7 1CH IN jacks do not have any corresponding video input jack on the rear You have to use one of the following methods to view the pictures through the external component Connect the video output jack on the external component directly to the TV and ...

Page 16: ...put ı To audio input Ç To composite video input Î To S video input To composite video output Ï To S video output VIDEO RIGHT LEFT DVD IN TV SOUND DBS IN OUT REC IN PLAY VCR 1 VCR 2 S VIDEO VIDEO Y PB PR 1IN DVD Y PB PR 3IN Y PB PR 2 IN FRONT IN PLAY OUT REC COMPONENT AUDIO A B C D E F G R L R L VIDEO RIGHT LEFT DVD IN TV SOUND DBS IN OUT REC IN PLAY VCR 1 L R VCR 2 S VIDEO VIDEO Y PB PR 1IN DVD Y ...

Page 17: ... video components without using S video or composite video connections DBS tuner Å To audio output ı To component video output Ç To S video output Î To composite video output VIDEO RIGHT LEFT TV SOUND DBS IN OUT REC IN PLAY VCR 1 S VIDEO VIDEO Y PB PR 1IN DVD Y PB PR 2 IN COMPONENT AUDIO DBS A B C D R L Notes When connecting the DBS tuner to the TV SOUND DBS IN jacks change the source name to DBS ...

Page 18: ...e video input terminal setting correctly For details see p Setting the Video Input Terminals VIDEO INPUT on page 37 Note If the DVD player has component video output jacks you can connect it to either the COMPONENT 1 IN DVD 2 IN or 3 IN jacks When connecting the DVD player to either one of the component input jacks make video input terminal setting correctly For details see p Setting the Video Inp...

Page 19: ...OMPU LINK or TEXT COMPU LINK remote control system connect the target component also as described in Analog Connections see page 11 Digital input terminals You can connect any digital components having a coaxial or optical digital output terminal DIGITAL IN 1 DVD 2 CD 3 TV DBS 4 CDR 5 MD 6 VCR 1 Digital coaxial cable not supplied between digital coaxial terminals Digital optical cable not supplied...

Page 20: ...turn off CAUTIONS Follow these precautions to avoid leaking or cracking cells Place batteries in the remote control so they match the polarity to and to Use the correct type of batteries Batteries that look similar may differ in voltage Always replace both batteries at the same time Do not expose batteries to heat or flame Connecting the Power Cord Before plugging the receiver into an AC outlet ma...

Page 21: ...level of the sound through the speakers From the remote control 1 Set LEARN TRANSMIT selector to TRANSMIT 2 Press AUDIO The STANDBY lamp goes off and the front door moves down For more details see Turning the Power On and Off Standby on page 19 3 Select and play a source The sound comes out of the front speakers If no sound comes out of the front speakers press SPEAKERS 1 and or SPEAKERS 2 on the ...

Page 22: ...urce to Play Press one of the source selecting buttons The selected source name and Surround THX DSP mode also appear on the display DVD Selects the DVD player DVD MULTI Selects the DVD player for viewing a digital video disc using the analog discrete output mode 5 1 channel reproduction To use the DVD MULTI playback mode see page 54 VCR 1 Selects the video component connected to the VCR 1 IN jack...

Page 23: ...f the THX mode or the DSP mode is activated or if SPEAKER 2 is set to BI AMP OUT see page 37 Signal indicators Speaker indicators SUBWFR L C R LS RS LFE L C R S LS SB RS SB How to use the speaker and signal indicators To obtain the best performance of this receiver while using the Surround THX DSP modes check the speaker and signal indicators on the display carefully and set the speakers correctly...

Page 24: ...PHONE appears on the unit s display Down Up MASTER VOLUME VOLUME Notes In the following cases the speakers connected to the FRONT 2 SPEAKERS terminals are deactivated even if both pairs of the front speakers are activated If you select DVD MULTI or EXT 7 1CH as the source or If you select one of the Surround THX DSP modes The SPEAKERS 2 button will not work if SPEAKER 2 is set to BI AMP OUT see pa...

Page 25: ...he unit to select DGTL DOLBY D or DGTL DTS while DIGITAL AUTO still remains on the display Each time you press the button the input mode changes as follows When DOLBY DIGITAL or DTS SURROUND is selected the DGTL AUTO indicator goes off and the corresponding digital signal format indicator DIGITAL or lights up on the display If the incoming signal does not match the selected digital signal format t...

Page 26: ...SPEAKERS VOLUME 1 SUBWFR R Ex When the source is VIDEO From the remote control On the unit inside the front door ANALOG DIRECT ANALOG DIRECT Making Sounds Natural JVC s CC Compensative Compression Converter eliminates jitter and ripples achieving a drastic reduction in digital distortion by processing the digital music data in 24 bit quantization and by expanding the sampling frequency to 128 kHz ...

Page 27: ... ON see page 38 When changing the source name from TV to DBS 1 Press TV DBS 2 Press and hold TV DBS until ASSGN DBS appears on the display To change the source name to TAPE or TV repeat the same procedure above press and hold TAPE MD to select TAPE or press and hold TV DBS to select TV in step 2 Note Without changing the source name you can still use the connected components However there may be s...

Page 28: ...ou want to store the FM reception mode for an FM station select the FM reception mode you want See Selecting the FM Reception Mode 2 Press MEMORY inside the front door The channel number position starts flashing on the display for about 10 seconds 3 Press PRESET 5 inside the front door to select a channel number while the channel number position is flashing 4 Press MEMORY again while the selected ...

Page 29: ...r example the stations send their station names as well as information about what type of program they broadcast such as sports or music etc When tuned to an FM station which provides the RDS service the RDS indicator lights up on the display With the receiver you can receive the following types of RDS signals PS Program Service Shows commonly known station names PTY Program Type Shows types of br...

Page 30: ...ected From the remote control ONLY Press TEXT DISPLAY while listening to an FM station The following information appears on the TV screen To erase the RDS information press EXIT Note The on screen display will disappear in the following case if no operation is done for about 10 minutes if you do any operation other than explained in this section PTY SEARCH PLAY FF REW PTY PTY9 L ANALOG STEREO TUNE...

Page 31: ...y selected source Notes Enhanced Other Networks data sent from some stations may not be compatible with this receiver In Enhanced Other Networks standby mode if you carry out synchronized recording see page 55 Enhanced Other Networks standby mode is canceled temporarily The receiver goes back to Enhanced Other Networks standby mode again when the recording is finished While listening to a program ...

Page 32: ... However the SPEAKER DISTANCE SUBWOOFER and THX AUDIO SETUP submenu settings are not the initial ones They are the settings when SUBWOOFER is set to YES on the SPEAKER SETTING submenu Some of the menus or some items on the menu cannot be shown or cannot be adjusted For details see the respective explanations in this section Setup Menu Configuration SETUP MENU 1 SETUP MENU 2 1 SPEAKER SETTING See p...

Page 33: ...own on the screen You can operate the menu with these buttons Usable buttons Usable buttons Button SETUP MENU To do display or erase the Setup Menu select a submenu on the Setup Menu or an item on a submenu downwards or upwards move to the selected submenu screen select the desired setting on a submenu exit from menu operations or return to the previous menu SET LEFT RIGHT EXIT DOWN UP RIGHT PRESE...

Page 34: ...speaker DISTANCE appears The first item on the selected submenu appears with the current setting shown on the lower line of the main display The selected submenu appears To move between the SETUP MENU 1 and 2 By simply pressing fi or DOWN repeatedly on the SETUP MENU 1 you can go to the SETUP MENU 2 By simply pressing or UP repeatedly on the SETUP MENU 2 you can go back to the SETUP MENU 1 To retur...

Page 35: ...OVER You can select the crossover frequency for the small speakers used The signals below the preset frequency level will be sent to and be reproduced by the subwoofer or by LARGE speakers when SUBWOOFER is set to NO Select one of the crossover frequency levels according to the size of the small speaker connected 80Hz Select when the cone speaker unit built in the speaker system is about 12 cm 100...

Page 36: ...PK on the SPEAKER SETTING submenu SBACK LEVEL will appear instead of these two level settings To adjust the sound output levels using the 10 keys You can also use the 10 keys on the remote control to adjust the sound output levels Once you adjust the sound output levels using the following procedure the adjustments you have done on the Setup menu will be also changed If you do not emit the test to...

Page 37: ...ER is set to NO on the SPEAKER SETTING submenu this function is not available 3 Setting the Speaker Distance SPEAKER DISTANCE The distance from your listening point to the speakers is another important element to obtain the best possible surround sound of the Surround THX DSP modes You need to set the distance from your listening point to the speakers By referring to the speaker distance setting t...

Page 38: ...0 cm 7 BASS PEAK LIMIT When this setting is ON Bass Peak Limit functions so that sounds exceeding the preset peak level see below will be cut off When this setting is ON you can set the bass peak level using the bass test tone see below to eliminate bass sound distortion Select one of the following ON Normally select this OFF Select when not using Bass Peak Limit Note If THX ULTRA2 SUBWOOFER is se...

Page 39: ...pears see page 23 6 Setting the Surround Channel Output Speakers SURR CH OUT On this submenu screen you can preset which surround speakers to use for 5 1 channel reproduction Note This submenu is not available in the following cases When SURR BACK OUT is set to 1SPK on the SPEAKER SETTING submenu SURR BACK SP is set to NONE on the SPEAKER SETTING submenu or SPEAKER 2 is set to BI AMP OUT on the SP...

Page 40: ...se the SURR CH OUT submenu cannot be adjusted see page 36 When BI AMP OUT is selected SURR BACK SP is set to NONE on the SPEAKER SETTING submenu see page 32 7 DIGITAL OUT Select the output digital signal format through the DIGITAL OUT optical terminal on the rear Each time you press the button the output signal format changes as follows THROUGH Select when connecting a digital signal processor or ...

Page 41: ...You can select whether or not to superimpose the menus on the playback pictures on the TV screen 7 SUPERIMPOSE Turn on or off superimpose ON Select to superimpose the menus on the playback pictures on the TV screen OFF Select to cancel superimposition Menus will be shown on the blue background screen Notes If a video component and this unit are connected only using component cords Superimpose will...

Page 42: ...as TREBLE LVL on the main unit s display NOTICE If Analog Direct is in use see page 23 you cannot make any sound adjustments using the Adjustment Menu Items on the menus shown above are all set to the initial values when shipped from the factory Some of the menus or some items on the menu cannot be shown or cannot be adjusted For details see the respective explanations in this section Adjustment M...

Page 43: ...ol operation mode for a while On the unit From the remote control SET ADJUST MENU EXIT Button ADJUST MENU SET EXIT fi To do display or erase the Adjustment Menu select a submenu on the Adjustment Menu or an item on a submenu downwards or upwards move to the selected submenu screen select the desired setting on a submenu exit from menu operations or return to the previous menu RIGHT PRESET5 EXIT FM ...

Page 44: ...or LEFT to set the item In this example set LIVENESS to 5 Operations On the main unit s display Press the button until EFFECT ADJ appears To return to the previous screens Press EXIT Each time you press the button the on screen display menu returns to the one previously displayed On the main unit s display the indications also change accordingly The selected submenu appears The first item on the s...

Page 45: ...ER SURROUND SURR BACK You can adjust equalization patterns to your preference First on the ADJUST MENU screen select the signal channel speaker you want to adjust then move to its submenu Notes If NO or NONE is selected for a speaker on the SPEAKER SETTING submenu see page 32 you cannot select the corresponding channel If THX is activated Parametric Equalizer is not available If EXT 7 1CH is selec...

Page 46: ... SETTING submenu see page 32 no adjustments related to the center channel are available CENTER EQ CENTER ALIGN CENTER WIDTH and CENTER GAIN When one of the DSP modes except ALL CH STEREO is activated Select and adjust the following items EFFECT LEVEL Adjust the DSP effect level As the number increases the DSP effect becomes stronger Normally select 3 Adjustable range 1 to 5 ROOM SIZE Adjust the vi...

Page 47: ... Select ON to cut off the high frequency of the center channel as is done in a real movie theater Select OFF not to use this function CENTER GAIN Adjust the sound localization of the center channel As the number increases center channel will be localized clearly Normally select 0 2 Adjustable range 0 to 0 5 When one of the other Surround modes is activated or DVD MULTI or EXT 7 1CH is selected wit...

Page 48: ... the display THX Ultra2 Cinema Best for playing any 5 1 channel encoded movie software this mode can stabilize the sound localization and enlarge the sound field Only selectable with a pair of surround back speakers THX Music Best for playing any 5 1 channel encoded music software Only selectable with a pair of surround back speakers THX Surround EX Best for playing Dolby Digital EX encoded softwa...

Page 49: ...S ES is another new multi channel digital encoding format It greatly improves the 360 degree surround impression and space expression by adding the third surround channel surround back channel DTS ES includes two signal formats with different surround signal recording methods DTS ES Discrete 6 1ch DTS ES DSCRT and DTS ES Matrix 6 1ch DTS ES MATRIX DTS ES Discrete 6 1ch has been designed to encode ...

Page 50: ... OFF Surround Mode THX Mode Dolby Digital EX 2SPK 1SPK AUTO DOLBY D EX THX SURR EX ON DOLBY D EX THX SURR EX OFF DOLBY DIGITAL THX CINEMA NONE Not available DOLBY DIGITAL THX CINEMA Dolby Digital 3 2 2 2 2SPK AUTO DOLBY DIGITAL THX U2 CINEMA THX MUSIC ON DOLBY D EX THX SURR EX THX U2 CINEMA THX MUSIC OFF DOLBY DIGITAL THX CINEMA 1SPK AUTO DOLBY DIGITAL THX CINEMA ON DOLBY D EX THX SURR EX OFF DOLB...

Page 51: ...RROUND THX U2 CINEMA THX MUSIC ON DTS SURROUND THX U2 CINEMA THX MUSIC OFF DTS SURROUND THX CINEMA 1SPK AUTO DTS SURROUND THX CINEMA ON DTS SURROUND THX CINEMA OFF DTS SURROUND THX CINEMA NONE Not available DTS SURROUND THX CINEMA DTS 1 0 3 0 Not available Not available DTS SURROUND THX CINEMA DTS Dual Mono Not available Not available DUAL MONO Not available Incoming Signal Type 2 channel Availabl...

Page 52: ...cel the 7 1 channel reproduction Notes When the Surround mode is deactivated pressing EX ES 7 1 will activate an appropriate Surround mode for multi channel digital software When an analog or digital 2 channel source is playing with Surround activated you can adjust the 7 1 channel reproduction mode and store the setting but it will not affect the current source In the following cases the EX ES 7 ...

Page 53: ... the Surround modes Parametric Equalizer adjustments done on the Adjustment menu also take effect for the activated speaker channels Available Surround modes vary depending on the received signal and the current speaker settings For details see Surround and THX Modes Applicable to the Various Software on pages 47 and 48 1 Select and play any source other than DVD MULTI and EXT 7 1CH Surround modes...

Page 54: ...Logic II Movie is activated before activating the THX mode it also changes to this mode PROLOGICTHX Select to apply Pro Logic and THX Cinema mode together If Pro Logic is activated before activating the THX mode it also changes to this mode NEO 6 C THX Select to apply Neo 6 Cinema and THX Cinema mode together If Neo 6 Music or Neo 6 Cinema is activated before activating the THX mode it also change...

Page 55: ...up Suitable for audio sources Suitable for video sources DAP modes You can use the following DAP modes in order to reproduce a more acoustic sound field in your listening room LARGE HALL 1 Reproduces the spatial feeling of a large shoebox shaped hall designed primarily for classical concerts Its seating capacity is about 2000 LARGE HALL 2 Reproduces the spatial feeling of a large vineyard shaped h...

Page 56: ...ication shown on the remote s display when you press a button this indicates the remote control operation mode for a while 1 Select and play any sound source 2 Press DSP repeatedly until the DSP mode you want appears on the display Each time you press the button the DSP modes change as follows LARGE HALL 1 LARGE HALL 2 RECITAL HALL OPERA HOUSE CHURCH LIVE CLUB DANCE CLUB PAVILION ALL CH STEREO LAR...

Page 57: ...SIC will be activated Note You cannot apply the THX mode in the following cases When Analog Direct is turned on or When the surround back speakers are deactivated or only one surround back speaker is used Press DSP to apply one of the DSP modes except STEREO FILM and MONO FILM Each time you press the button the DSP modes change in sequence see page 53 for details To adjust the speaker output level...

Page 58: ...aying immediately In both cases the previously selected source continues playing without sound for a few seconds Note If the source changes from an analog source for which Analog Direct see page 23 is activated to a digital source muting time will be a little longer The period during which the receiver changes the source mechanically No sound comes out during this period Automatic Power On Off Sta...

Page 59: ... example the CD player in the diagram on the left column TEXT COMPULINK SOURCE NOT CONNECTED appears on the display in the following cases When the connections explained on the left are not correctly done When you try to use the TEXT COMPU LINK function a few seconds after you turn on the connected equipment This is not a malfunction of the units Refer also to the manuals supplied with your CD pla...

Page 60: ...title performer music genre etc When this is selected in front you can change the disc information by pressing Each time you press the button disc information see Note on 7 changes 8 Select or then press SET to change the track 9 Usable buttons and their functions for the current selection Indication here will change according to what is currently selected in front on the screen See Note on 9 Note...

Page 61: ...y appear Going back to the DISC TITLE SEARCH screen Press EXIT Searching for a Disc Only for the CD player Search for a disc by its performer 1 Press TEXT DISPLAY while CD is selected as the source The Disc Information screen appears on the TV 2 Press fi to move to SEARCH then press SET The DISC SEARCH screen appears 3 Press fi to move to PERFORMER then press SET The PERFORMER SEARCH screen appears ...

Page 62: ...r with disc memory function You can use the disc memory function through this receiver The disc information its performer disc title and music genre of normal audio CDs will be stored into the memory built in the CD player For the disc memory function refer to the manual supplied with your CD player The performer disc title and music genre information are usually recorded on a CD Text However if a...

Page 63: ...nter a song title for the song currently selected 5 Enter the song title referring to steps 3 and 4 of For a CD Player with disc memory function on pages 59 and 60 You can enter up to 32 characters for the song title 6 Press fi to move to the song title you have just entered then press SET The song title is stored into the memory and the Disc Information screen appears again 4 Repeat step 3 until y...

Page 64: ...annel output level SURR L then LEVEL Adjusts the left surround speaker channel output level SURR R then LEVEL Adjusts the right surround speaker channel output level SURR BK L then LEVEL Adjusts the left surround back speaker channel output level SURR BK R then LEVEL Adjusts the right surround back channel speaker output level EFFECT Selects the effect level LIVENESS Selects the liveness Notes Aft...

Page 65: ... Turntable After pressing PHONO you can perform the following operations on a turntable PLAY Starts playing STOP Stops operations CD recorder After pressing CDR or selecting CDR by pressing CONTROL repeatedly you can perform the following operations on a CD recorder PLAY Starts playing 4 Returns to the beginning of the current or previous track Skips to the beginning of the next track STOP Stops p...

Page 66: ...he TV channels on the VCR PLAY Starts playing REW Rewinds a tape FF Fast winds a tape STOP Stops operations PAUSE Pauses playing To release press PLAY REC Press this button together with the PLAY button to start recording Press this button together with the PAUSE button to enter recording pause CHANNEL Changes the TV channels on the VCR DVD player You can always perform the following operations DV...

Page 67: ... TV CHANNEL Changes the channels 1 10 0 100 10 Selects the channels Number button 10 will function as the ENTER button if your TV requires pressing ENTER after selecting a channel number Notes Refer to the manual supplied for your TV All the buttons listed above may not be used for some TVs If you cannot change the channels of some TVs by pressing number buttons press CHANNEL 6 Try to operate your...

Page 68: ...or both the CATV converter and DBS tuner at the same time To change the transmittable signals for operating another manufacturer s VCR 1 Press and hold VCR 1 2 Press VCR 1 3 Enter a manufacturer s code using buttons 1 9 and 0 See page 67 to find the code 4 Release VCR 1 The following button can be used for operating the VCR VCR 1 Turns on or off the VCR After pressing VCR 1 you can perform the fol...

Page 69: ...th 45 46 This figure is set to the remote control as the initial JVC code To change the transmittable signals for operating another manufacturer s DVD player 1 Press and hold DVD 2 Press DVD 3 Enter a manufacturer s code using buttons 1 9 and 0 See page 67 to find the code 4 Release DVD After pressing DVD or DVD MULTI you can perform the following operations on a DVD player 1 9 0 10 Selects the ti...

Page 70: ... 32 33 34 35 80 81 NEC 26 27 Nokia 03 36 Nordmende 38 Orion 09 Panasonic 19 24 39 40 79 Philips 04 19 21 24 41 42 Phonola 21 Pioneer 73 RCA Proscan 04 18 19 23 24 43 44 45 SABA 38 46 Samsung 45 47 59 61 62 63 Sanyo 03 48 49 Sharp 37 50 75 Siemens 03 51 Sony 52 53 54 68 69 70 Telefunken 55 60 Toshiba 43 44 71 72 Zenith 56 57 This figure is set to the remote control as the initial JVC code Note Manu...

Page 71: ...fore pressing the TV DBS button set the TV operation mode selector to the desired position You can store different signals into the 10 keys each for the TV and the CATV converter or the DBS tuner If you want to store signals for the CD changer press CONTROL repeatedly until CD DISC appears on the remote s display Continued on the next page TRANSMIT LEARN DVD VCR 1 TV DBD DVD MULTI CD CDR PHONO TAP...

Page 72: ...splay you have failed in storing the signal Try again However some signals do not match with this remote control even though this remote control can learn most infrared signals 6 Repeat steps 4 and 5 to store more signals in the same remote mode source Repeat steps 3 to 5 to store more signals in a different remote mode source 7 Set the LEARN TRANSMIT selector to TRANSMIT to finish the storing pro...

Page 73: ...the LEARN TRANSMIT selector to LEARN 2 Press and hold EXIT then press one of the source selecting buttons from which you want to erase the stored signals CLEAR appears on the display and all the signals stored in the selected remote mode source are erased at the same time Notes You cannot erase a signal assigned to a particular button only Storing a new signal to a particular button erases the pre...

Page 74: ...ter turning on the power but soon the receiver turns off again into standby mode Remote control does not work Remote control does not work properly Surround THX SOLUTION To use the 7 1 channel reproduction mode set the SPEAKER 2 setting to SPEAKER 2 then activate the surround back speaker s Select LARGE or SMALL for the SURR BACK SP Activate all connected speakers correctly See How to use the spea...

Page 75: ...reports and forecasts FINANCE Stock Market reports commerce trading etc CHILDREN Programs targeted at a young audience SOCIAL Programs about sociology history geography psychology and society RELIGION Religious programs PHONE IN Involving members of the public expressing their views either by phone or at a public forum TRAVEL Travel information LEISURE Programs about recreational activities JAZZ J...

Page 76: ...dio Audio Input Sensitivity Impedance 1 kHz PHONO IN MC 0 25 mV 100 Ω MM 2 5 mV 47 kΩ CD IN CDR IN TAPE MD IN EXT 7 1CH IN 200 mV 47 kΩ DVD IN VCR 1 IN VCR 2 IN TV SOUND DBS IN VIDEO 200 mV 47 kΩ Audio Input DIGITAL IN Coaxial 1 DVD 2 CD 3 TV DBS 0 5 V p p 75 Ω Optical 4 CDR 5 MD 6 VCR1 21 dBm to 15 dBm 660 nm 30 nm Corresponding to Linear PCM Dolby Digital and DTS Digital Surround with sampling f...

Page 77: ...o 108 00 MHz Usable Sensitivity Monaural 17 0 dBf 1 95 µV 75 Ω 50 dB Quieting Sensitivity Monaural 21 3 dBf 3 2 µV 75 Ω Stereo 41 3 dBf 31 5 µV 75 Ω Signal to Noise Ratio IHF A weighted Monaural 78 dB at 85 dBf Stereo 73 dB at 85 dBf Total Harmonic Distortion Monaural 0 4 at 1 kHz Stereo 0 6 at 1 kHz Stereo Separation at REC OUT 35 dB at 1 kHz Alternate Channel Selectivity 60 dB 400 kHz Frequency ...

Page 78: ...VICTOR COMPANY OF JAPAN LIMITED 0503NHMMDWJEM EN 2003 VICTOR COMPANY OF JAPAN LIMITED AUDIO VIDEO CONTROL RECEIVER RX DP20VSL RX DP20VSL B COVER_f pdf 03 5 21 19 28 2 ...

Reviews: