background image

English

– 4 –

Additional Information

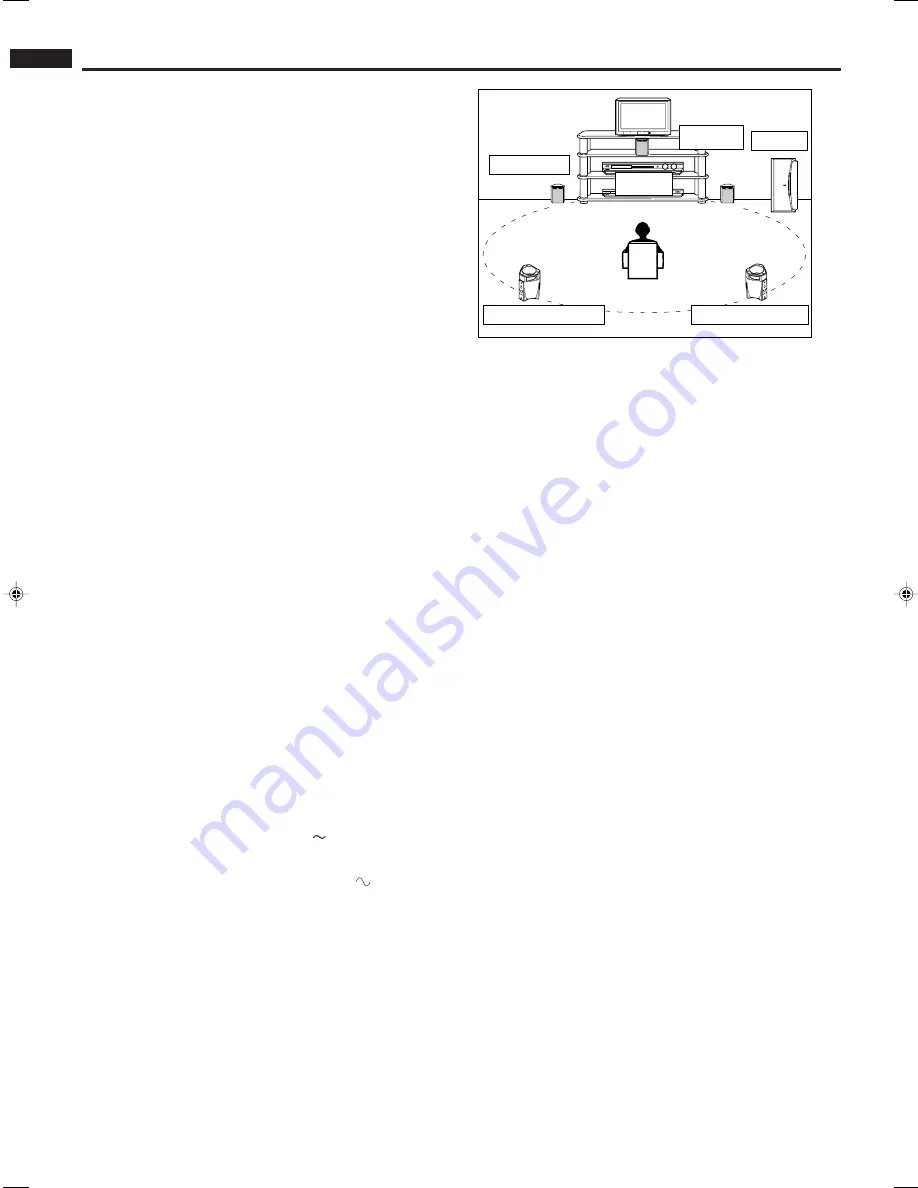
Speaker layout

To obtain the best possible sound from your unit:

—Place a subwoofer wherever you like since bass sound is non-

directional. Normally place it in front of you.

—Place all the main speakers at the same distance from the

listening position.

—Be sure to place the powered subwoofer to the TV’s right. If you

place the powered subwoofer to the TV’s left, keep sufficient
distance between them to prevent the TV from appearing
mottled.

Listening position

Center

speaker

Left front speaker

Right front

speaker

Subwoofer

Left surround speaker

Right surround speaker

Troubleshooting

Use this chart to help you solve daily operational problems. If there is any problem you cannot solve, contact your dealer.

Power does not come on.

• Is the unit pugged in?

– Plug the AC power cord firmly into the AC outlet.

Auto Power On/Standby does not function correctly.

• Signals are too weak or volume level is too low.

– This is not a malfunction. If this happens, cancel Auto Power On/Standby.

No sound is heard.

• Connections are incorrect, or loose.

– Check the connections. If incorrect, redo the corrections. (See page 3.)

• Audio signals through the amplifier are extremely weak.

– Increase the volume level on the amplifier.

Sounds fluctuate (suddenly become loud or soft).

• The built-in protective circuit is working.

– Lower the volume level, then turn off and on the unit.

Suddenly no sound comes out. – the power lamp still lights in green.

• The volume of the playback source is too high.

– Turn down the volume of the playback source, turn off and on the source, then adjust the volume properly on the source.

Specifications

Type :

Powered Subwoofer
Bass-reflex type
(magnetically shielded type)

Speaker :

16.0 cm cone 

 1)

Frequency Range :

32 Hz 

 200 Hz

Impedance :

Input terminals :

INPUT (LOW-LEVEL)

Power requirements :

AC 110-240 V

, 50/60 Hz

Output power of built-in amp :

100 W (50 Hz, 4 

, 10 % THD)

Power Handling Capacity :

27 W

Dimensions

(W 

×

 H

 × 

D) :

185 mm 

×

 374 mm 

×

 345 mm

Mass :

8.86 kg

Accessories :

Monaural audio cord (

×


1)

AC plug adaptor (

×


1)

SP-DWF10_Eng.pm65

4/27/04, 9:24 AM

4

Summary of Contents for SP-DWF10

Page 1: ...0 LVT1145 010A J POWERED SUBWOOFER INSTRUCTIONS For Customer Use Enter below the Model No and Serial No which are located either on the rear bottom or side of the cabinet Retain this information for future reference Model No Serial No ...

Page 2: ...dio cord 1 If the item mentioned above is missing contact your dealer immediately CAUTION TO REDUCE THE RISK OF ELECTRIC SHOCK DO NOT REMOVE COVER OR BACK NO USER SERVICEABLE PARTS INSIDE REFER SERVICING TO QUALIFIED SERVICE PERSONNEL RISK OF ELECTRIC SHOCK DO NOT OPEN The lightning flash with arrowhead symbol within an equilateral triangle is intended to alert the user to the presence of uninsula...

Page 3: ...ot detect sounds Auto Power On Standby may not work correctly Turning On the Power POWER To turn on the power Press the POWER switch to the ON position The power lamp lights in green To cut of the power Press the POWER switch to the OFF position The power lamp goes out This will disconnect the mains lead Operations Front Rear Power lamp Connections Before connecting this unit to the amplifier or r...

Page 4: ...r volume level is too low This is not a malfunction If this happens cancel Auto Power On Standby No sound is heard Connections are incorrect or loose Check the connections If incorrect redo the corrections See page 3 Audio signals through the amplifier are extremely weak Increase the volume level on the amplifier Sounds fluctuate suddenly become loud or soft The built in protective circuit is work...

Page 5: ...ing 4 Damage that occurs in shipment due to act of God and cosmetic damage 5 Signal reception problems and failures due to line power surge 6 Video Pick up Tubes CCD Image Sensor Cartridge Stylus Needle are covered for 90 days from the date of purchase 7 Accessories 8 Batteries except that Rechargeable Batteries are covered for 90 days from the date of purchase There are no express warranties exce...

Page 6: ...5722 for your nearest authorized servicer or visit our website at www JVC com Remember to retain your Bill of Sale for Warranty Service Do not service the television yourself Caution To prevent electrical shock do not open the cabinet There are no user serviceable parts inside Please refer to qualified service personnel for repairs Accessories To purchase accessories for your JVC product please ca...

Page 7: ...COMPACT COMPONENT SYSTEM SP DWF10 POWERED SUBWOOFER INSTRUCTIONS LVT1145 007A A SP PWE5 ...

Page 8: ...ections and standing waves Checking the Supplied Accessories Check to be sure you have the following supplied accessories The number in parenthesis indicates the quantity of the piece supplied Monaural audio cord 1 If the item mentioned above is missing contact your dealer immediately Contents Warnings Cautions and Others 2 Connections 3 Operations 3 Additional Information 4 20 cm 20 cm 15 cm 15 c...

Page 9: ...Y To activate AUTO POWER ON STANDBY Press the AUTO POWER ON STANDBY switch to the ON position If no sound comes in for 5 10 minutes the unit enters standby mode The power lamp lights in red If the unit detects incoming signals the unit starts operating The power lamp lights in green To cancel AUTO POWER ON STANDBY Press out the AUTO POWER ON STANDBY switch to set it to the CANCEL position CANCEL O...

Page 10: ...or loose Check the connections If incorrect redo the corrections See pages 3 Audio signals through the amplifier are extremely weak Increase the volume level on the amplifier Sounds fluctuate suddenly become loud or soft The built in protective circuit is working Lower the volume level then turn off and on the unit Suddenly no sound comes out the power lamp still lights in green The volume of the ...

Page 11: ...COMPACT COMPONENT SYSTEM SP DWF10 LVT1145 004A US UJ POWERED SUBWOOFER SUBWOOFER MOTRIZ SUBWOOFER AUTO ALIMENTADO INSTRUCTIONS MANUAL DE INSTRUCCIONES MANUAL DE INSTRUÇÕES ...

Page 12: ... por la compra de un altavoz JVC Para obtener el mejor rendimiento posible por favor lea atentamente las instrucciones antes de intentar el uso Si tienenaluna pregunta acuda a su agente de JVC Advertencias precauciones y notas Para reducir el riesgo de incendios descargas eléctricas etc 1 No retire los tornillos las cubiertas o la caja 2 No exponga este aparato a la lluvia o la humedad Precaución ...

Page 13: ...this case leave a more distance between the tuner and this unit or use an outdoor antenna for better tuner reception without interference from this unit This unit is magnetically shielded to avoid color distortions on TVs However if not installed properly it may cause color distortions So pay attention to the following when installing the unit When placing this unit near a TV set turn off the TV s...

Page 14: ...ring mottled Para obtener el mejor sonido posible de su unidad Coloque un subwoofer en cualquier lugar deseado dado que los sonidos graves son no direccionales Normalmente instálelo delante de usted Coloque los altavoces principales a la misma distancia desde la posición de audición Asegúrese de colocar el altavoz de subgraves activo a la derecha del televisor Si coloca el altavoz de subgraves act...

Page 15: ...ar la alimentación Pulse el botón POWER y ajústelo a la posición OFF La lámpara de la alimentación se apaga Esto desconectará el cordón de alimentación Funcionamiento automático de la unidad de acuerdo con las señales entrantes AUTO POWER ON STANDBY Para activar AUTO POWER ON STANDBY Pulse el botónAUTO POWER ON STANDBY y ajústelo a la posición ON Si no hay sonido durante un periodo de 5 10 minutos...

Page 16: ...emas Este cuadro le ayudará a resolver los problemas operacionales diarios Si hay algún problema que no puede resolver póngase en contacto con su concesionario La unidad no se encienda Está la unidad enchufada Enchufe firmemente el cable de alimentación de CA en la toma de CA AUTO POEWR ON STANDBY no funciona correctamente Señales muy débiles o nivel de volumen demasiado bajo Esto no es una anomal...

Page 17: ...COMPACT COMPONENT SYSTEM SP DWF10 LVT1145 005A UX POWERED SUBWOOFER INSTRUCTIONS ...

Page 18: ...nding waves Checking the Supplied Accessories Check to be sure you have the following supplied accessories The number in parenthesis indicates the quantity of the piece supplied Monaural audio cord 1 AC plug adaptor 1 If the item mentioned above is missing contact your dealer immediately Contents Warnings Cautions and Others 2 Connections 3 Operations 3 Additional Information 4 20 cm 20 cm 15 cm 1...

Page 19: ...annot detect sounds Auto Power On Standby may not work correctly Turning On the Power POWER To turn on the power Press the POWER switch to the ON position The power lamp lights in green To cut of the power Press the POWER switch to the OFF position The power lamp goes out This will disconnect the mains lead Operations Front Rear Power lamp Connections Before connecting this unit to the amplifier o...

Page 20: ...weak or volume level is too low This is not a malfunction If this happens cancel Auto Power On Standby No sound is heard Connections are incorrect or loose Check the connections If incorrect redo the corrections See page 3 Audio signals through the amplifier are extremely weak Increase the volume level on the amplifier Sounds fluctuate suddenly become loud or soft The built in protective circuit i...

Reviews: