(No.MB421)1-15
3.3.3 Removing the DVD pickup
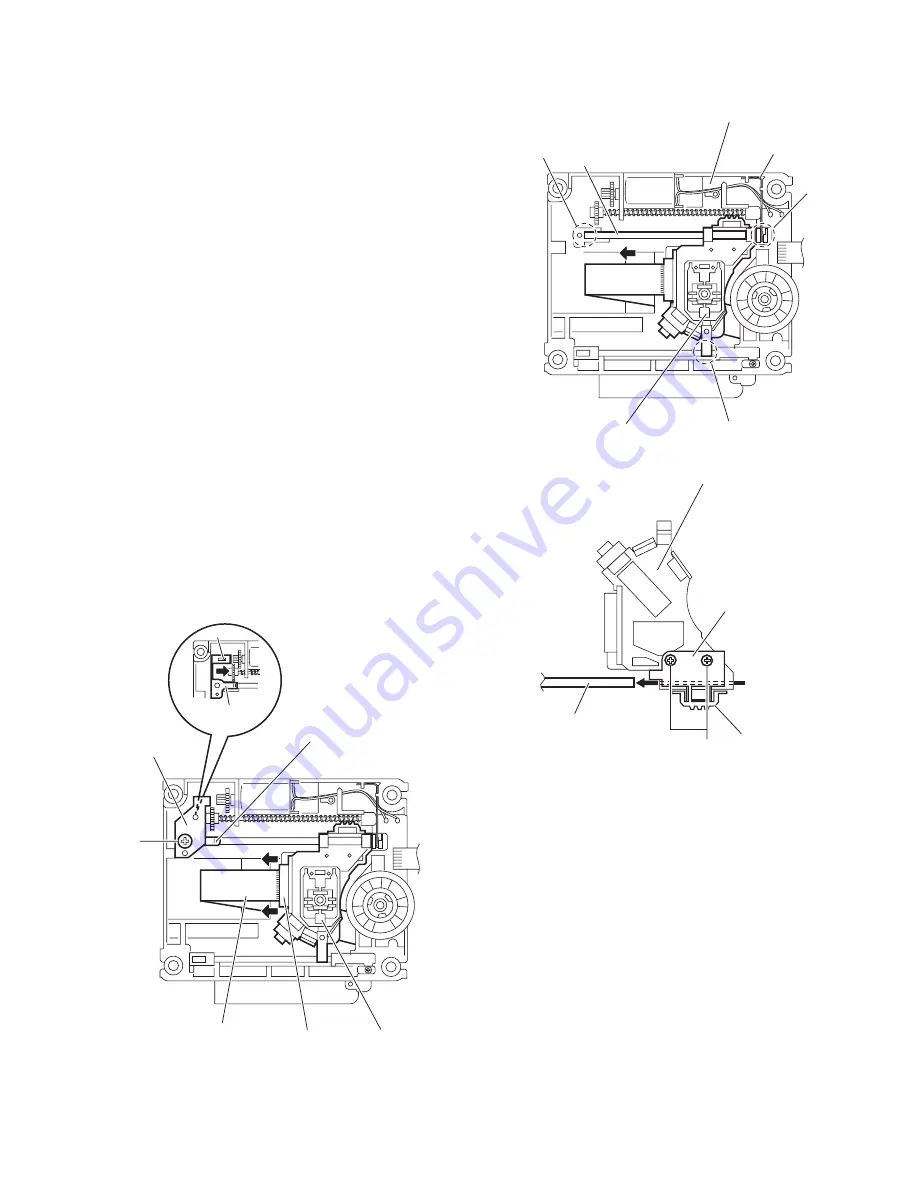
(See Figs.2,4 to 6)
• Remove the traverse mechanism assembly.
(1) From the side of the traverse mechanism assembly, solder
the short land sections
a
on the DVD pickup. (See Fig.2.)
(2) Release the lock of the connector on the DVD pickup in the
direction of the arrow and disconnect the card wire. (See
Fig.4.)
Caution:
• Solder the short land sections
a
on the DVD pickup be-
fore disconnecting the card wire from the connector on
the DVD pickup. If the card wire is disconnected with-
out attaching solder, the DVD pickup may be de-
stroyed by static electricity. (See Figs.2 and 4.)
• When attaching the DVD pickup, be sure to remove
solders from the short land sections
a
after connecting
the card wire to the connector on the DVD pickup.
(See Figs.2 and 4.)
(3) Remove the screw
C
and remove the feed bracket from the
sections
d
. (See Fig.4.)
(4) Release the claw
e
of the thrust spring in the direction of
the arrow and remove the thrust spring. (See Fig.4.)
(5) Remove the guide shaft of the DVD pickup from the section
f
on the traverse mechanism assembly and remove the
guide shaft from the section
g
while moving it in the direc-
tion of the arrow. (See Fig.5.)
(6) Remove the DVD pickup from the section
h
of the traverse
mechanism assembly and take out the DVD pickup with
the guide shaft. (See fig.5.)
(7) From the bottom side of the DVD pickup, remove the two
screws
D
attaching the rack arm and rack arm spring. (See
Fig.6.)
(8) Pull the guide shaft out of the DVD pickup. (See Fig.6.)
Fig.4
Fig.5
Fig.6
Thrust spring
e
Thrust spring
DVD pickup
Connector
Feed bracket
Card wire
C
Traverse mechanism assembly
DVD pickup
Guide shaft
f
g
h
Torsion spring
DVD pickup
Rack arm
Rack arm spring
D
Guide shaft


