background image

15

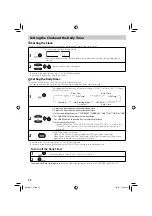
Setting the Clock and the Daily Timer


Setting the Clock

Without setting the built-in clock, you cannot use the Daily Timer or the Sleep Timer.

1

Press to activate the clock setting mode.

•  If you have already adjusted the clock before, press repeatedly until the clock setting mode is 

selected.

2


Adjust the hour, then the minute.

•  To exit from the clock settings, press CLOCK/TIMER as required.
•  To go back to the previous step, press CANCEL.


Setting the Daily Timer

Using the Daily Timer, you can wake up with your favourite music.
• You can store three Daily Timer settings, but you can activate only one of them at a time.

1

Press repeatedly to select one of the timer settings—DAILY 1 ON time, DAILY 2 ON time, 
or DAILY 3 ON time.

Daily 1 Timer

Daily 2 Timer

ON (Time)

ON (Time)

Canceled

Clock setting mode

ON (Time)

(See above.)

Daily 3 Timer

2


1

 Adjust the hour then the minute for the on-time.

2

 Adjust the hour then the minute for the off-time.

3

 Select the playback source—“TUNER-FM,” “TUNER-AM,” “DAB,” “DISC,” “LINE,” or “USB.”

4

 For DAB/FM/AM: Select a preset service/station.

  For LINE: Make the connected device ready for playback.

5

 Select the volume level.

•  You can choose from “VOLUME 0” to “VOLUME 31” and “VOLUME – –.” If you select 

“VOLUME – –,” the volume is set to the same level as when the System was last 
turned off.

3

Turn off the System (on standby).
•  When a Daily Timer is set, the timer indicator (

) lights up on the display.

•  When the on-time of the Daily Timer comes, the System increases the volume level 

gradually to the preset level over about 10 seconds.

•  To exit from the timer settings, press CLOCK/TIMER as required.
•  To correct a misentry during the process, press CANCEL. You can return to the previous step.

To turn off the Daily Timer

1

Press repeatedly to select “DAILY 1,” “DAILY 2,” or “DAILY 3.”

2

To turn on the Daily Timer again,

 select one of the timer settings by pressing CLOCK/TIMER, then press SET.

or

or

UXDAB11_B.indb   15

UXDAB11_B.indb   15

7/6/07   7:50:14 pm

7/6/07   7:50:14 pm

Summary of Contents for SP-UXDAB11

Page 1: ...MICRO COMPONENT SYSTEM UX DAB11 GVT0223 001B B Consists of CA UXDAB11 and SP UXDAB11 INSTRUCTIONS Cover_UXDAB11_B indd 1 Cover_UXDAB11_B indd 1 7 6 07 7 50 49 pm 7 6 07 7 50 49 pm ...

Page 2: ...ings or holes If the ventilation openings or holes are blocked by a newspaper or cloth etc the heat may not be able to get out Do not place any naked flame sources such as lighted candles on the apparatus When discarding batteries environmental problems must be considered and local rules or laws governing the disposal of these batteries must be followed strictly Do not expose this apparatus to rain...

Page 3: ...vironment and human health which could otherwise be caused by inappropriate waste handling of this product For more information about collection point and recycling of this product please contact your local municipal office your household waste disposal service or the shop where you purchased the product Penalties may be applicable for incorrect disposal of this waste in accordance with national leg...

Page 4: ...with Radio Data System 11 Changing the Radio Data System Information 11 Switching Temporarily to a Program of Your Choice Automatically 12 Searching for Programs Using PTY Codes PTY Search 12 What is the DAB System 13 Changing the DAB Information 13 Scanning for Ensembles 13 Tuning in to All the Ensembles 13 Improving the DAB Reception 13 Listening to a Digital Audio Player 14 Listening to a Digit...

Page 5: ...re that you have all the following items The number in parentheses indicates the quantity of each piece supplied Remote control x 1 Lithium coin battery CR2025 x 1 The battery has been installed when shipped from the factory AM loop antenna x 1 FM antenna x 1 DAB antenna x 1 Core filter x 1 If anything is missing consult your dealer immediately Getting Started Prepare the Remote Control When you u...

Page 6: ...w the conductor of the speaker cords to be in contact with any metallic parts of the System NOTES Make sure the antenna conductors do not touch any other terminals connecting cords or the power cord Also keep the antennas away from metallic parts of the System connecting cords and the power cord This could cause poor reception If the cords are covered with vinyl remove the vinyl to expose the tip ...

Page 7: ...the provided core filter to the USB cable not supplied to reduce interference 1 Release the stopper of the core filter 2 Run the USB cable through the core filter leaving approx 2 cm between the unit side end of the USB cable and the core filter Firmly wind the cable twice inside the cutout of the core filter 3 Close the core filter until you hear a clicking sound NOTE Do not damage the cable by a...

Page 8: ...ack a Disc USB Mass Storage Class Device on page 7 See Listening to the Radio on page 10 See Listening to a Digital Audio Player on page 14 Adjust the volume You can adjust the volume level from level 0 VOL MIN to level 31 VOL MAX Point at the remote sensor on the front panel The operating range is approx 7 m STANDBY lamp PHONES jack Stereo mini plug cord NOTE DO NOT turn off standby the System wi...

Page 9: ...the treble level Then press VOLUME to increase the level or press VOLUME to decrease it You can adjust the bass and or treble level from 3 to 3 Change the display information You can switch between the clock and the various source information display For setting the clock see page 15 Turn off the System by using the Sleep Timer Press briefly and repeatedly to specify the time in minutes as follows...

Page 10: ...in Program Play and Random Play see page 9 NOTES Always set the volume to the minimum level when connecting or disconnecting a USB mass storage class device Do not disconnect the USB mass storage class device when the System is turned on It may cause malfunction of both this System and the device The USB mass storage class device is charged through the USB MEMORY terminal when the System is turned...

Page 11: ... track during playback To stop searching press 6 Select a group MP3 WMA only Press to select the next group while playback is stopped Press to select the previous group while playback is stopped NOTES If no disc is inserted NO DISC appears on the main display If no USB mass storage class device is connected NO USB appears on the main display If MP3 WMA files are not recorded on the disc or the USB...

Page 12: ...am a 33rd track FULL will appear on the display 5 The tracks are played in the order you have programmed Playing at Random Random Play 1 Press until the RND random indicator lights up on the display before playback 2 Playback starts in a random order Random Play ends when all tracks have been played back Playing Repeatedly Repeat Play This function is not available when Random Play is active 1 Pre...

Page 13: ...ct a frequency Press and hold for more than 2 seconds The System starts searching for stations and stops when a station of sufficient signal strength is tuned in Press during search to stop Press repeatedly to change the frequency step by step Tune in to a preset station Press to select the preset number of the preset station For presetting stations see page 11 For DAB Select an ensemble Press bri...

Page 14: ...vices will be erased after a few hours Receiving FM Stations with Radio Data System Radio Data System allows FM stations to send an additional signal along with their regular program signals With the System you can receive the following types of Radio Data System signals PS Program Service Shows commonly known station names PTY Program Type Shows the type of the programs being broadcast RT Radio T...

Page 15: ...ystem can switch to another DAB service This function works only while listening to a station service which provides the required signals Press repeatedly to select the program type TA Traffic announcement in your area NEWS News INFO Information How the Enhanced Other Networks function works Case 1 If no station service is broadcasting the program of your choice The System continues tuning in to t...

Page 16: ...the power supply press and hold again ANT P OFF appears on the display You cannot change this setting when the Save Mode is activated see page 5 What is the DAB System DAB Digital Audio Broadcasting is one of the digital radio broadcasting systems available today It can deliver digital quality sound without any annoying interference or signal distortion Furthermore it can carry text pictures and d...

Page 17: ...r Recording on a Digital Audio Player To Play Back a Digital Audio Player Easily Quick Portable Link QP Link automatically switches the source to LINE as the Digital Audio Player connected to the LINE IN jack starts playback Press and hold for more than 2 seconds to activate QP Link The QPL indicator lights up on the display To cancel this function press and hold for more than 2 seconds again When...

Page 18: ...the on time 2Adjust the hour then the minute for the off time 3Select the playback source TUNER FM TUNER AM DAB DISC LINE or USB 4For DAB FM AM Select a preset service station For LINE Make the connected device ready for playback 5Select the volume level You can choose from VOLUME 0 to VOLUME 31 and VOLUME If you select VOLUME the volume is set to the same level as when the System was last turned ...

Page 19: ...red For USB mass storage class device playback When connecting a USB mass storage class device refer also to its manual You can play back MP3 WMA files on a USB mass storage class device maximum data transfer rate 2 Mbps Connect one USB mass storage class device to the System at a time Do not use a USB hub This System is compatible with USB 2 0 Full Speed You cannot play back a file larger than 2 ...

Page 20: ...the System off while QP Link is working the System deactivates QP Link temporarily In such cases the following will reactivate QP Link When no sound signal comes from the LINE IN jack for about 30 seconds after the System has been turned off When you turn on the power again Before recording on a Digital Audio Player deactivate QP Link or disconnect the Digital Audio Player from the LINE IN jack ot...

Page 21: ...ck Market reports commerce trading etc CHILDREN Programs targeted at a young audience SOCIAL Programs about sociology history geography psychology and society RELIGION Religious programs PHONE IN Involving members of the public expressing their views either by phone or at a public forum TRAVEL Travel information LEISURE Programs about recreational activities JAZZ Jazz music COUNTRY Songs which ori...

Page 22: ...lass device is not connected properly MP3 WMA groups and tracks are not played back as you expect The playing order was determined when the groups and tracks were recorded It depends on the writing application The sound is discontinuous The disc is scratched or dirty MP3 WMA files have not been properly copied onto the USB mass storage class device The USB mass storage class device s sound stops N...

Page 23: ...rior notice Maintenance To get the best performance out of the System keep your discs and the mechanism clean Handling discs Remove the disc from its case by holding it at the edge while pressing the center hole lightly Do not touch the shiny surface of the disc or bend the disc Put the disc back in its case after use Be careful not to scratch the surface of the disc when placing it back in its ca...

Page 24: ...ve equipment switched on when it is unattended unless it is specifically stated that it is designed for unattended operation or has a standby mode Switch off using the switch on the equipment and make sure that your family know how to do this Special arrangements may need to be made for infirm or handicapped people DON T use equipment such as personal stereos or radios so that you are distracted from...

Reviews: