background image

4

Intr

odu

ctio

n

This product has been designed to play back the 

following discs:

DVD VIDEO, DVD AUDIO, VCD, SVCD, CD

This product can also play back the following 
discs:

• Finalized DVD-R/RW discs recorded in the DVD 

VIDEO format.

• CD-R/RW discs recorded in the following for-

mats

- Music CDs (finalized discs)

- VCDs

- SVCDs

- MP3/WMA/JPEG discs recorded in ISO 9660 (for 

details, refer to "About MP3/WMA/JPEG discs")

However, some discs may not be played back 

because of their disc characteristics, recording 

conditions, or damage or stain on them.

Only sounds can be played back from the following 

discs:

MIX-MODE CD

CD-G

CD-EXTRA

CD TEXT

Discs you can play:

DVD Logo is a trademark of DVD Format/Logo 

Licensing Corporation.

*

Note on Region Code

DVD players and DVD VIDEOs have their own 

region code numbers. This product can only play 

back a DVD VIDEO recorded with the region 

code number and video format mentioned 

above.

If a DVD VIDEO with an improper region code 

number is loaded, "REGION CODE ERROR!" 

appears on the TV screen and playback cannot 

start.

• On some DVD VIDEOs, DVD AUDIOs, VCDs 

or SVCDs, their actual operation may be dif-

ferent from what is explained in this manual. 

This is due to the disc programming and disc 

structure, not a malfunction of this product.

You can play back a CD-R/CD-RW only 
when the disc is finalized. 

• You can play back a CD-R/CD-RW which 

has been recorded in the audio CD for-
mat and a CD-R/CD-RW to which audio 
data (MP3/WMA) or a still picture data 
(JPEG) file is recorded. 
However, playback is impossible in some 
cases due to the disc characteristics, 
recording condition, scratches or dirt on 
the disc, or dirt or condensation on the 
lens. 

• Before using a CD-R/CD-RW, carefully 

read the cautions regarding the disc. 

• This product does not support playback 

or CD text display of sound files such as 
MP3s. 

• To play back a CD-RW on this product, 

erase all tracks if the CD-RW was 
recorded in a format other than the audio 
CD format. Using the CD-RW without 
erasing all tracks may result in damage to 
the speakers or other parts caused by 
sudden loud volume. 

Discs that cannot be played back

• The following discs cannot be played back:

DVD-ROM, DVD-RAM, DVD-RW (recorded in 

VR format), CD-ROM, CD-I (CD-I Ready), Photo 

CD, SACD, etc.

Playing back these discs will generate noise and 

damage the speakers.

• Damaged discs and discs in an extraordinary 

shape (other than a disc of 12 cm or 8 cm in 

diameter) cannot be played back.

• JVC do not guarantee the operation and sound 

quality of discs not authorized by CD-DA, which 

is a CD specification. 

Before playback, confirm that the disc complies 

with this CD specification by checking the marks 

and reading notes printed on the package. 

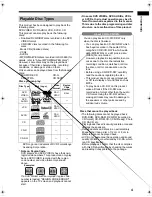
Playable Disc Types

Disc Type

Mark (Logo)

Video 

Format

DVD 

VIDEO

PAL/

NTSC

4/ALL

DVD 

AUDIO

VCD

PAL/

NTSC

SVCD

PAL/

NTSC

CD

CD-R

CD-RW

Region 

Code 

Number*


Examples:

About CD-Rs/CD-RWs

UX-QD9[A].book  4 ページ  2004年9月6日 月曜日 午後3時21分

Summary of Contents for SP-UXQD9S

Page 1: ...MICRO COMPONENT SYSTEM For hiding the demonstration display refer to page 15 UX QD9S Consists of CA UXQD9S and SP UXQD9S INSTRUCTIONS LVT1220 005A A ...

Page 2: ...able to get out Do not place any naked flame sources such as lighted candles on the apparatus When discarding batteries environmental problems must be considered and local rules or laws governing the disposal of these batteries must be followed strictly Do not expose this apparatus to rain moisture dripping or splashing and that no objects filled with liquids such as vases shall be placed on the a...

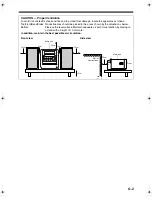
Page 3: ... obstructions should be placed in the areas shown by the dimensions below Bottom Place on the level surface Maintain adequate air path for ventilation by placing on a stand with a height of 10 cm more In addition maintain the best possible air circulation 15cm 15cm 10cm 15cm 15cm 1cm 1cm Main unit Wall or obstructions Front Front view Side view Main unit ...

Page 4: ...ing 19 Selecting a Radio Station 20 Storing Radio Stations Preset 20 Tuning In to a Preset Radio Station 20 Basic Operations of the DVD Player 21 Playback 21 Playing Back from a Position 10 Seconds Before One Touch Replay 23 Stopping Playback 24 Resuming Playback RESUME 24 Pausing Playback 24 Advancing Picture Frame by Frame 24 Fast Reverse Fast Forward Search 24 Slow Motion Playback 25 Skipping t...

Page 5: ...nly One Track from a Disc 45 Recording the Second or Subsequent Track to the Last Track from a Disc 45 Program Recording from a Disc 45 Recording with No Blank Time between Tracks 45 Erasing Recorded Sound from a Cassette Tape 45 Using the Timers 46 Sleep Timer 46 Recording Timer 47 Playback Timer 48 Auto Standby 50 Disc Ejection Lock 50 Using AV COMPU LINK 51 Connection and Setting 51 Operations ...

Page 6: ...en the operation panel is very dirty wipe it with a cloth dampened with a small amount of a neutral detergent and then wipe it with a soft dry cloth CAUTION Do not wipe the operation panel with thinners ben zenes or other chemical agents Do not spray insecticides onto the operation panel These may cause discoloration and damage to the surface When using headphones keep the volume at a moderate lev...

Page 7: ...play back a CD R CD RW which has been recorded in the audio CD for mat and a CD R CD RW to which audio data MP3 WMA or a still picture data JPEG file is recorded However playback is impossible in some cases due to the disc characteristics recording condition scratches or dirt on the disc or dirt or condensation on the lens Before using a CD R CD RW carefully read the cautions regarding the disc Th...

Page 8: ...omatic rotation function of a digital camera data goes beyond the DCF standard so the image may not be dis played If data has been processed edited and restored with PC image editing software the data may not be displayed This product cannot play back animations such as MOTION JPEG or still pictures TIFF etc other than JPEG and image data with sound The resolution of 640 x 480 pixels is recom mend...

Page 9: ...TV page 38 NOTE If you play back an NTSC disc with this setting set to PAL you can watch the playback pictures the disc will be reproduced using PAL 60 format but the TV screen may rolls over upward and down ward rapidly NOTE If you play back a PAL disc with this setting set to NTSC you can watch the playback pictures but the following symptoms may occur The items on the disc menu will be blurred ...

Page 10: ...age the system Care of the cabinet When cleaning the system use a soft cloth and fol low the relevant instructions on the use of chemi cally coated cloths Do not use benzene thinner or other organic solvents including disinfectants These may cause deformation or discoloring If water gets inside the system Turn the system off and disconnect the power cord plug from the wall outlet then call the sto...

Page 11: ...th a stereo mini plug not supplied While the headphones are connected the speakers do not produce any sound The numbers refer to the pages in which the parts are explained Cassette holder 42 PUSH OPEN Disc tray 21 Remote control sensor 9 18 46 49 17 50 31 33 21 20 42 43 17 15 18 24 42 25 30 37 45 17 21 28 44 28 17 20 21 42 44 30 22 ...

Page 12: ...e control sensor on the main unit is approximately 5 m maximum When the effective distance decreases replace the batteries Do not drop the remote control or subject it to excessive shock The numbers refer to the pages in which the parts are explained 17 17 10 43 10 20 22 25 28 30 34 16 20 25 31 35 42 44 42 17 24 42 47 49 24 25 42 25 50 33 17 27 29 27 28 29 28 17 17 18 24 24 42 47 49 38 16 47 23 20...

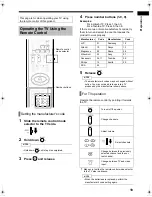
Page 13: ...nting it towards the TV 1 Make sure to slide the remote control mode selector to the TV side in advance NOTE When the batteries are replaced perform the manufacturer s code setting again This page is for when operating your TV using the remote control of this product Operating the TV Using the Remote Control Remote control mode selector Number buttons Setting the manufacturer s code Manufacturer C...

Page 14: ...ng the AM antenna Insert the tab into the slot Main unit rear view Main unit side view Connecting the antenna cord Connect the ends of the antenna cord as shown above When insulation covers the tips of the antenna cord twist and pull off the insulation When positioning the antennas find the best position for reception while listening to an actual radio program refer to Listening to Radio Broadcast...

Page 15: ...uct refer to the operation manuals for the antenna for details of connection Connecting the FM antenna Main unit rear view FM antenna supplied Main unit side view When positioning the antennas find the best position for reception while listening to an actual radio program refer to Listening to Radio Broadcasts page 19 Main unit rear view Antenna cord not supplied Communal antenna terminal or Outdo...

Page 16: ...TV and the speakers NOTE Improper speaker cord connection spoils the stereo effect and sound quality The impedance of speakers connected to this product must be within the range of 4 Ω to 16 Ω Cooling fan is built into the main unit for emitting generated heat When you turn on the main unit the internal cooling fan automatically starts rotating To ensure sufficient cooling leave a space of more th...

Page 17: ... is not a malfunction Also if the main unit is connected to a TV with a built in VCR there may be picture distortion during playback NOTE Please check that the setting for VIDEO OUT SELECT PAL NTSC on the rear panel of the main unit and the color system on your TV set are the same page 6 You need to set MONITOR TYPE in the PICTURE menu correctly according to the aspect ratio of your TV page 38 Con...

Page 18: ...AC outlet DEMO START appears in the display window and the demonstration display starts When you press on the main unit DEMO OFF appears in the display window and the demonstration display is canceled Turning on the main unit automatically cancels the demonstration display Resuming the demonstration display With the power turned off press on the main unit Connect all necessary parts before connect...

Page 19: ...nt You can use the number buttons to specify the hour Refer to Using the number buttons shown below 3 Press To return to step 2 press 4 Set the minute in the same manner as steps 2 and 3 Press four times to display the clock and then adjust the clock starting from step 2 Press repeatedly NOTE The time display on the main unit is a 24 hour clock The clock will gain or lose approximately 1 minute pe...

Page 20: ...ou press the display tog gles as follows While the sound mode is set to an item other than FLAT is displayed in the display window NOTE This function does not affect recording sound 1 Press repeatedly to display MANUAL 2 For adjusting bass sound Press For adjusting treble sound Press You can adjust the sound quality within the range of 5 to 5 The display returns to the sound source dis play in a f...

Page 21: ... With an item other than MANUAL selected When you operate the main unit after recording finishes the color pattern for the display window and disc tray returns to the selected pattern Press Each time you press the display toggles as follows NOTE Once you press to change the color pattern the brightness returns to the initial setting except for DIMMER AUTO When you turn off the main unit the bright...

Page 22: ...main unit ONLY When the main unit is turned off To select 10 kHz spacing while holding down on the main unit press on the main unit to turn on the power AM 10 kHz appears in the display window To select 9 kHz spacing while holding down on the main unit press on the main unit to turn on the power AM 9 kHz appears in the display window NOTE If the spacing is switched the memory in which the radio st...

Page 23: ...roxi mately 5 seconds 3 While the preset number is flash ing press the number buttons or to select the preset number you want to use Refer to Using the number buttons page 16 4 While the selected number is flashing press STORED appears and the selected radio station is stored NOTE When you store a radio station to a preset number to which another radio station has previously been stored the newly ...

Page 24: ...manual Operations are described by mainly using the remote control buttons If there are the same marks on the main unit the buttons on the main unit can also be used The following marks tell you for which type of the discs the operation can be made The illustrations and TV screens may be different between the actual case and the description VCD stands for Video CD SVCD stands for Super Video CD Nu...

Page 25: ...uttons on the remote control Select a menu item with or and then press Select a menu item with the number buttons Operation may differ from the explanation given here depending on the disc type Continued on next page Elapsed playing time CD indicator The CD indicator lights up while the CD is stopped The CD indicator flashes while the CD is being played back or paused Track number Total number of ...

Page 26: ...n the TV screen on screen guide Containing multi angle views page 27 Containing multi audio page 26 Containing multi subtitle page 27 The disc cannot accept the operation you have attempted Play page 21 Pause page 24 Fast reverse Fast forward search page 24 Slow motion playback reverse forward directions page 25 Playing Back from a Position 10 Seconds Before One Touch Replay PBC Playback control P...

Page 27: ... will be cleared Resume function is set to on as the initial preset You can set the function to off page 39 While a disc is being played back Press To resume normal playback press Playback cannot be paused by pressing on the main unit during JPEG disc slide show While a disc is paused Press Each time you press picture will be advanced frame by frame You cannot operate this function with on the mai...

Page 28: ...er buttons or to select the track chapter you want to listen to Refer to Using the number buttons page 16 NOTE You can operate a VCD or SVCD while the disc is stopped or played back with PBC off You can operate a DVD AUDIO CD MP3 WMA or JPEG while the disc is either played back or stopped This operation may not be carried out for some discs While a disc is stopped or being played back 1 Set the re...

Page 29: ...anged The audio can also be changed by pressing 2 Wait for a few seconds or press NOTE You can also operate this function by using the menu bar page 34 For a language code such as AA refer to Lan guage Codes page 41 When 2 channel sounds are recorded in 1 2 and multi channel sounds with down mix prohibited are recorded in 2 2 in a DVD AUDIO you can select 1 2 only Remote control mode selector Numb...

Page 30: ...ssing 2 Wait for a few seconds or press NOTE You can also operate this function by using the menu bar page 34 While a disc is played back or paused 1 Press Each time you press the picture magnification will be changed OFF ZOOM1 6 When a JPEG disc is used the picture magnification changes through ZOOM 1 ZOOM 2 to OFF You cannot change the picture magnification during slide show playback 2 Select th...

Page 31: ...s to change the value 6 Press To adjust other items go back to step 3 7 Press NOTE If no operation is made for several seconds during the procedure the settings made so far will be automatically stored VFP stands for video fine processor The two speakers produce an effect resembling surround sound While a disc is being played back Press Example TV screen Each time you press the display toggles as ...

Page 32: ...sive mode you can enjoy better pictures CAUTION In order to enjoy pictures in the progressive mode the following requirements should be met There must be component video input termi nals on the TV set connected to the main unit The main unit and the TV set must be con nected using a component video cord page 15 When the above requirements are not satisfied leave the main unit in the Interlace mode...

Page 33: ...s If an incorrect pin code is entered try entering a correct pin code again There are some DVD AUDIO discs with still pic tures recorded Among the still pictures there are pictures called B S P browsable still pictures You can change these pictures as if turning over pages This operation can be carried out when B S P is lit in the display window on the main unit While a disc is being played back 1...

Page 34: ... to program chapters tracks Display for DVD VIDEO Select a title number and then select a chapter number Display for DVD AUDIO MP3 WMA Select a group number and then select a track number Display for CD VCD SVCD Select a track number Playing Back the Disc in the Desired Order Program Playback Program indicator Program indicator DVD MP3 or WMA Program indicator VCD is displayed while VCD SVCD is se...

Page 35: ...opped hold down NOTE Ejecting the disc or turning off the main unit also erases the programmed content This operation also cancels program playback You can listen to tracks or chapters in random order While playback is stopped 1 Press repeatedly to select RANDOM Example For CD RANDOM appears in the TV screen 2 Press NOTE Pressing repeatedly does not return play back to the previous track Each trac...

Page 36: ...f a designated part refer to page 35 For the locations of remote control buttons refer to page 26 Repeat Playback Repeat types Display on the TV screen Display in the display window on the main unit Repeats the current chapter CHAP REPEAT CHAPTER Repeats the current title TITLE REPEAT TITLE Cancels repeat OFF REPEAT OFF Repeat types Display on the TV screen Display in the display window on the mai...

Page 37: ... in the display window on the main unit and the status bar Each time is pressed the display will be changed DVD VIDEO DVD AUDIO TOTAL Elapsed playing time of current title group T REM Remaining time of current title group TIME Elapsed playing time of current chapter track REM Remaining time of current chapter track CD VCD SVCD TIME Elapsed playing time of current track REM Remaining time of curren...

Page 38: ...r the time using the number buttons Example When you want to play back a disc from the position of 0 hour 23 minutes 45 seconds press the buttons in the order You can skip entering minutes and seconds If you enter wrong numbers press to delete the numbers and then enter the numbers again 6 Press To delete the menu bar press NOTE You may not be able to operate this function depending on the disc Th...

Page 39: ...ay window 2 Press to select a group 3 Press to move to the track list Pressing returns to the group list Continued on next page Number buttons Remote control mode selector Playback Elapsed playing time of the selected track only for MP3 WMA Tag information of the selected track only for MP3s WMAs Group list Track list Tracks con tained in the selected group This indicator lights up during program ...

Page 40: ...at playback is automatically canceled if there is a file that cannot be played back page 4 For the locations of remote control buttons refer to page 36 Group number Track number Elapsed playing time This indicator is not displayed while a JPEG is loaded Slide show playback For a JPEG disc when you press in step 5 files are continuously played back from the selected file slide show playback When yo...

Page 41: ... this item when the aspect ratio of your wide TV is fixed to 16 9 when playing back a DVD VIDEO recorded at 4 3 this product automatically adjusts the screen width of the output signal Select this item when the aspect ratio of your TV is conventional 4 3 While viewing a wide screen picture the black bars appear on the top and bottom of the screen 4 3 PS 4 3 MULTI PS pan scan Select this item when ...

Page 42: ...to Using AV COMPU LINK on page 51 Connect to the video 3 input on the TV set DVD2 Connect to the video 1 input of the TV set DVD3 Connect to the video 2 input of the TV set PARENTAL LOCK Set the parental lock function to cut off violent scenes or replace the scenes with others This is effective only for discs equipped with the parental lock function COUNTRY CODE page 40 Select your country or area...

Page 43: ...40 Listening to Discs Country Area Codes ...

Page 44: ...krit FA Persian SD Sindhi FI Finnish SG Sangho FJ Fiji SH Serbo Croatian FO Faroese SI Singhalese FY Frisian SK Slovak GA Irish SL Slovenian GD Scots Gaelic SM Samoan GL Galician SN Shona GN Guarani SO Somali GU Gujarati SQ Albanian HA Hausa SR Serbian HI Hindi SS Siswati HR Croatian ST Sesotho HU Hungarian SU Sundanese HY Armenian SV Swedish IA Interlingua SW Swahili IE Interlingue TA Tamil IK In...

Page 45: ... playback direction changes The initial play back direction after you have inserted a cas sette tape is always the normal direction The cassette tape playback direction indica tor facing right is displayed during normal playback The indicator facing left is dis played during reverse playback Operation Stop Press Fast forward Rewind Press or When a cassette tape is played back in the normal directi...

Page 46: ... the volume and make other necessary settings For adjusting the volume and making other necessary settings refer to Basic Opera tions page 17 1 Press 2 Hold down until the input level appears Each time you hold down the display toggles as follows Adjusting the Sound Input Level from Other Equipment Adjusting the sound input level of the AUX For ordinary use initial setting For increasing the level...

Page 47: ...pes of cas sette tapes You cannot obtain proper playback sound Write protect tags are attached to a cassette tape for preventing the erasing of recorded sound They enable you to avoid losing impor tant recordings because once you snap off the write protect tags you cannot record to the cas sette tape or erase recorded material When you want to use the cassette tape for recording again cover the ta...

Page 48: ...e tracks you want to record page 31 Before proceeding to step 4 play back a disc pause the playback and then press to return to the beginning of the first track Select the sound from other equip ment AUX in step 3 and then press Do not play back any tracks on the connected equipment NOTE If the cassette tape reverses direction while a track is being recorded from a disc this product starts recordi...

Page 49: ...ample Display while the sleep timer is set to 60 minutes NOTE When you set the sleep timer the display window automatically dims Before the clock has been set While 0 00 is flashing when you press CLOCK ADJUST appears Press repeatedly to select the time again With the sleep timer activated press once Set the clock beforehand page 16 Number buttons Remote control mode selector Sleep Timer Cancel Sl...

Page 50: ...t REC TIMER REC stands for Recording 9 Press 10 Press or to select a sound source Example To record an FM broadcast to a cassette tape When you want to record sound from other equipment you cannot use the recording timer function to start playback on any equipment other than this product When you want to record an FM AM radio broadcast Press and then press or the number buttons to select the prese...

Page 51: ...e the sound source you want to play back 2 Press repeatedly to select TIMER1 TIMER2 or TIMER3 Example When TIMER2 is selected 3 Press 4 Press or to set the starting time and ending time Example When you want to set the playback time from 7 00 a m to 7 30 a m You can use the number buttons to set the playback time Refer to Using the number buttons page 16 For setting the clock refer to Setting the ...

Page 52: ...s page 16 10 Press 11 Press or to adjust the playback volume 12 Press The settings appear in the display window 13 When the main unit is turned on press to turn off the main unit The playback timer is available only when the main unit is turned off NOTE During operation you can return to the previous step by pressing You can quit the playback timer settings by pressing The settings are not stored ...

Page 53: ...ut within 3 minutes the main unit automatically turns off A STANDBY OFF indicator starts to flash 20 seconds before the main unit is to turn off Press once again NOTE Leaving the volume at 0 is not the same as produc ing no sound and therefore does not start the auto standby function Disc Ejection Lock You can prohibit ejection of a disc When the main unit is turned off While holding down press on...

Page 54: ...2 input terminal of the TV DVD 3 When connecting to the VIDEO 3 input terminal of the TV DVD 1 You can enjoy sound or video simply by starting playback on the main unit You do not have to select the input setting for the TV or turn on the TV beforehand 1 Turn on the main power to the TV 2 Insert a disc into the main unit 3 Press on the main unit The following operation is performed auto matically ...

Page 55: ... cabi net with the dampened cloth followed by a soft dry cloth Do not wipe the cabinet with thinners or ben zenes Wiping it with these agents may cause discoloration of the cabinet or removal of the paint Do not spray insecticides or other highly volatile agents onto the cabinet Do not leave pieces of rubber or plastic on the cabinet for a long period Handling discs Cleaning discs Signal surface W...

Page 56: ...r printed surface facing up 21 Moisture has condensed on the lens Leave the main unit turned on wait for approximately 1 or 2 hours and then operate the main unit 3 A certain point cannot be played back properly The disc is scratched or dirty Clean or replace the disc 52 The volume of cassette tape playback is low The head or capstans are dirty Clean the head or capstans 52 You cannot record a cas...

Page 57: ...CD VCD SVCD MP3 WMA JPEG format DVD R DVD RW video format Cassette deck Frequency response Normal type I 60 Hz 14 000 Hz Wow and flutter 0 15 WRMS General Power requirement AC 240 V 50 Hz Power consumption 70 W at operation 1 3 W on standby Dimensions 165 mm W 200 mm H 355 mm D Mass approx 4 6 kg Speaker SP UXQD9S System 3 way bass reflex type Magnetically shielded type Speakers Woofer 10 cm 1 Mid...

Page 58: ...0904SKMMODJEM UX QD9S MICRO COMPONENT SYSTEM 2004 Victor Company of Japan Limited EN c ...

Page 59: ...NENT SYSTEM 微型组合音响 For hiding the demonstration display refer to page 15 有关隐藏演示显示的详情 请参阅 第 15 页 UX QD9S Consists of CA UXQD9S and SP UXQD9S 由 CA UXQD9S 和 SP UXQD9S 组成 INSTRUCTIONS 使用说明书 LVT1220 006A US English 中 文 ...

Page 60: ...onmental problems must be considered and local rules or laws governing the disposal of these batteries must be followed strictly Do not expose this apparatus to rain moisture dripping or splashing and that no objects filled with liquids such as vases shall be placed on the apparatus 注意 切勿堵塞通风口或通风孔 如果通风口或通风孔被报纸或布等物堵塞 热量将无 法散出 切勿在本系统上放置明火 如点燃的蜡烛 想要丢弃电池时 务必考虑环保问题以及严格遵守当地 关于处理废旧电池相关的法律规定和条例 切勿让本机受雨淋 受...

Page 61: ...om Place on the level surface Maintain adequate air path for ventilation by placing on a stand with a height of 10 cm or more In addition maintain the best possible air circulation 注意 正确的通风方法 为了防止触电 火灾及避免损坏 按如下要求放置机器 上面 前面 后面 侧面 在图中所示范围中 不应放置任何障 碍物 底部 放置在水平面上 放置在一个高 10 cm 或更高的台上以保留足够的通风道 此外 如图所示 尽可能保持最佳的空气循环 15cm 15cm 10cm 15cm 15cm 1cm 1cm Wall or obstructions 墙壁或障碍物 Front 前面 Main unit 本机 Main un...

Page 62: ...ing 19 Selecting a Radio Station 20 Storing Radio Stations Preset 20 Tuning In to a Preset Radio Station 20 Basic Operations of the DVD Player 21 Playback 21 Playing Back from a Position 10 Seconds Before One Touch Replay 23 Stopping Playback 24 Resuming Playback RESUME 24 Pausing Playback 24 Advancing Picture Frame by Frame 24 Fast Reverse Fast Forward Search 24 Slow Motion Playback 25 Skipping t...

Page 63: ...ng Only One Track from a Disc 45 Recording the Second or Subsequent Track to the Last Track from a Disc 45 Program Recording from a Disc 45 Recording with No Blank Time between Tracks 45 Erasing Recorded Sound from a Cassette Tape 45 Using the Timers 46 Sleep Timer 46 Recording Timer 47 Playback Timer 48 Auto Standby 50 Disc Ejection Lock 50 Using AV COMPU LINK 51 Connection and Setting 51 Operati...

Page 64: ...en the operation panel is very dirty wipe it with a cloth dampened with a small amount of a neutral detergent and then wipe it with a soft dry cloth CAUTION Do not wipe the operation panel with thinners ben zenes or other chemical agents Do not spray insecticides onto the operation panel These may cause discoloration and damage to the surface When using headphones keep the volume at a moderate lev...

Page 65: ...can play back a CD R CD RW which has been recorded in the audio CD for mat and a CD R CD RW to which audio data MP3 WMA or a still picture data JPEG file is recorded However playback is impossible in some cases due to the disc characteristics recording condition scratches or dirt on the disc or dirt or condensation on the lens Before using a CD R CD RW carefully read the cautions regarding the dis...

Page 66: ...omatic rotation function of a digital camera data goes beyond the DCF standard so the image may not be dis played If data has been processed edited and restored with PC image editing software the data may not be displayed This product cannot play back animations such as MOTION JPEG or still pictures TIFF etc other than JPEG and image data with sound The resolution of 640 x 480 pixels is recom mend...

Page 67: ...our TV page 38 NOTE If you play back an NTSC disc with this setting set to PAL you can watch the playback pictures the disc will be reproduced using PAL 60 format but the TV screen may rolls over upward and down ward rapidly NOTE If you play back a PAL disc with this setting set to NTSC you can watch the playback pictures but the following symptoms may occur The items on the disc menu will be blur...

Page 68: ...ystem Care of the cabinet When cleaning the system use a soft cloth and fol low the relevant instructions on the use of chemi cally coated cloths Do not use benzene thinner or other organic solvents including disinfectants These may cause deformation or discoloring If water gets inside the system Turn the system off and disconnect the power cord plug from the wall outlet then call the store where ...

Page 69: ...d with a stereo mini plug not supplied While the headphones are connected the speakers do not produce any sound The numbers refer to the pages in which the parts are explained Cassette holder 42 PUSH OPEN Disc tray 21 Remote control sensor 9 18 46 49 17 50 31 33 21 20 42 43 17 15 18 24 42 25 30 37 45 17 21 28 44 28 17 20 21 42 44 30 22 ...

Page 70: ...e control sensor on the main unit is approximately 5 m maximum When the effective distance decreases replace the batteries Do not drop the remote control or subject it to excessive shock The numbers refer to the pages in which the parts are explained 17 17 10 43 10 20 22 25 28 30 34 16 20 25 31 35 42 44 42 17 24 42 47 49 24 25 42 25 50 33 17 27 29 27 28 29 28 17 17 18 24 24 42 47 49 38 16 47 23 20...

Page 71: ... pointing it towards the TV 1 Make sure to slide the remote control mode selector to the TV side in advance NOTE When the batteries are replaced perform the manufacturer s code setting again This page is for when operating your TV using the remote control of this product Operating the TV Using the Remote Control Remote control mode selector Number buttons Setting the manufacturer s code Manufactur...

Page 72: ...ng the AM antenna Insert the tab into the slot Main unit rear view Main unit side view Connecting the antenna cord Connect the ends of the antenna cord as shown above When insulation covers the tips of the antenna cord twist and pull off the insulation When positioning the antennas find the best position for reception while listening to an actual radio program refer to Listening to Radio Broadcast...

Page 73: ...product refer to the operation manuals for the antenna for details of connection Connecting the FM antenna Main unit rear view FM antenna supplied Main unit side view When positioning the antennas find the best position for reception while listening to an actual radio program refer to Listening to Radio Broadcasts page 19 Main unit rear view Antenna cord not supplied Communal antenna terminal or O...

Page 74: ...TV and the speakers NOTE Improper speaker cord connection spoils the stereo effect and sound quality The impedance of speakers connected to this product must be within the range of 4 Ω to 16 Ω Cooling fan is built into the main unit for emitting generated heat When you turn on the main unit the internal cooling fan automatically starts rotating To ensure sufficient cooling leave a space of more th...

Page 75: ...s it is not a malfunction Also if the main unit is connected to a TV with a built in VCR there may be picture distortion during playback NOTE Please check that the setting for VIDEO OUT SELECT PAL NTSC on the rear panel of the main unit and the color system on your TV set are the same page 6 You need to set MONITOR TYPE in the PICTURE menu correctly according to the aspect ratio of your TV page 38...

Page 76: ...AC outlet DEMO START appears in the display window and the demonstration display starts When you press on the main unit DEMO OFF appears in the display window and the demonstration display is canceled Turning on the main unit automatically cancels the demonstration display Resuming the demonstration display With the power turned off press on the main unit Connect all necessary parts before connect...

Page 77: ...rement You can use the number buttons to specify the hour Refer to Using the number buttons shown below 3 Press To return to step 2 press 4 Set the minute in the same manner as steps 2 and 3 Press four times to display the clock and then adjust the clock starting from step 2 Press repeatedly NOTE The time display on the main unit is a 24 hour clock The clock will gain or lose approximately 1 minut...

Page 78: ...ou press the display tog gles as follows While the sound mode is set to an item other than FLAT is displayed in the display window NOTE This function does not affect recording sound 1 Press repeatedly to display MANUAL 2 For adjusting bass sound Press For adjusting treble sound Press You can adjust the sound quality within the range of 5 to 5 The display returns to the sound source dis play in a f...

Page 79: ...shed With an item other than MANUAL selected When you operate the main unit after recording finishes the color pattern for the display window and disc tray returns to the selected pattern Press Each time you press the display toggles as follows NOTE Once you press to change the color pattern the brightness returns to the initial setting except for DIMMER AUTO When you turn off the main unit the br...

Page 80: ...main unit ONLY When the main unit is turned off To select 10 kHz spacing while holding down on the main unit press on the main unit to turn on the power AM 10 kHz appears in the display window To select 9 kHz spacing while holding down on the main unit press on the main unit to turn on the power AM 9 kHz appears in the display window NOTE If the spacing is switched the memory in which the radio st...

Page 81: ... approxi mately 5 seconds 3 While the preset number is flash ing press the number buttons or to select the preset number you want to use Refer to Using the number buttons page 16 4 While the selected number is flashing press STORED appears and the selected radio station is stored NOTE When you store a radio station to a preset number to which another radio station has previously been stored the ne...

Page 82: ...manual Operations are described by mainly using the remote control buttons If there are the same marks on the main unit the buttons on the main unit can also be used The following marks tell you for which type of the discs the operation can be made The illustrations and TV screens may be different between the actual case and the description VCD stands for Video CD SVCD stands for Super Video CD Nu...

Page 83: ...ng buttons on the remote control Select a menu item with or and then press Select a menu item with the number buttons Operation may differ from the explanation given here depending on the disc type Continued on next page Elapsed playing time CD indicator The CD indicator lights up while the CD is stopped The CD indicator flashes while the CD is being played back or paused Track number Total number...

Page 84: ...n the TV screen on screen guide Containing multi angle views page 27 Containing multi audio page 26 Containing multi subtitle page 27 The disc cannot accept the operation you have attempted Play page 21 Pause page 24 Fast reverse Fast forward search page 24 Slow motion playback reverse forward directions page 25 Playing Back from a Position 10 Seconds Before One Touch Replay PBC Playback control P...

Page 85: ...tion will be cleared Resume function is set to on as the initial preset You can set the function to off page 39 While a disc is being played back Press To resume normal playback press Playback cannot be paused by pressing on the main unit during JPEG disc slide show While a disc is paused Press Each time you press picture will be advanced frame by frame You cannot operate this function with on the...

Page 86: ...er buttons or to select the track chapter you want to listen to Refer to Using the number buttons page 16 NOTE You can operate a VCD or SVCD while the disc is stopped or played back with PBC off You can operate a DVD AUDIO CD MP3 WMA or JPEG while the disc is either played back or stopped This operation may not be carried out for some discs While a disc is stopped or being played back 1 Set the re...

Page 87: ...e changed The audio can also be changed by pressing 2 Wait for a few seconds or press NOTE You can also operate this function by using the menu bar page 34 For a language code such as AA refer to Lan guage Codes page 41 When 2 channel sounds are recorded in 1 2 and multi channel sounds with down mix prohibited are recorded in 2 2 in a DVD AUDIO you can select 1 2 only Remote control mode selector ...

Page 88: ...ssing 2 Wait for a few seconds or press NOTE You can also operate this function by using the menu bar page 34 While a disc is played back or paused 1 Press Each time you press the picture magnification will be changed OFF ZOOM1 6 When a JPEG disc is used the picture magnification changes through ZOOM 1 ZOOM 2 to OFF You cannot change the picture magnification during slide show playback 2 Select th...

Page 89: ...Press to change the value 6 Press To adjust other items go back to step 3 7 Press NOTE If no operation is made for several seconds during the procedure the settings made so far will be automatically stored VFP stands for video fine processor The two speakers produce an effect resembling surround sound While a disc is being played back Press Example TV screen Each time you press the display toggles...

Page 90: ...sive mode you can enjoy better pictures CAUTION In order to enjoy pictures in the progressive mode the following requirements should be met There must be component video input termi nals on the TV set connected to the main unit The main unit and the TV set must be con nected using a component video cord page 15 When the above requirements are not satisfied leave the main unit in the Interlace mode...

Page 91: ...tarts If an incorrect pin code is entered try entering a correct pin code again There are some DVD AUDIO discs with still pic tures recorded Among the still pictures there are pictures called B S P browsable still pictures You can change these pictures as if turning over pages This operation can be carried out when B S P is lit in the display window on the main unit While a disc is being played ba...

Page 92: ... to program chapters tracks Display for DVD VIDEO Select a title number and then select a chapter number Display for DVD AUDIO MP3 WMA Select a group number and then select a track number Display for CD VCD SVCD Select a track number Playing Back the Disc in the Desired Order Program Playback Program indicator Program indicator DVD MP3 or WMA Program indicator VCD is displayed while VCD SVCD is se...

Page 93: ...s stopped hold down NOTE Ejecting the disc or turning off the main unit also erases the programmed content This operation also cancels program playback You can listen to tracks or chapters in random order While playback is stopped 1 Press repeatedly to select RANDOM Example For CD RANDOM appears in the TV screen 2 Press NOTE Pressing repeatedly does not return play back to the previous track Each ...

Page 94: ...f a designated part refer to page 35 For the locations of remote control buttons refer to page 26 Repeat Playback Repeat types Display on the TV screen Display in the display window on the main unit Repeats the current chapter CHAP REPEAT CHAPTER Repeats the current title TITLE REPEAT TITLE Cancels repeat OFF REPEAT OFF Repeat types Display on the TV screen Display in the display window on the mai...

Page 95: ...ayed in the display window on the main unit and the status bar Each time is pressed the display will be changed DVD VIDEO DVD AUDIO TOTAL Elapsed playing time of current title group T REM Remaining time of current title group TIME Elapsed playing time of current chapter track REM Remaining time of current chapter track CD VCD SVCD TIME Elapsed playing time of current track REM Remaining time of cu...

Page 96: ...r the time using the number buttons Example When you want to play back a disc from the position of 0 hour 23 minutes 45 seconds press the buttons in the order You can skip entering minutes and seconds If you enter wrong numbers press to delete the numbers and then enter the numbers again 6 Press To delete the menu bar press NOTE You may not be able to operate this function depending on the disc Th...

Page 97: ...isplay window 2 Press to select a group 3 Press to move to the track list Pressing returns to the group list Continued on next page Number buttons Remote control mode selector Playback Elapsed playing time of the selected track only for MP3 WMA Tag information of the selected track only for MP3s WMAs Group list Track list Tracks con tained in the selected group This indicator lights up during prog...

Page 98: ...at playback is automatically canceled if there is a file that cannot be played back page 4 For the locations of remote control buttons refer to page 36 Group number Track number Elapsed playing time This indicator is not displayed while a JPEG is loaded Slide show playback For a JPEG disc when you press in step 5 files are continuously played back from the selected file slide show playback When yo...

Page 99: ...lect this item when the aspect ratio of your wide TV is fixed to 16 9 when playing back a DVD VIDEO recorded at 4 3 this product automatically adjusts the screen width of the output signal Select this item when the aspect ratio of your TV is conventional 4 3 While viewing a wide screen picture the black bars appear on the top and bottom of the screen 4 3 PS 4 3 MULTI PS pan scan Select this item w...

Page 100: ...to Using AV COMPU LINK on page 51 Connect to the video 3 input on the TV set DVD2 Connect to the video 1 input of the TV set DVD3 Connect to the video 2 input of the TV set PARENTAL LOCK Set the parental lock function to cut off violent scenes or replace the scenes with others This is effective only for discs equipped with the parental lock function COUNTRY CODE page 40 Select your country or area...

Page 101: ...40 Listening to Discs English Country Area Codes ...

Page 102: ...krit FA Persian SD Sindhi FI Finnish SG Sangho FJ Fiji SH Serbo Croatian FO Faroese SI Singhalese FY Frisian SK Slovak GA Irish SL Slovenian GD Scots Gaelic SM Samoan GL Galician SN Shona GN Guarani SO Somali GU Gujarati SQ Albanian HA Hausa SR Serbian HI Hindi SS Siswati HR Croatian ST Sesotho HU Hungarian SU Sundanese HY Armenian SV Swedish IA Interlingua SW Swahili IE Interlingue TA Tamil IK In...

Page 103: ...tape playback direction changes The initial play back direction after you have inserted a cas sette tape is always the normal direction The cassette tape playback direction indica tor facing right is displayed during normal playback The indicator facing left is dis played during reverse playback Operation Stop Press Fast forward Rewind Press or When a cassette tape is played back in the normal dir...

Page 104: ... the volume and make other necessary settings For adjusting the volume and making other necessary settings refer to Basic Opera tions page 17 1 Press 2 Hold down until the input level appears Each time you hold down the display toggles as follows Adjusting the Sound Input Level from Other Equipment Adjusting the sound input level of the AUX For ordinary use initial setting For increasing the level...

Page 105: ...e types of cas sette tapes You cannot obtain proper playback sound Write protect tags are attached to a cassette tape for preventing the erasing of recorded sound They enable you to avoid losing impor tant recordings because once you snap off the write protect tags you cannot record to the cas sette tape or erase recorded material When you want to use the cassette tape for recording again cover th...

Page 106: ...e tracks you want to record page 31 Before proceeding to step 4 play back a disc pause the playback and then press to return to the beginning of the first track Select the sound from other equip ment AUX in step 3 and then press Do not play back any tracks on the connected equipment NOTE If the cassette tape reverses direction while a track is being recorded from a disc this product starts recordi...

Page 107: ...s Example Display while the sleep timer is set to 60 minutes NOTE When you set the sleep timer the display window automatically dims Before the clock has been set While 0 00 is flashing when you press CLOCK ADJUST appears Press repeatedly to select the time again With the sleep timer activated press once Set the clock beforehand page 16 Number buttons Remote control mode selector Sleep Timer Cance...

Page 108: ...t REC TIMER REC stands for Recording 9 Press 10 Press or to select a sound source Example To record an FM broadcast to a cassette tape When you want to record sound from other equipment you cannot use the recording timer function to start playback on any equipment other than this product When you want to record an FM AM radio broadcast Press and then press or the number buttons to select the prese...

Page 109: ...epare the sound source you want to play back 2 Press repeatedly to select TIMER1 TIMER2 or TIMER3 Example When TIMER2 is selected 3 Press 4 Press or to set the starting time and ending time Example When you want to set the playback time from 7 00 a m to 7 30 a m You can use the number buttons to set the playback time Refer to Using the number buttons page 16 For setting the clock refer to Setting ...

Page 110: ...s page 16 10 Press 11 Press or to adjust the playback volume 12 Press The settings appear in the display window 13 When the main unit is turned on press to turn off the main unit The playback timer is available only when the main unit is turned off NOTE During operation you can return to the previous step by pressing You can quit the playback timer settings by pressing The settings are not stored ...

Page 111: ...ed out within 3 minutes the main unit automatically turns off A STANDBY OFF indicator starts to flash 20 seconds before the main unit is to turn off Press once again NOTE Leaving the volume at 0 is not the same as produc ing no sound and therefore does not start the auto standby function Disc Ejection Lock You can prohibit ejection of a disc When the main unit is turned off While holding down pres...

Page 112: ...2 input terminal of the TV DVD 3 When connecting to the VIDEO 3 input terminal of the TV DVD 1 You can enjoy sound or video simply by starting playback on the main unit You do not have to select the input setting for the TV or turn on the TV beforehand 1 Turn on the main power to the TV 2 Insert a disc into the main unit 3 Press on the main unit The following operation is performed auto matically ...

Page 113: ... the cabi net with the dampened cloth followed by a soft dry cloth Do not wipe the cabinet with thinners or ben zenes Wiping it with these agents may cause discoloration of the cabinet or removal of the paint Do not spray insecticides or other highly volatile agents onto the cabinet Do not leave pieces of rubber or plastic on the cabinet for a long period Handling discs Cleaning discs Signal surfa...

Page 114: ...r printed surface facing up 21 Moisture has condensed on the lens Leave the main unit turned on wait for approximately 1 or 2 hours and then operate the main unit 3 A certain point cannot be played back properly The disc is scratched or dirty Clean or replace the disc 52 The volume of cassette tape playback is low The head or capstans are dirty Clean the head or capstans 52 You cannot record a cas...

Page 115: ...RW CD VCD SVCD MP3 WMA JPEG format DVD R DVD RW video format Cassette deck Frequency response Normal type I 60 Hz 14 000 Hz Wow and flutter 0 15 WRMS General Power requirement AC 230 V 50 60 Hz Power consumption 70 W at operation 1 3 W on standby Dimensions 165 mm W 200 mm H 355 mm D Mass approx 4 6 kg Speaker SP UXQD9S System 3 way bass reflex type Magnetically shielded type Speakers Woofer 10 cm...

Page 116: ...1004SKMMODJEM UX QD9S MICRO COMPONENT SYSTEM 2004 Victor Company of Japan Limited EN CS c ...

Page 117: ...NENT SYSTEM 微型组合音响 For hiding the demonstration display refer to page 15 有关隐藏演示显示的详情 请参阅 第 15 页 UX QD9S Consists of CA UXQD9S and SP UXQD9S 由 CA UXQD9S 和 SP UXQD9S 组成 INSTRUCTIONS 使用说明书 LVT1220 004A UN English 中 文 ...

Page 118: ...onmental problems must be considered and local rules or laws governing the disposal of these batteries must be followed strictly Do not expose this apparatus to rain moisture dripping or splashing and that no objects filled with liquids such as vases shall be placed on the apparatus 注意 切勿堵塞通风口或通风孔 如果通风口或通风孔被报纸或布等物堵塞 热量将无 法散出 切勿在本系统上放置明火 如点燃的蜡烛 想要丢弃电池时 务必考虑环保问题以及严格遵守当地 关于处理废旧电池相关的法律规定和条例 切勿让本机受雨淋 受...

Page 119: ...om Place on the level surface Maintain adequate air path for ventilation by placing on a stand with a height of 10 cm or more In addition maintain the best possible air circulation 注意 正确的通风方法 为了防止触电 火灾及避免损坏 按如下要求放置机器 上面 前面 后面 侧面 在图中所示范围中 不应放置任何障 碍物 底部 放置在水平面上 放置在一个高 10 cm 或更高的台上以保留足够的通风道 此外 如图所示 尽可能保持最佳的空气循环 15cm 15cm 10cm 15cm 15cm 1cm 1cm Wall or obstructions 墙壁或障碍物 Front 前面 Main unit 本机 Main un...

Page 120: ...ing 19 Selecting a Radio Station 20 Storing Radio Stations Preset 20 Tuning In to a Preset Radio Station 20 Basic Operations of the DVD Player 21 Playback 21 Playing Back from a Position 10 Seconds Before One Touch Replay 23 Stopping Playback 24 Resuming Playback RESUME 24 Pausing Playback 24 Advancing Picture Frame by Frame 24 Fast Reverse Fast Forward Search 24 Slow Motion Playback 25 Skipping t...

Page 121: ...ng Only One Track from a Disc 45 Recording the Second or Subsequent Track to the Last Track from a Disc 45 Program Recording from a Disc 45 Recording with No Blank Time between Tracks 45 Erasing Recorded Sound from a Cassette Tape 45 Using the Timers 46 Sleep Timer 46 Recording Timer 47 Playback Timer 48 Auto Standby 50 Disc Ejection Lock 50 Using AV COMPU LINK 51 Connection and Setting 51 Operati...

Page 122: ...en the operation panel is very dirty wipe it with a cloth dampened with a small amount of a neutral detergent and then wipe it with a soft dry cloth CAUTION Do not wipe the operation panel with thinners ben zenes or other chemical agents Do not spray insecticides onto the operation panel These may cause discoloration and damage to the surface When using headphones keep the volume at a moderate lev...

Page 123: ...can play back a CD R CD RW which has been recorded in the audio CD for mat and a CD R CD RW to which audio data MP3 WMA or a still picture data JPEG file is recorded However playback is impossible in some cases due to the disc characteristics recording condition scratches or dirt on the disc or dirt or condensation on the lens Before using a CD R CD RW carefully read the cautions regarding the dis...

Page 124: ...omatic rotation function of a digital camera data goes beyond the DCF standard so the image may not be dis played If data has been processed edited and restored with PC image editing software the data may not be displayed This product cannot play back animations such as MOTION JPEG or still pictures TIFF etc other than JPEG and image data with sound The resolution of 640 x 480 pixels is recom mend...

Page 125: ...our TV page 38 NOTE If you play back an NTSC disc with this setting set to PAL you can watch the playback pictures the disc will be reproduced using PAL 60 format but the TV screen may rolls over upward and down ward rapidly NOTE If you play back a PAL disc with this setting set to NTSC you can watch the playback pictures but the following symptoms may occur The items on the disc menu will be blur...

Page 126: ...ystem Care of the cabinet When cleaning the system use a soft cloth and fol low the relevant instructions on the use of chemi cally coated cloths Do not use benzene thinner or other organic solvents including disinfectants These may cause deformation or discoloring If water gets inside the system Turn the system off and disconnect the power cord plug from the wall outlet then call the store where ...

Page 127: ...d with a stereo mini plug not supplied While the headphones are connected the speakers do not produce any sound The numbers refer to the pages in which the parts are explained Cassette holder 42 PUSH OPEN Disc tray 21 Remote control sensor 9 18 46 49 17 50 31 33 21 20 42 43 17 15 18 24 42 25 30 37 45 17 21 28 44 28 17 20 21 42 44 30 22 ...

Page 128: ...e control sensor on the main unit is approximately 5 m maximum When the effective distance decreases replace the batteries Do not drop the remote control or subject it to excessive shock The numbers refer to the pages in which the parts are explained 17 17 10 43 10 20 22 25 28 30 34 16 20 25 31 35 42 44 42 17 24 42 47 49 24 25 42 25 50 33 17 27 29 27 28 29 28 17 17 18 24 24 42 47 49 38 16 47 23 20...

Page 129: ... pointing it towards the TV 1 Make sure to slide the remote control mode selector to the TV side in advance NOTE When the batteries are replaced perform the manufacturer s code setting again This page is for when operating your TV using the remote control of this product Operating the TV Using the Remote Control Remote control mode selector Number buttons Setting the manufacturer s code Manufactur...

Page 130: ...ng the AM antenna Insert the tab into the slot Main unit rear view Main unit side view Connecting the antenna cord Connect the ends of the antenna cord as shown above When insulation covers the tips of the antenna cord twist and pull off the insulation When positioning the antennas find the best position for reception while listening to an actual radio program refer to Listening to Radio Broadcast...

Page 131: ...product refer to the operation manuals for the antenna for details of connection Connecting the FM antenna Main unit rear view FM antenna supplied Main unit side view When positioning the antennas find the best position for reception while listening to an actual radio program refer to Listening to Radio Broadcasts page 19 Main unit rear view Antenna cord not supplied Communal antenna terminal or O...

Page 132: ...TV and the speakers NOTE Improper speaker cord connection spoils the stereo effect and sound quality The impedance of speakers connected to this product must be within the range of 4 Ω to 16 Ω Cooling fan is built into the main unit for emitting generated heat When you turn on the main unit the internal cooling fan automatically starts rotating To ensure sufficient cooling leave a space of more th...

Page 133: ...s it is not a malfunction Also if the main unit is connected to a TV with a built in VCR there may be picture distortion during playback NOTE Please check that the setting for VIDEO OUT SELECT PAL NTSC on the rear panel of the main unit and the color system on your TV set are the same page 6 You need to set MONITOR TYPE in the PICTURE menu correctly according to the aspect ratio of your TV page 38...

Page 134: ...AC outlet DEMO START appears in the display window and the demonstration display starts When you press on the main unit DEMO OFF appears in the display window and the demonstration display is canceled Turning on the main unit automatically cancels the demonstration display Resuming the demonstration display With the power turned off press on the main unit Connect all necessary parts before connect...

Page 135: ...rement You can use the number buttons to specify the hour Refer to Using the number buttons shown below 3 Press To return to step 2 press 4 Set the minute in the same manner as steps 2 and 3 Press four times to display the clock and then adjust the clock starting from step 2 Press repeatedly NOTE The time display on the main unit is a 24 hour clock The clock will gain or lose approximately 1 minut...

Page 136: ...ou press the display tog gles as follows While the sound mode is set to an item other than FLAT is displayed in the display window NOTE This function does not affect recording sound 1 Press repeatedly to display MANUAL 2 For adjusting bass sound Press For adjusting treble sound Press You can adjust the sound quality within the range of 5 to 5 The display returns to the sound source dis play in a f...

Page 137: ...shed With an item other than MANUAL selected When you operate the main unit after recording finishes the color pattern for the display window and disc tray returns to the selected pattern Press Each time you press the display toggles as follows NOTE Once you press to change the color pattern the brightness returns to the initial setting except for DIMMER AUTO When you turn off the main unit the br...

Page 138: ...main unit ONLY When the main unit is turned off To select 10 kHz spacing while holding down on the main unit press on the main unit to turn on the power AM 10 kHz appears in the display window To select 9 kHz spacing while holding down on the main unit press on the main unit to turn on the power AM 9 kHz appears in the display window NOTE If the spacing is switched the memory in which the radio st...

Page 139: ... approxi mately 5 seconds 3 While the preset number is flash ing press the number buttons or to select the preset number you want to use Refer to Using the number buttons page 16 4 While the selected number is flashing press STORED appears and the selected radio station is stored NOTE When you store a radio station to a preset number to which another radio station has previously been stored the ne...

Page 140: ...manual Operations are described by mainly using the remote control buttons If there are the same marks on the main unit the buttons on the main unit can also be used The following marks tell you for which type of the discs the operation can be made The illustrations and TV screens may be different between the actual case and the description VCD stands for Video CD SVCD stands for Super Video CD Nu...

Page 141: ...ng buttons on the remote control Select a menu item with or and then press Select a menu item with the number buttons Operation may differ from the explanation given here depending on the disc type Continued on next page Elapsed playing time CD indicator The CD indicator lights up while the CD is stopped The CD indicator flashes while the CD is being played back or paused Track number Total number...

Page 142: ...n the TV screen on screen guide Containing multi angle views page 27 Containing multi audio page 26 Containing multi subtitle page 27 The disc cannot accept the operation you have attempted Play page 21 Pause page 24 Fast reverse Fast forward search page 24 Slow motion playback reverse forward directions page 25 Playing Back from a Position 10 Seconds Before One Touch Replay PBC Playback control P...

Page 143: ...tion will be cleared Resume function is set to on as the initial preset You can set the function to off page 39 While a disc is being played back Press To resume normal playback press Playback cannot be paused by pressing on the main unit during JPEG disc slide show While a disc is paused Press Each time you press picture will be advanced frame by frame You cannot operate this function with on the...

Page 144: ...er buttons or to select the track chapter you want to listen to Refer to Using the number buttons page 16 NOTE You can operate a VCD or SVCD while the disc is stopped or played back with PBC off You can operate a DVD AUDIO CD MP3 WMA or JPEG while the disc is either played back or stopped This operation may not be carried out for some discs While a disc is stopped or being played back 1 Set the re...

Page 145: ...e changed The audio can also be changed by pressing 2 Wait for a few seconds or press NOTE You can also operate this function by using the menu bar page 34 For a language code such as AA refer to Lan guage Codes page 41 When 2 channel sounds are recorded in 1 2 and multi channel sounds with down mix prohibited are recorded in 2 2 in a DVD AUDIO you can select 1 2 only Remote control mode selector ...

Page 146: ...ssing 2 Wait for a few seconds or press NOTE You can also operate this function by using the menu bar page 34 While a disc is played back or paused 1 Press Each time you press the picture magnification will be changed OFF ZOOM1 6 When a JPEG disc is used the picture magnification changes through ZOOM 1 ZOOM 2 to OFF You cannot change the picture magnification during slide show playback 2 Select th...

Page 147: ...Press to change the value 6 Press To adjust other items go back to step 3 7 Press NOTE If no operation is made for several seconds during the procedure the settings made so far will be automatically stored VFP stands for video fine processor The two speakers produce an effect resembling surround sound While a disc is being played back Press Example TV screen Each time you press the display toggles...

Page 148: ...sive mode you can enjoy better pictures CAUTION In order to enjoy pictures in the progressive mode the following requirements should be met There must be component video input termi nals on the TV set connected to the main unit The main unit and the TV set must be con nected using a component video cord page 15 When the above requirements are not satisfied leave the main unit in the Interlace mode...

Page 149: ...tarts If an incorrect pin code is entered try entering a correct pin code again There are some DVD AUDIO discs with still pic tures recorded Among the still pictures there are pictures called B S P browsable still pictures You can change these pictures as if turning over pages This operation can be carried out when B S P is lit in the display window on the main unit While a disc is being played ba...

Page 150: ... to program chapters tracks Display for DVD VIDEO Select a title number and then select a chapter number Display for DVD AUDIO MP3 WMA Select a group number and then select a track number Display for CD VCD SVCD Select a track number Playing Back the Disc in the Desired Order Program Playback Program indicator Program indicator DVD MP3 or WMA Program indicator VCD is displayed while VCD SVCD is se...

Page 151: ...s stopped hold down NOTE Ejecting the disc or turning off the main unit also erases the programmed content This operation also cancels program playback You can listen to tracks or chapters in random order While playback is stopped 1 Press repeatedly to select RANDOM Example For CD RANDOM appears in the TV screen 2 Press NOTE Pressing repeatedly does not return play back to the previous track Each ...

Page 152: ...f a designated part refer to page 35 For the locations of remote control buttons refer to page 26 Repeat Playback Repeat types Display on the TV screen Display in the display window on the main unit Repeats the current chapter CHAP REPEAT CHAPTER Repeats the current title TITLE REPEAT TITLE Cancels repeat OFF REPEAT OFF Repeat types Display on the TV screen Display in the display window on the mai...

Page 153: ...ayed in the display window on the main unit and the status bar Each time is pressed the display will be changed DVD VIDEO DVD AUDIO TOTAL Elapsed playing time of current title group T REM Remaining time of current title group TIME Elapsed playing time of current chapter track REM Remaining time of current chapter track CD VCD SVCD TIME Elapsed playing time of current track REM Remaining time of cu...

Page 154: ...r the time using the number buttons Example When you want to play back a disc from the position of 0 hour 23 minutes 45 seconds press the buttons in the order You can skip entering minutes and seconds If you enter wrong numbers press to delete the numbers and then enter the numbers again 6 Press To delete the menu bar press NOTE You may not be able to operate this function depending on the disc Th...

Page 155: ...isplay window 2 Press to select a group 3 Press to move to the track list Pressing returns to the group list Continued on next page Number buttons Remote control mode selector Playback Elapsed playing time of the selected track only for MP3 WMA Tag information of the selected track only for MP3s WMAs Group list Track list Tracks con tained in the selected group This indicator lights up during prog...

Page 156: ...at playback is automatically canceled if there is a file that cannot be played back page 4 For the locations of remote control buttons refer to page 36 Group number Track number Elapsed playing time This indicator is not displayed while a JPEG is loaded Slide show playback For a JPEG disc when you press in step 5 files are continuously played back from the selected file slide show playback When yo...

Page 157: ...lect this item when the aspect ratio of your wide TV is fixed to 16 9 when playing back a DVD VIDEO recorded at 4 3 this product automatically adjusts the screen width of the output signal Select this item when the aspect ratio of your TV is conventional 4 3 While viewing a wide screen picture the black bars appear on the top and bottom of the screen 4 3 PS 4 3 MULTI PS pan scan Select this item w...

Page 158: ...to Using AV COMPU LINK on page 51 Connect to the video 3 input on the TV set DVD2 Connect to the video 1 input of the TV set DVD3 Connect to the video 2 input of the TV set PARENTAL LOCK Set the parental lock function to cut off violent scenes or replace the scenes with others This is effective only for discs equipped with the parental lock function COUNTRY CODE page 40 Select your country or area...

Page 159: ...40 Listening to Discs English Country Area Codes ...

Page 160: ...krit FA Persian SD Sindhi FI Finnish SG Sangho FJ Fiji SH Serbo Croatian FO Faroese SI Singhalese FY Frisian SK Slovak GA Irish SL Slovenian GD Scots Gaelic SM Samoan GL Galician SN Shona GN Guarani SO Somali GU Gujarati SQ Albanian HA Hausa SR Serbian HI Hindi SS Siswati HR Croatian ST Sesotho HU Hungarian SU Sundanese HY Armenian SV Swedish IA Interlingua SW Swahili IE Interlingue TA Tamil IK In...

Page 161: ...tape playback direction changes The initial play back direction after you have inserted a cas sette tape is always the normal direction The cassette tape playback direction indica tor facing right is displayed during normal playback The indicator facing left is dis played during reverse playback Operation Stop Press Fast forward Rewind Press or When a cassette tape is played back in the normal dir...

Page 162: ... the volume and make other necessary settings For adjusting the volume and making other necessary settings refer to Basic Opera tions page 17 1 Press 2 Hold down until the input level appears Each time you hold down the display toggles as follows Adjusting the Sound Input Level from Other Equipment Adjusting the sound input level of the AUX For ordinary use initial setting For increasing the level...

Page 163: ...e types of cas sette tapes You cannot obtain proper playback sound Write protect tags are attached to a cassette tape for preventing the erasing of recorded sound They enable you to avoid losing impor tant recordings because once you snap off the write protect tags you cannot record to the cas sette tape or erase recorded material When you want to use the cassette tape for recording again cover th...

Page 164: ...e tracks you want to record page 31 Before proceeding to step 4 play back a disc pause the playback and then press to return to the beginning of the first track Select the sound from other equip ment AUX in step 3 and then press Do not play back any tracks on the connected equipment NOTE If the cassette tape reverses direction while a track is being recorded from a disc this product starts recordi...

Page 165: ...s Example Display while the sleep timer is set to 60 minutes NOTE When you set the sleep timer the display window automatically dims Before the clock has been set While 0 00 is flashing when you press CLOCK ADJUST appears Press repeatedly to select the time again With the sleep timer activated press once Set the clock beforehand page 16 Number buttons Remote control mode selector Sleep Timer Cance...

Page 166: ...t REC TIMER REC stands for Recording 9 Press 10 Press or to select a sound source Example To record an FM broadcast to a cassette tape When you want to record sound from other equipment you cannot use the recording timer function to start playback on any equipment other than this product When you want to record an FM AM radio broadcast Press and then press or the number buttons to select the prese...

Page 167: ...epare the sound source you want to play back 2 Press repeatedly to select TIMER1 TIMER2 or TIMER3 Example When TIMER2 is selected 3 Press 4 Press or to set the starting time and ending time Example When you want to set the playback time from 7 00 a m to 7 30 a m You can use the number buttons to set the playback time Refer to Using the number buttons page 16 For setting the clock refer to Setting ...

Page 168: ...s page 16 10 Press 11 Press or to adjust the playback volume 12 Press The settings appear in the display window 13 When the main unit is turned on press to turn off the main unit The playback timer is available only when the main unit is turned off NOTE During operation you can return to the previous step by pressing You can quit the playback timer settings by pressing The settings are not stored ...

Page 169: ...ed out within 3 minutes the main unit automatically turns off A STANDBY OFF indicator starts to flash 20 seconds before the main unit is to turn off Press once again NOTE Leaving the volume at 0 is not the same as produc ing no sound and therefore does not start the auto standby function Disc Ejection Lock You can prohibit ejection of a disc When the main unit is turned off While holding down pres...

Page 170: ...2 input terminal of the TV DVD 3 When connecting to the VIDEO 3 input terminal of the TV DVD 1 You can enjoy sound or video simply by starting playback on the main unit You do not have to select the input setting for the TV or turn on the TV beforehand 1 Turn on the main power to the TV 2 Insert a disc into the main unit 3 Press on the main unit The following operation is performed auto matically ...

Page 171: ... the cabi net with the dampened cloth followed by a soft dry cloth Do not wipe the cabinet with thinners or ben zenes Wiping it with these agents may cause discoloration of the cabinet or removal of the paint Do not spray insecticides or other highly volatile agents onto the cabinet Do not leave pieces of rubber or plastic on the cabinet for a long period Handling discs Cleaning discs Signal surfa...

Page 172: ...r printed surface facing up 21 Moisture has condensed on the lens Leave the main unit turned on wait for approximately 1 or 2 hours and then operate the main unit 3 A certain point cannot be played back properly The disc is scratched or dirty Clean or replace the disc 52 The volume of cassette tape playback is low The head or capstans are dirty Clean the head or capstans 52 You cannot record a cas...

Page 173: ...RW CD VCD SVCD MP3 WMA JPEG format DVD R DVD RW video format Cassette deck Frequency response Normal type I 60 Hz 14 000 Hz Wow and flutter 0 15 WRMS General Power requirement AC 240 V 50 60 Hz Power consumption 70 W at operation 1 3 W on standby Dimensions 165 mm W 200 mm H 355 mm D Mass approx 4 6 kg Speaker SP UXQD9S System 3 way bass reflex type Magnetically shielded type Speakers Woofer 10 cm...

Page 174: ...1004SKMMODJEM UX QD9S MICRO COMPONENT SYSTEM 2004 Victor Company of Japan Limited EN CS c ...

Reviews: