9
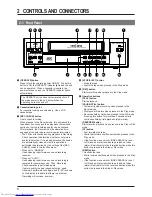
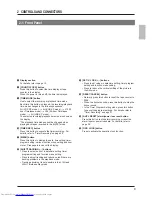
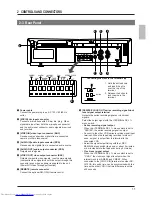
2-1 Front Panel
7
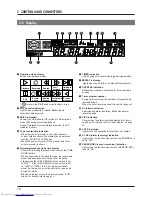
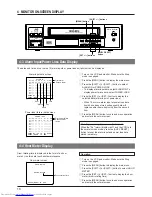
Display section
For details, refer to page 10.
8
[COUNT/CLOCK] button
Press this button to select the time display or tape
counter in the display.
When the power is turned off, the time is displayed.
9
[TIME MODE] button
Use to select the recording or playback time mode.
Each time this button is pressed, the recording/playback
time mode changes in the following sequence.
2H (VHS SP mode)
[
6H(VHS EP mode)
[
L12(12-
hour Timelapse mode)
[
L24 (24-hour Timelapse
mode)
[
2H (VHS SP mode) ....
The selected recording/playback time mode is shown on
the display.
*The playback time mode cannot be changed when
playing back tapes recorded in the 6H(EP) mode.
0
[TIMER REC] button
Press this button to execute the timer recording. For
details, refer to "Timer Recording" on page 28.
!
[MENU] button
Press this button to display the date, time setting, timer
program setting, various function menu setting and hour
meter. Press again to cancel the display.
@
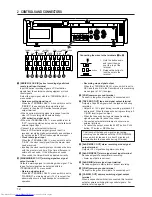
[SHIFT/TR, -] buttons
• Press to select an item in date/time setting, timer
program setting and function menu setting.
• Press to adjust tracking and reduce noise if there are
tracking problems in the play back mode.
• Tracking adustment is not possible in the L12H and
L24H Timelapse Play mode.
2 CONTROLS AND CONNECTORS
#
[SET/V. LOCK +, -] buttons
• Press to set values in date/time setting, timer program
setting and function menu setting.
• Press to reduce the vertical shifting of the picture in
the Still mode.
$
[RESET/CANCEL] button
• Normally press this button to reset the tape counter to
0000.
• When the buzzer sounds, press this button to stop the
buzzer sound.
• In the Timer Program Setting mode, press this button
to cancel the program settings. For details, refer to
"Timer Recording" on page 31.
%
[AL/PL RESET] alarm/power loss reset button
Press this button to stop alarm recording or reset the
alarm input or power loss data. For details, refer to
page 34.
^
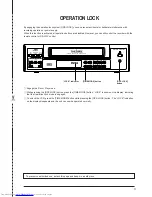
[OPE. LOCK] button
Press to activate the operation lock function.
Summary of Contents for SR-L910UA
Page 4: ...4 ...


