6
2 CONTROLS AND CONNECTORS
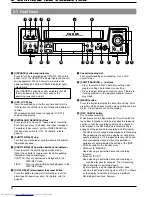
2-1 Front Panel
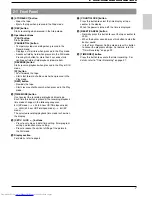
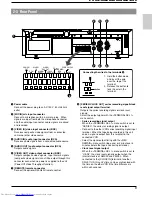
1
[OPERATE] button and indicator
Press to turn the operating power ON/OFF. When this
button is ON, the OPERATE indicator lights and the unit
can be operated. When a cassette is inserted, the
power switches on and the OPERATE indicator lights
automatically.
The OPERATE button does not completely shut off
the mains power to the unit, but switches the
operating current on and off.
2
[OPE. LOCK] key
lnsert the provided key into this key hole and turn it to
"ON" to lock the VCR in its current mode and disable all
controls.
When operation Lock mode is engaged, "LOCK" is
shown on the display.
3
[SKIP/ALARM SEARCH] buttons
Press to search and cue an indexed alarm recording.
Each time you press this button, one index is skipped.
To perform index search, set the <INDEX SEARCH>
function menu switch to “ON”. For details, refer to
page 19.
4
[SHUTTLE/FIELD] ring
Turn this ring clockwise or counterclockwise to control
the playback speed.
5
[SHUTTLE/FIELD] operation buttons and indicator
Press to switch the shuttle ring operation mode.
(When these buttons are pressed, the corresponding
indicators change accordingly.)
SHUTTLE: Press to control search playback in the
FWD/REV mode.
FIELD
: Press to control field-by-field playback in the
FWD/REV mode.
6
[AL/PL RESET] alarm/power loss reset button
Press this button to stop alarm recording or reset the
alarm input or power loss data. For details, refer to
page 32.
REC
PLAY
MENU
SHIFT/TRACKING
TIME
MODE
VIDEO CASSETTE RECORDER
HIGH DENSITY
AL/PL
RESET
COUNT/
CLOCK
SKIP/ALARM
SEARCH
TIMER
REC
OPERATE
ON
OPE. LOCK
FWD
SR-L911US
REV
RESET
/CANCEL
REW
FF
REVERSE
REC
CHECK
PAUSE/
STILL
STOP/EJECT
SET/V.LOCK
SHUTTLE
FIELD
SHUTTLE
/FIELD
10
9
11
12
17
7
6
19
18
2
3
4
5
15
16
13
14
1
8
24H
FIELD
ADVANCE
FIELD
ADVANCE
7
Cassette loading slot
For cassette loading and unloading. Use a VHS
cassette tape.
8
[SHIFT/TR, -] buttons
• Press to select an item in date/time setting, timer
program setting and function menu setting.
• Press to adjust tracking and reduce noise if there are
tracking problems in the playback mode or reverse
play mode.
9
[MENU] button
Press this button to display the date, time setting, timer
program setting, various function menu setting and hour
meter. Press again to cancel the display.
0
[REC CHECK] button
Use to check recording.
When pressed in the Record mode, this will rewind the
tape about 5 seconds and then play back the rewound
section so that the recording quality can be checked.
After playback, the Record mode is automatically re-
engaged at the point where recording was interrupted.
• The FM level is checked during playback in Recording
Check operation to determine whether or not picture
quality is defective. If it is judged defective, the heads
are automatically cleaned. How this operation is
performed is determined by the setting of the [REC
CHECK] switch in the function menu.
– When set to "MANUAL":
Head cleaning is performed once and recording
resumes.
– When set "AUTO":
Head cleaning is performed once and recording is
resumed for several seconds. Then, Recording
Check operation is performed again.
If picture quality is again judged defective, head
cleaning is performed once again and "E-09" is shown
on the display to indicate that there is a problem.
Recording will continue, however.
Summary of Contents for SR-L911US
Page 55: ...55 11 APPENDIXES ...


