background image

EN 

69

MEMO

Summary of Contents for SR-TS1U - Super Vhs Et Player Recorder

Page 1: ... CH T V V O L TV CH TV V O L TV CANCEL TIMER START STOP DATE PLAY REW REC STOP SHUTTLE PLUS PAUSE FF MENU OK CH POWER TV VCR C RESET DBS DAILY M F AUX WEEKLY PROG CHECK PROG SP EP SKIP SEARCH DISPLAY ENTER OSD CABLE DBS 1 2 3 4 5 6 7 8 9 0 2 4 1 3 EXPRESS PROGRAMMING MULTI BRAND REMOTE CONTROL UNIT MBRSET A B JOG SHUTTLE VIDEO MONO L AUDIO R PLAY FF REW MENU OK CH S VHS ET REC LINK SP EP TV VCR PA...

Page 2: ...le 820 40 of the NEC that provides guidelines for proper grounding and in particular specifies that the cable ground shall be connected to the grounding system of the building as close to the point of cable entry as practical CAUTION Changes or modifications not approved by JVC could void user s authority to operate the equipment 䡲 Cassettes marked S VHS and VHS can be used with this video cassett...

Page 3: ... paying particular attention to cords at plugs convenience receptacles and the point where they exit from the product 5 Ventilation Slots and openings in the cabinet are provided for ventilation To ensure reliable operation of the product and to protect it from overheating these openings must not be blocked or covered Do not block the openings by placing the product on a bed sofa rug or other simi...

Page 4: ...plained in the manual This section also illustrates the controls and connections on the front and rear panel the front display panel and the remote control The 墌 mark signals a reference to another page for instructions or related information Operation buttons necessary for the various procedures are clearly indicated through the use of illustrations at the beginning of each major section BEFORE Y...

Page 5: ...splay Panel 66 Remote Control 67 SPECIFICATIONS 68 FOR SERVICING Only in U S A 69 WARRANTY Only in U S A 70 INSTALLING YOUR NEW VCR 6 Connections 6 Basic Connections 6 S Video Connection 7 INITIAL SETTINGS 8 Plug Play 8 Clock 10 Preparation 10 Semi Auto 11 Manual 12 Tuner 13 Set Receivable Channels 13 Add Or Delete A Channel 14 Cable Box Control 15 Situate And Connect Controller 15 Set Cable Box O...

Page 6: ...ront display panel before the VCR is powered on the clock and tuner channels are being set automatically Wait for the time to be displayed on the front display panel before powering on the VCR FINAL PREPARATION FOR USE 5 Power on the VCR and if you have connected the VCR to the TV using the RF connector select the VCR channel 3 or 4 by setting the switch on the rear of the VCR as shown in the illu...

Page 7: ...plained in step 3 of Basic Connections 墌 pg 6 b Connect the S Video cable between the S VIDEO OUT jack on the rear of the VCR and the S Video Input on the TV S Video Cable supplied To S Video Input Connector Connect the power plug to an AC outlet before installing the lithium battery See below Installing Removing the lithium battery 1 Make sure that the power plug is connected to an AC outlet and ...

Page 8: ...le by your VCR It then automatically assigns each receivable channels to the CH5 buttons It skips non receivable channels During auto channel set the channel numbers are displayed as they are scanned and set When Plug Play has been completed successfully the correct time is displayed If an incorrect time or appears on the display panel see What To Do If Plug Play Has Failed on next page ATTENTION ...

Page 9: ... TV system In this case perform the Semi Auto 墌 pg 11 or Manual Clock Set 墌 pg 12 procedure Auto channel set has already taken place and it need not be set again If appears on the display your antenna cable may not be connected to the VCR or there may not be a Host PBS signal available in your area Ensure that the antenna cable is connected correctly Then power on and power off the VCR the Plug Pl...

Page 10: ... SET SCREEN 3 At the Main Menu screen move the highlight bar arrow to INITIAL SET by pressing CH5 or SHUTTLE PLUS fi then press OK or SHUTTLE PLUS ACCESS CLOCK SET SCREEN 4 Move the highlight bar arrow at the Initial Set screen to CLOCK SET by pressing SHUTTLE PLUS fi then press OK or SHUTTLE PLUS CABLE BOX USERS SET CLOCK MANUALLY appears on the screen for about 5 seconds then the Clock Set scree...

Page 11: ...not transmit clock setting data SELECT D S T MODE 7 You have three choices a Select AUTO and the adjustment to your VCR s clock will be made according to the incoming signal from the host channel b Select ON and the adjustment will be made based on the clock itself c Select OFF if Daylight Saving Time does not apply to you Move the highlight bar to D S T by pressing OK or SHUTTLE PLUS then press C...

Page 12: ... Manual To Make Corrections Press OK or SHUTTLE PLUS until the item you want to change blinks then press CH 5 or SHUTTLE PLUS fi SELECT TIME ZONE 8 You can select the time zone automatically or manually Move the highlight bar to TIME ZONE by pressing OK or SHUTTLE PLUS then press CH 5 or SHUTTLE PLUS fi to select AUTO or the desired time zone AUTO ATLANTIC HAWAII EASTERN ALASKA CENTRAL PACIFIC MOU...

Page 13: ...appears on screen If the scan was unsuccessful SCAN COMPLETED NO SIGNAL appears on screen Check the connections and start again RETURN TO NORMAL SCREEN 5 Press MENU INFORMATION The VCR detects the band TV or CATV and selects the correct band automatically during Auto Channel Set The selected band will be displayed on the right side of BAND on the Tuner Set screen Turn on the TV and select the VCR ...

Page 14: ...SIRED CHANNEL 4 Input the channel number using the NUMBER keys or by pressing CH5 or SHUTTLE PLUS fi then press OK or SHUTTLE PLUS to set to SKIP Repeat for each channel you want to skip Input the channel number using the NUMBER keys then press OK or SHUTTLE PLUS to set to ADD the channel RETURN TO NORMAL SCREEN 5 Press MENU TUNER SET BAND CATV AUTO CHANNEL SET MANUAL CHANNEL SET SELECT WITH 5 AND...

Page 15: ...ENNA IN connector on the rear of your VCR Set the VCR tuner to the same channel as the cable box RF output see page 16 also NOTE When connecting your cable box refer to its instruction manual CONNECT CONTROLLER TO VCR 4 Connect to the CABLE BOX connector on your VCR Suggested Location Place the cable box on top of the VCR Attach the VCR s Controller to the top of the VCR with the Controller s tran...

Page 16: ...ds on how your cable box is connected to your VCR If your cable box is connected to your VCR using an RF connection press CH 5 or SHUTTLE PLUS fi until the channel number representing the cable box s output CH2 CH9 appears on the screen If your cable box is connected to your VCR s FRONT AUDIO VIDEO IN connectors press CH 5 or SHUTTLE PLUS fi until ON F 1 FRONT appears on the screen If your cable b...

Page 17: ...lthough the supplied Controller is compatible with many different cable box brands it is possible that it will not work with your cable box If your cable box doesn t respond to any code between 1 and 25 you can t use the Controller to change cable box channels In this case make sure to leave the cable box turned on and tuned to the proper channel before the scheduled start of timer recording Pleas...

Page 18: ...Unit can control your DBS Receiver This eliminates the need for a separate DBS Receiver Remote Control Unit The VCR s Controller can also control your DBS Receiver This allows the VCR to change your DBS receiver s channel number during timer recording Each method must be set up separately To set up the VCR s Remote Control unit refer to page 58 To set up the Controller go to page 19 DBS receiver C...

Page 19: ...US SELECT DBS RECEIVER OUTPUT CHANNEL 6 Your selection depends on how your DBS receiver is connected to your VCR If your DBS receiver is connected to your VCR using an RF connection press CH 5 or SHUTTLE PLUS fi until the channel number representing the DBS receiver s output CH3 CH4 appears on the screen If your DBS receiver is connected to your VCR s FRONT AUDIO VIDEO IN connectors press CH 5 or ...

Page 20: ...rrow to NO then press OK Re enter the correct code BRAND CODE JVC DISH Network 51 ECHOSTAR DISH Network 51 PRIMESTAR 50 SONY DSS 41 RCA DSS 40 NOTES It is possible that the Controller will not work with all types of DBS receiver If your DBS receiver doesn t respond to the code you can t use the Controller to change satellite channels In this case make sure to leave the DBS receiver turned on and t...

Page 21: ... 9 0 2 4 1 3 STOP EJECT PLAY PLAY REW Rewind FF Fast Forward STOP Usable cassettes Full Size VHS T 30 ST 30 T 60 ST 60 T 90 T 120 ST 120 T 160 ST 160 ST 210 Compact VHS TC 20 ST C20 TC 30 ST C30 TC 40 ST C40 Compact VHS camcorder recordings can be played on this video recorder Simply place the recorded cassette into a VHS Cassette Adapter and it can be used just like any full sized VHS cassette Th...

Page 22: ...ns or NUMBER keys Video Calibration will not take place if the tape speed is changed while in record pause mode STOP RECORDING 6 Press STOP or STOP EJECT Then press STOP EJECT to remove the cassette Turn on the TV and select the VCR channel 3 or 4 or AV mode To prevent accidental recording on a recorded cassette remove its record safety tab To record on it later cover the hole with adhesive tape o...

Page 23: ...ct the reverse slow motion reverse play and reverse search modes OR During playback or still picture turn the SHUTTLE ring to the right for forward slow motion or to the left for reverse slow motion OR During still picture press and hold SHUTTLE PLUS for forward slow motion or press and hold SHUTTLE PLUS for reverse slow motion Release to return to still picture To resume normal playback press PLA...

Page 24: ...sired recording is located If necessary press REW or FF when play starts to search visually to find the very beginning of the desired program NOTE An index code is not placed on the tape when recording is paused and then resumed High Speed Search ACTIVATE HIGH SPEED SEARCH 1 During playback or still turn the SHUTTLE ring to the right for forward high speed search or to the left for reverse high sp...

Page 25: ...e quality When VIDEO CALIBRATION is set to OFF 墌 pg 36 you can only select NORM instead of AUTO EDIT Select when you dub tapes SOFT Select when you want to soften the picture SHARP Select when you want to sharpen the picture NOTE When you select EDIT SHARP or SOFT the selected mode will not change until you select again When you select EDIT to dub tapes be sure to select AUTO or NORM when VIDEO CA...

Page 26: ...OK or SHUTTLE PLUS to select the desired mode a Hi Fi b Hi Fi L c Hi Fi R d Normal e Mix RETURN TO NORMAL SCREEN 4 Press MENU NOTES If the tape being played back has no Hi Fi soundtrack the Normal soundtrack will be heard no matter what choice you make in step 3 If RF connection is used for TV even if Hi Fi audio monitor is selected the sound will be mono and will be reproduced in both loudspeaker...

Page 27: ...BILIZER by pressing CH 5 or SHUTTLE PLUS fi then press OK or SHUTTLE PLUS to set to ON RETURN TO NORMAL SCREEN 4 Press MENU NOTES When you finish viewing the tape be sure to set it back to OFF Regardless of the setting this function has no effect during recording and during special effects playback The Superimpose mode indications may jitter vertically when VIDEO STABILIZER is set to ON To watch r...

Page 28: ...ing end This VCR considers a 20 second unrecorded portion as the recording end When the returning position is reached playback stops and the cassette will be automatically rewound ACCESS MAIN MENU SCREEN 1 Press MENU ACCESS FUNCTION SET 2 SCREEN 2 Move the highlight bar arrow to FUNCTION SET 2 by pressing CH5 or SHUTTLE PLUS fi then press OK or SHUTTLE PLUS ACCESS REC PLAY MODE SET SCREEN 3 Move t...

Page 29: ...nction Memory The Next Function Memory tells the VCR what to do after rewinding Before continuing ensure that the VCR is in stop mode a For Automatic Start Of Playback After Tape Rewind press REW then press PLAY within 2 seconds b For Automatic Power Off After Tape Rewind press REW then press POWER within 2 seconds c For Automatic Timer Standby After Tape Rewind press REW then press TIMER within 2...

Page 30: ... by pressing CH5 or SHUTTLE PLUS fi then press OK or SHUTTLE PLUS ACCESS SUPERIMPOSE SET SCREEN 3 Move the highlight bar arrow to SUPERIMPOSE SET by pressing CH5 or SHUTTLE PLUS fi then press OK or SHUTTLE PLUS SELECT SUPERIMPOSE SET MODE 4 Move the highlight bar arrow to IN PLAY MODE or IN RECORD MODE by pressing CH5 or SHUTTLE PLUS fi then press OK or SHUTTLE PLUS to select ON or OFF a IN PLAY M...

Page 31: ...ach time The tape will forward search a little past the start of the next preview then will reverse search to the beginning of the preview and start playback SKIP MENU MOVIE ADVANCE MOVIE ADVANCE PREVIEW SKIP SEARCH PRESS 5 THEN OK PRESS SKIP TO CANCEL ATTENTION Movie Advance and Movie Advance Preview work only on prerecorded cassettes that have been recorded in the SP mode and have no safety tab ...

Page 32: ...REMOTE To AUDIO VIDEO OUT To S VIDEO OUT To AUDIO VIDEO IN To AUDIO VIDEO OUT To Audio Video Input To S VIDEO IN Mini plug cable not supplied To REMOTE Audio Video Cable Supplied Audio Video Cable Supplied S Video Cable Supplied S Video Cable Supplied To S VIDEO OUT To S Video Input SR TS1U 1 SR TS1U 2 ...

Page 33: ...ning position tape end or recording end 墌 pg 28 the other SR TS1U successively starts to play The cassette will automatically be rewound when the playback stops Therefore the cassettes loaded on two SR TS1U will be played back alternately as many times as you want STOP PLAYBACK 5 Press STOP EJECT on the SR TS1U which is playing back a cassette Using two sets of SR TS1U you can play back two casset...

Page 34: ...UT To REMOTE To REMOTE To S VIDEO OUT To S Video Input To S VIDEO IN To S Video Output Audio Video Cable Supplied Audio Video Cable Supplied Audio Video Cable Not supplied S Video Cable Not supplied S Video Cable Supplied S Video Cable Supplied Mini plug cable not supplied NOTE Select the correct input mode L 1 for the rear connector F 1 for the front connector 墌 step 3 SR TS1U 1 SR TS1U 2 ...

Page 35: ... camcorder recording another VCR playback or TV broadcast Use the buttons and controls on the VCR s front display panel for the Series Playback operations except when using Mode Lock To prohibit operations during Series Recording Mode Lock Press and hold OK on the remote control for more than 5 seconds The Mode Lock indicator lights up on the front display panel 墌 pg 66 The picture will be recorde...

Page 36: ...to FUNCTION SET 1 then press OK or SHUTTLE PLUS SELECT VIDEO CALIBRATION MODE 4 Press CH 5 or SHUTTLE PLUS fi to move the highlight bar arrow to VIDEO CALIBRATION then press OK or SHUTTLE PLUS to set to ON or OFF NOTE When recording or when playing back tapes recorded on this VCR set the Video Calibration to ON RETURN TO NORMAL SCREEN 5 Press MENU MAIN MENU FUNCTION SET 1 FUNCTION SET 2 TUNER SET ...

Page 37: ... To display the Video Calibration screen SUPERIM POSE must be set to ON or the Video Calibration screen will not appear 墌 pg 30 START RECORDING 1 Press and hold REC then press PLAY on the remote control or press REC on the VCR s front panel The VCR takes about 7 seconds to assess the quality of the tape in use then recording begins with the picture level optimized NOTES Calibration occurs immediat...

Page 38: ...SET Display Tape Remaining Time DISPLAY COUNTER INFORMATION 1 Press OSD All indications corresponding to the VCR s current status are displayed for 5 seconds The counter display remains on the screen indicating the elapsed time DISPLAY TAPE REMAINING TIME 2 Press DISPLAY until REMAIN appears on screen The approximate tape remaining time appears on the TV screen and also on the VCR display panel wi...

Page 39: ... then press OK or SHUTTLE PLUS SELECT RECORD SAFETY 4 Move the highlight bar arrow to RECORD SAFETY by pressing CH 5 or SHUTTLE PLUS fi then press OK or SHUTTLE PLUS to select ON or OFF a ON When you do not want to record onto a cassette whose record safety tab is removed b OFF When you want to record onto a cassette whose record safety tab is removed RETURN TO NORMAL SCREEN 5 Press MENU FUNCTION ...

Page 40: ...efer to page 41 To record in S VHS perform the steps 1 4 below to set the S VHS MODE to ON then insert a cassette marked S VHS the S VHS indicator will light on the display panel The S VHS recording mode will be automatically selected To record in S VHS ET on a VHS high grade cassette press S VHS ET and set to ON 墌 Super VHS ET on page 41 To record in VHS insert a cassette marked VHS press S VHS E...

Page 41: ...del S VHS recording on S VHS tape is recommended You can play back S VHS ET recordings not only on this VCR but also on another VHS VCR equipped with S VHS ET It is recommended to specifically label S VHS ET recordings so you can easily distinguish them from regular VHS recordings S VHS ET recordings can also be played back on an S VHS VCR or a VHS VCR equipped with SQPB S VHS QUASI PLAY BACK func...

Page 42: ...AP audio is recorded on both the Normal and Hi Fi tracks The main audio program is not recorded If a non SAP program is received the main audio is recorded on both the Hi Fi and Normal audio tracks To Record SAP Programs ACCESS MAIN MENU SCREEN 1 Press MENU ACCESS FUNCTION SET 1 SCREEN 2 Move the highlight bar arrow to FUNCTION SET 1 by pressing CH5 or SHUTTLE PLUS fi then press OK or SHUTTLE PLUS...

Page 43: ...1 for the clock setting procedure ENTER PLUSCODE NUMBER 3 Press the appropriate NUMBER keys to enter the PlusCode number printed in the TV listings for the TV program you wish to record and press OK If the Guide Channel Set screen appears go to step 4 If the VCR Plus program screen appears go to step 5 To make corrections press CANCEL and input the correct PlusCode number INPUT RECEIVING CHANNEL N...

Page 44: ...ormal screen appears ENGAGE TIMER MODE 8 Press TIMER The VCR turns off automatically and is displayed on the display panel IMPORTANT If you have moved to a different area or if a broadcasting station s channel number has been changed the wrong VCR or CABLE CH number will be displayed on the VCR Plus program screen in step 5 When this happens set the correct Guide Channel number for that station 墌 ...

Page 45: ...stings have a section usually a chart indicating the Guide Channel numbers assigned to each station For accurate VCR Plus programming the VCR Plus Guide Channel number for each station should match the channel number on which it is received in your area NOTES In many instances the VCR Plus Guide Channel numbers for cable and broadcast TV stations DO NOT match the channel number on which it is rece...

Page 46: ...T RECEIVING CHANNEL NUMBER 6 Press CH 5 SHUTTLE PLUS fi or the appropriate NUMBER keys to input the number of the channel on which the Guide Channel s broadcasts are received Then press OK or SHUTTLE PLUS Repeat steps 5 and 6 for each instance RETURN TO NORMAL SCREEN 7 Press MENU Ex When inputting the Guide Channel number 6 for WNJU Ind Ex If WNJU Ind is received on channel 47 GUIDE CHANNEL SET GU...

Page 47: ...TART TIME 4 Press START to enter the time you want recording to start Press and hold START to move in 30 minute increments or press and release repeatedly to move 1 minute at a time SET PROGRAM STOP TIME 5 Press STOP to enter the time you want recording to stop Press and hold STOP to move in 30 minute increments or press and release repeatedly to move 1 minute at a time SET PROGRAM DATE 6 Press DA...

Page 48: ...ower ON 10 00 11 00 12 00 ATTENTION If there is a conflict in the timer schedule and one program overlaps with another only the parts shown below in gray will be recorded Pattern 1 The program with the lower program number will be recorded Pattern 2 The program that is broadcast earlier will be recorded Pattern 3 The program that is broadcast earlier will be recorded followed by the remaining port...

Page 49: ...4 2 10 00A 10 45 40 12 25 3 11 30P 1 00 125 12 25 4 5 6 7 8 PRESS CHECK TO NEXT CANCEL OR REVISE A PROGRAM 4 To cancel a program press CANCEL at the appropriate program screen To revise a program press the appropriate button START STOP DATE CH SP EP RETURN TO NORMAL SCREEN 5 Press PROG CHECK as many times as necessary If there are still programs remaining go to step 6 RE ENGAGE TIMER 6 Press TIMER...

Page 50: ...hen press OK or SHUTTLE PLUS SELECT AUTO SP EP TIMER SET MODE 3 Move the highlight bar arrow to AUTO SP EP TIMER by pressing CH 5 or SHUTTLE PLUS fi then press OK or SHUTTLE PLUS to set to ON RETURN TO NORMAL SCREEN 4 Press MENU NOTES If you have programmed the VCR to timer record 2 or more programs the second program and those thereafter may not fit on the tape if you set the Auto SP EP Timer mod...

Page 51: ... If you want to record for more than 30 minutes press REC to extend the time Each press extends recording time by 30 minutes NOTES You can only perform ITR using the REC button on the VCR s front panel After you set the ITR time the previous display reappears To check the remaining time press REC once during record ing and the remaining time will be displayed for about 5 seconds Be careful not to ...

Page 52: ... not enter the Timer mode even though AUTO TIMER is set to ON For timer programming of the satellite receiver refer to the instruction manual of the satellite receiver Auto Satellite Prog recording is not possible if your satellite receiver does not have a timer The REC LINK button s light blinks while Auto Satellite Prog recording is in progress Pressing the VCR s POWER button while Auto Satellit...

Page 53: ...mended to use the S VIDEO connection to minimize picture degradation while editing When using your VCR as the recorder and a monaural VCR as the player connect the player s AUDIO OUT connector to the AUDIO IN L connector on the recorder LOAD CASSETTES 2 Insert the playback cassette into the player and the cassette to be recorded on into the recorder SET RECORDER S INPUT MODE 3 Set to AUX With this...

Page 54: ...a mono 3 5 mm mini plug to mono 3 5 mm mini plug connector If connecting to a camcorder with a monaural output connect the audio output connector on the camcorder to AUDIO IN L of the VCR LOAD A CASSETTE 2 Insert the cassette to be recorded on into the recorder SET RECORDER S INPUT MODE 3 Set to AUX Press the NUMBER key 0 and or CH to select depending on the connector being used L 1 for the rear p...

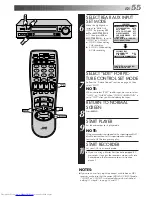
Page 55: ...ure then set its superimpose or display feature to OFF before pressing play START RECORDER 10 Set your VCR to its record mode If you are using a Master Edit Control equipped JVC camcorder it can put the recorder automatically into Record mode Refer to camcorder s instruction manual NOTES If you use an auxiliary input to connect a cable box or DBS receiver make sure that the correct REAR AUX INPUT ...

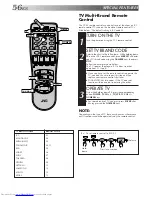
Page 56: ...te control to operate the TV you don t have to repeat this step until you replace your remote control s batteries PANASONIC has two codes If the TV does not function with one code try entering the other OPERATE TV 3 First while holding down TV press the corresponding button POWER TV CH TV VCR TV VOL NUMBER keys For some brands of TV you must press ENTER after having pressed the NUMBER keys POWER T...

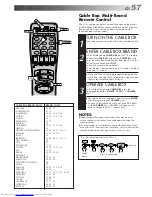
Page 57: ...le box s channel press TV CH or the NUMBER keys The CH button can be used to change the VCR s channel only 1 2 3 4 5 6 7 8 9 0 2 4 1 3 POWER CABLE DBS M B R S E T STOP E N T E R NUMBER CABLE BOX BRAND NAME BRAND CODE ARCHER 01 05 17 CABLETENNA 01 17 CABLEVIEW 15 16 17 21 25 CITIZEN 15 16 17 21 25 CURTIS 02 DIAMOND 01 17 EASTERN 19 GC BRAND 15 16 17 21 25 GEMINI 15 GENERAL INSTRUMENTS 01 04 06 11 1...

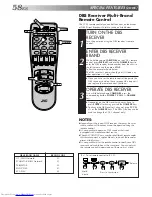
Page 58: ...on POWER TV CH NUMBER keys Depending on the DBS receiver you may have to press ENTER after having pressed the NUMBER keys To change the DBS receiver s channel press TV CH or the NUMBER keys The CH button can be used to change the VCR s channel only POWER CABLE DBS M B R S E T E N T E R STOP NUMBER DBS BRAND NAME BRAND CODE JVC DISH Network 51 ECHOSTAR DISH Network 51 PRIMESTAR 50 SONY DSS 41 RCA D...

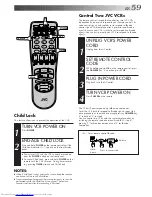
Page 59: ...code control signals The remote control is preset to send A code signals because your VCR is initially set to respond to A code signals You can easily modify your VCR to respond to B code signals A B POWER NUMBER 1 STOP TURN VCR POWER ON 1 Press POWER ENGAGE CHILD LOCK 2 Press and hold POWER on the remote control until the Child Lock indicator appears on the front display panel Power turns OFF and...

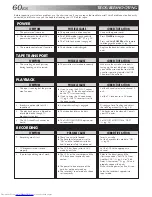
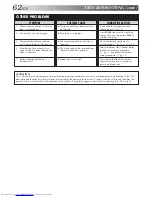
Page 60: ...cannot be heard POSSIBLE CAUSE If you re using the RF OUT connec tion 墌 pg 6 the channel selector on the TV is set incorrectly If you re using the AV connection 墌 pg 6 the TV receiver is set to the wrong mode Automatic tracking is engaged The video heads may be dirty The AUDIO MONITOR option was set incorrectly CORRECTIVE ACTION Set the channel selector to channel 3 or 4 Set the TV receiver to its...

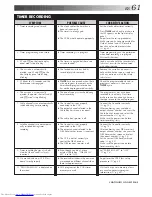
Page 61: ...rogramming won t work 3 and on the front display panel won t stop blinking 4 The cassette is automatically ejected and and on the front display panel won t stop blinking 5 blinks for 10 seconds and the timer mode is disengaged 6 The cassette is automatically ejected the power shuts off and and won t stop blinking 7 Cable channels are not automatically switched during timer recording 8 Satellite ch...

Page 62: ... TV or cable box or DBS receiver 4 Even though Auto or Semi Auto clock setting has been selected the clock is incorrect 5 Buttons and controls do not function at all POSSIBLE CAUSE Those channels have been preset to be skipped Recording is in progress The remote control brand setting is incorrect The clock setting data received from the Host Channel is incorrect Mode Lock is activated ATTENTION Th...

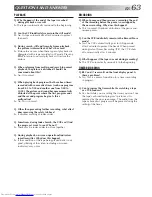
Page 63: ...an t find the program I want to see Why not A There may be index codes too close together Q During playback on screen operational indicators sometimes jitter Why does this happen A If the condition of the tape being played back is not good jittering of the video including on screen indicators may occur RECORDING Q When I pause and then resume a recording the end of the recording before the pause i...

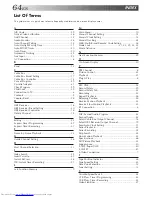
Page 64: ...ant Timer Recording 51 L Last Function Memory 9 M Main Menu 10 Manual Channel Setting 14 Manual Clock Setting 12 Manual Tracking 24 MBR Multi Brand Remote Code Setting 56 Mode Lock 21 22 29 33 35 Movie Advance 31 N Next Function Memory 29 O On Screen Display 30 P PBS Channel 8 Picture Control 25 Playback 21 Plug Play 8 R REC LINK 52 Record Safety 39 Record Safety Tab 22 Recording 22 Repeat Playbac...

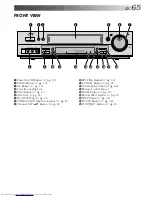
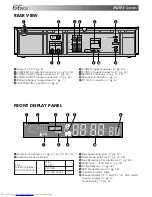
Page 65: ...Button 墌 pg 10 4 Cassette Loading Slot 5 PLAY Button 墌 pg 21 6 JOG Dial 墌 pg 23 7 SHUTTLE Ring 墌 pg 21 8 VIDEO AUDIO Input Connectors 墌 pg 53 9 Channel CH 5 Button 墌 pg 22 0 REC LINK Button 墌 pg 52 S VHS ET Button 墌 pg 41 Front Display Panel 墌 pg 66 Remote Control Sensor PAUSE Button 墌 pg 23 Record REC Button 墌 pg 22 SP EP Button 墌 pg 22 TV VCR Button 墌 pg 38 STOP EJECT Button 墌 pg 21 FRONT VIEW ...

Page 66: ...O Output Connector 墌 pg 53 9 REMOTE Connector 墌 pg 32 34 0 Channel 3 4 Switch 墌 pg 6 TV OUT Connector 墌 pg 6 FRONT DISPLAY PANEL 3 Tape Speed Indicators 墌 pg 22 4 Timer Mode Indicator 墌 pg 44 48 5 Tape Remaining Time Indicator 墌 pg 38 6 Child Lock Indicator 墌 pg 59 7 S VHS Indicator 墌 pg 40 8 VCR Mode Indicator 墌 pg 38 9 Cassette Loaded Mark 0 Channel Display L 1 and F 1 for AUX mode Counter Displ...

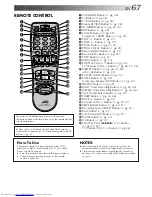
Page 67: ...OK Button 墌 pg 10 E SHUTTLE PLUS Button 墌 pg 23 24 TV Volume VOL Button 墌 pg 56 TV CH T V V O L TV CH TV V O L TV CANCEL TIMER START STOP DATE PLAY REW REC STOP SHUTTLE PLUS PAUSE FF MENU OK CH POWER TV VCR C RESET DBS DAILY M F AUX WEEKLY PROG CHECK PROG SP EP SKIP SEARCH DISPLAY ENTER OSD CABLE DBS 1 2 3 4 5 6 7 8 9 0 2 4 1 3 EXPRESS PROGRAMMING MULTI BRAND REMOTE CONTROL UNIT MBRSET A B i o u W...

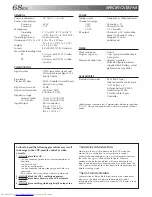
Page 68: ...ACCESSORIES Provided accessories RF cable F type Infrared remote control unit AA battery x 2 Lithium battery CR2025 Audio Video Cable S Video cable 4 pin Controller Specifications shown are for SP mode unless otherwise specified E O E Design and specifications subject to change without notice Failure to heed the following precautions may result in damage to the VCR remote control or video cassette...

Page 69: ...EN 69 MEMO ...

Page 70: ...MEMO ...

Page 71: ...MEMO ...

Page 72: ...SR TS1U COPYRIGHT 1999 VICTOR COMPANY OF JAPAN LTD U Printed in Malaysia 0599 IYV MW PJ VICTOR COMPANY OF JAPAN LIMITED ...

Reviews: