EN
7
NOTES:
●
To make the most of the Super VHS picture performance we
recommend that you use the supplied S-VIDEO cable to
connect your VCR to a TV with an S-VIDEO input connector.
●
To operate the VCR with your TV using the S-VIDEO
connection, set your TV to the AV mode using the TV's
remote control.
You can also use the
TV/VCR
button on the VCR's remote
control to set your TV to the AV mode. (
Z
pg. 66)
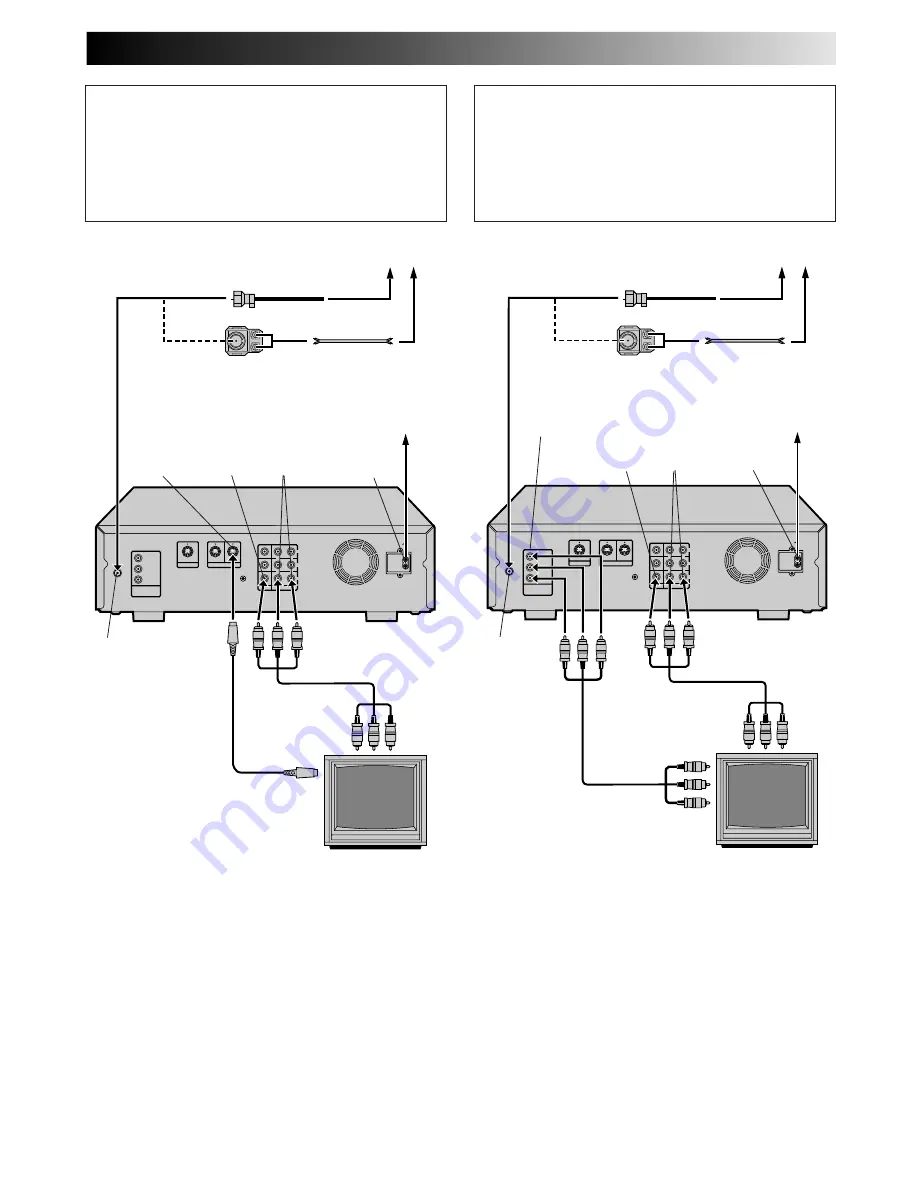
S-VIDEO Connection
CONNECT VCR TO TV
a– Connect the AV cables to the TV as explained in step
3
of
"Basic Connections" (
Z
pg. 6).
b– Connect the S-Video cable between the S-VIDEO OUT
jack on the rear of the VCR and the S-VIDEO IN jack on
the TV.
S VIDEO IN
Component Video Connection
CONNECT VCR TO TV
a– Connect the AV cables to the TV as explained in step
3
of
"Basic Connections" (
Z
pg. 6).
b– Connect the component video cables between the DV
PLAYBACK COMPONENT VIDEO OUT jacks on the rear
of the VCR and the component video input jacks on the TV.
NOTES:
●
The menu screens of the VCR are not displayed on the TV.
●
To change the settings or set the timer program on the menu
screen, switch the TV's input mode for the connection with
Audio/Video cables.
ANT. IN
AC IN
AUDIO
VIDEO
DV PLAYBACK
COMPONENT
VIDEO OUT
R
R
L
L
IN
OUT1
OUT2
CABLE
BOX
S VIDEO OUT
1
S VIDEO IN
2
Y
P
b
P
r
Antenna or Cable
Flat Feeder
Coaxial Cable
AC Outlet
TV
Matching Transformer
(not supplied)
Audio/Video
Cable (supplied)
ANT. IN
(Antenna or
Cable input)
AUDIO
OUT
S-VIDEO
OUT
AC power
inlet
Back of VCR
ANT. IN
AC IN
AUDIO
VIDEO
DV PLAYBACK
COMPONENT
VIDEO OUT
R
R
L
L
IN
OUT1
OUT2
CABLE
BOX
S VIDEO OUT
1
S VIDEO IN
2
Y
P
b
P
r
Antenna or Cable
Flat Feeder
Coaxial Cable
AC Outlet
TV
Audio/Video
Cable (supplied)
DV PLAYBACK
COMPONENT
VIDEO OUT
AUDIO
OUT
VIDEO
OUT
AC power
inlet
Back of VCR
S-Video Cable
(supplied)
VIDEO
OUT
Component
video Cable
(not supplied)
Matching Transformer
(not supplied)
ANT. IN
(Antenna or
Cable input)


