background image

37

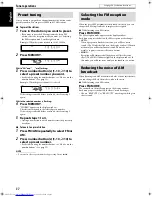
Once a station is assigned to a channel number, the station can be 
quickly tuned in. You can preset 30 FM and 15 AM stations.

7

To preset the stations

1

Tune in the station you want to preset.

• If you want to store the FM reception mode for an FM 

station, select the reception mode you want. See “Selecting 
the FM reception mode” on the right column.

Example

When the system is tuned in to 103.5 MHz.

2

Press MEMORY.

While “CH” and “_ _” are flashing:

3

Press number button(s) (1-10, 

h

10) to 

select a preset number you want.

• For details on using the number buttons, see “How to use the 

number buttons”. (See page 22.)

Example: When the preset channel 1 is selected.

If the setting is canceled before you finish, start from step 2 
again.

While the selected number is flashing:

4

Press MEMORY.

“STORED” appears on the display window.
The station is assigned to the selected preset number.
If the setting is canceled before you finish, start from step 2 
again.

5

Repeat steps 1 to 4.

• Storing a new station to a used number erases the previously 

stored one.

7

To tune in to a preset station

1

Press FM/AM repeatedly to select FM or 
AM.

2

Press number button(s) (1-10, 

h

10) to 

select a preset number.

• For details on using the number buttons, see “How to use the 

number buttons”. (See page 22.)

NOTE

• You can also select a preset number by pressing Cursor 

3

/

2

.

When the stereo FM program currently tuned in is noisy, you can 
change the FM reception mode to improve the reception.

7

While listening to an FM station

Press FM MODE.

The FM reception mode appears on the display window.
Each time you press the button, the FM reception mode changes.

• AUTO:

When a program is broadcast in stereo, you will hear stereo 
sound. (The ST indicator lights on the display window.) When in 
monaural, you will hear monaural sound. This mode is also 
useful to suppress static noise between stations.

• MONO:

Reception will be improved although you will lose the stereo 
effect. (The MONO indicator lights on the display window.) In 
this mode, you will hear noise until you are tuned in to a station.

When listening to an AM broadcast with a lot of noise interference, 
you can change the Beat Cut mode to reduce the noise.

7

While listening to an AM station

Press FM MODE.

The current Beat Cut mode appears on the display window.
Each time you press the button, the Beat Cut mode changes.
• Choose “BEATCUT1” or “BEATCUT2” according to which gives 

clearer sound.

Preset tuning

Selecting the FM reception 
mode

Reducing the noise of AM 
broadcast

Tuner operations 

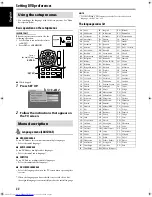
See page 36 for button locations.

TH-C60-40[C]0.book  Page 37  Wednesday, March 1, 2006  1:03 PM

Summary of Contents for TH-C40

Page 1: ...om or side of the cabinet Retain this information for future reference Model No Serial No TH C50 INSTRUCTIONS Consists of XV THC60 SP PWC60 SP THC60F SP THC60C and SP THC60S Consists of XV THC50 SP PWC50 SP THC60F SP THC60C and SP THC50S Consists of XV THC40 SP PWC40 SP THC40F SP THC40C and SP THC40S DVD DIGITAL THEATER SYSTEM ...

Page 2: ...ITAL APPARATUS DOES NOT EXCEED THE CLASS B LIMITS FOR RADIO NOISE EMISSIONS FROM DIGITAL APPARATUS AS SET OUT IN THE INTERFERENCE CAUSING EQUIPMENT STANDARD ENTITLED DIGITAL APPARATUS ICES 003 OF THE DEPARTMENT OF COMMUNICATIONS Pour le Canada CET APPAREIL NUMERIQUE RESPECTE LES LIMITES DE BRUITS RADIOELECTRIQUES APPLICABLES AUX APPAREILS NUMIRIQUES DE CLASSE B PRESCRITES DANS LA NORME SUR LE MATE...

Page 3: ...button XV THC60 XV THC50 XV THC40 Disconnect the mains plug to shut the power off completely the STANDBY lamp goes off When installing the apparatus ensure that the plug is easily accessible The button in any position does not disconnect the mains line When the system is on standby the STANDBY lamp lights red When the system is turned on the STANDBY lamp goes off The power can be remote controlled...

Page 4: ... DIMMER 17 Sleep Timer SLEEP 18 Adjusting the output level of the subwoofer and speakers 18 Adjusting the sound 18 Changing the scan mode 18 Playback 19 Basic playback 19 One Touch Replay 21 Fast forward fast reverse search 21 Skip to the beginning of a desired selection 22 Skipping at about 5 minute intervals 22 Locating a desired title group using number buttons 22 Advanced operations 23 Using t...

Page 5: ... Do not place the system in moist or dusty places Avoid high temperatures Do not expose the system to direct sunlight and do not place it near a heating device When you are away When away on travel or for other reasons for an extended period of time disconnect the power cord plugs from the wall outlet Do not block the vents Blocking the vents may damage the system Care of the cabinet When cleaning...

Page 6: ...mat Logo Licensing Corporation Notes on DVD R and DVD RW This system does not support multi border disc This system does not support a disc recorded with DVD VR format Notes on CD R and CD RW This system can play CD Rs or CD RWs recorded with ISO 9660 format This system supports multi session discs up to 12 sessions This system cannot play packet write discs Region code of DVD VIDEO DVD VIDEO play...

Page 7: ... G 726 Max picture size 352 x 288 CIF Max bit rate 384 kbps For MPEG 2 MPEG 1 files The stream format should conform to MPEG system program stream 720 x 576 pixels 25 fps 720 x 480 pixels 30 fps is recommended for the highest resolution This system also supports the resolutions of 352 x 576 480 x 576 352 x 288 pixels 25 fps and 352 x 480 480 x 480 352 x 240 pixels 30 fps The file format should be ...

Page 8: ...where the details of the parts are described Rear panel center unit Display window 24 37 20 24 18 28 20 37 31 32 Disc tray inside 19 20 20 21 19 19 19 21 36 17 17 17 19 16 16 36 31 30 36 Remote sensor 7 13 12 18 13 38 13 13 8 13 12 13 12 12 Description of parts and controls ...

Page 9: ...ure that there is sufficient space behind the powered subwoofer Do not block the ventilation openings to allow proper air circulation by the cooling fan Front Rear POWER ON lamp 16 11 Power cord 13 13 Front Rear POWER ON lamp 16 11 Power cord 13 13 Description of parts and controls ...

Page 10: ...ng the system from the remote control Aim the remote control directly to the front panel of the center unit Do not block the remote sensor 14 17 14 15 19 37 18 37 22 29 33 28 32 17 25 32 Number buttons 22 18 28 29 24 18 26 17 19 31 20 14 22 36 16 15 19 14 36 21 29 19 37 26 14 26 15 21 18 18 30 30 31 30 17 18 19 29 R03 UM 4 AAA 24F type dry cell batteries supplied Description of parts and controls ...

Page 11: ...al cable for the FM antenna as it is well shielded against interference Connecting the FM and AM antennas If the antenna cord is covered with the insulation coat twist and pull the insulation coat off and remove 1 Center unit 2 3 Antenna cord Outdoor single vinyl covered wire antenna not supplied AM loop antenna Center unit Extend the supplied FM antenna horizontally Center unit FM antenna supplie...

Page 12: ... surround speakers Assembled speakers With stand Refer to steps 1 to 3 Without stand Refer to steps 2 and 3 Front speaker SP THC60F 2 Base plate 4 Surround speaker SP THC60S 2 Stand 4 Front speaker SP THC60F 2 Base plate 2 Stand 2 or Speaker Screw M5 x 40 mm M5 x 1 5 8 inches supplied 1 Stand 2 When assembling a speaker without stand Speaker Stand or speaker directly Base plate ScrewM4x20mm M4 x 1...

Page 13: ... front surround and center speakers are equipped with their speaker cords attached directly to their speaker unit instead of having speaker terminals on their cabinet Center speaker SP THC60C 1 Red White Black Black Center speaker SP THC40C Surround speaker SP THC40S Front speaker SP THC40F Connections Do not connect the power cord until all other connections have been made ...

Page 14: ...herwise the speakers may fall over causing damage or injury Do not reproduce sounds at so high a volume that the sound is distorted otherwise the speakers may be damaged by internal heat buildup For TH C60 TH C50 When holding a speaker always grasp the lower portion Do not lean against the speakers as the speakers could fall down or break possibly causing an injury Especially be careful that child...

Page 15: ...This system outputs the audio signal of 48 kHz 44 1 kHz or 32 kHz Linear PCM from HDMI MONITOR OUT terminal To activate or deactivate the audio signal output from HDMI terminal see page 34 HDMI indicator lights on the display window when the system and the TV recognize each other and are ready to send and receive signals When you enjoy HDCP contents sound and picture may not be transmitted to the ...

Page 16: ...compatible with the USB 1 1 You can play back the following types of files in a USB mass storage class device maximum data transfer rate 2 Mbps Music MP3 WMA Picture JPEG Movie MPEG 4 ASF DivX maximum frame rate of 30 fps for progressive You cannot play back a file larger than 2 GB When playing a file which has a large transfer rate frames or sounds may be dropped during playback This system canno...

Page 17: ...control at the TV IMPORTANT Before using the remote control to operate a TV Set the remote control mode selector to TV The following buttons are available F TV Turns TV on and off TV VOL Adjusts the volume TV VIDEO Selects the input mode either TV or VIDEO CH Changes the channels 1 10 0 h10 100 Selects the channel TV RETURN Alternates between the previously selected channel and the current channel...

Page 18: ...ere is more than one code listed for your brand try each one until you enter the correct one 7 Operation Aim the remote control at the VCR IMPORTANT Before using the remote control to operate a VCR 1 Set the remote control mode selector to VCR DBS 2 Press VCR The following buttons are available F VCR DBS Turns VCR on and off 3 play button Starts playback 7 Stops operation 8 Pauses playback y Fast ...

Page 19: ...e control One of the DISC 1 5 0 buttons on the center unit One of the source selecting buttons or 3 play button on the remote control One of the DISC 1 5 3 buttons or 3 on the center unit The buttons on the remote control are used to explain most of the operations in this manual You can use the buttons on the center unit same as on the remote control for operations unless otherwise noted The butto...

Page 20: ...OLUME clockwise To decrease the volume turn VOLUME counterclockwise CAUTION Be sure to turn down the volume Before connecting or putting on headphones as high volume may damage both the headphones and your hearing Before disconnecting headphones as high volume may be suddenly output from the speakers While connecting a pair of headphones to the PHONES jack on the center unit the system automatical...

Page 21: ... TV according to the High Definition video signal compatibility of the TV When selecting AUTO 1080i or 720p the system up convert the 480i or 480p signal to 1080i or 720p When 1080i or 720p is selected the HD indicator lights on the display window 480i 480p 1080i and 720p indicate the number of scanning lines and scanning format of a video signal 480i 1080i indicates 480 1080 scanning lines with i...

Page 22: ...connecting a USB mass storage class device see Connecting a USB mass storage class device See page 13 7 When playing the following files For MP3 WMA files The file control display see page 27 appears on the TV screen For JPEG files Each file still pictures is shown on the TV screen for about 3 seconds slide show When stopping playback the file control display see page 27 appears on the TV screen F...

Page 23: ...Example When an MP3 file is played back JPEG file Example When slide show is played back ASF MPEG 2 MPEG 1 DivX file Example When an ASF file is played NOTE You can change the time information mode except for MP3 WMA ASF MPEG 2 MPEG 1 DivX See page 25 You can also check the playback information on the TV screen See page 25 Signal and speaker indicators See page 24 Chapter number Elapsed playing ti...

Page 24: ... NOTE This function works in the same title This feature may not work for some discs 7 During playback On the remote control Press y or 1 Each time you press the button the search speed changes To return to normal speed playback Press 3 play button On the center unit Press and hold x or 4 Continuously pressing x or 4 increases the fast forward reverse search speed NOTE When a DVD VIDEO VCD SVCD or...

Page 25: ...ing playback Press Cursor 3 2 Each time you press the button the playback position skips to the beginning of the previous or next interval Each interval is about 5 minutes NOTE Intervals are automatically assigned from the beginning of a file This feature is available only within the same file This feature may not work for some discs files 7 During playback or while stopped 1 Press TITLE GROUP is ...

Page 26: ...ftware encoded with Dolby Digital There are other encoding formats of digital surround introduced by Dolby Laboratories such as Dolby Digital EX 7 DTS Digital Surround 2 Used to reproduce multichannel soundtracks of the software encoded with DTS Digital Surround DTS Digital Surround DTS is another discrete multichannel digital audio format available on CD and DVD software There are other encoding ...

Page 27: ...roducing the channels sound If the channels sound decoded into 5 1 channel is reproduced only lights Selecting the surround mode The system is set up to automatically select the optimal surround mode for input signal from digital multichannel software When playing back a 2 channel source you can select the desired surround mode manually IMPORTANT Before using the remote control for the following o...

Page 28: ...K Select this for chapter search function See page 26 L Select this to change audio language or channel See page 29 M Select this to change subtitle language and subpicture See page 28 N Select this to change view angle See page 28 O Shows Playback mode status PROGRAM appears during Program Playback See page 30 RANDOM appears during Random Playback See page 31 P Shows Repeat mode status See page 3...

Page 29: ... desired item For details on using the number buttons see How to use the number buttons See page 22 To return to the menu Press RETURN repeatedly until the menu screen appears When NEXT or PREVIOUS is shown on the TV screen To go to the next page press x To return to the previous page press 4 NOTE If you want to play a PBC compatible VCD SVCD without using the PBC function perform any of the follo...

Page 30: ...ring playback MP3 WMA or while stopped 7 For MP3 WMA During playback or while stopped 7 For JPEG ASF MPEG 2 MPEG 1 DivX While stopped 1 Press Cursor 3 2 Y 5 to select the desired group track file For MP3 WMA playback starts from the selected track 2 Press 3 play button or ENTER Track playback slide show starts from the selected track file When you press ENTER for JPEG only the selected file is pla...

Page 31: ...1 Press ON SCREEN twice The on screen bar appears on the TV screen 2 Press Cursor 3 2 to highlight 3 Press ENTER 4 Press Cursor Y 5 to select the desired view angle 5 Press ENTER 6 Press ON SCREEN The on screen bar disappears 7 During playback of a disc file containing subtitles in several languages When using the SUBTITLE button 1 Press SUBTITLE Example DVD VIDEO ENGLISH is selected out of 3 subt...

Page 32: ...eturn to normal playback Press 3 play button Playing back in slow motion 7 During playback 1 Press 8 at the point where you want to start playback in slow motion from The system pauses playback 2 Press SLOW 9 Playback in forward slow motion starts For DVD VIDEO only To play back in reverse slow motion press SLOW Each time you press the button the playback speed becomes faster Example On the TV To ...

Page 33: ...instructions that appear on the TV screen to program the desired chapters tracks For details on using the number buttons see How to use the number buttons See page 22 The content s numbers that you have to specify for programming varies depending on the disc file type DVD VIDEO Titles and chapters VCD SVCD CD Tracks MP3 WMA Groups and tracks You can specify the chapters tracks whose number is up t...

Page 34: ...back of the disc next to the DVD VIDEO will not start although REPEAT ALL on the TV screen or ALL in the display window is shown For DVD VIDEO REPEAT ALL and REPEAT DISC may not be available depending on the disc When using the on screen bar except for MP3 WMA JPEG ASF MPEG 2 MPEG 1 DivX 1 Press ON SCREEN twice The on screen bar appears on the TV screen 2 Press Cursor 3 2 to highlight 3 Press ENTE...

Page 35: ...disc LOCKED appears to indicate that the tray is locked To cancel Carry out the same operation again UNLOCKED appears on the display window IMPORTANT Before using the remote control for the following operation Set the remote control mode selector to AUDIO NOTE Before you start operation There is a time limit when doing the following steps If the setting is canceled before you finish start from ste...

Page 36: ...W Hebrew SA Sanskrit AR Arabic JI Yiddish SD Sindhi AS Assamese JW Javanese SG Sangho AY Aymara KA Georgian SH Serbo Croatian AZ Azerbaijani KK Kazakh SI Singhalese BA Bashkir KL Greenlandic SK Slovak BE Byelorussian KM Cambodian SL Slovenian BG Bulgarian KN Kannada SM Samoan BH Bihari KO Korean KOR SN Shona BI Bislama KS Kashmiri SO Somali BN Bengali Bangla KU Kurdish SQ Albanian BO Tibetan KY Ki...

Page 37: ...IVE Suitable for playing back a video source disc file with relatively a lot of movements 7 SCREEN SAVER See page 21 You can activate or deactivate screen saver function 7 FILE TYPE When several types of files are recorded on a disc device you can select which files to play AUDIO Select this to play MP3 WMA files STILL PICTURE Select this to play JPEG files VIDEO Select this to play ASF MPEG 2 MPE...

Page 38: ...woofer menu SUBWOOFER LEVEL You can set the output level of the subwoofer in the 6 dB to 6 dB range CROSS OVER The signals below the preset frequency level will be sent to and be reproduced by the subwoofer Select one of the crossover frequency levels according to the size of the small speaker connected 120Hz Select when the cone speaker unit built in the speaker is about 8 cm 3 3 16 inches 150Hz ...

Page 39: ...tton until the system starts searching for stations and then release it the system stops searching automatically when a station of sufficient signal strength is tuned in to On the center unit 1 Press SOURCE repeatedly to select the band FM or AM 2 Press TUNING repeatedly until you find the frequency you want NOTE When an FM stereo program is received the ST indicator lights on the display window T...

Page 40: ...eset number For details on using the number buttons see How to use the number buttons See page 22 NOTE You can also select a preset number by pressing Cursor 3 2 When the stereo FM program currently tuned in is noisy you can change the FM reception mode to improve the reception 7 While listening to an FM station Press FM MODE The FM reception mode appears on the display window Each time you press ...

Page 41: ... COMPU LINK remote control system allows you to use the functions listed following One touch video play Simply by inserting a video cassette without its safety tab into the VCR you can enjoy video playback without manually setting other switches This system automatically turns on and changes the source to VCR The TV automatically turns on and changes the input mode to the appropriate position so t...

Page 42: ...or speaker cord is not connected Check the connection The audio cord is not connected to AUX IN VCR and or DIGITAL IN DBS correctly Connect the cord correctly See page 13 An incorrect source has been selected Select the correct source See page 17 No picture is displayed on the TV screen The video cord is not connected correctly Connect the cord correctly See page 12 The disc or file is not playabl...

Page 43: ...le file system FAT16 FAT32 Bus power supply Max 500 mA Tuner section Tuning Range FM 87 5 MHz to 108 0 MHz AM 530 kHz to 1 710 kHz General Power Requirements AC 120 V 60 Hz Power Consumption 25 W at operation 0 6 W in standby mode Dimensions W M H M D 400 mm M 85 mm M 316 mm 15 3 4 inches M 3 3 8 inches M 12 1 2 inches Mass 3 8 kg 8 4 lbs 7 Subwoofer SP PWC60 SP PWC50 Amplifier section Front Cente...

Page 44: ...wer Handling Capacity 200 W Impedance 3 Ω Frequency Range 100 Hz to 20 000 Hz Sound Pressure Level 78 dB W m Dimensions W M H M D 280 mm M 1 106 mm M 280 mm 11 1 16 inches M 43 9 16 inches M 11 1 16 inches Mass 3 3 kg 7 3 lbs each Center speaker SP THC60C Type 1 way 2 speaker Bass reflex type Magnetically shielded Type Speaker 6 5 cm 2 9 16 inches cone M 2 Power Handling Capacity 200 W Impedance 3...

Page 45: ...ically shielded Type Speaker 8 0 cm 3 3 16 inches cone M 1 1 5 cm 5 8 inches dome M 1 Power Handling Capacity 170 W Impedance 3 Ω Frequency Range 80 Hz to 20 000 Hz Sound Pressure Level 77 dB W m Dimensions W M H M D 104 5 mm M 139 mm M 101 mm 4 1 8 inches M 5 1 2 inches M 4 inches Mass 0 56 kg 1 3 lbs each Center speaker SP THC40C Type 2 way 2 speaker Bass reflex type Magnetically shielded Type S...

Page 46: ...43 ...

Page 47: ...44 ...

Page 48: ...EN 0206RYMMDWJSC 2006 Victor Company of Japan Limited TH C60 TH C50 TH C40 DVD DIGITAL THEATER SYSTEM ...

Page 49: ...40 Consists of XV THC40 SP PWC40 SP THC40F SP THC40C and SP THC40S Se compose de XV THC40 SP PWC40 SP THC40F SP THC40C et SP THC40S TH C50 Consists of XV THC50 SP PWC50 SP THC60F SP THC60C and SP THC50S Se compose de XV THC50 SP PWC50 SP THC60F SP THC60C et SP THC50S DVD DIGITAL THEATER SYSTEM SYSTÈME DVD DIGITAL CINEMA INSTRUCTIONS MANUEL D INSTRUCTIONS ...

Page 50: ...ITAL APPARATUS DOES NOT EXCEED THE CLASS B LIMITS FOR RADIO NOISE EMISSIONS FROM DIGITAL APPARATUS AS SET OUT IN THE INTERFERENCE CAUSING EQUIPMENT STANDARD ENTITLED DIGITAL APPARATUS ICES 003 OF THE DEPARTMENT OF COMMUNICATIONS Pour le Canada CET APPAREIL NUMERIQUE RESPECTE LES LIMITES DE BRUITS RADIOELECTRIQUES APPLICABLES AUX APPAREILS NUMIRIQUES DE CLASSE B PRESCRITES DANS LA NORME SUR LE MATE...

Page 51: ...button XV THC60 XV THC50 XV THC40 Disconnect the mains plug to shut the power off completely the STANDBY lamp goes off When installing the apparatus ensure that the plug is easily accessible The button in any position does not disconnect the mains line When the system is on standby the STANDBY lamp lights red When the system is turned on the STANDBY lamp goes off The power can be remote controlled...

Page 52: ... DIMMER 17 Sleep Timer SLEEP 18 Adjusting the output level of the subwoofer and speakers 18 Adjusting the sound 18 Changing the scan mode 18 Playback 19 Basic playback 19 One Touch Replay 21 Fast forward fast reverse search 21 Skip to the beginning of a desired selection 22 Skipping at about 5 minute intervals 22 Locating a desired title group using number buttons 22 Advanced operations 23 Using t...

Page 53: ...autions Avoid moisture water and dust Do not place the system in moist or dusty places Avoid high temperatures Do not expose the system to direct sunlight and do not place it near a heating device When you are away When away on travel or for other reasons for an extended period of time disconnect the power cord plugs from the wall outlet Do not block the vents Blocking the vents may damage the sys...

Page 54: ...mat Logo Licensing Corporation Notes on DVD R and DVD RW This system does not support multi border disc This system does not support a disc recorded with DVD VR format Notes on CD R and CD RW This system can play CD Rs or CD RWs recorded with ISO 9660 format This system supports multi session discs up to 12 sessions This system cannot play packet write discs Region code of DVD VIDEO DVD VIDEO play...

Page 55: ... G 726 Max picture size 352 x 288 CIF Max bit rate 384 kbps For MPEG 2 MPEG 1 files The stream format should conform to MPEG system program stream 720 x 576 pixels 25 fps 720 x 480 pixels 30 fps is recommended for the highest resolution This system also supports the resolutions of 352 x 576 480 x 576 352 x 288 pixels 25 fps and 352 x 480 480 x 480 352 x 240 pixels 30 fps The file format should be ...

Page 56: ...where the details of the parts are described Rear panel center unit Display window 24 37 20 24 18 28 20 37 31 32 Disc tray inside 19 20 20 21 19 19 19 21 36 17 17 17 19 16 16 36 31 30 36 Remote sensor 7 13 12 18 13 38 13 13 8 13 12 13 12 12 Description of parts and controls ...

Page 57: ...ure that there is sufficient space behind the powered subwoofer Do not block the ventilation openings to allow proper air circulation by the cooling fan Front Rear POWER ON lamp 16 11 Power cord 13 13 Front Rear POWER ON lamp 16 11 Power cord 13 13 Description of parts and controls ...

Page 58: ...ng the system from the remote control Aim the remote control directly to the front panel of the center unit Do not block the remote sensor 14 17 14 15 19 37 18 37 22 29 33 28 32 17 25 32 Number buttons 22 18 28 29 24 18 26 17 19 31 20 14 22 36 16 15 19 14 36 21 29 19 37 26 14 26 15 21 18 18 30 30 31 30 17 18 19 29 R03 UM 4 AAA 24F type dry cell batteries supplied Description of parts and controls ...

Page 59: ...al cable for the FM antenna as it is well shielded against interference Connecting the FM and AM antennas If the antenna cord is covered with the insulation coat twist and pull the insulation coat off and remove 1 Center unit 2 3 Antenna cord Outdoor single vinyl covered wire antenna not supplied AM loop antenna Center unit Extend the supplied FM antenna horizontally Center unit FM antenna supplie...

Page 60: ...the satellite front center surround speakers Assembled speakers With stand Refer to steps 1 to 3 Without stand Refer to steps 2 and 3 Front speaker SP THC60F 2 Base plate 4 Surround speaker SP THC60S 2 Stand 4 Front speaker SP THC60F 2 Base plate 2 Stand 2 or Speaker Screw M5 x 40 mm supplied 1 Stand 2 When assembling a speaker without stand Speaker Stand or speaker directly Base plate Screw M4 x ...

Page 61: ... front surround and center speakers are equipped with their speaker cords attached directly to their speaker unit instead of having speaker terminals on their cabinet Center speaker SP THC60C 1 Red White Black Black Center speaker SP THC40C Surround speaker SP THC40S Front speaker SP THC40F Connections Do not connect the power cord until all other connections have been made ...

Page 62: ...herwise the speakers may fall over causing damage or injury Do not reproduce sounds at so high a volume that the sound is distorted otherwise the speakers may be damaged by internal heat buildup For TH C60 TH C50 When holding a speaker always grasp the lower portion Do not lean against the speakers as the speakers could fall down or break possibly causing an injury Especially be careful that child...

Page 63: ...This system outputs the audio signal of 48 kHz 44 1 kHz or 32 kHz Linear PCM from HDMI MONITOR OUT terminal To activate or deactivate the audio signal output from HDMI terminal see page 34 HDMI indicator lights on the display window when the system and the TV recognize each other and are ready to send and receive signals When you enjoy HDCP contents sound and picture may not be transmitted to the ...

Page 64: ...patible with the USB 1 1 You can play back the following types of files in a USB mass storage class device maximum data transfer rate 2 Mbps Music MP3 WMA Picture JPEG Movie MPEG 4 ASF DivX maximum frame rate of 30 fps for progressive You cannot play back a file larger than 2 GB When playing a file which has a large transfer rate frames or sounds may be dropped during playback This system cannot r...

Page 65: ...control at the TV IMPORTANT Before using the remote control to operate a TV Set the remote control mode selector to TV The following buttons are available F TV Turns TV on and off TV VOL Adjusts the volume TV VIDEO Selects the input mode either TV or VIDEO CH Changes the channels 1 10 0 h10 100 Selects the channel TV RETURN Alternates between the previously selected channel and the current channel...

Page 66: ...ere is more than one code listed for your brand try each one until you enter the correct one 7 Operation Aim the remote control at the VCR IMPORTANT Before using the remote control to operate a VCR 1 Set the remote control mode selector to VCR DBS 2 Press VCR The following buttons are available F VCR DBS Turns VCR on and off 3 play button Starts playback 7 Stops operation 8 Pauses playback y Fast ...

Page 67: ...e control One of the DISC 1 5 0 buttons on the center unit One of the source selecting buttons or 3 play button on the remote control One of the DISC 1 5 3 buttons or 3 on the center unit The buttons on the remote control are used to explain most of the operations in this manual You can use the buttons on the center unit same as on the remote control for operations unless otherwise noted The butto...

Page 68: ...OLUME clockwise To decrease the volume turn VOLUME counterclockwise CAUTION Be sure to turn down the volume Before connecting or putting on headphones as high volume may damage both the headphones and your hearing Before disconnecting headphones as high volume may be suddenly output from the speakers While connecting a pair of headphones to the PHONES jack on the center unit the system automatical...

Page 69: ... TV according to the High Definition video signal compatibility of the TV When selecting AUTO 1080i or 720p the system up convert the 480i or 480p signal to 1080i or 720p When 1080i or 720p is selected the HD indicator lights on the display window 480i 480p 1080i and 720p indicate the number of scanning lines and scanning format of a video signal 480i 1080i indicates 480 1080 scanning lines with i...

Page 70: ...connecting a USB mass storage class device see Connecting a USB mass storage class device See page 13 7 When playing the following files For MP3 WMA files The file control display see page 27 appears on the TV screen For JPEG files Each file still pictures is shown on the TV screen for about 3 seconds slide show When stopping playback the file control display see page 27 appears on the TV screen F...

Page 71: ...Example When an MP3 file is played back JPEG file Example When slide show is played back ASF MPEG 2 MPEG 1 DivX file Example When an ASF file is played NOTE You can change the time information mode except for MP3 WMA ASF MPEG 2 MPEG 1 DivX See page 25 You can also check the playback information on the TV screen See page 25 Signal and speaker indicators See page 24 Chapter number Elapsed playing ti...

Page 72: ... NOTE This function works in the same title This feature may not work for some discs 7 During playback On the remote control Press y or 1 Each time you press the button the search speed changes To return to normal speed playback Press 3 play button On the center unit Press and hold x or 4 Continuously pressing x or 4 increases the fast forward reverse search speed NOTE When a DVD VIDEO VCD SVCD or...

Page 73: ...ing playback Press Cursor 3 2 Each time you press the button the playback position skips to the beginning of the previous or next interval Each interval is about 5 minutes NOTE Intervals are automatically assigned from the beginning of a file This feature is available only within the same file This feature may not work for some discs files 7 During playback or while stopped 1 Press TITLE GROUP is ...

Page 74: ...ftware encoded with Dolby Digital There are other encoding formats of digital surround introduced by Dolby Laboratories such as Dolby Digital EX 7 DTS Digital Surround 2 Used to reproduce multichannel soundtracks of the software encoded with DTS Digital Surround DTS Digital Surround DTS is another discrete multichannel digital audio format available on CD and DVD software There are other encoding ...

Page 75: ...roducing the channels sound If the channels sound decoded into 5 1 channel is reproduced only lights Selecting the surround mode The system is set up to automatically select the optimal surround mode for input signal from digital multichannel software When playing back a 2 channel source you can select the desired surround mode manually IMPORTANT Before using the remote control for the following o...

Page 76: ...K Select this for chapter search function See page 26 L Select this to change audio language or channel See page 29 M Select this to change subtitle language and subpicture See page 28 N Select this to change view angle See page 28 O Shows Playback mode status PROGRAM appears during Program Playback See page 30 RANDOM appears during Random Playback See page 31 P Shows Repeat mode status See page 3...

Page 77: ... desired item For details on using the number buttons see How to use the number buttons See page 22 To return to the menu Press RETURN repeatedly until the menu screen appears When NEXT or PREVIOUS is shown on the TV screen To go to the next page press x To return to the previous page press 4 NOTE If you want to play a PBC compatible VCD SVCD without using the PBC function perform any of the follo...

Page 78: ...ring playback MP3 WMA or while stopped 7 For MP3 WMA During playback or while stopped 7 For JPEG ASF MPEG 2 MPEG 1 DivX While stopped 1 Press Cursor 3 2 Y 5 to select the desired group track file For MP3 WMA playback starts from the selected track 2 Press 3 play button or ENTER Track playback slide show starts from the selected track file When you press ENTER for JPEG only the selected file is pla...

Page 79: ...1 Press ON SCREEN twice The on screen bar appears on the TV screen 2 Press Cursor 3 2 to highlight 3 Press ENTER 4 Press Cursor Y 5 to select the desired view angle 5 Press ENTER 6 Press ON SCREEN The on screen bar disappears 7 During playback of a disc file containing subtitles in several languages When using the SUBTITLE button 1 Press SUBTITLE Example DVD VIDEO ENGLISH is selected out of 3 subt...

Page 80: ...eturn to normal playback Press 3 play button Playing back in slow motion 7 During playback 1 Press 8 at the point where you want to start playback in slow motion from The system pauses playback 2 Press SLOW 9 Playback in forward slow motion starts For DVD VIDEO only To play back in reverse slow motion press SLOW Each time you press the button the playback speed becomes faster Example On the TV To ...

Page 81: ...instructions that appear on the TV screen to program the desired chapters tracks For details on using the number buttons see How to use the number buttons See page 22 The content s numbers that you have to specify for programming varies depending on the disc file type DVD VIDEO Titles and chapters VCD SVCD CD Tracks MP3 WMA Groups and tracks You can specify the chapters tracks whose number is up t...

Page 82: ...back of the disc next to the DVD VIDEO will not start although REPEAT ALL on the TV screen or ALL in the display window is shown For DVD VIDEO REPEAT ALL and REPEAT DISC may not be available depending on the disc When using the on screen bar except for MP3 WMA JPEG ASF MPEG 2 MPEG 1 DivX 1 Press ON SCREEN twice The on screen bar appears on the TV screen 2 Press Cursor 3 2 to highlight 3 Press ENTE...

Page 83: ...disc LOCKED appears to indicate that the tray is locked To cancel Carry out the same operation again UNLOCKED appears on the display window IMPORTANT Before using the remote control for the following operation Set the remote control mode selector to AUDIO NOTE Before you start operation There is a time limit when doing the following steps If the setting is canceled before you finish start from ste...

Page 84: ...W Hebrew SA Sanskrit AR Arabic JI Yiddish SD Sindhi AS Assamese JW Javanese SG Sangho AY Aymara KA Georgian SH Serbo Croatian AZ Azerbaijani KK Kazakh SI Singhalese BA Bashkir KL Greenlandic SK Slovak BE Byelorussian KM Cambodian SL Slovenian BG Bulgarian KN Kannada SM Samoan BH Bihari KO Korean KOR SN Shona BI Bislama KS Kashmiri SO Somali BN Bengali Bangla KU Kurdish SQ Albanian BO Tibetan KY Ki...

Page 85: ...IVE Suitable for playing back a video source disc file with relatively a lot of movements 7 SCREEN SAVER See page 21 You can activate or deactivate screen saver function 7 FILE TYPE When several types of files are recorded on a disc device you can select which files to play AUDIO Select this to play MP3 WMA files STILL PICTURE Select this to play JPEG files VIDEO Select this to play ASF MPEG 2 MPE...

Page 86: ...rom 0 ms to 15 ms by 1 ms 7 Subwoofer menu SUBWOOFER LEVEL You can set the output level of the subwoofer in the 6 dB to 6 dB range CROSS OVER The signals below the preset frequency level will be sent to and be reproduced by the subwoofer Select one of the crossover frequency levels according to the size of the small speaker connected 120Hz Select when the cone speaker unit built in the speaker is ...

Page 87: ...tton until the system starts searching for stations and then release it the system stops searching automatically when a station of sufficient signal strength is tuned in to On the center unit 1 Press SOURCE repeatedly to select the band FM or AM 2 Press TUNING repeatedly until you find the frequency you want NOTE When an FM stereo program is received the ST indicator lights on the display window T...

Page 88: ...eset number For details on using the number buttons see How to use the number buttons See page 22 NOTE You can also select a preset number by pressing Cursor 3 2 When the stereo FM program currently tuned in is noisy you can change the FM reception mode to improve the reception 7 While listening to an FM station Press FM MODE The FM reception mode appears on the display window Each time you press ...

Page 89: ... COMPU LINK remote control system allows you to use the functions listed following One touch video play Simply by inserting a video cassette without its safety tab into the VCR you can enjoy video playback without manually setting other switches This system automatically turns on and changes the source to VCR The TV automatically turns on and changes the input mode to the appropriate position so t...

Page 90: ...d and or speaker cord is not connected Check the connection The audio cord is not connected to AUX IN VCR and or DIGITAL IN DBS correctly Connect the cord correctly See page 13 An incorrect source has been selected Select the correct source See page 17 No picture is displayed on the TV screen The video cord is not connected correctly Connect the cord correctly See page 12 The disc or file is not p...

Page 91: ... 2 0 Full Speed Compatible device Mass Storage Class Compatible file system FAT16 FAT32 Bus power supply Max 500 mA Tuner section Tuning Range FM 87 5 MHz to 108 0 MHz AM 530 kHz to 1 710 kHz General Power Requirements AC 120 V 60 Hz Power Consumption 25 W at operation 0 6 W in standby mode Dimensions W M H M D 400 mm M 85 mm M 316 mm Mass 3 8 kg 7 Subwoofer SP PWC60 SP PWC50 Amplifier section Fro...

Page 92: ...ex type Magnetically shielded Type Speaker 5 5 cm cone M 2 Power Handling Capacity 200 W Impedance 3 Ω Frequency Range 100 Hz to 20 000 Hz Sound Pressure Level 78 dB W m Dimensions W M H M D 280 mm M 1 106 mm M 280 mm Mass 3 3 kg each Center speaker SP THC60C Type 1 way 2 speaker Bass reflex type Magnetically shielded Type Speaker 6 5 cm cone M 2 Power Handling Capacity 200 W Impedance 3 Ω Frequen...

Page 93: ... Magnetically shielded Type Speaker 8 0 cm cone M 1 1 5 cm dome M 1 Power Handling Capacity 170 W Impedance 3 Ω Frequency Range 80 Hz to 20 000 Hz Sound Pressure Level 77 dB W m Dimensions W M H M D 104 5 mm M 139 mm M 101 mm Mass 0 56 kg each Center speaker SP THC40C Type 2 way 2 speaker Bass reflex type Magnetically shielded Type Speaker 8 0 cm cone M 1 1 5 cm dome M 1 Power Handling Capacity 17...

Page 94: ...EN FR 0306RYMMDWJSC 2006 Victor Company of Japan Limited TH C60 TH C50 TH C40 DVD DIGITAL THEATER SYSTEM ...

Reviews: