background image

13

12

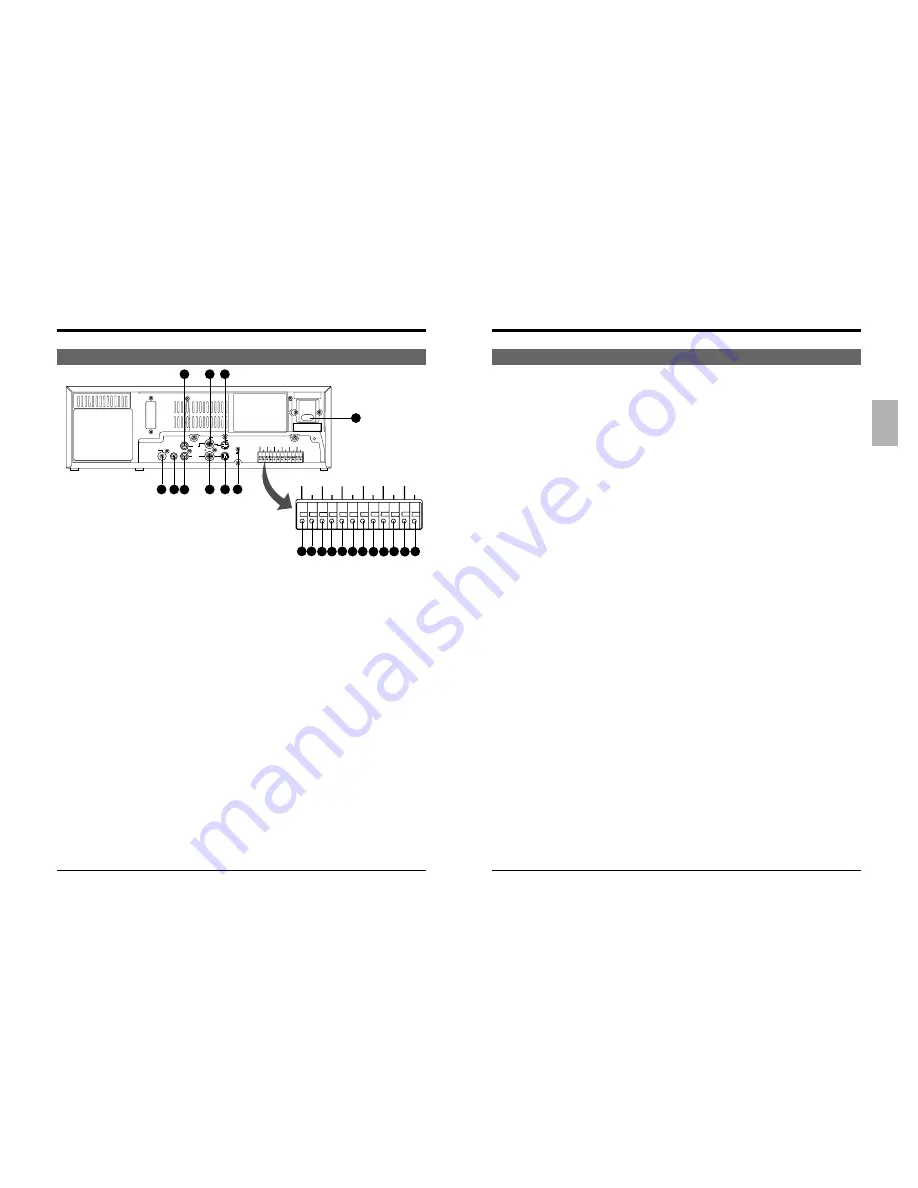
2-3  Rear Panel

2-1 FRONT PANEL

2-3  Rear Panel

0

Signal ground terminal

This ground terminal is not provided for safety purposes.
It is used to ground signals.  Connect this terminal to
ground the signal between VCRs.

!

[CAM SW OUT] camera switching signal output
terminal

When a sequential switcher is connected, this terminal
outputs camera switching timing control signals. For
details on these signals, refer to page 65.

@

[COM] common ground terminal

Connect to the signal ground terminal of a connected
unit.

#

[ALARM IN] alarm signal input terminal

Receives signals to start alarm or sensor recording.

$

[ALARM RESET] alarm signal reset input terminal

Receives signals to cancel alarm recording.
* Alarm input data is not reset.

%

[ALARM REC OUT] alarm recording mode signal
output terminal

O12 V signals during alarm recording.

^

[TAPE END OUT] tape end signal output terminal

Outputs a signal when the tape ends during recording.
If the menu switch <CNT TAPE END> on the <SRI/EXT
MODE> screen is set, signals are output when the
specified tape reel counter value is exceeded.
• Outputs a +12 V signal during recording.  When the

tape ends or the specified counter value is passed, a 0
V (GND level) signal is output.

• When the tape ends during auto repeat recording or

auto rewind recording, 0 V signal is output for about 2
seconds.

• Connect an external alarm or buzzer via an external

interface.

• To cancel the output, press the [EJECT] button,

[PLAY] button, [FF] button or [REW] button.

1

[AC IN] connector

Connect to an AC 220-240 V, 50/60 Hz power outlet
using the provided AC power cable.

2

[REMOTE] remote connector (RCA)

Connect the optional RM-G30U remote control.

3

[MIC IN] mic input connector

Connect a microphone with 3.6-mm dia. plug. When
signals are input from both the microphone connector
and the audio input connector, audio signals are mixed
and recorded.

4

[AUDIO IN] audio input connector (RCA)

Receives audio signals from a connected audio source.

5

[AUDIO OUT] audio output connector (RCA)

Outputs audio signals. No signal is output in the
Timelapse Recording/Playback mode (except in the
L12H/L24H mode).

6

[VIDEO IN] video input connector (BNC)

Receives composite video signals from a connected
camera or other video source.
* To input a composite video signal, set the menu switch

<VIDEO IN> to “LINE”.

7

[VIDEO OUT] video output connector (BNC)

Outputs composite video signals. Even when the power
is not supplied to this unit, input signals (composite
video signals) from a camera can be output through this
connector (Operating mode-Off Video Throughout
function).

8

[Y/C IN] YC input terminal (4-pin)

To input separate YC signals.
* When inputting separate YC signals, set the menu

switch <VIDEO IN> to “Y/C”.

9

[Y/C OUT] YC output terminal (4-pin)

To output separate YC signals.

2  CONTROLS AND CONNECTORS

2  CONTROLS AND CONNECTORS

&

[COM] common ground terminal

Connect to the signal ground terminal of a connected
unit.

*

[WARNING OUT] warning signal output terminal

Outputs warning signals (+12 V) when a tape running or
mechanism problem occurs.

(

[CLOCK RESET IN] clock reset input terminal

Connect to a master clock or another SR-S990E/EK’s
[CLOCK RESET OUT] terminal.  When the clock reset
signal is input, the time is automatically synchronized
with the master clock or another SR-S990E/EK’s clock.
However, the time difference between VCRs should be
within ±30 seconds.
When the clock reset signal is input, the clock in this unit
is reset as shown below.
• When the seconds value is 29 or less, the minutes

value is the same but the seconds value is reset to 0.
(eg. 12:34:29 —> 12:34:00)

• When the seconds value is 30 or more, the second

value is reset to 00 and the minutes value is increased
by one. (e.g. 12:34:30 —> 12:35:00)

)

[CLOCK RESET OUT] clock reset output terminal

Outputs the clock reset signal.
The clock reset signal is output in the following cases.
• When the internal clock is at 0:00 or 12:00

When this unit is connected to another SR-S990E/EK’s
[CLOCK RESET IN] terminal, the other VCR’s clock
can be set to the clock in this unit.  However, the time
difference should be within ±30 seconds.

q

[SERIES REC IN] series recording/VCR activation
signal input terminal

Receives series recording signal or VCR activation
signal from an external control device.
Select the input signal with the menu switches in the
<SRI/EXT MODE> menu.

5

 Series recording input

A series recording signal is input when [SRI/EXT
REC] is set to “SERIES”.
• Connect to another VCR’s series recording signal

output terminal.

• When the tape in the preceding VCR ends, a signal

is delivered to this terminal and recording starts
automatically.
When the menu switch <CNT TAPE END> on the
<SRI/EXT MODE> screen is set, the signals are
delivered when the specified tape reel counter
value is reached. Recording starts automatically.

5

 VCR activation signal input

When [SRI/EXT REC] is set to “EXT”, recording is
started and stopped with an external signal.
• Connect to an external control device.

If a VCR activation signal (ground input) is input to
this terminal, the VCR starts recording
automatically and continues recording for as long
as the VCR activation signal is input.

w

[SERIES REC OUT] series recording signal output
terminal

Outputs series recording signals.
A series recording signal is output when [SRI/EXT REC]
is set to “SERIES”.
• Connect to another VCR’s series recording signal

input terminal.

• Outputs a signal when the tape being recorded in this

unit ends.
When the menu switch <CNT TAPE END> on the
<SRI/EXT MODE> screen is set, the signals are
output when the specified tape reel counter value is
reached.

AC~IN

AC220-240V~50/60Hz

REMOTE

MIC

IN

OUT

Y/C

AUDIO

VIDEO

R S - 2 3 2 C

CAM SW

OUT

ALARM

IN

COM

COM

ALARM

REC OUT

ALARM
RESET

TAPE

END OUT

WARNING

OUT

CLOCK

RESET  IN

SERIES
REC IN

SERIES

REC  OUT

CLOCK

RESET  OUT

CAM SW

OUT

ALARM

IN

COM

COM

ALARM

REC OUT

ALARM
RESET

TAPE

END OUT

WARNING

OUT

CLOCK

RESET  IN

SERIES
REC  IN

SERIES

REC  OUT

CLOCK

RESET  OUT

15

14

13

12

11

6

4

3 5

7

10

2

1

8

9

20

19

18

17

21 22

16

Summary of Contents for TIMELAPSE SR-S990E

Page 1: ...k you for purchasing this JVC product Before operating this unit please read the instructions carefully to ensure the best possible performance R R SR S990E VIDEO CASSETTE RECORDER REC REC STOP REC CHECK EJECT OPERATE OPERATE VHS PAL 625 VHS PAL 625 This instruction book is made from 100 recycled paper PREPARATION RECORDING ON SCREEN MENU SWITCHES INTRODUCTION CONTROLS AND CONNECTORS CONNECTIONS P...

Page 2: ... signal lead or aerial IMPORTANT Connection to the mains supply in the United Kingdom DO NOT cut off the mains plug from this equipment If the plug fitted is not suitable for the power points in your home or the cable is too short to reach a power point then obtain a proper safety approved extension lead adapter or consult your dealer BE SURE to replace the fuse only with an identical approved typ...

Page 3: ...re 45 6 10 External Timer Recording 45 6 11 Tape End Buzzer 45 7 PLAYBACK AND SPECIAL EFFECTS PLAYBACK 7 1 Preparation 46 7 2 Playback 46 7 3 Special Effects Playback 47 Still Field advance reverse playback 47 Shuttle search playback 48 7 4 Alarm Search Date and Time Search 49 7 5 Repeat Playback 51 7 6 Counter Memory Function 51 7 7 Tracking V Lock Adjustment 52 7 8 V Pulse 52 8 TROUBLESHOOTING 8...

Page 4: ... also promotes the wear and deterioration of mechanical parts by causing poor contact between tape and heads This also prevents the VCR from maintaining video and audio quality at high levels To prevent wear and deterioration clean the heads regularly using a head cleaning tape However because a head cleaning tape alone cannot clean the entire tape transport mechanism this should also be inspected...

Page 5: ...n page 31 2 3 1 7 6 5 4 15 14 13 12 11 10 9 8 SR S990E VIDEO CASSETTE RECORDER REC REC STOP REC CHECK EJECT OPERATE REVERSE FIELD REV FIELD ADV REW PLAY TRACKING TIMER SEARCH RESET CANCEL DISPLAY LOCK CNTRESET MENU TIME MODE SHIFT ON SCREEN OPERATE V LOCK PAUSE FF SET VHS PAL 625 5 Condensation When cold beer is poured into a glass water drops appear on the glass s surface This phenomenon is calle...

Page 6: ...ing menu switch setting 2 3 4 5 1 6 7 8 9 13 12 11 10 13 14 24 25 22 23 20 19 18 17 16 SR S990E REC REC STOP REC CHECK EJECT OPERATE REVERSE FIELD REV FIELD ADV REW PLAY TRACKING TIMER SEARCH RESET CANCEL DISPLAY LOCK CNTRESET MENU TIME MODE SHIFT ON SCREEN OPERATE V LOCK PAUSE FF SET 21 VHS PAL 625 VIDEO CASSETTE RECORDER SEARCH button Use to search the alarm recorded section or a section recorde...

Page 7: ...f a connected unit WARNING OUT warning signal output terminal Outputs warning signals 12 V when a tape running or mechanism problem occurs CLOCK RESET IN clock reset input terminal Connect to a master clock or another SR S990E EK s CLOCK RESET OUT terminal When the clock reset signal is input the time is automatically synchronized with the master clock or another SR S990E EK s clock However the ti...

Page 8: ... amplifier 4 When connecting an alarm sensor connect it to the SR S990E EK s alarm input terminal 5 When the connection is complete connect the power plug to an AC 220 240 V 50 60 Hz outlet CONNECTION TO THE SW 501E SW 502E SEQUENTIAL SWITCHER 1 Connect pin 6 on the sequential switcher s TIMER INPUT connector to the VCR s CAMERA SW OUT terminal Connect pin 1 to the GND terminal 2 Connect pin 8 on ...

Page 9: ...rated devices ALARM COM IN Sequential switcher alarm output terminal ALARM REC OUT COM Switch ALARM RESET External interface Alarm lamp COM Vcc 5V 12V Vcc ALARM RESET Switch COM CAM SW OUT Sequential switcher camera switching signal input TAPE END OUT tape end output terminal WARNING OUT warning signal output terminal COM WARNING OUT External interface Alarm lamp COM TAPE END OUT External interfac...

Page 10: ...play HOLiDY Shows timer recording program settings at specified dates 5 HOUR METER VCR s display HOUR Shows the VCR s operating time drum rotation time 5 OTHER VCR s display OTHER Shows the date and time when an alarm was input or a power failure occurred SET button Operation 1 Turn on the monitor and VCR 2 Press the MENU button to display the main menu screen 3 Press the SHIFT 7 button to set the...

Page 11: ...sses are shown When 5 or more power losses are input the most recent data will replace the earliest data beginning with the second item 7 Press the MENU button three times to restore the normal screen Press the MENU button once to restore the OTHER screen and press once more to restore the main menu Resetting alarm input power loss failure data Press the RESET CANCEL button on the alarm in list sc...

Page 12: ...ing screen can be accessed independently from the main menu MENU button SHIFT 7 button SET button SET button Main menu screen MENU button ON SCREEN F DISPLAY MODE screen SET button SRI EXT ALARM SENSOR MODE screen VIDEO VTR MODE screen MENU button Operation 1 Turn on the VCR and monitor 2 Press the MENU button to display the main menu on the monitor 3 Press the SHIFT 7 button to select the menu sw...

Page 13: ...ing or automatic recording after power failure is disabled regardless of whether power is supplied or not ON Recording starts automatically when power is turned on POWER ON OFF REC ON OFF ON Sets whether or not Recording Check is automatically performed at the beginning of a tape in the Repeat Recording mode OFF Automatic recording check function is disabled ON Automatic recording check function i...

Page 14: ...ON The buzzer sounds when the tape ends during recording Also the buzzer sounds when the tape reel counter value set with the menu switch CNT TAPE END on the SRI EXT MODE screen is reached When the mode is changed by pressing the REW button EJECT button or OPERATE button the buzzer sound stops BUZZER TAPE END OFF ON OFF ON AL SENSOR OFF IN ON OFF ON Selects whether or not the buzzer sounds during ...

Page 15: ...DE For alarm recording set to ALARM or ALL For details refer to 6 4 Alarm Recording on page 38 For sensor recording set to SENSOR or ALL For details refer to 6 5 Sensor Recording on page 40 5 BUZZER TAPE END Set to ON if you want the buzzer to sound when the tape ends during recording 5 IN OUT CAMERA SW Set the camera switching timing signal output to an external sequential switcher during recordi...

Page 16: ...s automatically re engaged at the point where the recording was interrupted During playback in the Recording Check mode check the picture to ensure that the recording is satisfactory If the signals are not recorded properly the built in head cleaner cleans the heads and recording continues In this case the error code E 09 is shown on the display for about 10 seconds 1 Press the OPERATE button to t...

Page 17: ...s the SHIFT 7 button so that the next setting line blinks and repeat steps 4 to 9 0 End timer program setting Press the MENU button twice The normal screen is restored Press the TIMER button The TIMER indication and effective timer recording programmed numbers light on the display and the operating mode is automatically turned off to engage the Timer Recording Standby mode 6 RECORDING 6 RECORDING ...

Page 18: ...s the SHIFT f button to select the day of the week and set the operating day of the week with the SET button Set the items for Tuesday Thursday and Friday to Timer recording will take place on the days of the week shown on the display Timer recording will not take place on days of the week indicated by 9 End timer program setting Press the MENU button twice The normal screen is restored 0 Press th...

Page 19: ...ANCEL button The program being set is canceled 2 Press the MENU button twice The normal screen mode is restored To cancel preset timer programs 1 Press the TIMER button so that the TIMER indication goes out on the display 2 Turn on the VCR and monitor 3 Press the MENU button to show the main menu screen and press the SHIFT 7 button to select PROGRAM TIMER or HOLIDAY SET Then press the SET button T...

Page 20: ...ding 5 Setting the on screen brightness and display items Select the monitor display setting with the menu switch On screen information is recorded together with the video signals You can change the on screen display position with the ON SCREEN 7 f buttons on the front panel 6 4 Alarm Recording Alarm recording functions during timelapse recording When an alarm signal is input to the rear panel s A...

Page 21: ... to engage the Stop mode 5 When an alarm signal is input to the rear panel s ALARM IN terminal recording starts automatically in the 3H SP mode and the AL indication is lit The ALARM indication is shown on screen After the specified recording duration expires recording stops As sensor recording starts from the Stop mode it takes several seconds before actual recording starts 6To stop sensor record...

Page 22: ... when the tape ends even if there is an alarm or sensor recording To continue repeat recording even if an alarm recording or sensor recording takes place during recording set TAPE END MODE to OFF When the Tape End Forced Stop mode and Repeat Rec mode are engaged and an alarm or sensor recording takes place the REPEAT indication goes out 5 Automatic recording check function This unit is provided wi...

Page 23: ...Connection VCR control signal ground signal Start of recording Stop or operating mode off LV 0 V Shown only when the SA K97U is installed Operation 1 Set the SRI EXT REC menu switch in SRI EXT MODE to EXT to use the external recording function Use the EXT REC END menu switch to select the mode engaged when externally activated recording ends When set to STOP the VCR enters the Stop mode When set t...

Page 24: ...rch playback etc This will result in deteriorating picture quality Due to the performance of the unit noise may appear in the playback picture during search playback and field advance Connection Connect the output connectors on the rear panel correctly Menu switch setting Set the menu switches in VIDEO VTR MODE as required 5 DETAIL Factory setting OFF To make details of the playback picture cleare...

Page 25: ...rch Recording duration is especially important with timelapse recordings If the duration is too short date time search will not function correctly The recording duration must be equivalent to at least 5 seconds at Standard 3H speed Example In the 240 hour timelapse mode the recording time should be 7 minutes or more Alarm search A specified alarm recording is searched and the Stop mode is engaged ...

Page 26: ... the date time search setting screen is shown on the monitor td 0100 is shown on the VCR s display To cancel the Date Time Search mode press the SEARCH button once 2 Press the SET or SET button to set the date you want to search 01 31 3 Press the SHIFT f button so that hour blinks 4Press the SET button to set the hour you want to search 00 23 5 Press the FF button or REW button The VCR fast forwar...

Page 27: ...ler for replacement of the built in battery Input video signals Contact your local JVC dealer Replace the cassette Turn the operating mode on again 8 TROUBLESHOOTING 8 1 Error Indication Error indications are shown on the display whenever condensation occurs or there are problems with cassette loading unloading or mechanism operation 5 When a problem occurs the error indication E lights when the W...

Page 28: ...E END MODE menu switch to OFF When setting the camera switching timing on this unit set the menu switch to 1 FIELD or 2 FIELD To perform repeat recording using external recording activation set REPEAT REC to OFF and AUTO REW to ON Causes q Is the power cord disconnected q Is the TIMER indication shown q Is the Operation Lock mode engaged Is the Operation Lock mode engaged q Is the monitor connecte...

Page 29: ...able commands in addition to the JVC table 1 commands shown below The commands in the shaded area in the table below are contained in both the JVC table 1 and JVC basic table The JVC basic table commands include only those in the shaded areas 0 1 2 3 4 5 6 7 8 9 A B C D E F 0 Data 0 ENTER TIMER ON SCREEN VISS FRAME CODE ON ON FWD COUNT 1 COMPLE Data 1 CLEAR TIMER ON SCREEN VISS REC DEVICE AL PL TI...

Page 30: ...input point from the current position The VCR starts search after returning ACK When the specified point is reached the VCR returns COMPLETION 01H If the end or beginning of the tape is reached before the specified point the VCR returns NOT TARGET 05H Sending either the 30H 30H or 30H 31H command will cause the VCR to search for the 1st alarm input point After transmitting the VISS SEARCH command ...

Page 31: ... the VCR controls Be sure to transmit commands 1 byte at a time with ACK 0AH confirmation from the VCR after each transmission 2 ON SCREEN SELECT 74H Switches the on screen display items POS V 73H Moves the on screen indication in the vertical direction POS H 75H Moves the on screen indication in the horizontal direction 5 Other commands 1 AL PL RESET E1H When transmitted during alarm recording th...

Page 32: ... 0 1 REC Mode VCR is in the Record mode 2 Eject A cassette is being ejected 3 Not defined Always 1 4 Stop Mode VCR is in the Stop mode 5 REW Mode VCR is in the Rewind mode 6 FF Mode VCR is in the Fast Forward mode 7 PB Mode VCR is in the Play mode 5th byte BIT Status when BIT is 1 0 Speed Code 0 VCR s current tape running mode See below 1 Speed Code 1 VCR s current tape running mode See below 2 Sp...

Page 33: ... 15 m 0 m When the cassette tape is ejected the tape reel counter is reset to 0000 When the tape is rewound to the beginning in the Repeat Recording or Auto Rewind mode using the counter end output function the tape reel counter is reset to 0000 Counter end output function Set the menu switch CNT TAPE END to any position except OFF 168H 171 h 34 m 150 h 28 m 130 h 37 m 112 h 0 m 94 h 37 m 78 h 28 ...

Page 34: ...rd x 1 SR S990E VIDEO CASSETTE RECORDER REC REC STOP REC CHECK EJECT OPERATE REVERSE FIELD REV FIELD ADV REW PLAY TRACKING TIMER SEARCH RESET CANCEL DISPLAY LOCK CNTRESET MENU TIME MODE SHIFT ON SCREEN OPERATE V LOCK PAUSE FF SET 113 115 360 2 362 370 VHS PAL 625 Luminance FM recording Colour down converted direct recording PAL type colour signal CCIR monochrome signal 625 lines 50 fields 23 39 mm...

Reviews: