background image

– 2 –

English

Contents

Location of the Buttons and Controls ..................... 3

Front Panel ................................................................ 4
Remote Control ......................................................... 5

Getting Started .......................................................... 6

Unpacking ................................................................. 6
Putting the Batteries into the Remote Control .......... 6
Connections .............................................................. 6

Common Operations ................................................. 8

Turning On or Off the Unit ....................................... 8
Setting the Clock ....................................................... 8
Adjusting the Volume ................................................ 8
Digital Sound Control ............................................... 9

Listening to FM and AM Broadcasts .................... 10

Tuning In a Station .................................................. 10
Presetting Stations ................................................... 10
Tuning In a Preset Station ....................................... 10

Playing Back CDs .................................................... 11

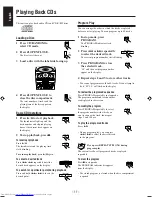
Loading a Disc ........................................................ 11
Basic CD Operations .............................................. 11
Program Play ........................................................... 11
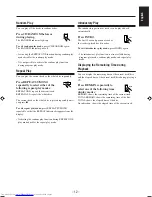
Random Play ........................................................... 12
Repeat Play ............................................................. 12
Introductory Play .................................................... 12
Displaying the Remaining Time during Playback .. 12

Playing Back Tapes ................................................. 13

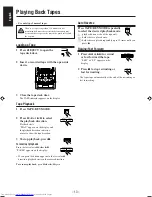
Loading a Tape ........................................................ 13
Tape Playback ......................................................... 13
Auto Reverse ........................................................... 13
Rewind/Fast Forward .............................................. 13

Recording ................................................................. 14

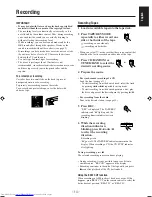
Recording Tapes ...................................................... 14

Using the Timers ...................................................... 15

Using Daily Timer .................................................. 15
Timer Recording ..................................................... 15
Using Sleep Timer .................................................. 16

Troubleshooting ....................................................... 17

Maintenance ............................................................ 18

Specifications ........................................................... 19

02_01_19_UXM5_UW_En.p65

5/17/02, 5:22 PM

2

Summary of Contents for UX-M5

Page 1: ... E M U X M 5 AUTO REVERSE FULL LOGIC DECK TIMER ON OFF SET REMAIN EJECT INTRO OPEN CLOSE STANDBY ON ST MONO STOP CLEAR PRESET C D R R W P L A Y B A C K CD RANDOM DISPLAY MODE REC SLEEP TIMER PROGRAM MUTING BEAT CUT PRE EQ HBS STANDBY ON VOLUME TUNER BAND TAPE REV MODE INTRO REMAIN REPEAT ST MONO RM SUXM5U REMOTE CONTROL PRE DOWN PRE UP UX M5 Consists of CA UXM5 and SP UXM5 Se compone de CA UXM5 y ...

Page 2: ...pilas tenga en cuenta los problemas ambientales y observe estrictamente los reglamentos o las leyes locales sobre disposición de las pilas No exponga este aparato a la lluvia humedad goteos o salpicaduras Tampoco ponga recipientes conteniendo líquidos como floreros encima del aparato PRECAUÇÃO Não obstrua as aberturas e orifícios de ventilação Se os orifícios ou aberturas de ventilação estiverem o...

Page 3: ... PROVISTA SOBRE LA SUPERFICIE EXTERIOR 1 ETIQUETA DE CLASSIFICAÇÃO LOCALIZADA NA PARTE POSTERIOR DA CAIXA DO APARELHO CLASS LASER 1 PRODUCT 2 WARNING LABEL PLACED INSIDE THE UNIT 2 ETIQUETA DE ADVERTENCIA PEGADA EN EL INTERIOR DE LA UNIDAD 2 ETIQUETA DE ADVERTÊNCIA LOCALIZADA NA PARTE INTERNA DA UNIDADE DANGER Invisible laser radiation when open and interlock defeated AVOID DIRECT EXPOSURE TO BEAM...

Page 4: ...d hints you had better know Precautions Installation Install in a place which is level dry and neither too hot nor too cold between 5 C and 35 C Install the unit in a location with adequate ventilation to prevent internal heat built up in the unit Leave sufficient distance between the unit and the TV Keep the speakers away from the TV to avoid interference with TV DO NOT install the unit in a loca...

Page 5: ...oadcasts 10 Tuning In a Station 10 Presetting Stations 10 Tuning In a Preset Station 10 Playing Back CDs 11 Loading a Disc 11 Basic CD Operations 11 Program Play 11 Random Play 12 Repeat Play 12 Introductory Play 12 Displaying the Remaining Time during Playback 12 Playing Back Tapes 13 Loading a Tape 13 Tape Playback 13 Auto Reverse 13 Rewind Fast Forward 13 Recording 14 Recording Tapes 14 Using t...

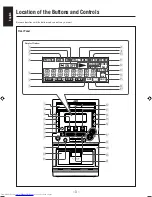
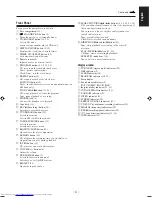
Page 6: ... O M P O N E N T S Y S T E M U X M 5 TIMER ON OFF SET REMAIN EJECT INTRO OPEN CLOSE STANDBY ON DIRECTION PLAY PAUSE REPEAT REV MODE AUTO REVERSE FULL LOGIC DECK ST MONO STOP CLEAR PRESET C D R R W P L A Y B A C K ON PROGRAM SLEEP HBS TOTAL REMAIN INTRO RANDOM TAPE POP REC MHz kHz REPEAT STEREO ONE ALL CD SYNC OFF CLASSIC ROCK JAZZ 8 9 3 2 1 4 5 6 7 1 2 3 4 5 6 p 7 8 9 q p q w e r t u w e r t y u i...

Page 7: ... t REMAIN button 12 CD displays the remaining time of a track disc or elapsed time of a disc during playback y INTRO button 12 CD starts or stops introductory play u VOLUME buttons 8 Adjust the volume i PRE EQ HBS button 9 Selects the desired sound mode Switches on or off the HBS system o 0 EJECT 13 Opens the tape deck door SEARCH TUNING 4 buttons 8 10 11 13 15 CD search backward forward or skip t...

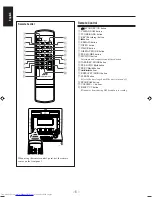
Page 8: ...EAT CUT button Eliminates beats during AM broadcast recording Remote Control When using the remote control point it at the remote sensor on the front panel DISPLAY MODE REC SLEEP TIMER PROGRAM MUTING BEAT CUT STANDBY ON VOLUME INTRO REMAIN REPEAT ST MONO RM SUXM5U REMOTE CONTROL CD RANDOM PRE EQ HBS TUNER BAND TAPE REV MODE PRE DOWN PRE UP 4 5 6 7 8 3 2 1 9 p q w e r t y u i o REPEAT DISPLAY MODE ...

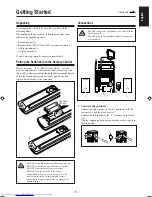
Page 9: ...ies at the same time DO NOT use an old battery together with a new one DO NOT use different types of batteries together DO NOT expose batteries to heat or flame DO NOT leave the batteries in the battery compartment when you are not going to use the remote control for an extended period of time otherwise the remote control may be damaged by battery leakage Connections DO NOT connect any equipment t...

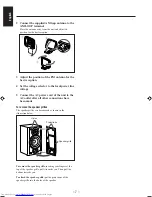
Page 10: ...e 5 Connect the AC power cord of the unit to the AC outlet after all other connections have been made To remove the speaker grilles The speaker grilles can be removed as shown in the illustration below To remove the speaker grille inserting your fingers at the top of the speaker grille pull it towards you Then pull the bottom towards you To attach the speaker grille put the projections of the spea...

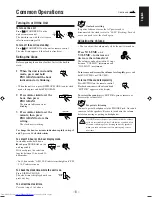
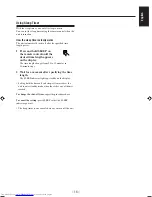
Page 11: ...n Press DISPLAY MODE The clock time is displayed until you press any key To correct the clock time Carry out steps 1 to 3 above notes On clock resetting If a power failure occurs or the AC power cord is disconnected the clock is reset to 00 00 flashing In such a case you need to set the clock again Adjusting the Volume You can adjust the volume only while the unit is turned on Press VOLUME or VOLU...

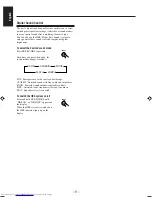
Page 12: ...e Press PRE EQ HBS repeatedly Each time you press the button the sound mode changes as follows POP CLASSIC ROCK JAZZ FLAT POP More presence in the vocals and midrange CLASSIC Enriched sound with fine treble and ample bass ROCK Powerful sound emphasizing treble and bass JAZZ Accented lower frequencies for jazz type music FLAT Equalizer effect is canceled To switch the HBS system on off Press and ho...

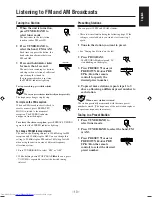
Page 13: ... number Tuning In a Station 1 When the unit is turned on press TUNER BAND to select tuner mode The unit tunes in the last station tuned in either FM or AM 2 Press TUNER BAND to select the band FM or AM Each time you press the button the band selection alternates between FM and AM 3 Press and hold 4 or for more than 1 second The unit starts searching for stations and stops when a station of suffici...

Page 14: ...RAM The PROGRAM indicator starts blinking 2 Press 4 or repeatedly to select the desired track The current program number starts blinking 3 Press PROGRAM to store the selected track 00 and the next program number appear on the display 4 Repeat steps 2 and 3 to store other tracks You cannot program more than 60 tracks If you attempt to do it FULL will flash on the display To review the programed seq...

Page 15: ...REPEAT indicator disappears from the display Activating the random play function during REPEAT ONE play mode disables the repeat play mode Introductory Play The introductory portions of tracks can be played back automatically Press INTRO The first 10 second portion of each of the tracks is played back in order To exit introductory play mode press INTRO again The introductory play function is also ...

Page 16: ...top playback press 7 To interrupt playback Press the last selected 8 2 or 3 8 PAUSE appears on the display If you press the button opposite to the last selected direction playback starts in the reverse direction To resume playback press 8 2 or 3 8 again Auto Reverse Press TAPE REV MODE repeatedly to select the desired playback mode playback on one side of the tape only both sides are played once b...

Page 17: ...ther source REC ON appears on the display Recording continues to the end of the tape until you press 7 even after playback of the CD has finished Using the BEAT CUT function When recording an AM broadcast beats may occur If this happens press BEAT CUT on the remote control to select the better beat cut position BEAT 01 or BEAT 02 IMPORTANT It may be unlawful to record or playback copyrighted mater...

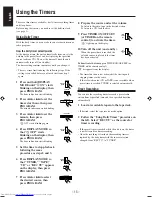
Page 18: ...n the display then press PROGRAM 7 Press 4 or to select the desired source then press PROGRAM 8 Prepare the source and set the volume To listen to the radio tune in the desired station To listen to a CD load the disc 9 Press TIMER ON OFF SET or TIMER on the remote control to activate the timer lights up on the display 10 Turn off the unit on standby When the preset time is reached the selected sou...

Page 19: ...red time length appears on the display The time length changes from 90 to 10 minutes in 10 minute steps 2 Wait for a moment after specifying the time length The SLEEP indicator lights up steadily on the display Setting both the timer off and sleep off times causes the unit to enter standby mode when the earlier one of them is reached To change the shut off time repeat the procedure above To cancel...

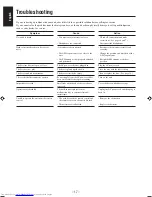
Page 20: ...microprocessor may malfunction due to external electrical interference The path between the remote control and the remote sensor on the unit is blocked The batteries are exhausted Action Check all connections and make corrections See pages 6 and 7 Disconnect the headphones Reconnect the antennas correctly and securely Change the position and direction of the AM loop antenna Extend the FM antenna a...

Page 21: ...nner or benzine DO NOT apply any volatile substance such as insecticides to it DO NOT allow any rubber or plastic to remain in contact with it for a long time Handling discs Remove the disc from its case by holding it at the edge while pressing the center hole lightly Do not touch the shiny surface of the disc or bend the disc Put the disc back in its case after use to prevent warping Be careful n...

Page 22: ...s 531 kHz 1 602 kHz CD player Dynamic range 60 dB Signal to noise ratio 60 dB Wow and flutter Unmeasurable Cassette deck Frequency response Normal type I 100 Hz 12 000 Hz Wow and flutter 0 35 WRMS General Power requirement AC 110 V 127 V 220 V 240 V Ó adjustable with the voltage selector 50 Hz 60 Hz Power consumption 40 W operation mode 6 W standby mode Dimensions 160 mm 269 5 mm 340 mm W H D Mass...

Page 23: ...MEMO ...
Page 24: ...or del equipo y si es diferente reajuste el selector de tensión para evitar el riesgo de incendios descargas eléctricas IMPORTANTE para a ligação à tensão da rede CA ANTES DE LIGAR O APARELHO A UMA TOMADA DA REDE verifique se a tensão da rede CA corresponde à posição do selector de voltagem localizado na parte externa deste equipamento Caso não corresponda reajuste o selector de voltagem a fim de ...

Reviews: