

21
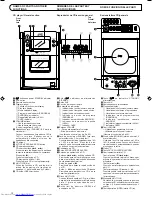
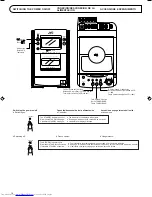
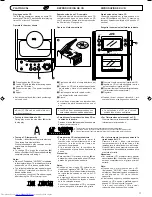
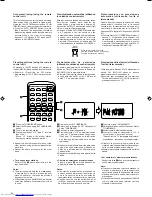
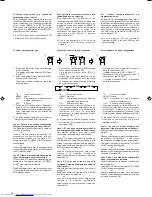
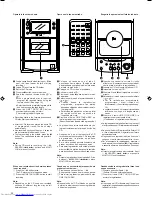
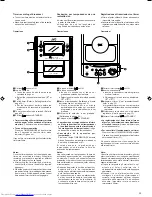
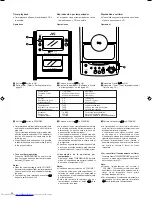
Cassette loading
1. Press the eject (
8
) button to open the
cassette holder.
2. Load a cassette as shown.
3. Close the cassette holder by pressing it
gently. Listen for the click indicating that the
holder is securely shut.
Colocación de cassettes
1. Presione el botón eject (
8
) para abrir el
portacassette.
2. Extraiga el cassette como se muestra.
3. Cierre el portacassette presionándolo
suavemente. Cuando oiga un “clic” ello
indica que el portacassette está
correctamente cerrado.
Inserimento cassette
1. Premere il tasto eject (
8
) per aprire il vano
portacassetta.
2. Inserire una cassetta come indicato.
3. Chiudere il vano portacassetta premendo
gentilmente su di esso. Accertarsi di udire lo
scatto che indica la sua chiusura.
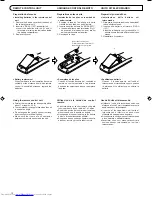
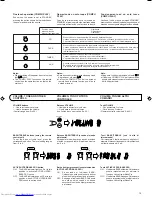
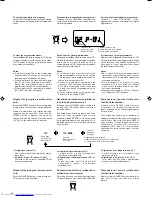
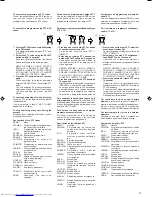
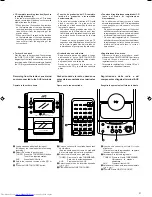
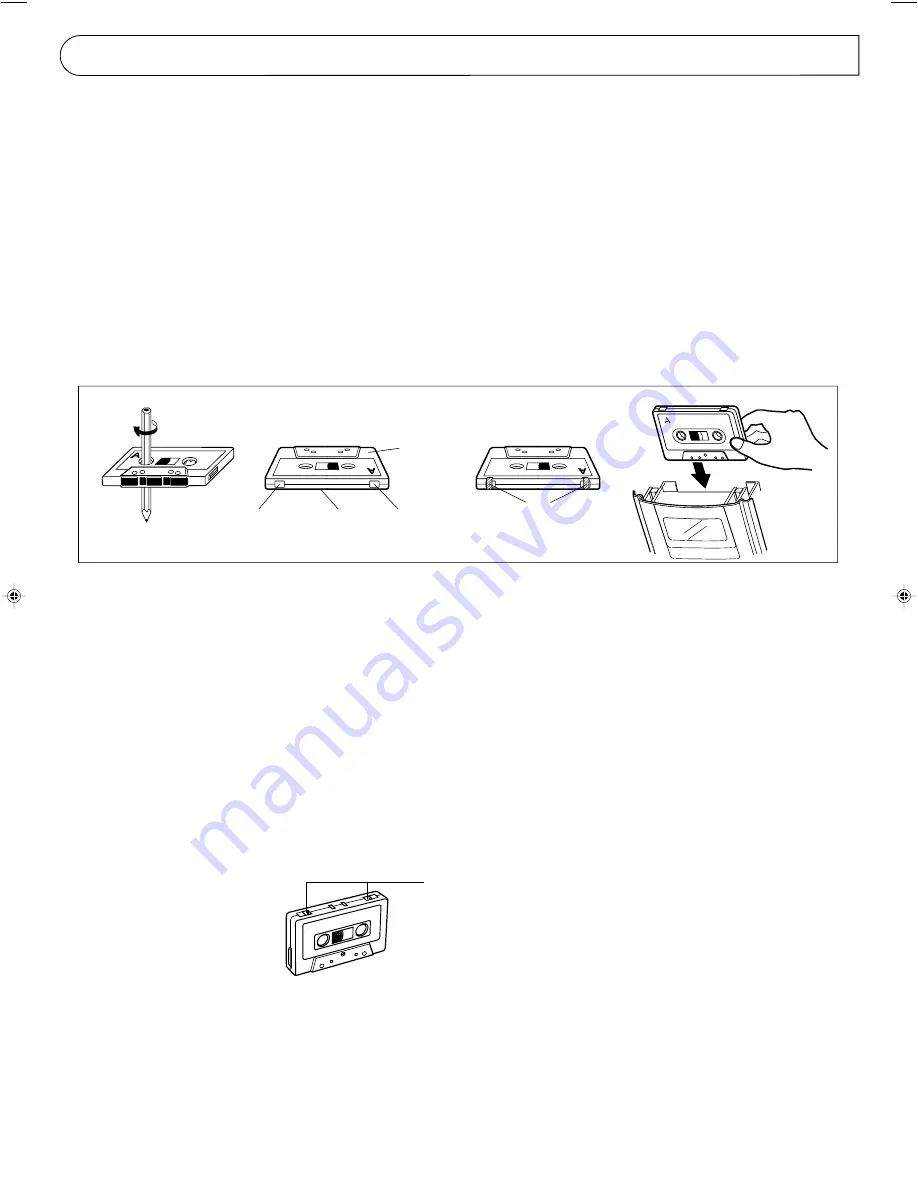
Cassette tapes
1. Loose tape may cause trouble. Using a pencil
or like object, gently tighten the tape as
shown.
2. To prevent recordings from being erased
accidentally, remove the tab(s) with a
screwdriver, etc. Reseal the slots with
adhesive tape to erase and re-record after
the tabs have been removed.
3. C-120 cassettes are not recommended
because they are prone to malfunction.
Cassettes de cinta
1. La cinta floja puede causar problemas.
Utilice un lápiz o un objeto similar y tensione
gentilmente la cinta tal como se muestra.
2. Para evitar borrar grabaciones
accidentalmente, extraiga la/s lengüeta/s
con un destornillador, etc. Para borrar la
cinta después de haber extraído las
lengüetas, selle las ranuras con cinta
adhesiva.
3. No se recomienda el uso de cassettes C-
120 porque tienen tendencia a fallar.
Nastri a cassetta
1. Nastri allentati possono causare problemi.
Eliminare l’allentamento del nastro come
illustrato per mezzo di una matita o di un
oggetto simile.
2. Per evitare la cancellazione accidentale di
registrazioni, rimuovere le linguette con un
cacciavite o un oggetto simile. Per cancellare
o registrare nuovamente il nastro, coprire i
fori con nastro adesivo.
3. Si raccomanda di non utilizzare cassette C-
120 in quanto queste possono causare
problemi.
HANDLING CASSETTE TAPES
MANIPULACION DE CASSETTES
DE CINTA
MANEGGIO DEI NASTRI A
CASSETTA
Adhesive tape
Cinta adhesiva
Nastro adesivo
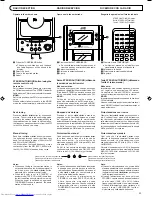
Note:
If the power is switched off while a tape is
running, it may be impossible to remove the
cassette. If this happens, switch the power on
again before attempting to remove the cassette.
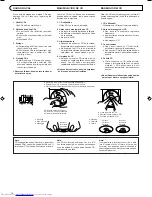
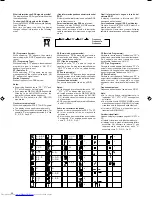
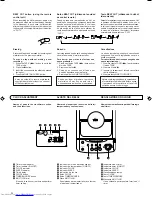
Auto tape select mechanism
This unit has an Auto Tape Select mechanism
which distinguishes between different types of
tape using detection holes in the cassette. After
the type of tape has been detected, bias and
equalization suitable for the tape are set.
●
Cassettes with detection holes:
Metal tape (EQ: 70 µs) .................... Type IV
CrO
2
(chrome) tape (EQ: 70 µs) ..... Type II
●
Cassettes without detection holes:
Normal tape (EQ: 120 µs) ............... Type I
Nota:
Si se desconecta la alimentación durante el
transporte de cinta, puede que sea imposible
extraer el cassette. Si ello ocurre, conecte la
alimentación otra vez antes de intentar extraer
el cassette.
Mecanismo de selección automática de la
cinta
Esta unidad posee un mecanismo de selección
automática de la cinta que distingue los diferentes
tipos de cinta por medio de orificios de detección
en el cassette. Después de haber detectado el
tipo de cinta, la unidad establece la polarización
y ecualización adecuadas para la cinta.
●
Cassettes con orificios de detección:
Cinta de metal (EQ: 70 µs) ................ Tipo IV
Cinta de CrO
2
(cromo) (EQ: 70 µs) ... Tipo II
●
Cassettes sin orificios de detección:
Cinta normal (EQ: 120 µs) ................. Tipo I
Nota:
Se l’alimentazione viene disattivata durante lo
scorrimento del nastro, potrebbe essere
impossibile rimuovere la cassetta. Se ciò
dovesse accadere, riattivare l’alimentazione
prima di riprovare a rimuovere la cassetta.
Meccanismo per la selezione automatica del
tipo di nastro
Questa unità possiede un meccanismo per la
selezione automatica del tipo di nastro che è in
grado di rilevare automaticamente il tipo di nastro
utilizzato per mezzo dei fori appositi sulla cassetta.
Una volta rilevato il tipo di nastro, la polarizzazione
e l’equalizzazione adatte a tale tipo di nastro
vengono impostate automaticamente.
●
Cassette con fori di identificazione:
Nastro Metal (EQ: 70 µs) ....Tipo IV
Nastro CrO
2
(al cromo) (EQ: 70 µs) ....Tipo II
●
Cassette senza fori di identificazione:
Nastro normale (EQ: 120 µs) ....Tipo I
Metal/CrO
2
tape detection holes
Orificios de detección de cintas de metal/cromo
Fori identificazione nastro Metal/CrO
2
Side “A”
Lado “A”
Lato "A"
Tab “A”
Lengüeta “A”
Linguetta "A"
Tab “B”
Lengüeta “B”
Linguetta "B"
Side “B”
Lado “B”
Lato "B"
Turn the pencil to tighten the tape.
Gire el lápiz para ajustar la cinta.
Ruotare la matita per stringere il nastro.
UX-T77R E,LVT0280-002A
99.3.30, 8:37 PM
21


