

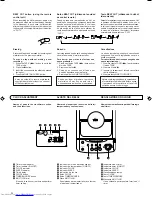

32
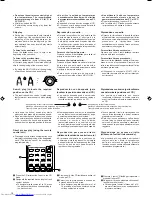
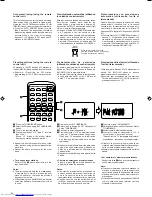
BEAT CUT
BEAT CUT button (using the remote
control unit)
When recording an AM broadcast, beats may
be produced which are not heard when listening
to the broadcast. In such case, set this button
after setting the deck to the record mode so that
the beats are eliminated. Normally set this button
to “CUT-1”.
Botón BEAT CUT (utilizando la unidad
de control remoto)
Cuando graba una radiodifusión de AM, es
posible que se escuchen compases inaudibles
cuando escucha la radiodifusión. En tal caso,
ajuste este botón después de activar el modo
de grabación de la platina, para eliminar los
compases. Normalmente, ajuste este botón en
“CUT-1”.
Tasto BEAT CUT (utilizzando l’unità di
telecomando)
Durante la registrazione di una trasmissione AM,
si possono verificare dei battimenti che non si
sentono mentre si ascolta la trasmissione stessa.
In tali casi, impostare questo tasto dopo aver
portato il registratore nel modo di registrazione
in modo da eliminare i battimenti. Impostare
normalmente questo tasto su “CUT-1”.
Erasing
A recorded tape can be erased by recording new
material over the previous material.
To erase a tape without making a new
recording...
1. Press the TAPE (
;'
) button to set to the
TAPE mode.
2. Press the
5
button.
3. Insert the cassette with the side to be erased
facing out.
4. Press the ONE TOUCH REC button.
Borrado
La cinta grabada puede ser borrada grabando
otro material sobre el material anterior.
Para borrar una cinta sin efectuar una
nueva grabación...
1. Presione el botón TAPE (
;'
) para activar
el modo TAPE.
2. Presione el botón
5
.
3. Coloque un cassette con el lado a ser
borrado apuntando hacia afuera.
4. Presione el botón ONE TOUCH REC.
Cancellazione
Un nastro registrato può essere cancellando
eseguendo una nuova registrazione sopra a
quella precedente.
Per cancellare un nastro senza eseguire una
nuova registrazione...
1. Premere il tasto TAPE (
;'
) per impostare
il modo TAPE.
2. Premere il tasto
5
.
3. Inserire la cassetta col lato da cancellare
rivolto all'esterno.
4. Premere tasto ONE TOUCH REC.
Puede ser ilegal el grabar o reproducir
material con derechos de autor sin el
consentimiento del dueño de los mismos.
Notare che la registrazione o la riproduzione
di materiali protetti da diritti d’autore senza
il permesso del proprietario di tali diritti
potrebbe essere contro la legge.
It may be unlawful to record or playback
copyrighted material without the consent
of the copyright owner.
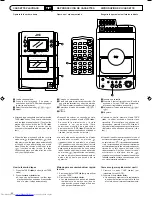
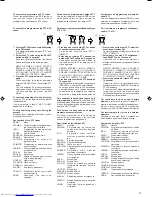
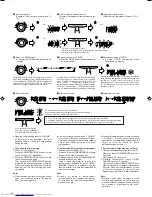
REGOLAZIONE OROLOGIO
Names of parts in the clock/timer section,
and their functions:
Nombre de las parte de la sección del reloj/
temporizador y sus funciones:
Nome e funzioni delle varie parti dell’orologio
e del timer:
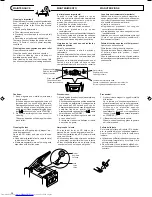
CLOCK ADJUSTMENT
AJUSTE DEL RELOJ
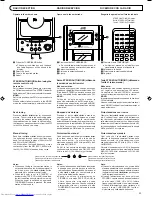
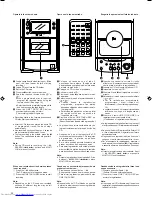
1
Indicador del modo de temporizador
2
Indicador de temporizador (ON/OFF)
3
Indicador CLOCK
4
Indicador SLEEP
5
Indicación de la hora
6
Botón CLOCK
7
Botón TIMER/SNOOZE
8
Disco MULTI JOG
Es empleado para ajustar la hora y efectuar
el ajuste del temporizador.
1
Timer mode indicator
2
Timer indicator (ON/OFF)
3
CLOCK indicator
4
SLEEP indicator
5
Time display
6
CLOCK button
7
TIMER/SNOOZE button
8
MULTI JOG dial
It is used to set the current time and perform
timer setting.
1
Indicatore modo timer
2
Indicatore timer (ON/OFF)
3
Indicatore CLOCK
4
Indicatore SLEEP
5
Visualizzazione tempo
6
Tasto CLOCK
7
Tasto TIMER/SNOOZE
8
Manopola MULTI JOG
Viene utilizzata per impostare l'orario ed il
timer.
SLEEP
CLOCK
REC
OFF
ON
COMPACT
DIGITAL AUDIO
BAND
ONE TOUCH
REC
TAPE
OPEN
CD
TUNER
TIMER/SNOOZE
MU
LTI JOG
ACTIVE HYPER
BASS PRO
8
7
6
4
2
1
3
5
CLOCK
UX-T77R E,LVT0280-002A
99.3.30, 8:40 PM
32


