background image

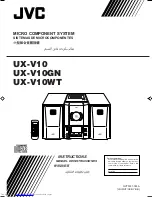
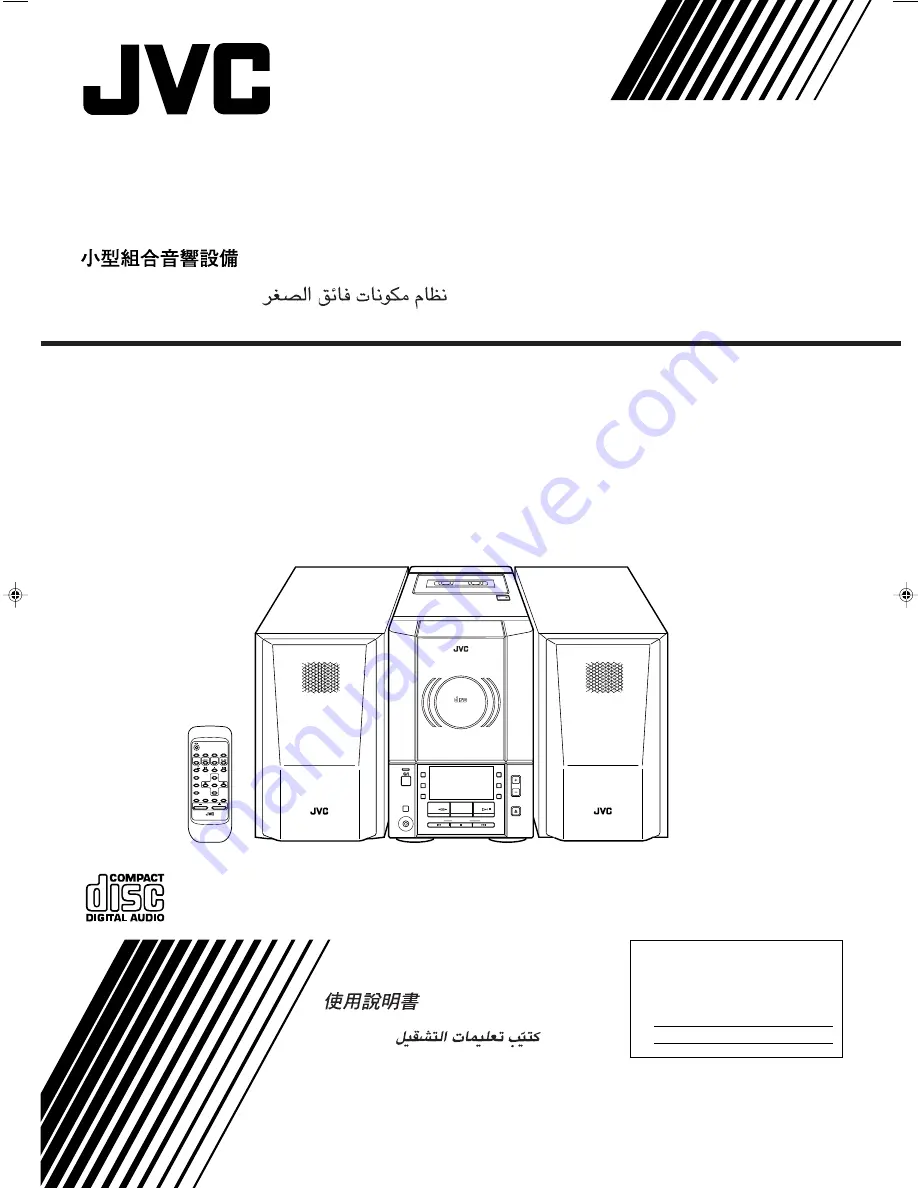
MICRO COMPONENT SYSTEM

SISTEMAS DE MICROCOMPONENTES

UX-V10
UX-V10GN
UX-V10WT

INSTRUCTIONS

For Customer Use:

Enter below the Model No. and Serial No.
which are located either on the rear, bot-
tom or side of the cabinet. Retain this
information for future reference.

Model No.                                                         

Serial No.                                                          

GVT0031-003A

[U/US/UT/UX/UY/UB]

MANUEL DE INSTRUCCIONES

AUTO REVERSE

AUTO TAPE SELECTOR

DOWN

UP

MULTI CONTROL

TAPE

FM/AM

CD

STANDBY

PHONES

AUX

REC

REV.

MODE

AHB
PRO

TIMER

CLOCK

VERTICAL DISC

LOADING MECHANISM

COMPACT

DIGITAL AUDIO

VOLUME

CD

OPEN/CLOSE

REMOTE CONTROL RM-SUXV10E

CANCEL

TREBLE

FM/AM

FM 

MODE

DISPLAY

SLEEP

AUX

TAPE

CD

CD

BASS

AHB 
PRO

DOWN

RANDOM

UP

AUTO

PRESET

REPEAT

SET

PROGRAM

VOLUME

TAPE

MICRO COMPONENT SYSTEM


UX-V10

COVER.UX-V10[U]

00.4.19, 10:29 AM

3

Summary of Contents for UX-V10

Page 1: ...nce Model No Serial No GVT0031 003A U US UT UX UY UB MANUEL DE INSTRUCCIONES AUTO REVERSE AUTO T APE SELECTOR DOWN UP MULTI CONTROL TAPE FM AM CD STANDBY PHONES AUX REC REV MODE AHB PRO TIMER CLOCK VERTICAL DISC LOADING MECHANISM COMPACT DIGITAL AUDIO VOLUME CD OPEN CLOSE REMOTE CONTROL RM SUXV10E CANCEL TREBLE FM AM FM MODE DISPLAY SLEEP AUX TAPE CD CD BASS AHB PRO DOWN RANDOM UP AUTO PRESET REPE...

Page 2: ...e ajuste del interruptor la alimentación no es cortada completamente La alimentación puede ser controlada remotamente Warnings Cautions and Others Avisos precauciones y otras notas CAUTION To reduce the risk of electrical shocks fire etc 1 Do not remove screws covers or cabinet 2 Do not expose this appliance to rain or moisture PRECAUCIÓN Para reducir riesgos de choques eléctricos incendio etc 1 N...

Page 3: ...ith a height of 10 cm or more Precaucion ventilación correcta Para evitar el riesgo de descargas eléctricas e incendio y prevenir posibles daños instale el equipo en un lugar que cumpla los siguientes requisitos 1 Parte frontal Sin obstrucciones espacio abierto 2 Lados parte superior parte posterior No debe haber ninguna obstrucción en las áreas mostradas por las dimensiones de la siguiente figura...

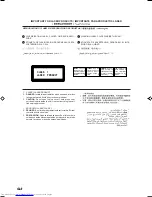
Page 4: ...all servicing to quali fied service personnel 1 PRODUCTO LÁSER CLASE 1 2 PELIGRO En el interior hay radiación láser invisible Evite el contacto directo con el haz 3 PRECAUCIÓN No abra la tapa superior En el interior de la unidad no existen piezas reparables por el usuario deje todo servicio técnico en manos de personal calificado DANGER Invisible laser radiation when open and interlock failed or d...

Page 5: ...ing device For the other areas it is used only as a playback device How This Manual Is Organized Basic information that is the same for many different functions e g setting the volume is given in the section Common Operations and not repeated under each function The names of buttons controls and display messages are written in all capital letters e g TAPE NO DISC IMPORTANT PRECAUTIONS 1 Installati...

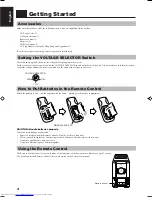
Page 6: ...arity and on the batteries with the and markings in the battery compartment CAUTION Handle batteries properly To avoid battery leakage or explosion Remove batteries when the Remote Control will not be used for a long time When you need to replace the batteries replace both batteries at the same time with new ones Do not use an old battery with a new one Do not use different types of batteries toge...

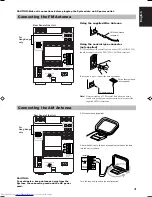
Page 7: ...lied A 75 Ω antenna with coaxial type connector IEC or DIN 45325 should be connected to the FM 75 Ω COAXIAL terminal If reception is poor connect the outdoor antenna Note Before attaching a 75 Ω coaxial lead the kind with a round wire going to an outdoor antenna disconnect the supplied FM Wire Antenna FM Wire Antenna supplied Coaxial cable FM outdoor antenna not supplied AM EXT AM LOOP FM 75Ω COAX...

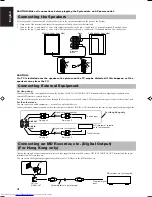
Page 8: ...an then listen to the external source through the System or record the System s CD player cassette tape or tuner to the external unit For the other areas You can connect an audio equipment used only as a playback device Connect the audio output terminals on the other equipment and the LINE IN AUX terminals on the rear using a signal cord not supplied Connecting an MD Recorder etc Digital Output Fo...

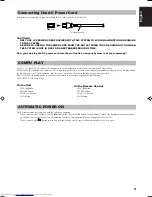
Page 9: ...n external equipment at a single press of the play button for that function One Touch Operation turns the power on for you then starts the function you have specified How One Touch Operation works in each case is explained in the section dealing with that function The COMPU PLAY buttons are AUTOMATIC POWER ON The System automatically turns on with the following operation When you press the CD OPEN...

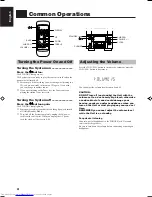
Page 10: ...e System comes on ready to play the source it was for when the power was last turned off For example if the last thing you were doing was listening to a CD you are now ready to listen to a CD again If you wish you can change to another source If you were listening to the Tuner last the Tuner comes on playing the station it was last set to Turning the System off Press the button again The STANDBY l...

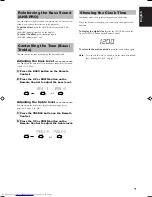
Page 11: ...yback To get the effect press the AHB Active Hyper Bass PRO button The BASS indicator lights up on the display To cancel the effect press the button again The BASS indicator goes out Controlling the Tone Bass Treble You can control the tone by changing the bass and treble Adjusting the bass level You can adjust the bass level low frequency range level between 5 and 5 0 Flat 1 Press the BASS button...

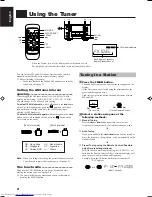
Page 12: ... to the radio Make sure that both the FM and AM antennas are correctly connected See page 3 Setting the AM tuner interval spacing When shipped the AM tuner interval is set to 9 kHz or 10 kHz spacing Initial setting U UB US UT UX 9 kHz UY 10 kHz You can change it to 10 kHz or 9 kHz spacing To select 10 kHz intervals while holding down the button on the Unit in Standby mode press the button on the U...

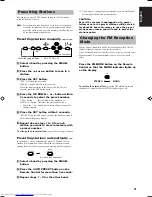
Page 13: ... as above Presetting stations automatically In each band you can automatically preset 30 FM and 15 AM stations Preset numbers will be allocated as stations are found starting from the lowest frequency and moving up the frequency 1 Select a band by pressing the FM AM button 2 Press the AUTO PRESET button on the Remote Control for more than 2 seconds 3 Repeat steps 1 2 for the other band If you want...

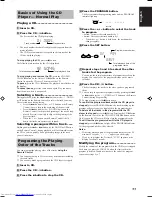
Page 14: ...he Remote Control again to close the CD cover To close the CD cover and play the CD you can just press the CD 8 button You can place an 8 cm CD without an adaptor When a CD with 16 tracks or more is loaded the OVER indicator will light up on the display If the CD cannot be read correctly because it is scratched for example 00 0000 appears on the display You can insert a CD while listening to anoth...

Page 15: ...ps 5 to 7 PROGRAM PROGRAM RANDOM Total playback time of the programed tracks Program order number Track number Playback time Total track number Basics of Using the CD Player Normal Play Playing a CD 1 Insert a CD 2 Press the CD 8 button The first track of the CD begins playing The track number that has already played disappears from the music calendar The CD Player automatically stops when the las...

Page 16: ... below Repeats one track ALL In Normal Play mode repeats all the tracks In Program Play mode repeats all the tracks in the program In Random Play mode repeats all the tracks in random order To exit from Repeat mode press the REPEAT button until the Repeat indicator on the display goes out In Random Play cannot be selected Repeat mode remains in effect even when you change the play mode Locking the...

Page 17: ...te in with the side you want to listen to facing up If the cassette holder does not open turn the Unit off then back on and press the TAPE 0 button again 3 Close the holder gently until it clicks 4 Press the TAPE button The tape is played in the direction shown by the Tape Direction indicator 5 If you need to change the playback direction press the TAPE button again The other Tape Direction indica...

Page 18: ...sed for recording Note At the start and end of cassette tapes there is leader tape which cannot be recorded onto Thus when recording CDs or radio broadcasts wind on the leader tape first to ensure that the recording will be made without any music part lost CAUTION If a recording you make has excessive noise or static the Unit may have been too close to a TV which was on during the recording Either...

Page 19: ...tem begins recording When recording a CD onto tape with Reverse mode on If a song is recorded for more than 12 seconds which corresponds to the length of leader tape but not finished before the first side of tape comes to an end this song will automatically be recorded on the second side from its beginning to avoid being split on both sides If a song is recorded for less than 12 seconds before the...

Page 20: ...ernal equipment refer to its Instructions For recording from the external equipment refer to Standard Recording on page 14 DOWN UP MULTI CONTROL TAPE FM AM CD STANDBY PHONES AUX REC REV MODE AHB PRO TIMER CLOCK VOLUME CD OPEN CLOSE AUX AUX Recording the System s Source to External Equipment For Hong Kong only You can record the System s sources to external equipment which is connected to the LINE ...

Page 21: ...to move the hour rapidly Press the TIMER button again to adjust the minute The timers let you control listening and recording functions automatically Setting the Clock When you plug the AC power cord into the wall outlet the CLOCK indicator flashes on the display You can set the clock whether the System is on or off Notes The clock must be correctly set for the timers to work The procedure must be...

Page 22: ... If the System is unplugged or a power failure occurs the timer will be canceled You will need to reset the clock first then the timer SLEEP Setting the Recording Timer With the Recording Timer you can make a tape of radio broadcast automatically How Recording Timer actually works The Unit automatically turns on tunes into the last received station and starts recording when the on time comes Then ...

Page 23: ...el 1 Press the TIMER button on the Unit The current volume setting flashes on the display 2 Press the or 4 button to select the volume level The current volume level will be used 0 to 40 When the timer is turned on the volume will be automatically set to the selected level To turn off the volume while the Recording Timer is working set the volume level to 0 9 Press the TIMER button on the Unit The...

Page 24: ... Unit and use a head demagnetizer available at electronics and record shops Care and Maintenance Handle your CDs carefully and they will last a long time Compact Discs Only CDs bearing this mark can be used with this System However continued use of irregular shape CDs heart shape octagonal etc can damage the System Remove the CD from its case by holding it at the edges while pressing the case s ce...

Page 25: ...positioned The CD is upside down The CD is dirty or scratched The AC power cord is not plugged in During tape playing the power cord was unplugged Cassette record protect tabs are removed The built in microprocessor has malfunctioned due to external electrical interference The path between the Remote Control and the sensor on the Unit is blocked The batteries have lost their charge Action Check al...

Page 26: ...urable Tuner FM Tuner Tuning Range 87 5 MHz 108 0 MHz AM Tuner Tuning Range 531 kHz 1 710 kHz except for Saudi Arabia 531 kHz 1 602 kHz for Saudi Arabia only at 9 kHz channel space 530 kHz 1 710 kHz except for Saudi Arabia 530 kHz 1 600 kHz for Saudi Arabia only at 10 kHz channel space Speaker Specifications each unit Speakers 8 cm cone x 1 Impedance 4 Ω Dimensions 140 mm x 230 mm x 211 mm W H D M...

Page 27: ...omo dispositivo de reproducción y de grabación Para las otras áreas se utiliza sólo como dispositivo de reproducción Cómo está organizado este manual En la sección Funciones comunes se ofrece información básica común a muchas funciones distintas por ejemplo el ajuste del volumen sin repetirla luego debajo de cada función El nombre de los botones y mandos y los mensajes de la pantalla aparecen todo...

Page 28: ...a coincidir la polaridad de las pilas y con las marcas y dentro del compartimento de las pilas CUIDADO Manipule las pilas adecuadamente Para evitar que las pilas pierdan líquido o exploten Saque las pilas cuando no vaya a utilizar el mando a distancia durante mucho tiempo Cuando necesite cambiar las pilas cambie las dos al mismo tiempo por otras nuevas No utilice una pila vieja con otra nueva No u...

Page 29: ... Antena de cuadro para AM incluida Fije la antena de cuadro AM a la base introduciendo las pestañas del cuadro en la base Antena monofilar FM incluida AM EXT AM LOOP FM 75Ω COAXIAL ANTENNA Gire la antena de cuadro hasta obtener la mejor recepción Antena exterior FM no incluida Conexión de la antena de AM CUIDADO Para evitar ruidos mantenga las antenas lejos del cable de conexión del cable de alime...

Page 30: ...nte externa a través del sistema o grabar desde el reproductor de CD la platina o el sintonizador hacia el equipo externo Para las otras áreas Usted podrá conectar un equipo de audio utilizado sólo como un dispositivo reproducción Utilizando el cable de señal no incluidos conecte los terminales de salida de audio del otro equipo con los terminales LINE IN AUX de la parte posterior Conexión de un g...

Page 31: ...una cinta encender la radio o escuchar una fuente externa con sólo pulsar el botón Play de la función El funcionamiento de un sólo botón enciende la unidad para usted y luego comienza la función elegida por usted El funcionamiento de un sólo botón se explica en cada caso en la sección relacionada con esta función Los botones COMPU PLAY son ENCENDIDO AUTOMATICO El equipo se enciende automáticamente...

Page 32: ...el reloj será reposicionado a 0 00 Ajuste del volumen Pulse el botón VOLUME para aumentar el volumen o el botón VOLUME para disminuirlo Puede ajustar el nivel del volumen entre 0 y 40 CUIDADO NO desconecte la unidad en espera con el volumen ajustado a un nivel extremadamente alto de lo contrario la sobrecarga acústica repentina podrá dañar su oído los altavoces y o auriculares cuando vuelva a cone...

Page 33: ...istancia 2 Presione los botones UP o DOWN en el mando a distancia para ajustar el nivel de los graves Control de agudos Puede ajustar el nivel de agudos nivel de altas frecuencias entre 5 y 5 0 sin efectos 1 Presione el botón TREBLE en el mando a distancia 2 Presione los botones UP o DOWN en el mando a distancia para ajustar el nivel de los agudos Visualización del reloj En modo de espera el reloj...

Page 34: ...o FM Presentación de banda presentación de frecuencia Canal de presintonía Cuando se utiliza el sistema la pantalla también muestra otros datos Para mayor sencillez mostramos sólo los puntos descritos en esta sección A intervalos de 10 kHz A intervalos de 9 kHz DOWN UP en el equipo AM FM FM AM FM AM AM FM en el mando a distancia Sintonización de una emisora 1 Presione el botón FM AM En la pantalla...

Page 35: ...dicador MONO Presintonía de emisoras Se pueden prefijar hasta 30 emisoras de FM y hasta 15 emisoras de AM con el mando a distancia Nota Antes del empaquetado puede que haya algún número de presintonía memorizado en fábrica para realizar pruebas No se trata de un mal funcionamiento Puede prefijar en la memoria las emisoras que desee siguiendo uno de los métodos siguientes Prefijado manual 1 Selecci...

Page 36: ...D y empezar la reproducción del disco sólo tiene que pulsar el botón CD 8 Puede insertar un CD de 8 cm sin necesidad de adaptador Si introduce un CD conteniendo 16 pistas o más se iluminará el indicador OVER en la pantalla Si el CD no puede reproducirse correctamente porque está rayado por ejemplo en la pantalla aparecerá 00 0000 Puede introducir un disco compacto mientras se reproduce otra fuente...

Page 37: ...po de reproducción Instrucciones básicas para la utilización del reproductor de CD reproducción normal Para reproducir un CD 1 Inserte un CD 2 Pulse el botón CD 8 Se inicia la reproducción de la primera pista del CD El número de pista que ya se haya reproducido desaparece del listado de pistas El reproductor de CD se parará automáticamente cuando acabe la última pista del CD Para detener la reprod...

Page 38: ...todas las pistas dentro del programa En el modo de reproducción aleatoria repite todas las pistas en orden aleatorio Para salir del modo de repetición Repeat presione el botón REPEAT hasta que el indicador Repeat se apague en el visor En el modo de reproducción aleatoria no se puede seleccionar El modo de repetición Repeat permanece activo en la pantalla aunque se cambie el modo de reproducción Bl...

Page 39: ...ompartimento de la cinta apague el equipo y pulse de nuevo el botón TAPE 0 3 Cierre suavemente el compartimento hasta oír un clic 4 Pulse el botón TAPE La cinta se reproduce en la dirección mostrada en el indicador de dirección de cinta 5 Si desea cambiar la dirección de reproducción de la cinta pulse de nuevo el botón TAPE Se enciende el indicador de dirección de cinta opuesto y la cinta cambia d...

Page 40: ...como del tipo II Nota Al principio y al final de las cintas hay una cinta guía que no permite la grabación Por lo tanto cuando grabe de un CD o de un programa de radio primero enrolle la cinta de guía para no perder ninguna parte de la grabación Cuando se utiliza el sistema la pantalla también muestra otros datos Para mayor sencillez mostramos sólo los puntos descritos en esta sección Cinta adhesi...

Page 41: ... de pasar al punto siguiente Pulse el botón CD 8 dos veces El reproductor de CD entra en modo de pausa 7 Pulse el botón REC del equipo Se encenderá el indicador REC y el sistema iniciará la grabación Cuando graba un CD en una cinta con el modo de inversión activado Si la canción se graba durante más de 12 segundos que corresponde a la duración de la cinta de guía pero no termina de grabarse antes ...

Page 42: ...externo consulte el manual de instrucciones pertinente Para grabación desde equipo externo consulte el apartado Grabación estándar en la página 14 DOWN UP MULTI CONTROL TAPE FM AM CD STANDBY PHONES AUX REC REV MODE AHB PRO TIMER CLOCK VOLUME CD OPEN CLOSE REMOTE CONTROL RM SUXV10E CANCEL TREBLE FM AM FM MODE DISPLAY SLEEP AUX TAPE CD CD BASS AHB PRO DOWN RANDOM UP AUTO PRESET REPEAT SET PROGRAM VO...

Page 43: ...R para ajustar los minutos Los temporizadores le permiten controlar automáticamente las funciones de reproducción y grabación Ajuste del reloj Al enchufar el cordón de alimentación de CA en el tomacorriente mural el indicador CLOCK destella en la pantalla El reloj puede ajustarse tanto si el equipo está en marcha como parado Notas Para que funcionen los temporizadores el reloj debe estar bien ajus...

Page 44: ...ción del temporizador el temporizador de ajuste diario no funcionará CUIDADO Si el sistema se desenchufa o si falla la alimentación el temporizador será cancelado Tendrá que fijar primero la hora y luego el temporizador de nuevo SLEEP Ajuste del temporizador de grabación Con el temporizador de grabación podrá grabar automáticamente un programa de radio en una cinta Cómo funciona el temporizador de...

Page 45: ...n la pantalla parpadea el nivel de volumen en uso 2 Pulse el botón o 4 para seleccionar el nivel del volumen Se utilizará el nivel seleccionado en ese momento 0 a 40 Cuando se activa el temporizador el volumen se sitúa automáticamente en la posición seleccionada Para desconectar el volumen mientras está funcionando el temporizador de grabación ajuste el nivel de volumen a 0 9 Presione el botón TIM...

Page 46: ...para eliminar el polvo de la lente Si hay huellas dactilares etc en la lente límpiela suavemente con un bastoncillo de algodón Condensación Puede condensarse humedad en las lentes dentro del equipo en los casos siguientes Después de poner en marcha la calefacción En un cuarto húmedo Si la unidad cambia directamente de una zona fría a otra caliente Si ocurre el equipo puede funcionar mal En este ca...

Page 47: ...nterferencia eléctrica externa La comunicación entre el mando a distancia y el sensor del equipo está bloqueada Las pilas están agotadas Acción Compruebe todas las conexiones y haga las correcciones oportunas Consulte las páginas 2 5 Desconecte los auriculares Vuelva a conectar bien la antena Cambie la posición y la dirección de la antena de cuadro AM Alargue la antena monofilar FM hasta que la re...

Page 48: ...M Rango de sintonización 87 5 MHz 108 0 MHz Sintonizador AM Rango de sintonización 531 kHz 1 710 kHz excepto para Arabia Saudita 531 kHz 1 602 kHz sólo para Arabia Saudita con un espacio 9 kHz entre emisoras 530 kHz 1 710 kHz excepto para Arabia Saudita 530 kHz 1 600 kHz sólo para Arabia Saudita con un espacio 10 kHz entre emisoras Especificaciones de los altavoces cada unidad Altavoces De cono de...

Page 49: ... BEFORE PLUGGING IN do check that your mains AC line voltage corresponds with the position of the voltage selector switch provided on the outside of this equipment and if different reset the voltage selector switch to prevent from damage or risk of fire electric shock IMPORTANTE para la línea de la red CA ANTES DE ENCHUFAR EL EQUIPO compruebe si la tensión de la línea de la red CA corresponde con ...

Reviews: