background image

7

A

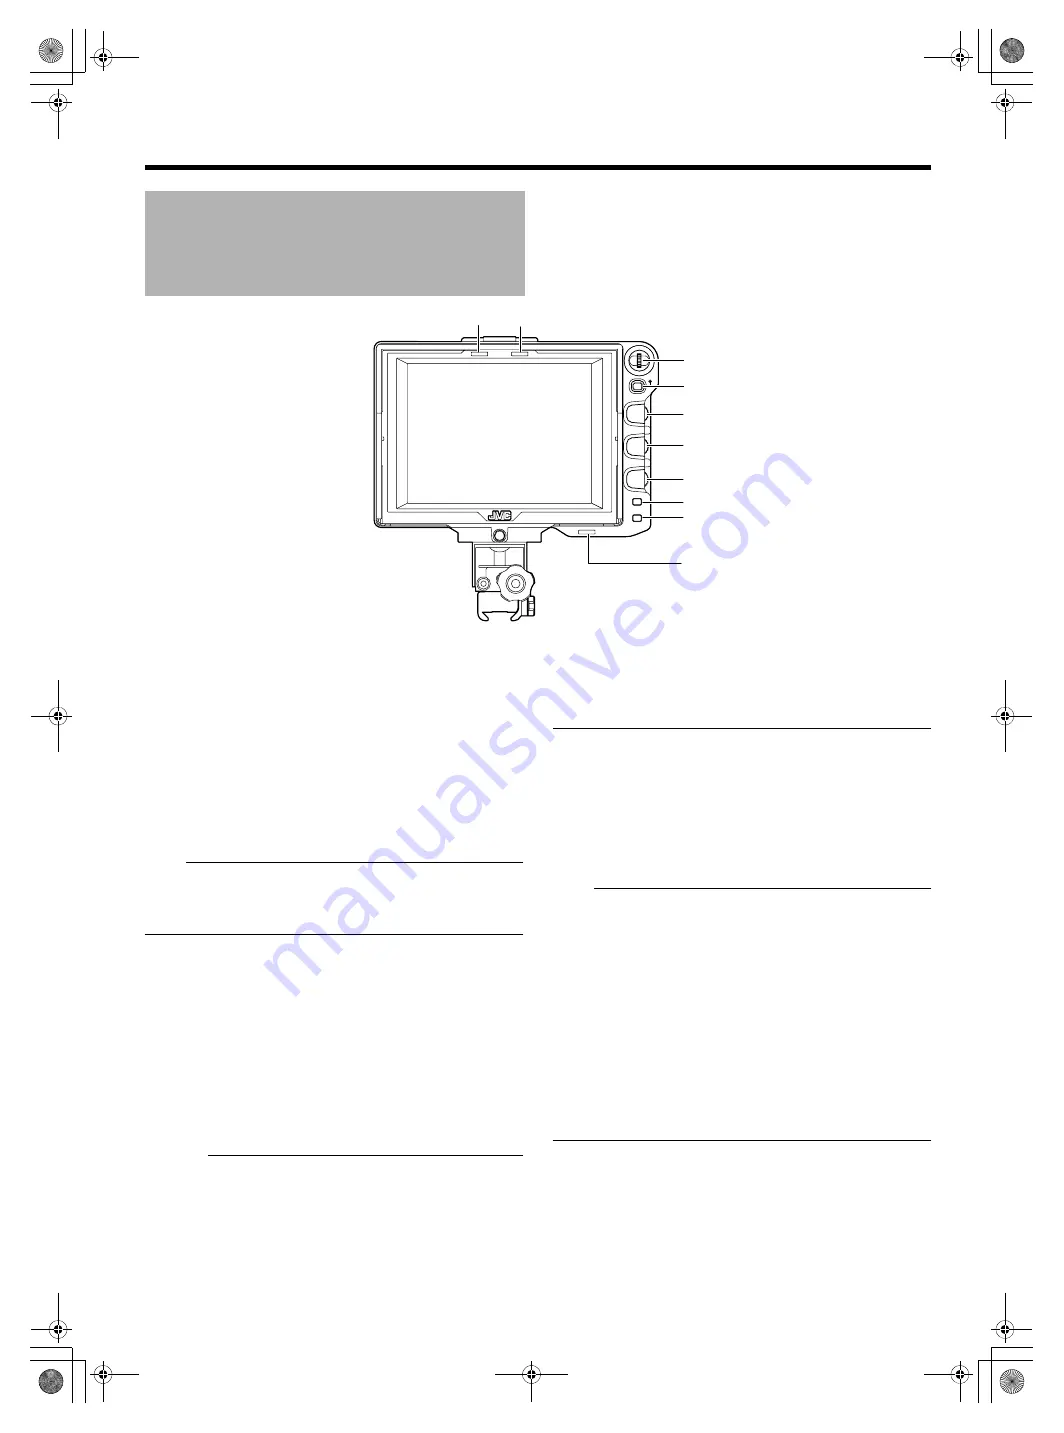
[MENU] Dial (Button)

Scroll 

u

p and down thi

s

 dial to move 

u

p and down the c

u

r

s

or 

(

X

) for 

s

electing item

s

 when the Men

u


s

creen i

s

 di

s

played. 

Pre

ss

 the dial to confirm the 

s

elected item.

B

[STATUS/MENU] Button

When the normal 

s

creen i

s

 di

s

played, pre

ss

 thi

s

 b

u

tton to 

exit the 

s

tat

us

 di

s

play 

s

et in the Men

u

 (ASPECT MARKER, 

SAFETY ZONE, CENTER MARK, CAMERA NAME, 
ZEBRA). Pre

ss

 thi

s

 b

u

tton again to di

s

play the 

s

tat

us

.

When the normal 

s

creen i

s

 di

s

played, pre

ss

 thi

s

 b

u

tton for more 

than 1 

s

econd to di

s

play the Men

u


s

creen. When the Men

u


s

creen i

s

 di

s

played, pre

ss

 thi

s

 b

u

tton to exit the Men

u


s

creen.

Note


Item

s

 where the [ASPECT MARKER], [SAFETY ZONE], 

[CENTER MARK], [CAMERA NAME], [ZEBRA] di

s

play are 

s

et to 

A

OFF

B

 in the Men

u

 will not be di

s

played on the Stat

us


s

creen even when thi

s

 b

u

tton i

s

 pre

ss

ed.

C

[BRIGHT] Adjustment Control

Thi

s

 adj

us

t

s

 the brightne

ss

 of the 

s

creen. T

u

rn to the right to 

brighten and t

u

rn to the left to darken.

D

[CONTRAST] Adjustment Control

Thi

s

 adj

us

t

s

 the contra

s

t of the 

s

creen. T

u

rn to the right to increa

s

the contra

s

t and t

u

rn to the left to decrea

s

e the contra

s

t.

E

[PEAKING] Adjustment Control

Thi

s

 adj

us

t

s

 the peaking of the 

s

creen. T

u

rn to the right to 

s

harpen the conto

u

r and t

u

rn to the left to 

s

often.

Caution


When thi

s

 prod

u

ct i

s

 connected to GY-HD250U, the LCD 

monitor di

s

play of the camera can be changed if yo

u

 t

u

rn the 

PEAKING control on the camera. However, the monitor 
di

s

play at VF-HP840U cannot be changed. PEAKING for VF-

HP840U m

us

t be operated on VF-HP840U.

When connected to GY-HD250U and [VF SIGNAL] 

s

etting at 

the camera i

s


s

et to 

A

RGB

B

, [PEAKING] adj

us

tment at the 

camera i

s

 forced to off.

The above feat

u

re may not f

u

nction depending on the 

ver

s

ion of the camera’

s


s

oftware. For detail

s

, plea

s

e con

su

lt 

JVC’

s

 a

u

thorized dealer

s

.

F

[1 : 1] Button

Pre

ss

 thi

s

 b

u

tton to di

s

play the inp

u

t video 

s

ignal

s

 1: 1 witho

u

re

s

izing. D

u

ring thi

s

 di

s

play, the [ASPECT MARKER], [SAFETY 

ZONE], [CENTER MARK] di

s

play will be temporarily 

A

OFF

B

.

G

[FOCUS ASSIST] Button

Pre

ss

 thi

s

 b

u

tton to di

s

play the foc

us

ed area in color. Acc

u

rate 

foc

us

ing can be done. (PEAKING cannot be adj

us

ted.)

Note


The color and level of the foc

us

ed area can be changed at 

the Men

u


s

creen. (

A

Page 14)

When connected to GY-HD250U and [VF SIGNAL] i

s


s

et to 

A

RGB

B

 at the camera LCD/VF MENU 

s

creen, 

s

et FOCUS 

ASSIST at the camera to 

A

OFF

B

. Setting

s

 at VF will be invalid.

When connected to GY-HD250U and the FOCUS ASSIST 

s

etting on the camera i

s

 ON, pre

ss

ing the [FOCUS ASSIST] 

b

u

tton of thi

s

 prod

u

ct will di

s

play 

A

PLEASE CHECK 

CAMERA SETTING

B

.

When connected to GY-HD250U, the prod

u

ct will not operate 

u

nder the following condition

s

.

D

u

ring BARS ON, SKIN COLOR ADJUST or SKIN AREA 

SW ON

When connected to GY-HD250U, a

s

 the character being 

o

u

tp

u

t from the camera i

s

 recognized a

s

 foc

us

 area, 

s

et 

[ANALOG OUTPUT CHAR.] at the camera to 

A

OFF

B

.

H

TALLY Lamp

Thi

s

 di

s

play

s

 the monitor 

s

tat

us

 of the inp

u

s

creen in red or green.

When Tally PGM (Program) 

s

ignal

s

 are inp

u

t, the lamp light

s


u

p in red.

When Tally PVM (Preview) 

s

ignal

s

 are inp

u

t, the lamp light

s


u

in green.
When CALL 

s

ignal

s

 are inp

u

t, the lamp blink

s

 in red.

Names and Functions of Parts
(Front)

MENU

STATUS

BRIGHT

CONTRAST

PEAKING

1:1

FOCUS
ASSIST

5

6

4

5

6

4

H

C

D

E
F

G

H

A

B

H

VF-HP840U_EN.book  Page 7  Thursday, January 17, 2008  2:48 PM

Summary of Contents for ViewFinder VF-HP840U

Page 1: ... future reference Model No Serial No Thank you for purchasing this JVC product Before beginning to operate this unit please read the instructions carefully to ensure the best possible performance VIEWFINDER VF HP840U INSTRUCTIONS LST0662 001B VF HP840U_EN book Page 1 Thursday January 17 2008 2 48 PM ...

Page 2: ...disconnect the antenna or cable system This will prevent damage to the product due to lightning and power line surges These are general IMPORTANT SAFEGUARDS and certain items may not apply to all appliances 3 All warnings on the product and in the operating instructions should be adhered to FOR USA 14 Never push objects of any kind into this appliance through cabinet slots as they may touch danger...

Page 3: ... THE FOLLOWING TWO CONDITIONS 1 THIS DEVICE MAY NOT CAUSE HARMFUL INTERFERENCE AND 2 THIS DEVICE MUST ACCEPT ANY INTERFERENCE RECEIVED INCLUDING INTERFERENCE THAT MAY CAUSE UNDESIRED OPERATION This unit should be used with 12 V DC only Cet appareil num rique de la Classe A est conforme á la norme NMB 003 du Canada INFORMATION FOR CANADA RENSEIGNEMENT POUR CANADA This Class A digital apparatus comp...

Page 4: ...äische Vertretung für die Victor Company of Japan Limited ist JVC Technology Centre Europe GmbH Firmenname geändert in JVC Technical Services Europe GmbH Postfach 10 05 52 61145 Friedberg Deutschland Information for Users on Disposal of Old Equipment European Union Attention This symbol indicates that the electrical and electronic equipment should not be disposed as general household waste at its ...

Page 5: ...roduct is equipped with a return video input terminal and allows composite signals and HD component Y signals only input Rich Marker The product is installed with the Safety Zone display two types of Zebra display and the Focus Assist function all of which are highly useful in the studio Screen Menu Function The menu is displayed on the screen and you can set or adjust the most appropriate monitor...

Page 6: ...fall off when come into contact with rubber or vinyl products for a prolonged period of time Energy Conservation When this product is not used for a prolonged period of time turn off the power of the system for safety and energy conservation purposes LCD Screen Leaving the LCD screen exposed to the sun will damage the LCD screen Do not place the product outdoors or near a window Do not scratch or ...

Page 7: ...GNAL setting at the camera is set to ARGBB PEAKING adjustment at the camera is forced to off The above feature may not function depending on the version of the camera s software For details please consult JVC s authorized dealers F 1 1 Button Press this button to display the input video signals 1 1 without resizing During this display the ASPECT MARKER SAFETY ZONE CENTER MARK display will be tempo...

Page 8: ...AOFFB The above feature may not function depending on the version of the camera s software For details please consult JVC s authorized dealers L VF CABLE Input Terminal Connect this terminal to the KA HD250U VF output terminal 20 pin with the provided VF cable M TALLY Lamp This displays the monitor status of the input screen in red Only when Tally PGM Program signals are input the lamp lights up i...

Page 9: ...rovided VF cable completely into the VF CABLE terminal 2 Loosen the set screw on the cable holder tilt the holder at an angle and insert the VF cable from the bottom into the groove on the holder 3 Press the cable holder squarely against the main unit and secure the set screw If the cable holder is slanted the set screw cannot be secured and it may damage the screw hole of the main unit Caution To...

Page 10: ... If the BRIGHT control is turned completely to the left images may not be output 2 Turn the CONTRAST control to adjust the contrast of the screen To increase the contrast turn to the right 3 Turn the PEAKING control to adjust the peaking To sharpen the contour turn to the right Note You can adjust the freqency band where the contour is emphasized with the PEAKING control under the PEAKING FREQ ite...

Page 11: ...st character blinks 4 Turn the MENU dial to select any character 5 Press the MENU dial to confirm the character The next character blinks 6 Repeat the above steps 3 and 4 to enter 6 characters To enter a title of less than 6 characters use space 7 After all the characters are entered press the MENU button This returns to the normal screen Note To display the camera name on the Status screen set th...

Page 12: ... ASPECT T YPE V I DEO RA T I O 1 6 9 POS I T I ON CENT ER ASPECT MARKER ON T YPE L I NE HA L F SA F E T Y ZONE ON S I Z E 9 5 CENT ER MARK ON PAGE BACK MA I N MENU MARKER SE T T I NG SHOOT I NG ASS I S T V I DEO FORMA T OTHERS EX I T SHOOT I NG ASS I S T FOCUS ASS I S T B L UE L EVE L M I DD L E Z EBRA 2 PA T T ERNS TOP 1 8 0 BOT TOM1 7 0 TOP 2 OVER BOT TOM2 8 0 PEAK I NG FREQ M I DD L E PAGE BACK...

Page 13: ...et to BARS this function is AOFFB during Return Video display 1 1 display and when status display is OFF TYPE LINE HALFTONE LINE HALF This item sets the type of labeling for markers outside the aspect area LINE Displays the aspect area in lines HALFTONE Displays the image level outside the aspect area in half the brightness LINE HALF Displays the aspect area in lines and sets outside the area in h...

Page 14: ...e value can be set in intervals of 5 OVER Cancels the upper limit of the brightness of the displayed Zebra Note When ZEBRA is set to AOFFB will be displayed and setting is disabled BOTTOM1 0 70 100 This item sets the lower limit of the brightness of Zebra 1 0 100 Displays the brightness above this setting as Zebra The value can be set in intervals of 5 Note When ZEBRA is set to AOFFB will be displ...

Page 15: ...s item sets the aspect of the screen display when SD signals are input 4 3 Displays 4 3 input signals as is 16 9 Displays 4 3 images in 16 9 This is valid when the input signals are at SQUEEZE RET VIDEO SD 720P 1080I Select the signal format of the return video signals SD Select this during composite video signal input Signals will be output in black and white on the monitor 720P Select this durin...

Page 16: ...er GY HD250U setting the settings in this product will be invalid ZEBRA When connected to GY HD250U SKIN COLOR ADJUST screen displayed from camera cannot be adjusted via this unit When adjustment is required adjust via the camera TALLY SYSTEM STUDIO The TALLY lamp displays TALLY PGM PVM CALL and warning from the remote control 1 Other than STUDIO The TALLY lamp displays the VTR operation status an...

Page 17: ...rmination for the input video signals excluding return video signals Setting OFF With 75K termination ON Without 75K termination Set to ON when connecting to KA HD250U Troubleshooting Troubleshooting Check Point Power does not turn on Insert the VF cable or power cable fully Turn on the power supply of GY HD250U RM HP250U There are no images Insert the VF cable fully Turn on the power supply of GY...

Page 18: ...spect Ratio 4 3 LCD Panel TFT LCD Resolution 1024 x 768 dots XGA Display Color Approx 16 77 million colors View Angle Standard 60 50 65 65 Top Bottom Left Right Brightness 300 cd m Contrast Ratio 400 1 Supported Video Signal Format 480 60i NTSC 720 60P 1080 60i 576 50i PAL 720 50P 1080 50i 䡵 Input Terminal Return Video Input Composite signals or HDTV component signals Y signal only 1 V p p 75 K un...

Page 19: ...f this product and other related products may be modified for improvement without prior notice With Hood Without Hood 261 130 261 195 184 90 67 12 MENU STATUS BRIGHT CONTRAST PEAKING 1 1 FOCUS ASSIST 5 6 4 5 6 4 5 6 4 VF HP840U_EN book Page 19 Thursday January 17 2008 2 48 PM ...

Page 20: ...001B VF HP840U VIEWFINDER ᆠ MDEᅳჸධ 2008 Victor Company of Japan Limited 贩卖商名 杰伟世 中国 投资有限公司 住址 北京市朝阳区光华路 12A 号北京科伦大厦 316 室 出版日 2008 年 2 月 1 日 日本 JVC 公司 VF HP840U_EN book Page 20 Thursday January 17 2008 2 48 PM ...

Reviews: