background image

5

English

Getting Started

Checking the Supplied Accessories

Check to be sure you have all of the following supplied accessories.
The number in the parentheses indicates the quantity of the pieces
supplied.

• Remote Control (1)
• Batteries (2)
• Audio cord (2)
• Optical digital cord (1)

If anything is missing, contact your dealer immediately.

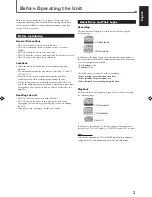
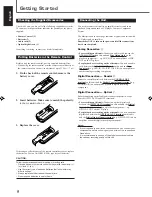
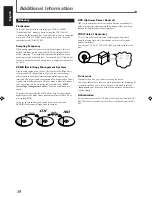
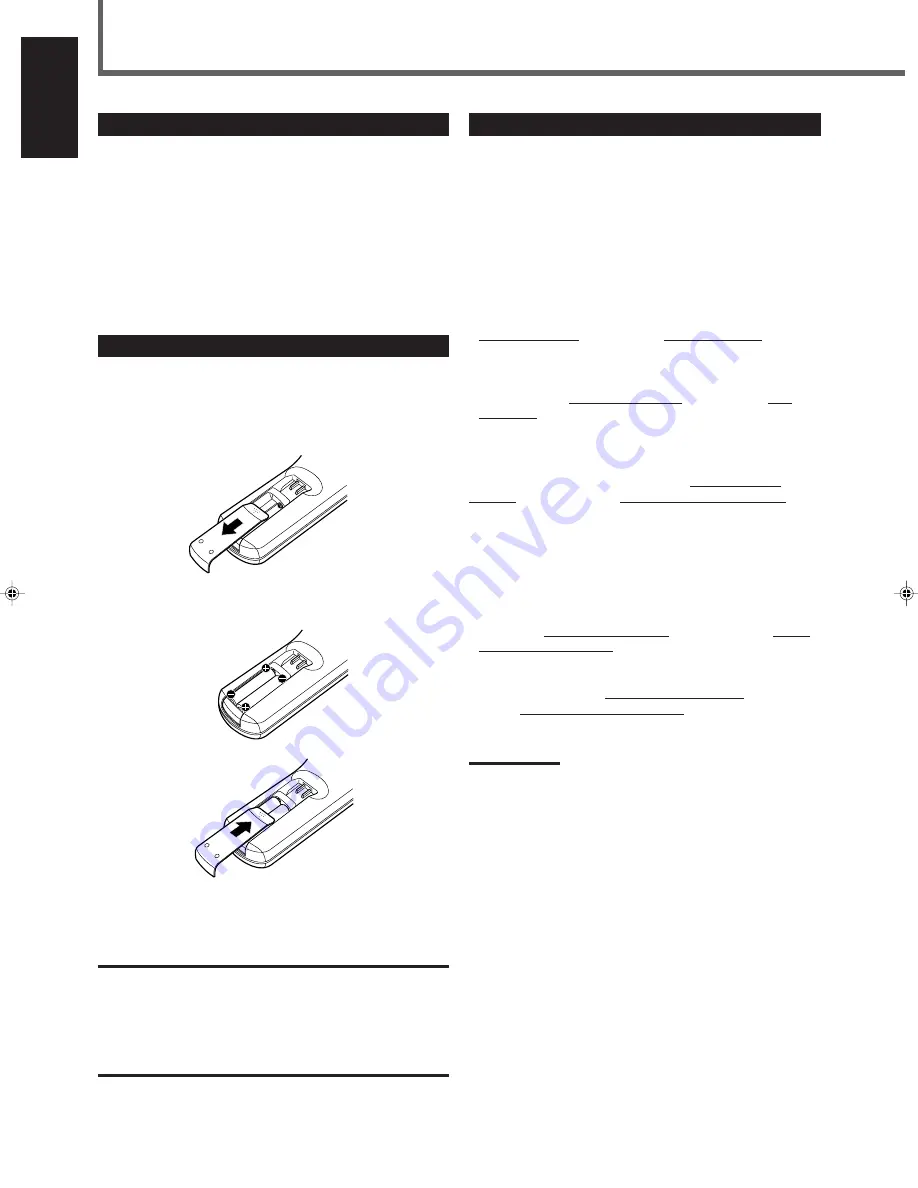
Putting Batteries in the Remote Control

Before using the remote control, put two supplied batteries first.
• When using the remote control, aim the remote control directly at

the remote sensor on the unit (at a distant of up to 23 feet — 7 m).

1. On the back of the remote control, remove the

battery cover.

2. Insert batteries. Make sure to match the polarity:

(+) to (+) and (–) to (–).

3. Replace the cover.

If the range or effectiveness of the remote control decreases, replace
the batteries. Use two AAA/R03(UM-4) type dry-cell batteries.

CAUTION:

Follow these precautions to avoid leaking or cracking cells:
• Place batteries in the remote control so they match the polarity: (+)

to (+) and (–) to (–).

• Use the correct type of batteries. Batteries that look similar may

differ in voltage.

• Always replace both batteries at the same time.
• Do not expose batteries to heat or flame.
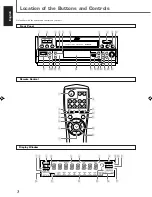
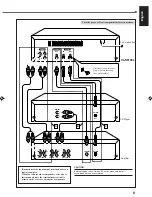
Connecting the Unit

You need to connect this unit to an amplifier/receiver and some
playback components such as CD player, Compact Component
System.

The illustration on the next page indicates a typical connection with
a CD player and an amplifier.
Remember NOT to turn on the power until all the connections
have been completed.

Analog Connection 

Å

• For recording on this unit: Connect an audio cord between the

ANALOG IN jack on this unit and Line Output jack on the
playback equipment — e.g. AUX-OUT on an amplifier or LINE
OUT on the CD player.

• For playback or recording on the other unit: Connect an audio

cord between the ANALOG OUT jack on this unit and Line
Input jack
 (e.g. AUX-IN, CD-R IN, TAPE-IN) on an amplifier or
another analog recording component.

Digital Connection — Coaxial 

ı

Connect a coaxial digital cord between the COAXIAL OUT
terminal
 on this unit and the Digital Coaxial Input terminal (e.g.
COAXIAL IN) on an amplifier or another digital recording
component.

Digital Connection — Optical 

Ç

Before connecting optical cables, disconnect the protective caps
from the OPTICAL IN and OUT terminals.

• For recording on this unit: Connect an optical digital cord

between the OPTICAL IN terminal on this unit and the Digital
Optical Output terminal
 on a playback component — e.g.
OPTICAL OUT on the CD player.

• For playback or recording on the other unit: Connect an optical

digital cord between the OPTICAL OUT terminal on this unit
and the Digital Optical Input terminal (e.g. OPTICAL IN) on an
amplifier or another digital recording component.

Notes:

• It is not required to do all three connections. You can connect your

components and this unit using only one or two of the connections
listed above.

• It is recommended to use one of the digital connections to obtain

the optimum recording quality on this unit.

EN01-06.XL-R910[C]_f

01.3.13, 5:42 PM

5

Summary of Contents for XL-R910SL

Page 1: ...T DIS C R ECOR DER PR OGR AM SET CLEAR R EPEAT _ON Ñ OFF POW ER R ANDOM AUTO TR ACK DISPLAY R EC PAUSE R EC R EC LEVEL M IN M AX FINALIZE ER ASE R EC SOUR CE DIGITAL SYNCHR O X L R 9 1 0 OP EN CLOS E R M S XLR 9 1 0 A R EM OTE CON TR OL R EC P AUS E R EC S OUR CE R EC R AN DOM DIS PLAY PLAY S TOP PAUS E R EPEAT 1 3 4 5 6 7 8 9 0 2 0 INSTRUCTIONS MANUAL DÕINSTRUCTIONS COMPACT DISC RECORDER ENREGIST...

Page 2: ...lectrocution d incendie etc 1 Ne pas enlever les vis ni les panneaux et ne pas ouvrir le coffret de l appareil 2 Ne pas exposer l appareil à la pluie ni à l humidité 7 Caution POWER switch This apparatus is provided with a POWER switch to be able to minimize power consumption for safe use Therefore 1 When doing initial setting complete all the connections required connect the mains plug into the w...

Page 3: ...nnect the equipment into an outlet on a circuit different from that to which the receiver is connected Consult the dealer or an experienced radio TV technician for help For Canada pour Le Canada THIS DIGITAL APPARATUS DOES NOT EXCEED THE CLASS B LIMITS FOR RADIO NOISE EMISSIONS FROM DIGITAL APPARATUS AS SET OUT IN THE INTERFERENCE CAUSING EQUIPMENT STANDARD ENTITLED DIGITAL APPARATUS ICES 003 OF T...

Page 4: ...fore You Start Recording 11 Using Automatic Tracking while Recording 11 Adjusting the Recording Level through the Analog Input Jacks 11 1 Load a Recordable Disc and Prepare the Playback Source 12 2 Select the Recording Source Input 12 3 Start Recording 12 Other Recording Functions 13 Synchronized Digital Recording 13 Finalizing a Disc CD R CD RW 14 Unfinalizing a Disc CD RW 14 Erasing the Tracks o...

Page 5: ... unit where it will not be affected by the amplifier Handling the unit DO NOT touch the power cord with wet hands DO NOT pull on the power cord to unplug the cord When unplugging the cord always grasp the plug so as not to damage the cord If the power cord is damaged consult your dealer About Discs and Their Logos Recording This unit has been designed to record on the discs bearing the following l...

Page 6: ...K DISPLAY REC PAUSE REC REC LEVEL MIN MAX FINALIZE ERASE REC SOURCE DIGITAL SYNCHRO XL R910 wer t y u d s a i o q 2 4 5 6 1 8 7 9 p 3 Location of the Buttons and Controls Remote Control OPEN CLOSE REC PAUSE REC SOURCE REC RANDOM DISPLAY PLAY STOP PAUSE REPEAT 1 3 4 5 6 7 8 9 0 2 0 1 2 3 4 5 6 7 8 9 p q w e Display Window 2 3 4 5 6 7 8 9 p q 1 w e r y t u ...

Page 7: ...Recording indicator 12 13 Lights up while recording Also lights up while recording pause with the 8 indicator this time 3 ERASE indicator 14 4 3 Play 8 Pause indicators 7 8 3 Lights up during play 8 Lights up during pause 5 TRACK indicator Lights up when the track number is shown below this indicator 6 MIN Minute indicator Lights up when the minutes are shown below this indicator 7 SEC Second indi...

Page 8: ...D player and an amplifier Remember NOT to turn on the power until all the connections have been completed Analog Connection Å For recording on this unit Connect an audio cord between the ANALOG IN jack on this unit and Line Output jack on the playback equipment e g AUX OUT on an amplifier or LINE OUT on the CD player For playback or recording on the other unit Connect an audio cord between the ANA...

Page 9: ...re that all connections have been completed Illustrations of the input output terminals above are typical examples When you connect other components refer also to their manuals since the terminal names actually printed on the rear vary among the components Turn the power off to all components before connections CD Player Amplifier Disconnect the protective plug s before inserting the optical cord ...

Page 10: ...ote NOT If a disc is already loaded the total track number and the total playing time appear _ON OFF POWER 3 Start Playback Press 3 The disc tray automatically closes CLOSE flashes on the display and the unit starts reading the disc information recorded on the disc TOC READ flashes then starts playback Normal Play Notes If you have loaded a CD R the CD R indicator lights up If the disc is finalize...

Page 11: ...time During play or pause press DISPLAY Each time you press DISPLAY the following information appear on the display in sequence Note When you stop playing this setting is reset Next time you start playing the elapsed playing time of the current track will be shown on the display To repeat playback You can have all the tracks in a disc the program or the individual track currently playing repeat as...

Page 12: ...ISC RECORDER PROGRAM SET CLEAR REPEAT _ON OFF POWER RANDOM AUTO TRACK DISPLAY REC PAUSE REC REC LEVEL MIN MAX FINALIZE ERASE REC SOURCE DIGITAL SYNCHRO XL R910 POWER _ ON _ON OFF POWER PROGRAM RANDOM CLEAR 7 3 Programming the Playing Order of the Tracks Program Play You can arrange the order in which tracks play before you start playing You can program up to 30 tracks 1 Load a disc 2 Press PROGRAM...

Page 13: ...dom Play The tracks will play at random 1 Load a disc If the unit is in program play mode the PROGRAM indicator is lit on the display you cannot go to the next step If this happens press 7 to exit from program play mode 2 Press RANDOM so that the unit enters random mode The RANDOM indicator lights up on the display The tracks are played at random Random play ends when all the tracks are played onc...

Page 14: ...LEVEL control When an unfinalized CD R or CD RW is loaded this unit checks the disc and automatically adjusts the laser for optimum recording setting Optimum Power Control OPC Adjusting the Recording Level through the Analog Input Jacks Before recording through the Analog Input jacks adjust the recording level properly To adjust the recording level follow the procedure below BEFORE you start recor...

Page 15: ...e automatic tracking see Using Automatic Tracking while Recording on page 11 When you select ANALOG you have to adjust the recording level using the REC LEVEL control see page Adjusting the Recording Level through the Analog Input Jacks on page 11 3 Start Recording 1 Press REC PAUSE to enter the unit into recording pause The recording pause 8 indicator starts flashing on the display 2 Press REC to...

Page 16: ...ack recording Each time you press DIGITAL SYNCHRO the display changes to show as follows ONE Select this to record only one track ALL Select this to record all the tracks 4 Press SET 5 Start playback on the playback component As soon as signals come into this unit recording starts on this unit If you have selected one track recording recording will end when one track is played back You can continu...

Page 17: ...nt to unfinalize is placed on the disc tray UN FINAL appears on the display If you want to cancel unfinalization press CLEAR 2 Press SET to unfinalize the disc The FINALIZE indicator starts flashing on the display The unfinalization process requires about a few minutes to complete when unfinalized the FINALIZE indicator goes off Erasing the Tracks on a CD RW You can erase a track or all the tracks...

Page 18: ...tecting the copyright and SCMS Serial Copy Management System has been established as a result To protect the copyright the SCMS allows only first generation digital copies to be made from premastered software like CDs or prerecorded MDs If you try to record from such copied discs on this unit the PROHIBIT indicator will light up on the display OPC Optimum Power Control OPC is a function that check...

Page 19: ...edges If such a disc is used this unit may reject the disc To remove these rough spots rub the edges with a pencil or ballpoint pen etc Moisture condensation Moisture may condense on the lens inside the unit in the following cases After starting the heater When the unit is moved from the extremely hot place to the extremely cold place Should this occur the unit may malfunction In this case eject t...

Page 20: ...te control and the remote sensor on the unit is blocked The batteries are exhausted Action Load a recorded disc Load it correctly with the label side facing up Leave the power on for a few hours until moisture evaporates Clean or replace the disc Replace the disc CD R Replace the disc CD RW Unfinalize the CD RW see page 14 Select ANALOG as the recording source input Clean or replace the disc Sourc...

Page 21: ...scale 12 dB 47 kΩ OPTICAL IN Input level 23 dBm to 15 dBm with sampling rate 32 kHz 44 1 kHz 48 kHz Output ANALOG OUT 2V 50 kΩ Full scale Full scale 12 dB 50 kΩ OPTICAL OUT Output level 21 dBm to 15 dBm with sampling rate 44 1 kHz COAXIAL OUT 0 5 Vp p 75 Ω General Power requirement AC 120 V 60 Hz Power consumption 20 W Dimensions approx 270 mm x 95 mm x 353 mm W H D 1011 16 in x 33 4 in x 1315 16 ...

Page 22: ...VICTOR COMPANY OF JAPAN LIMITED EN FR 0301KSMMDWSAM J VC ...

Reviews: