background image

9

1

Fr-


Préparation de l'installation

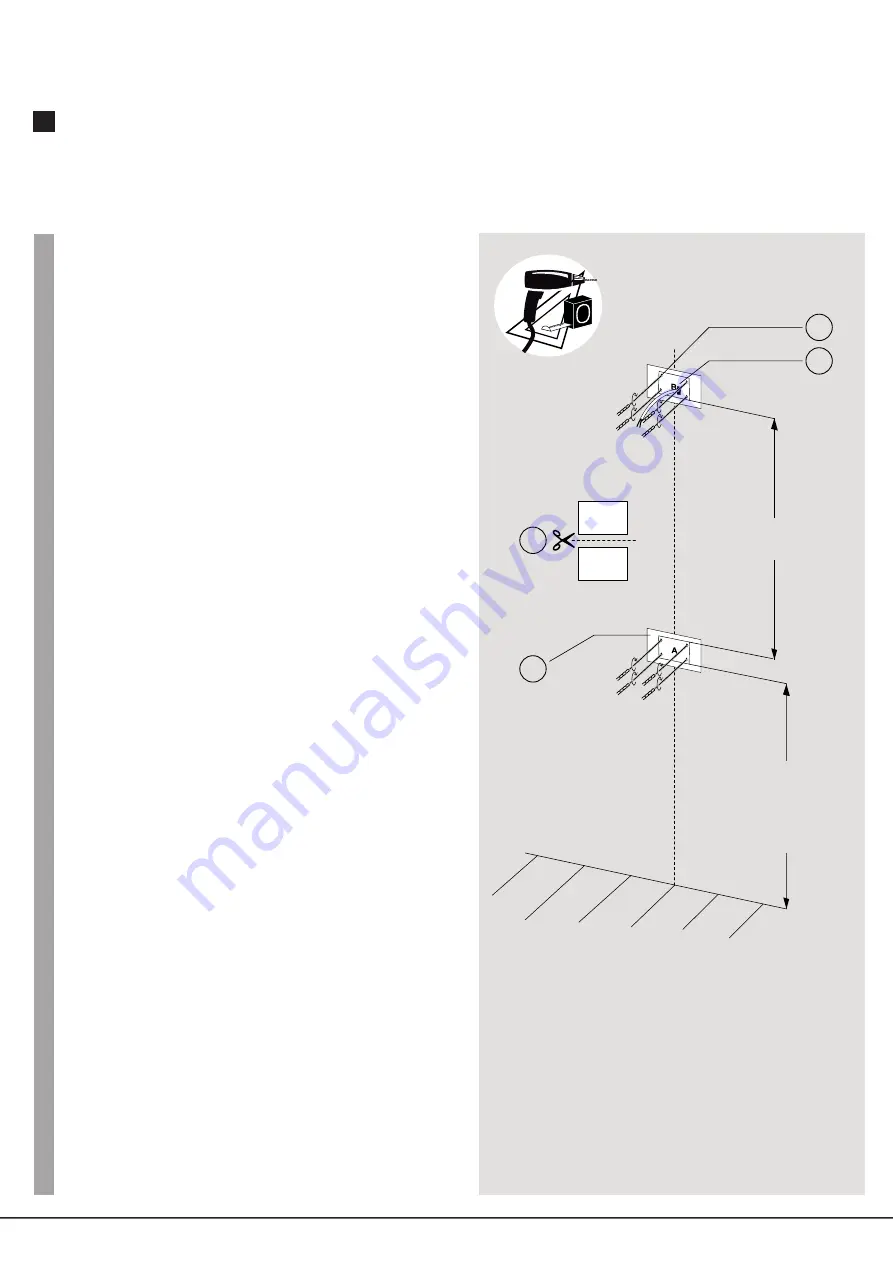
1.  Découper les 2 gabarits à disposition dans cette notice

2.  Après avoir choisi la hauteur d'installation ( entre 910 et 

1210 mm) positionner les gabarits d'installation au mur pour 

les fixations haute et basse. 

Attention

 a bien respecter 

l'aplomb et la dimension qui sépare les 2 gabarits (932 mm)

3.  Prévoir la sortie du câble du mur (adaptée à la hauteur d'ins-

tallation) 

4. 

Réaliser les 8 trous de fixation et installer les 8 chevilles 

fournies dans le kit

En-


Prior to installation

1.  Cut out the two printed templates found in these pages.

2.  After deciding on an installation height (from 910 to 

1210mm) position these templates on the wall for installation 

of the top and bottom brackets. 

Make sure

 the brackets 

are plumb and the gap between the templates is correct 

(932 mm).

3.  Provide the outlet in the wall for the cable (to suit the instal-

lation height).

4.  Drill the 8 holes for fastening the brackets and insert the 

8 wall plugs from the kit.

De-


Vorbereitung der Installation

1.  Die beiden in dieser Anleitung enthaltenen Schablonen 

ausschneiden.

2.  Installationshöhe wählen (zwischen 910 und 1210 mm) und 

die Schablonen für die obere und untere Befestigung an der 

Wand positionieren. 

Vorsicht

 - Bei der Positionierung auf 

lotrechte Ausrichtung und den richtigen Abstand zwischen 

den beiden Schablonen (932 mm) achten.

3.  Kabelaustritt an der Wand vorsehen (passend zur gewün-

schten Installationshöhe).

4.  8 Bohrungen für die Befestigung anbringen und die 8 Dübel 

aus dem Befestigungssatz einsetzen.

Fr-


Preparación de la instalación

1.  Cortar las 2 plantillas incluidas en estas instrucciones.

2.  Después de elegir la altura de instalación (entre 910 y 

1210 mm), colocar las plantillas de instalación en la pared 

para las fijaciones superior e inferior. 

Atención

: respetar el 

aplomo y la distancia que separa las 2 plantillas (932 mm).

3.  Prever la salida del cable de la pared (adecuada para la 

altura de instalación).

4. 

Realizar las 8 perforaciones de fijación e instalar las 8 clavi

-

jas suministradas en el kit.

Procédure d’installation / Installation procedure 

Installationsanweisung / Procedimiento de instalación

932

mm

2

2

1

4

x8

910 - 1210

B

A

Summary of Contents for NEPTUNE

Page 1: ...ONSERVER CES INSTRUCTIONS Installation and user guide READ AND SAVE THESE INSTRUCTIONS Installations und Gebrauchsanweisung DIESE ANWEISUNGEN LESEN UND BEWAHREN Manual de instalación y utilizacion LEER Y CONSERVAR LAS INSTRUCCIONES NEPTUNE Sèche cheveux Hair dryer haartrockner Secador de pelo ...

Page 2: ...étéappréhendés Nepaslaisserlesenfantssesuspendreà l appareil celui cipourraitsedétacherdeson support Lenettoyageetlamaintenancedel appareil nedoitpasêtreeffectuépardesenfants Débrancherl appareilavantdelevérifieroude lenettoyer En IMPORTANTSAFETYPRECAUTIONS Neverattempttoinstalltheapplianceyourself unlessyouareasuitablequalifiedtechnician Doingsomayaffectitsoperationandsafety Thisappliancemustbein...

Page 3: ...rät hängen EskönntesichausderHalterung lösen DieReinigungundPflegedesGerätsdarf nichtKindernanvertrautwerden DasGerätwährendderÜberprüfungoderRei nigungausstecken Es MEDIDASDESEGURIDADIMPORTANTES Nointenteinstalarelaparatoustedmismoa noserqueustedseaunprofesionalcualificado Estopodríaafectarasubuenfuncionamientoy portantoasuseguridad Lainstalacióndeesteaparatodebehacerla untécnicocualificado Unaco...

Page 4: ... correctly to promote the sustainable use of material resources Use the recycle facilities provided by your local authority or contact the retailer who sold you the product They will ensure the product is properly recycled Informationen zur Entsorgung Diese Aufschrift weist darauf hin dass das Produkt in der gesamten EU von anderen Haushaltsabfällen getrennt entsorgt werden muss Zum Schutz der Umw...

Page 5: ...y cable inlet Find out the dimensions and space requirements of the product before installing Fr En ACHTUNG Versuchen Sie nicht das Gerät selbst zu installieren es sei denn Sie sind selbst ein Fachmann Sonst könnte der ordentliche Betrieb und damit die Sicherheit beein trächtigt werden Das Gerät darf während des Installierens nicht angeschlossen sein Das Gerät an einer ausreichend tragfähigen Unte...

Page 6: ...ión inferior Corps de l appareil raccordé à la fixation haute Appliance body connected via the top bracket Gehäuse des Geräts mit der oberen Befestigung verbunden Cuerpo del aparato conectado a la fijación superior Tube Tube Rohr Tubo Kit de fixation 8 chevilles 8 vis et 1 serre câble 2 vis Fastening kit 8 plugs 8 screws and 1 cable clamp 2 screws Befestigungssatz 8 Dübel 8 Schrauben und 1 Kabelkl...

Page 7: ... template Bohrschablone Tamaño de perforación ECHELLE 1 SCALE 1 MASSSTAB 1 1 ESCALA 1 Passage prévu pour le câble vers la connexion Path of the cable towards the connection Kabeldurchführung zum Anschluss Conducto previsto para pasar el cable hacia la conexión ...

Page 8: ...7 ...

Page 9: ...80 1900 300 1300 1600 1000 910 Hauteur d installation préconisé pour les enfants Recommended installation height for children Empfohlene Installationshöhe für Kinder Altura de instalación recomendada para los niños Hauteur d installation préconisé pour les adultes Recommended installation height for adults Empfohlene Installationshöhe für Erwachsene Altura de instalación recomendada para los adult...

Page 10: ... De Vorbereitung der Installation 1 Die beiden in dieser Anleitung enthaltenen Schablonen ausschneiden 2 Installationshöhe wählen zwischen 910 und 1210 mm und die Schablonen für die obere und untere Befestigung an der Wand positionieren Vorsicht Bei der Positionierung auf lotrechte Ausrichtung und den richtigen Abstand zwischen den beiden Schablonen 932 mm achten 3 Kabelaustritt an der Wand vorseh...

Page 11: ...hrauben 3 Sicherstellen dass sich das schwarze Gleitstück in der Öffnung für das Rohr befindet Es Instalar la fijación inferior 1 Quitar la cubierta de las 2 fijaciones inferior y superior pres ionando en el clip 2 Atornillar la fijación inferior en la pared con ayuda de los 4 tornillos suministrados en el kit 3 Comprobar la presencia del patín negro de unión en el orifi cio destinado al tubo Fr M...

Page 12: ...festigung mithilfe von 4 Schrauben aus dem Befestigungssatz an der Wand anschrauben 4 Sicherstellen dass das Metallkabel sachgemäß in der Nut liegt Es Fijación de la parte superior 1 Instalar el tubo con el aparato y la fijación superior en el orificio dotado del patín de la fijación inferior ya fijada en la pared 2 Recuperar el cable de alimentación en la parte delantera de la fijación superior 3...

Page 13: ... trapo suave y seco Si se detecta que algunas piezas están desgastadas de forma anómala se debe contactar con el servicio posventa 6 Fr Fin de l installation 1 Déverrouiller le contre poids en enlevant la vis de fixation 2 Remettre les 2 capotages sur les 2 fixations haute et basse 3 Mettre l appareil sous tension en appuyant sur l interrupteur position enfoncée marche position relâchée arrêt En C...

Page 14: ... Lacher la poignée Approcher la tête dans la zone de détec tion le produit se met en fonctionnement automatiquement En Operation 1 Adjust the height with the handle 2 Let go of the handle When your head enters the detection zone the dryer will start up automatically De Betrieb 1 Mit dem Griff die gewünschte Höhe einstellen 2 Griff loslassen Kopf in den Erkennungsbereich des Sensors bewegen Das Ger...

Page 15: ... de Clase II IP 23 Seguridad electrónica en caso de mal funcionamiento Sistema de detección por infrarrojos Nivel de ruido 70 dBA Peso total del aparato 6 kg 14 IV III Fr La distance de détection ne convient pas 1 Enlever les 4 vis du capot pour accéder à la carte électro nique repérer le potentiomètre côté grille d aspiaration 2 Faire varier la sensibilité à l aide d un tournevis plat 3 Remettre ...

Page 16: ...render the guarantee void This equipment complies with the regulations in European directives 2014 35 UE 2014 30 UE and 2011 65 EC De Ein fehlerhafter Anschluss oder eine Beschädigung aufgrund von unsachgemäßer Nutzung oder eine Verwendung entgegen der Angaben in dieser Bedienungsanleitung hebt die Garantie auf Das Material entspricht den Vorschriften der europäischen Richtlinien 2014 35 UE 2014 3...

Reviews: