


29
INSTALLING HARDWARE AND SOFTWARE (continued)
If you have purchased a complete system (including the computer ) from JW Fishers then the hard-
ware and SCAN-650 Software have already been installed and tested. You can go directly to
CONNECTING THECABLES
on page 31.
If you are using your own computer system then proceed below.
(If your SCAN-650 connects to your PC using a PC-CARD or PCI board (desktop PC) skip to page 26)
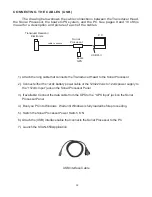
When you first connect the Sonar Processor SP to PC Interface (USB Cable), the Windows “Found
New Hardware Wizard will launch.
1. The first message box will state: ‘Can Windows Connect to Windows update to search for
software?’ Select ‘No, not this time.’ then click ‘Next’ to continue.
2.The next screen states: ‘If your hardware came with an installation CD of Floppy, insert it now The
drivers have already been installed on the PC. It is not necessary to insert the CD. Select ‘Install the
software automatically (Recommended)’, then click ‘Next’ to continue.
InstaCal program - Interface board configuration and calibration
Before the
SCAN-650
can be used for the first time, this program must be run to
configure the
Interface board which is integrated into the Sonar Processor. This program must also be run
whenever the Sonar Processor is used with a different PC. The SP to PC interface (USB Cable)
must be connected before running this program.
1. From the Start menu select Programs / Measurement Computing / InstaCal.
2. The InstaCal software starts.
3. A ‘Plug and PlayBoard Detection’ window should open. USB-1208HS should show in the
window. Click ‘OK’
4. ‘Board #0 - USB-1208HS’ should show in the board list window.
5. From the ‘Install’ pull-down menu click on ‘Configure’. The ‘Board Configuration’ box opens.
6. • Next to ‘Number of Channels’, select ‘8 Single Ended’. from the drop down list.
• Click ‘OK’ to continue.
7. Exit the InstaCal program.
Summary of Contents for SCAN-650
Page 10: ...10 LEFT BLANK...


